¶ Basic company settings
In order to go to the company settings page, you need to:
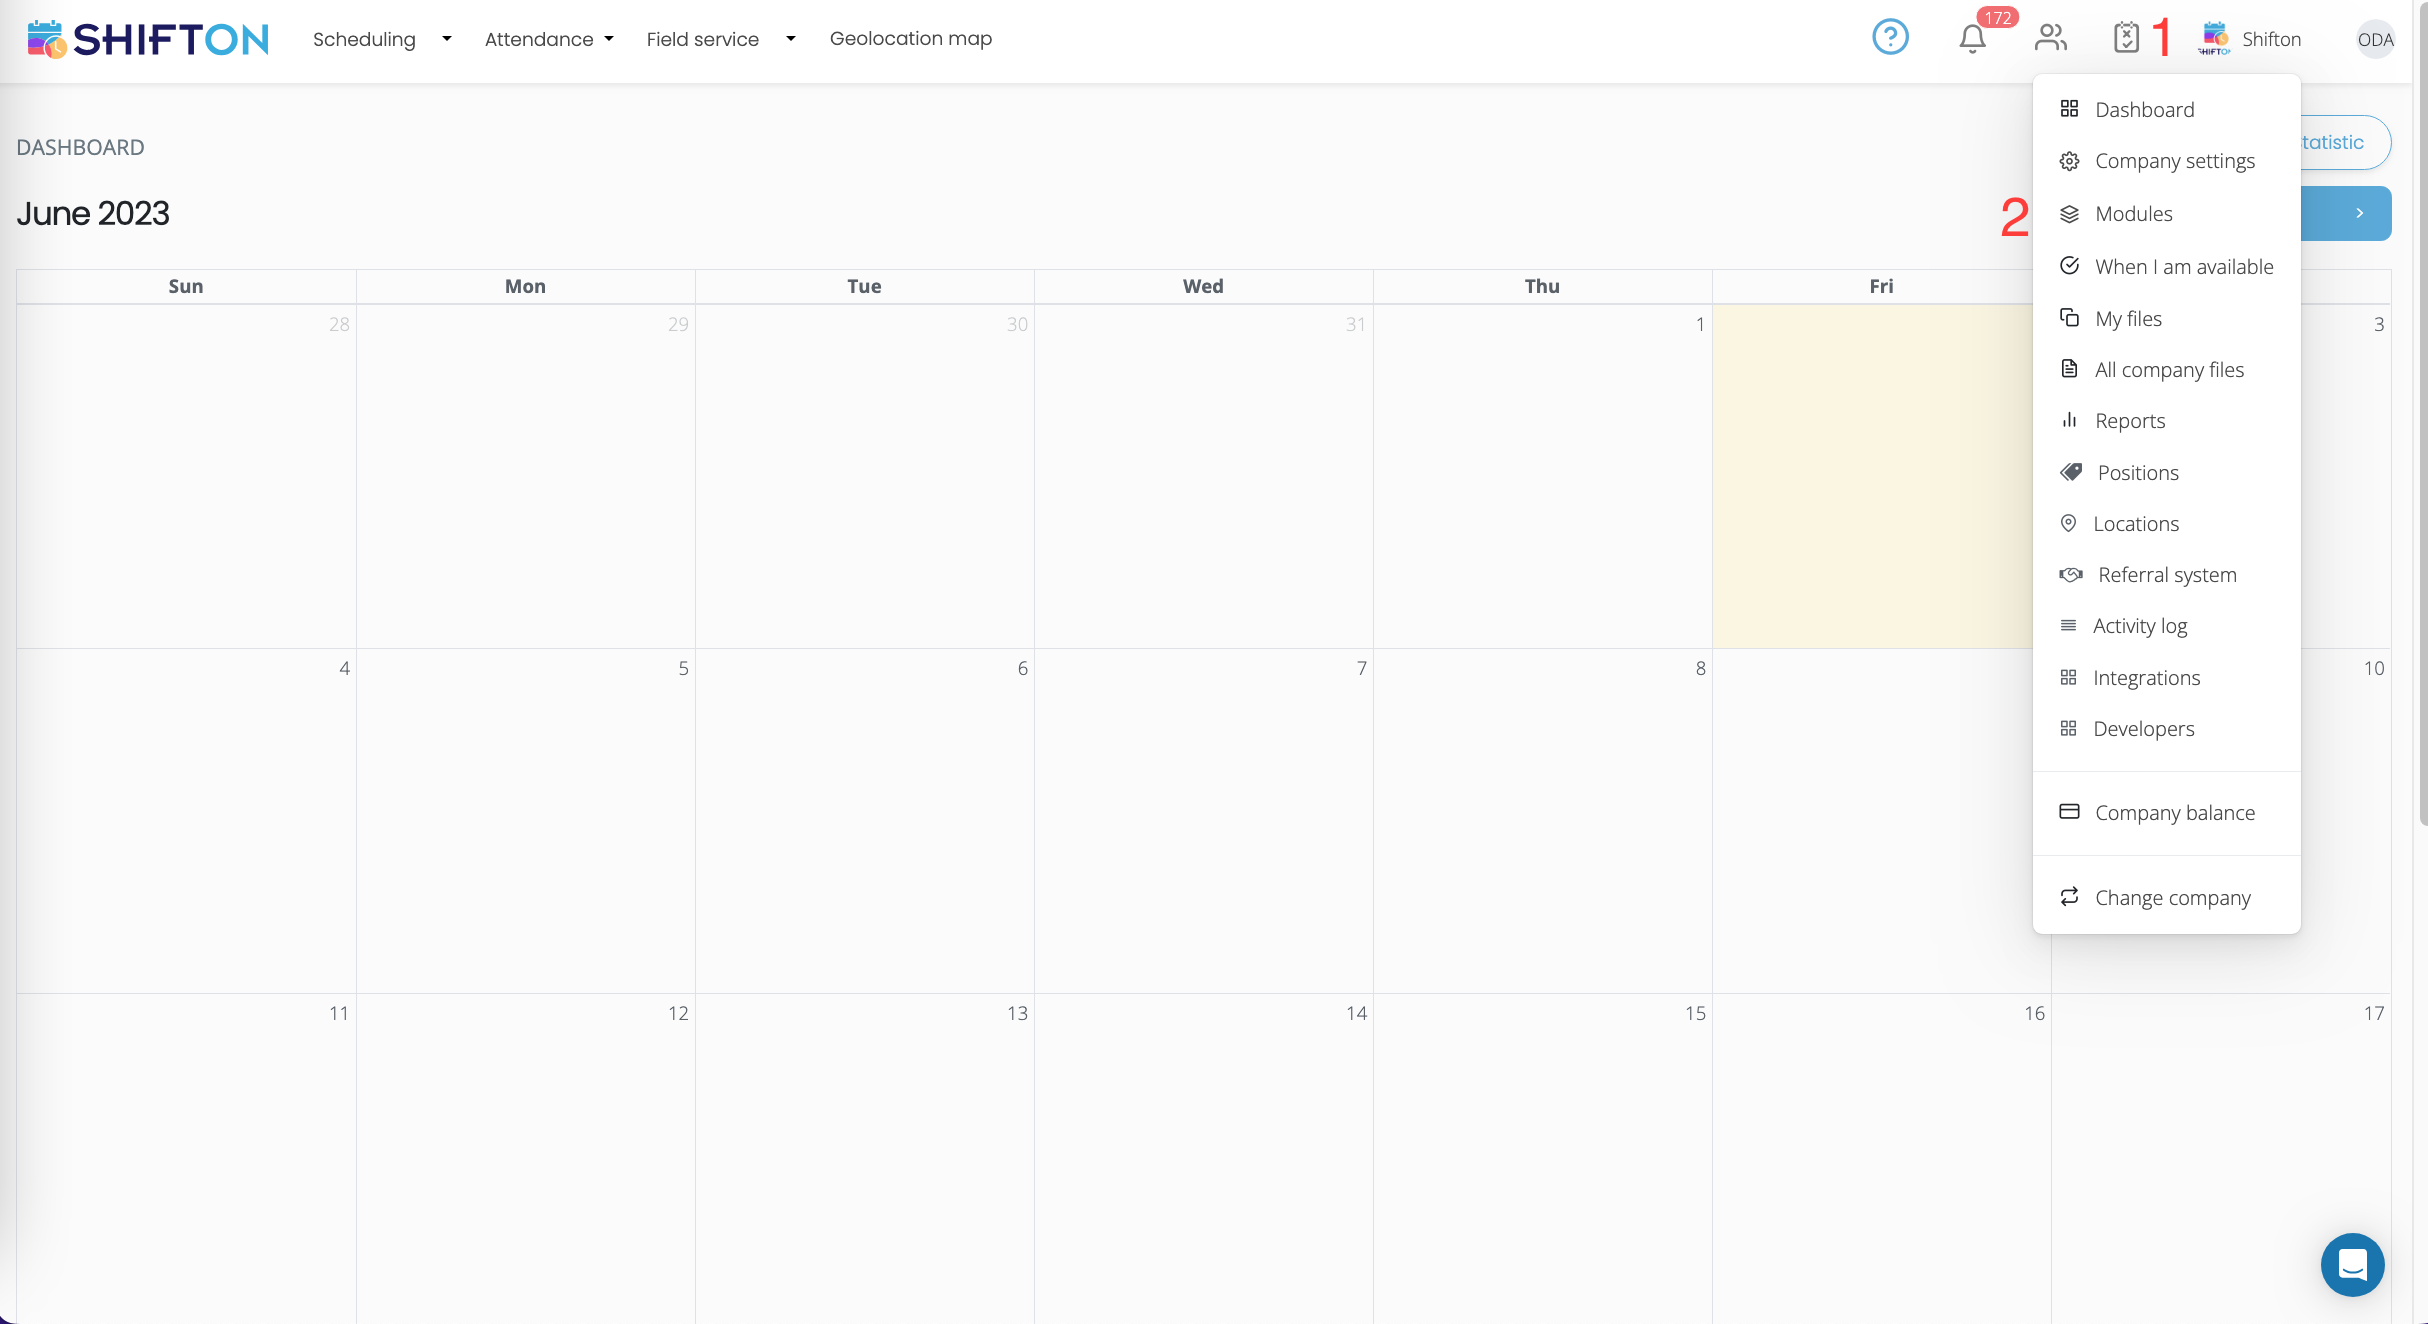
- Click on the avatar icon (upper right corner).
- Select the "Modules" section.
This page displays a list of all modules of the company, as well as the main settings of the company.
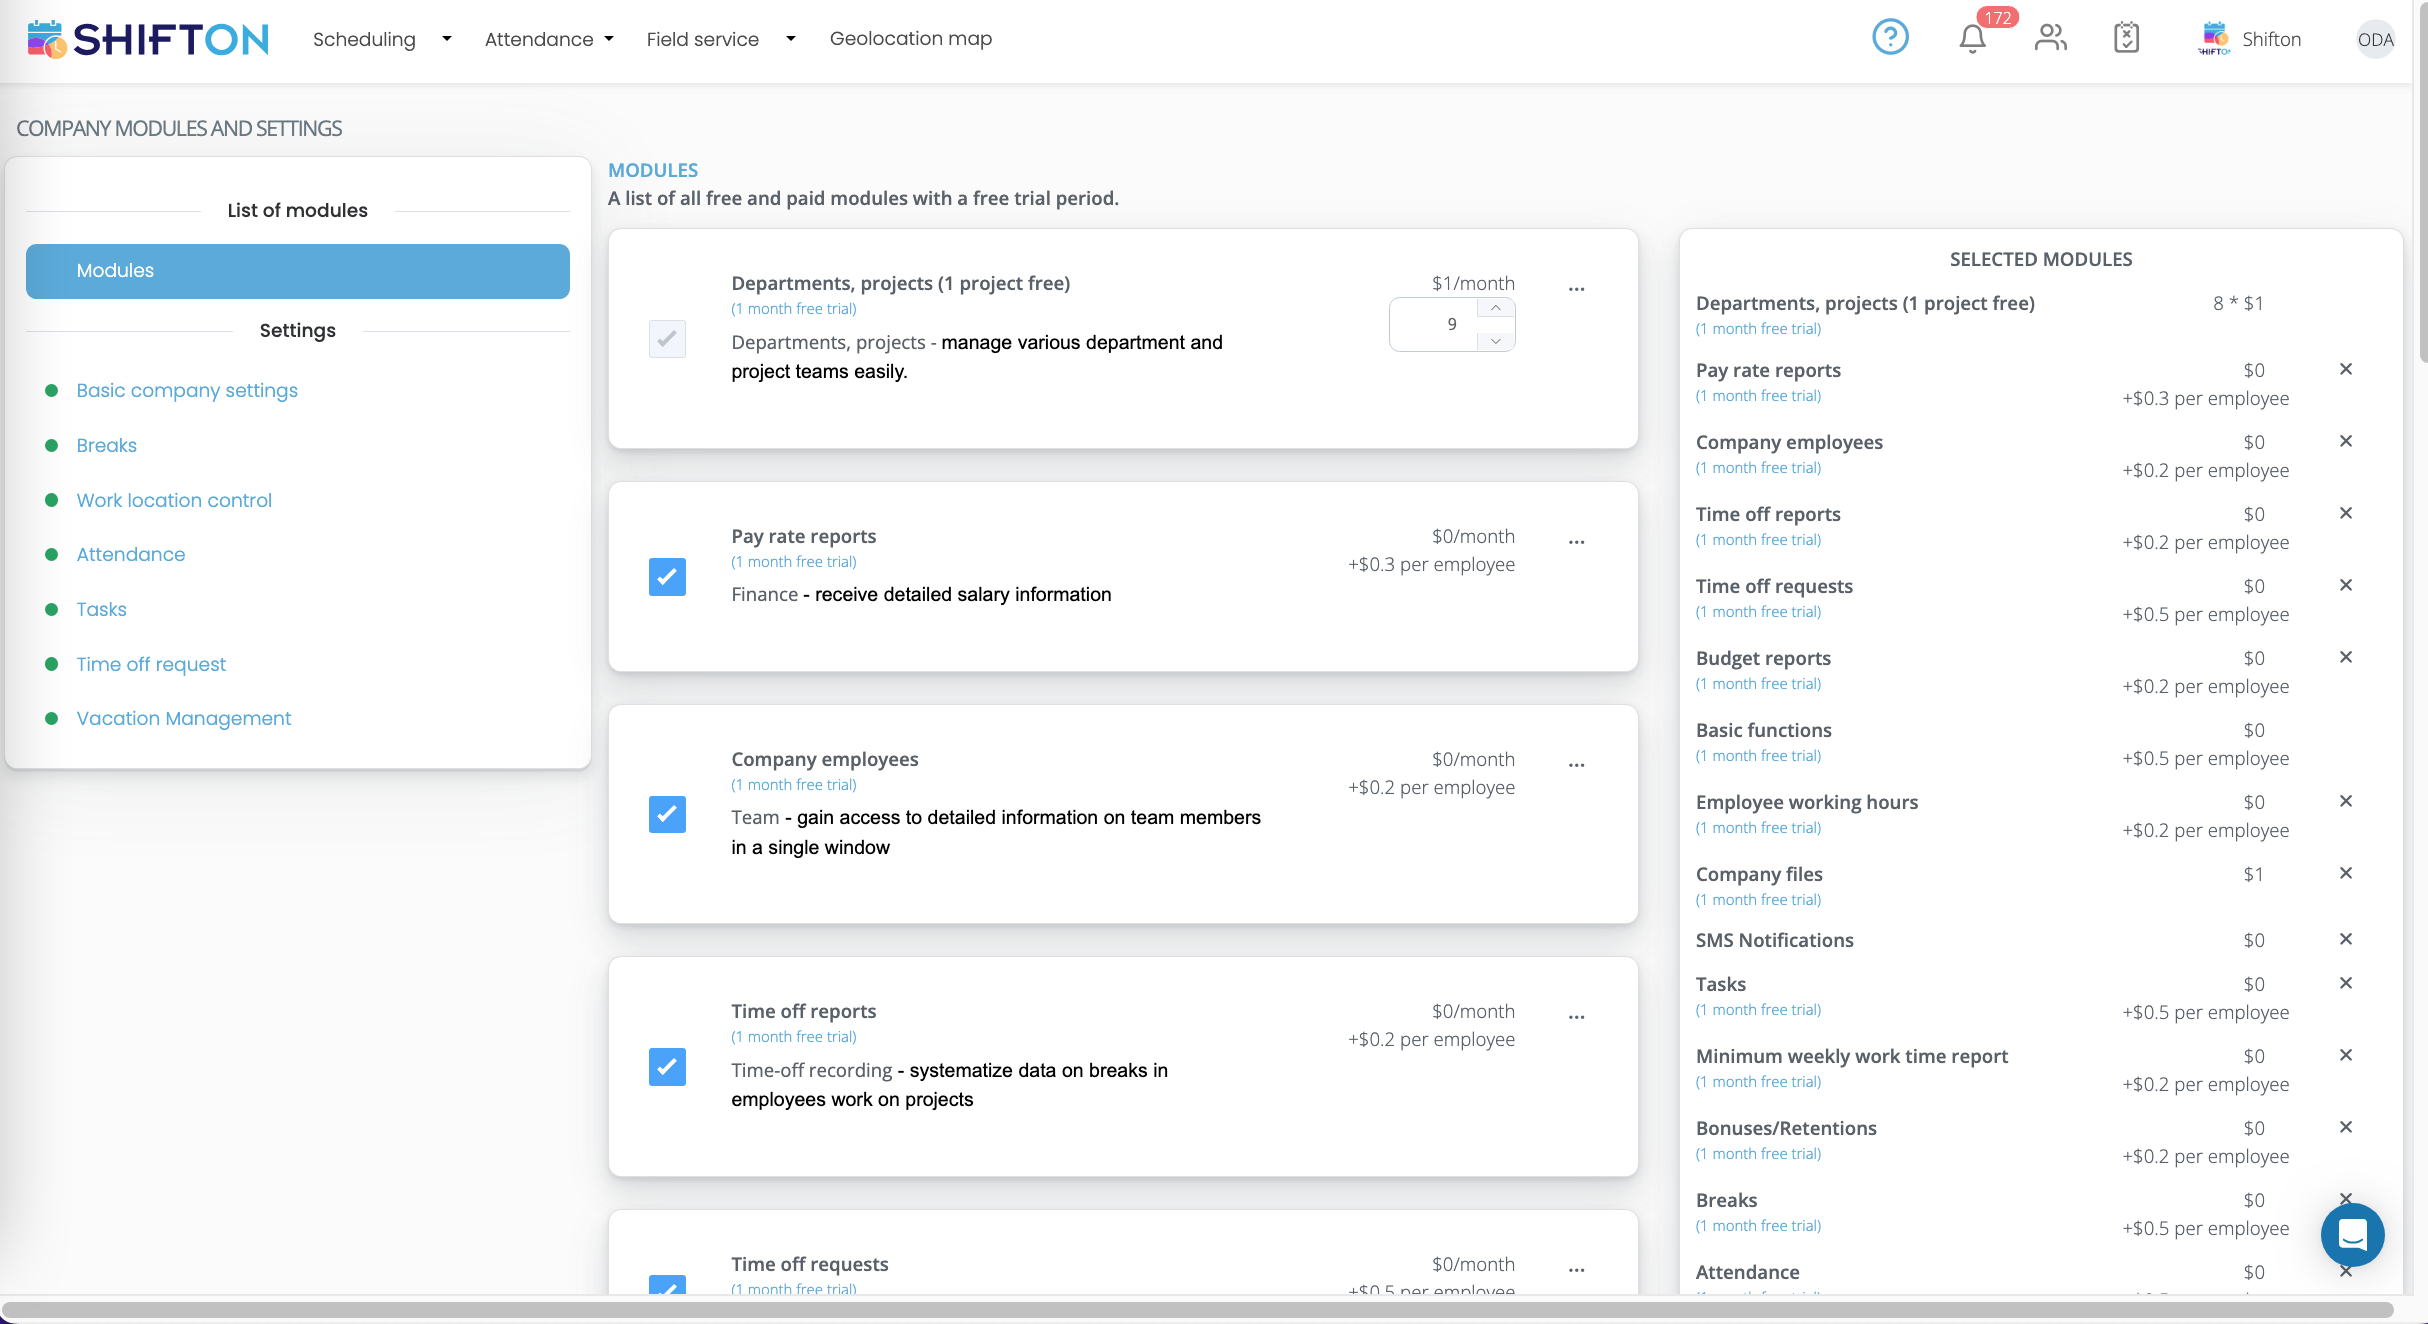
In order to go to the company settings, you need to click on the “Basic company settings” tab in the left menu.
This page contains the main settings of the company.
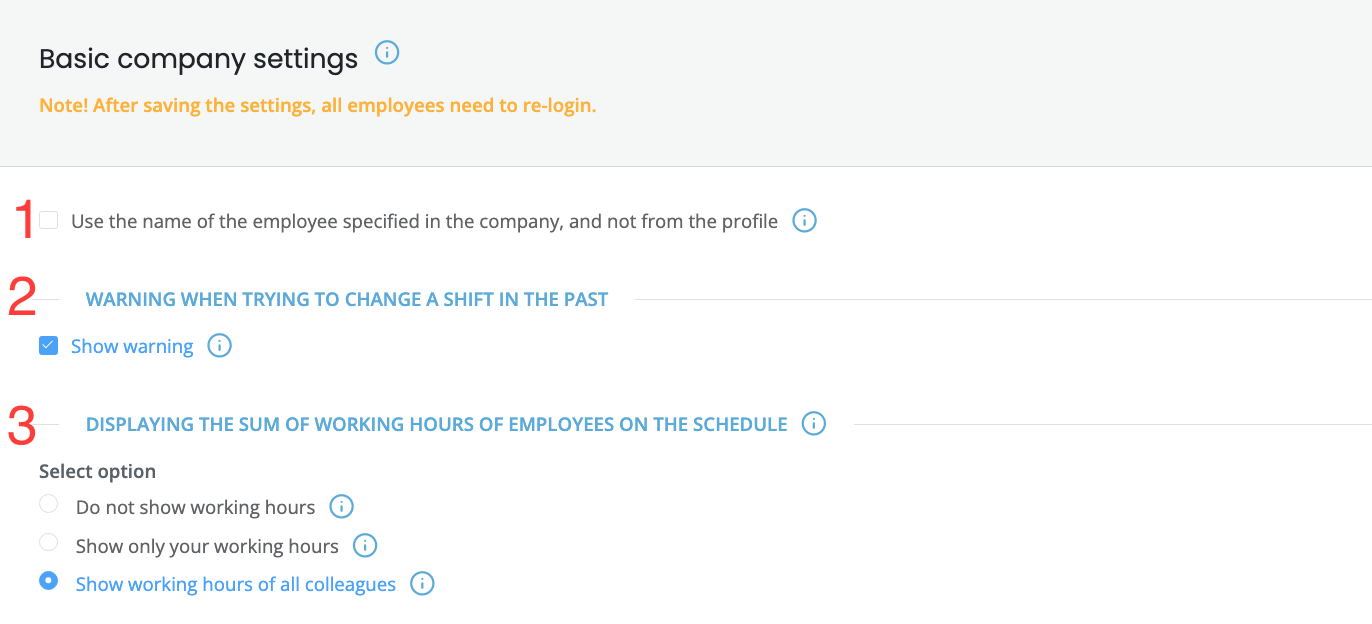
NOTE! After saving the settings, all employees need to log in again.
¶ 1. Use the employee name specified in the company, and not from the profile
If this option is enabled, then within the company the employee name set by the company will be used (the name from the real user profile will be ignored).
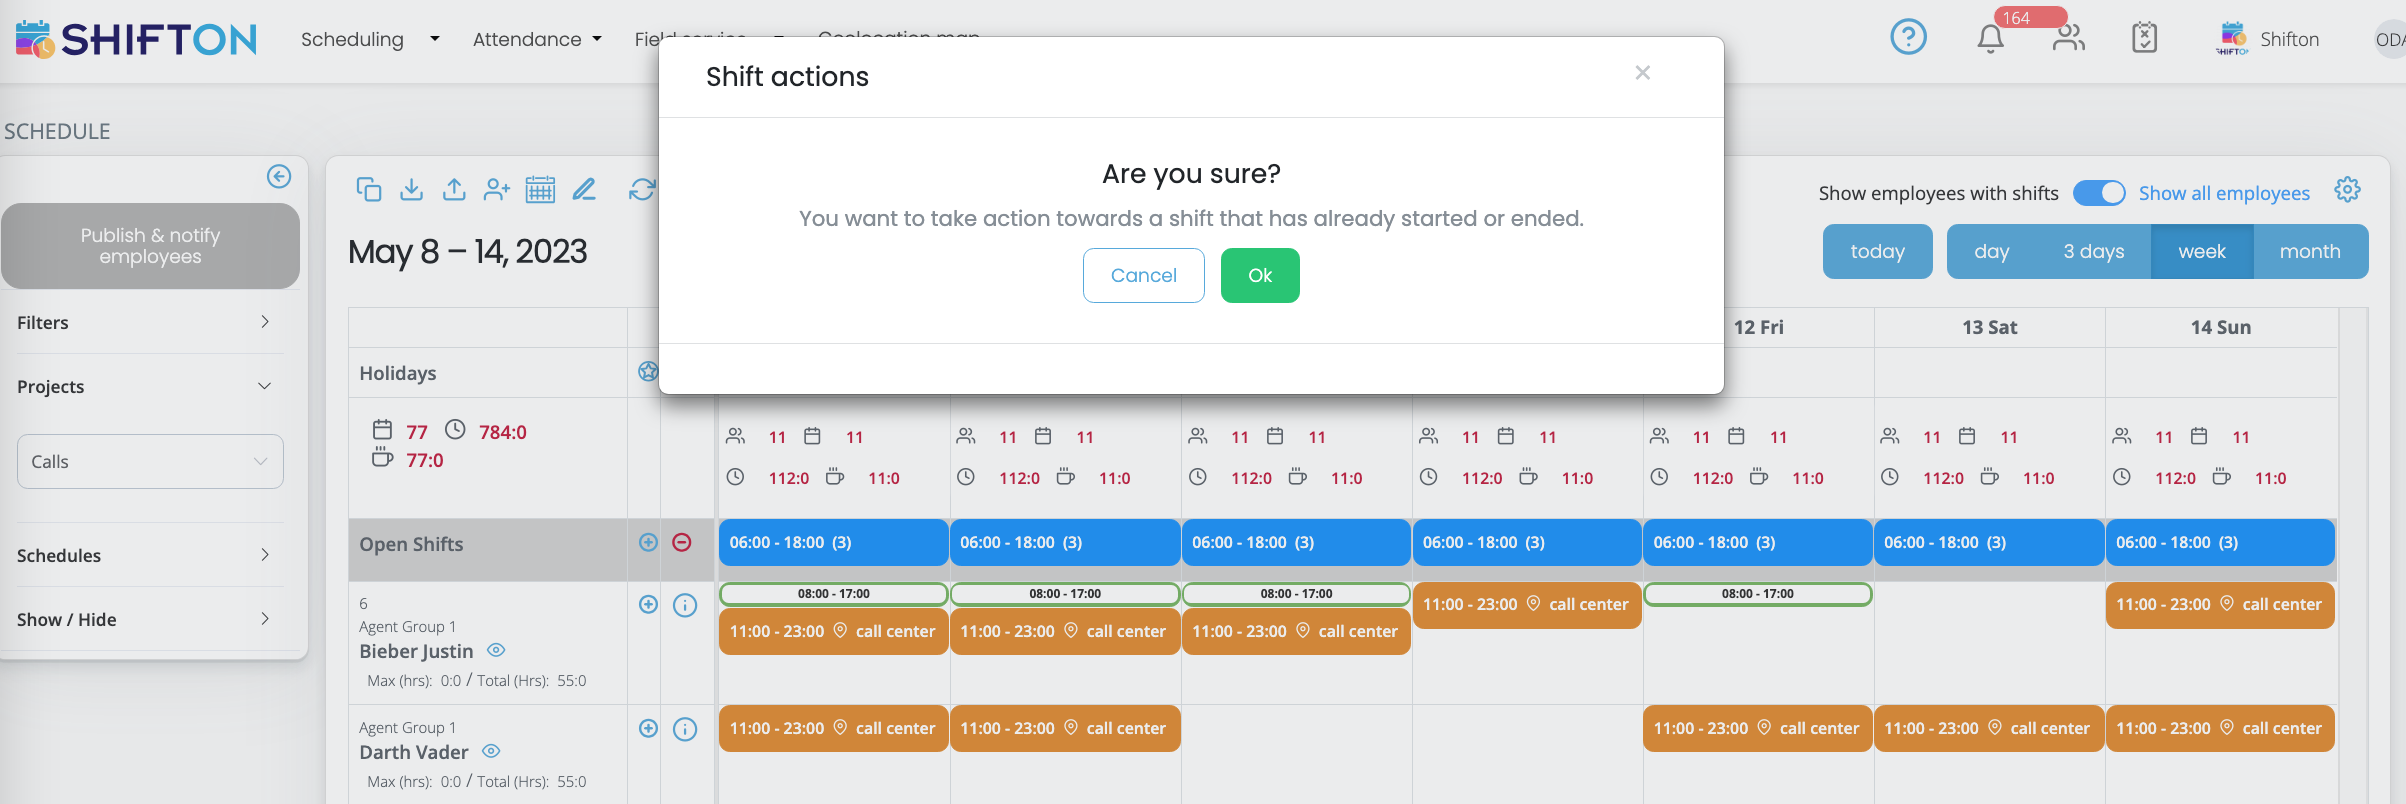
¶ 2. Warning when trying to change a shift in the past

When you try to change a shift in the past period, the system will show a warning message.
¶ 2. Displaying the sum of working hours of employees on the schedule
- If the “Do not show working hours” option is selected, the sum of working hours will not be displayed to the employee on the schedule..


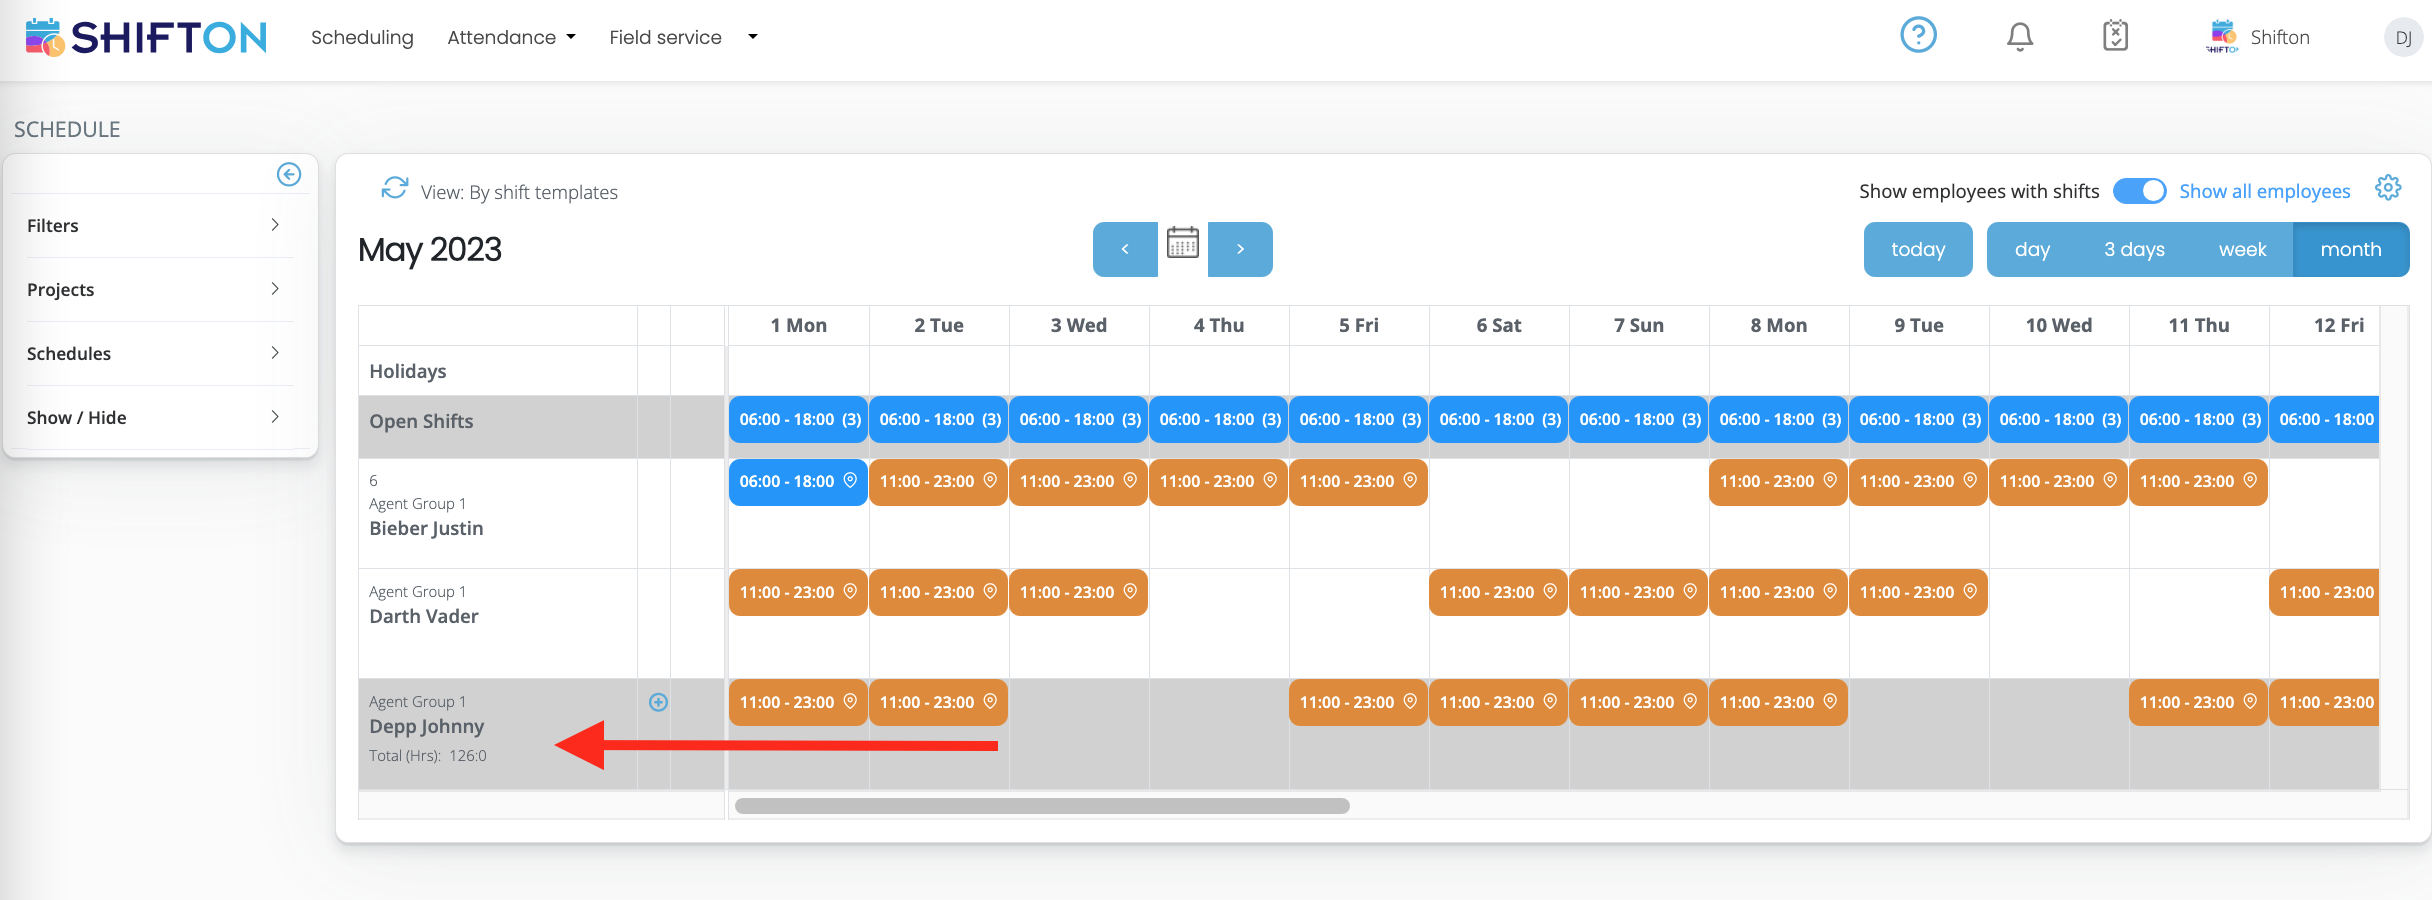
- If you select “Show only your own working hours”, the employee on the schedule will only see the sum of his working hours.

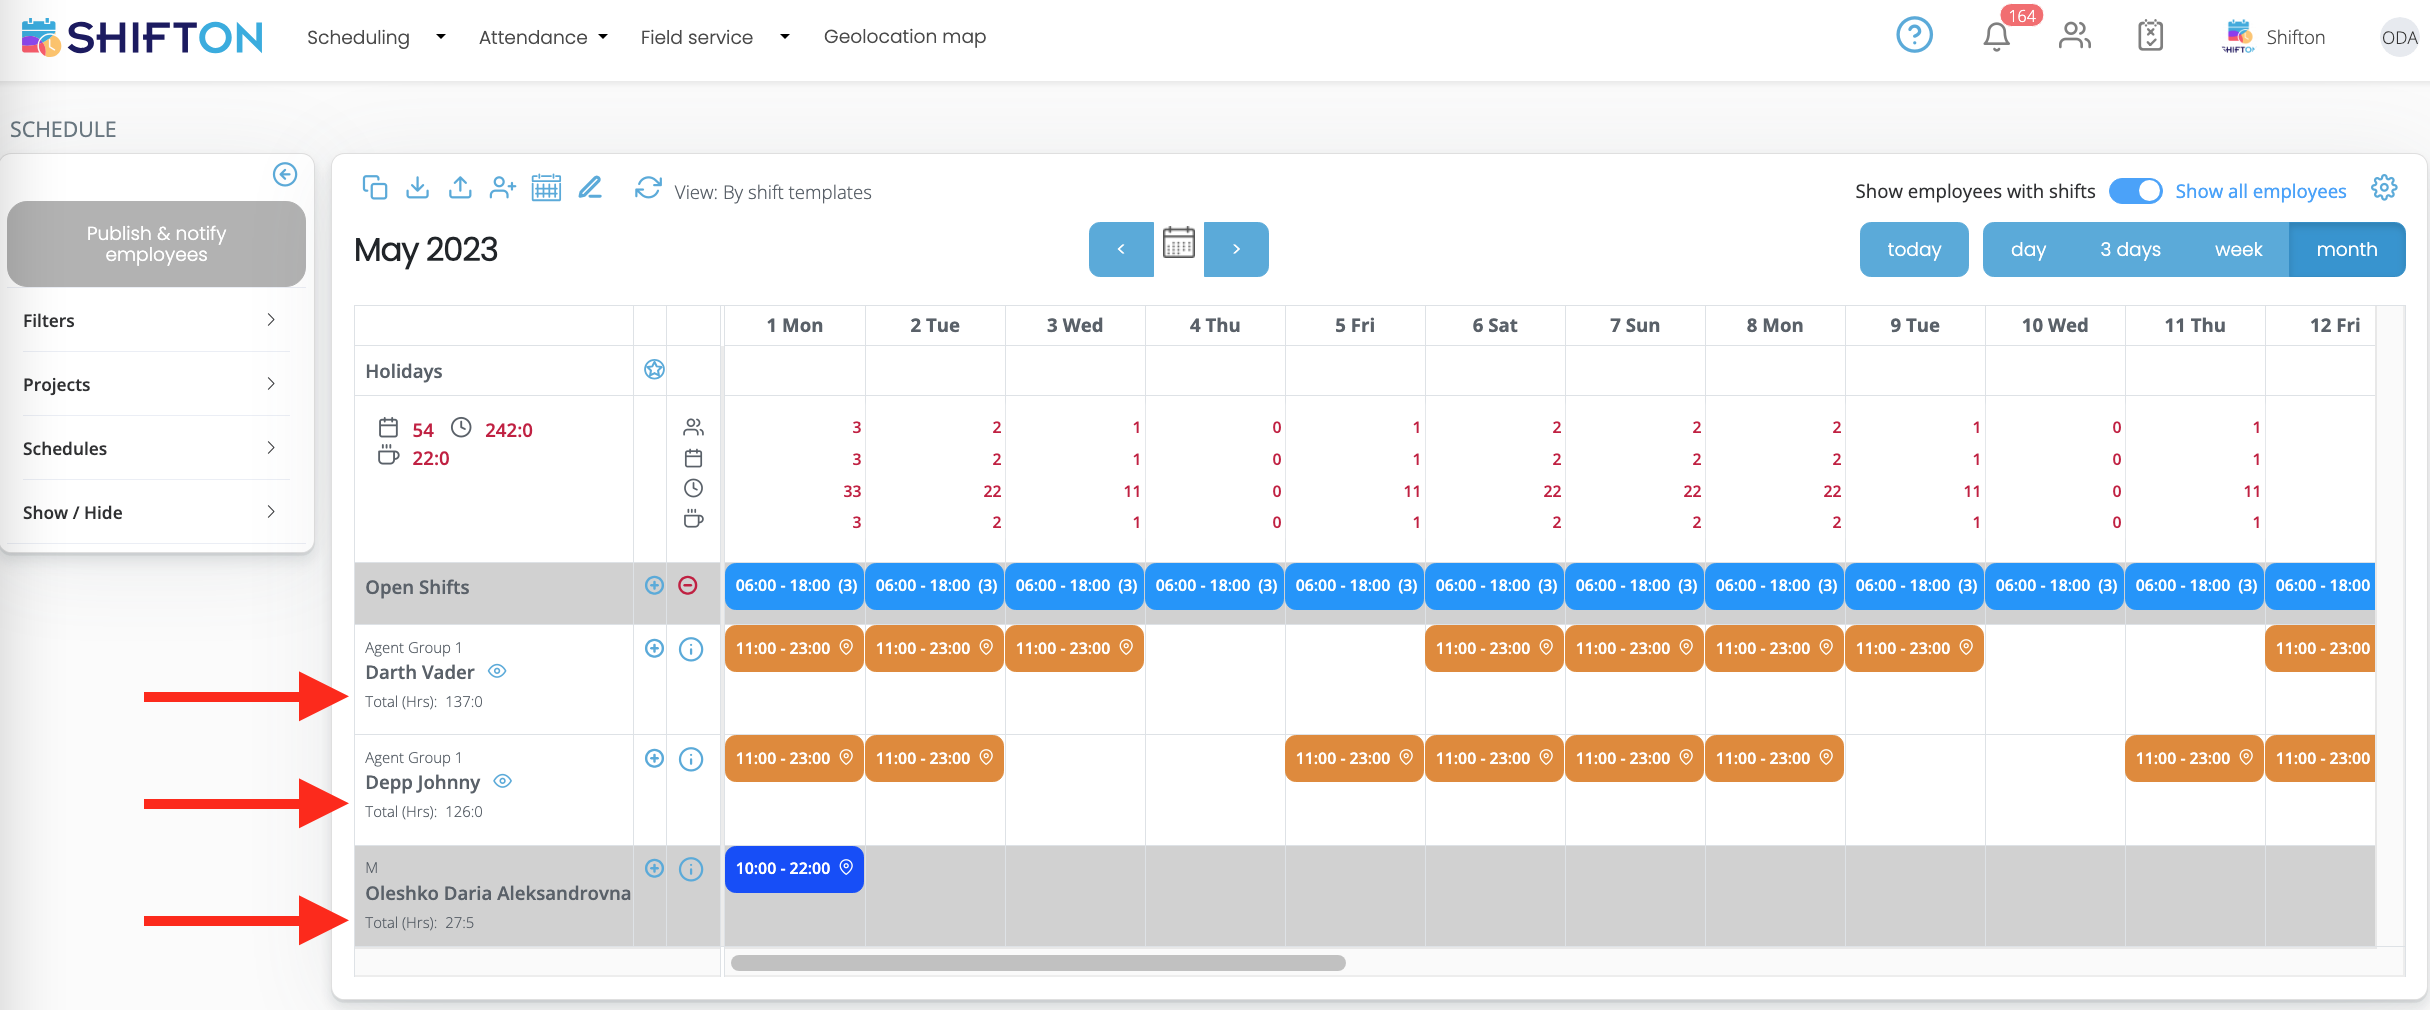
- If you select “Show working hours of all colleagues”, the employees on the company schedule will display the sum of the working hours of all employees on the schedule.

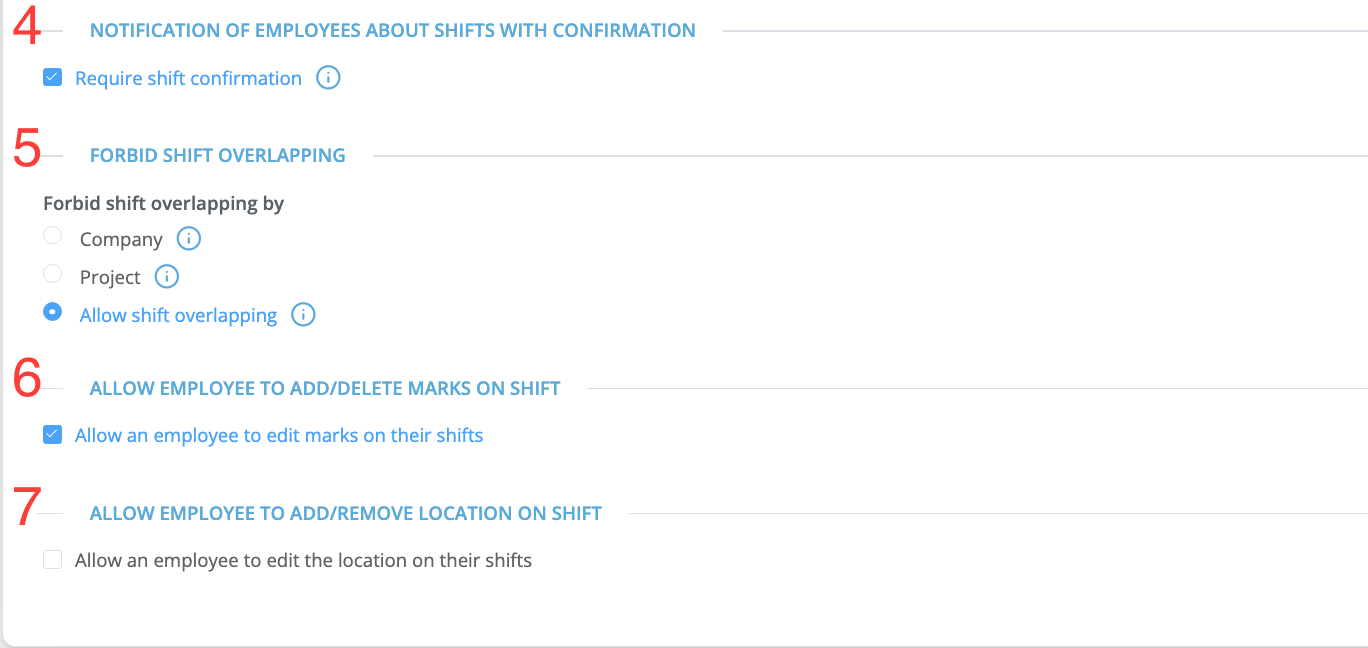
¶ 3. Notification of employees about shifts with confirmation
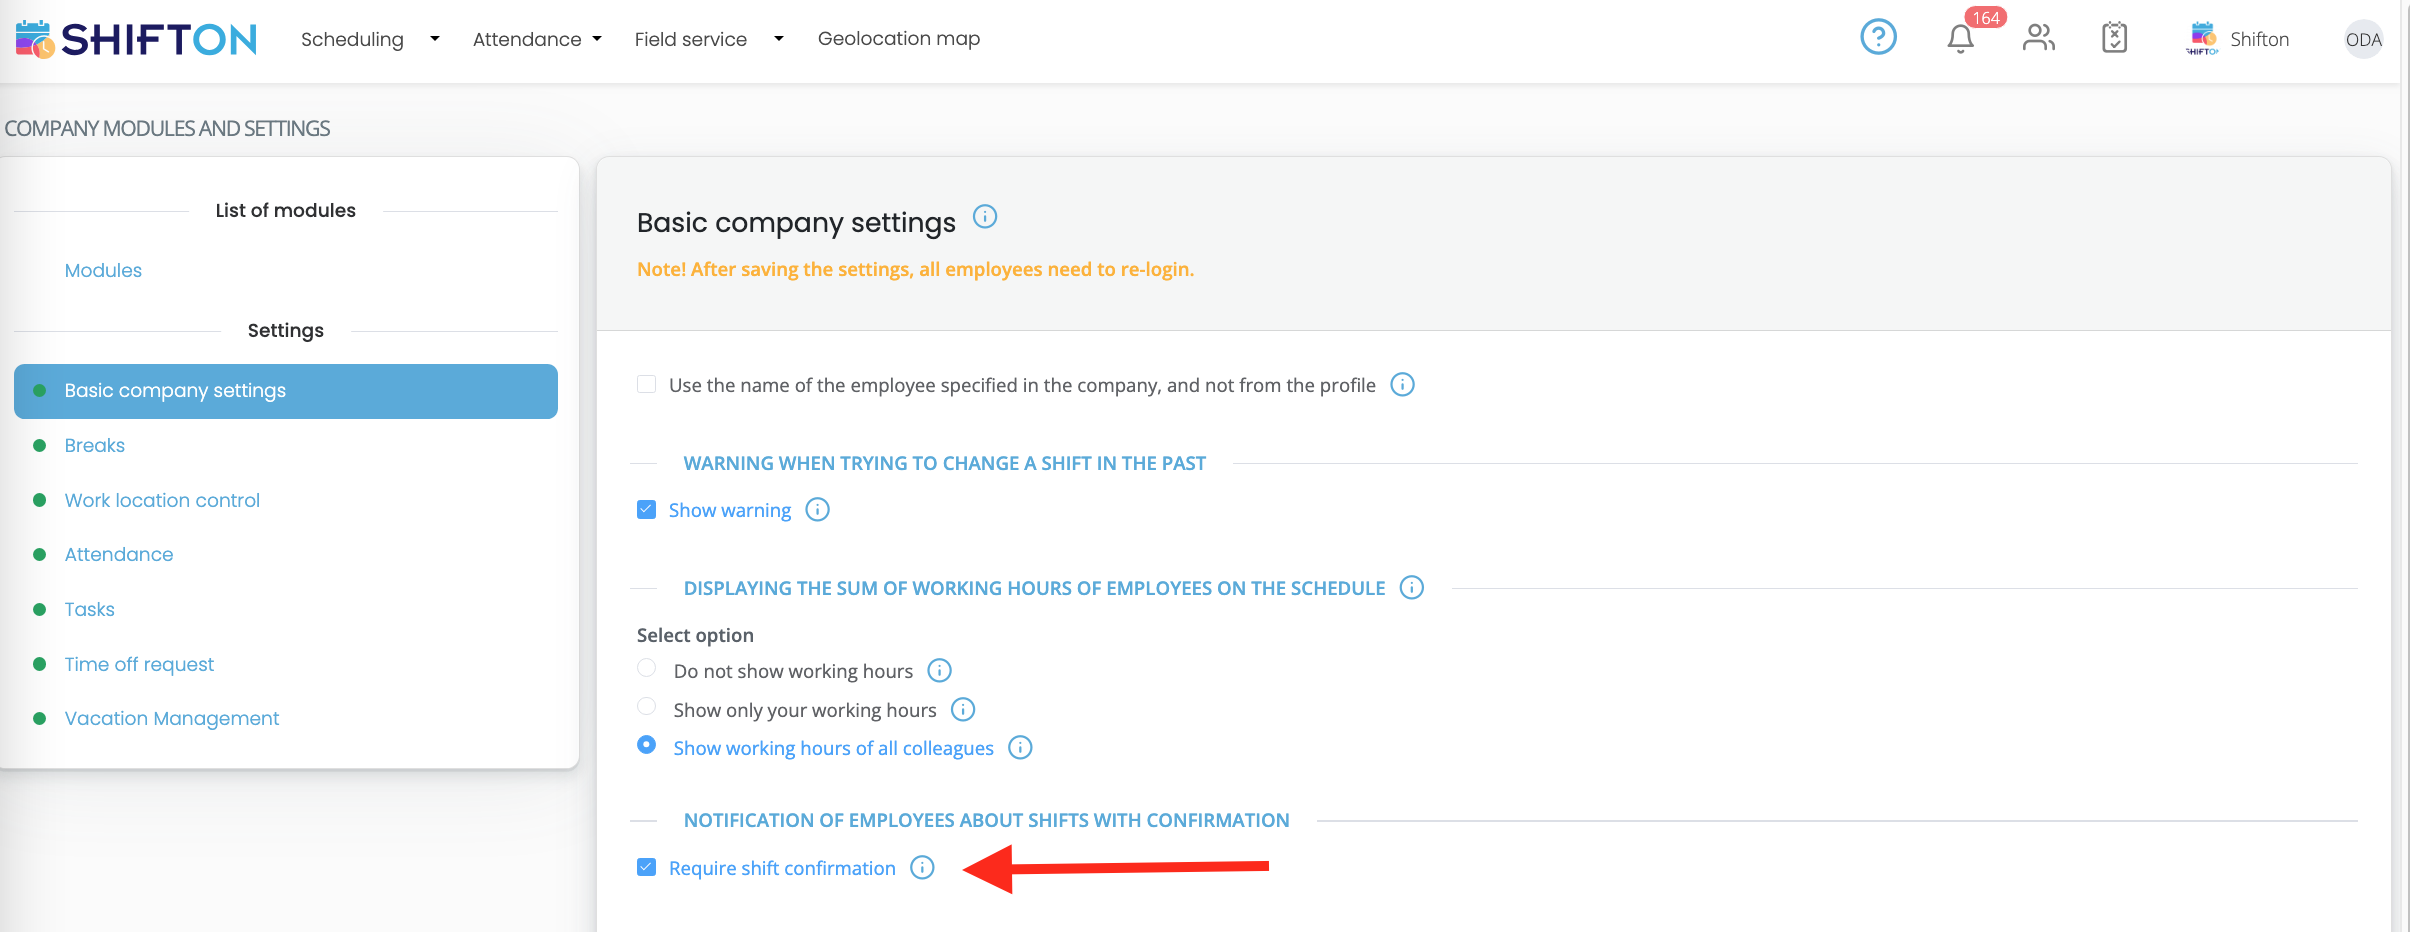
If the “Require shifts confirmation” checkbox is enabled, then when creating a schedule or making changes to shifts, a message will be displayed to the employee with the need to confirm shifts.
In the pop-up window, the employee can get acquainted with the shifts.
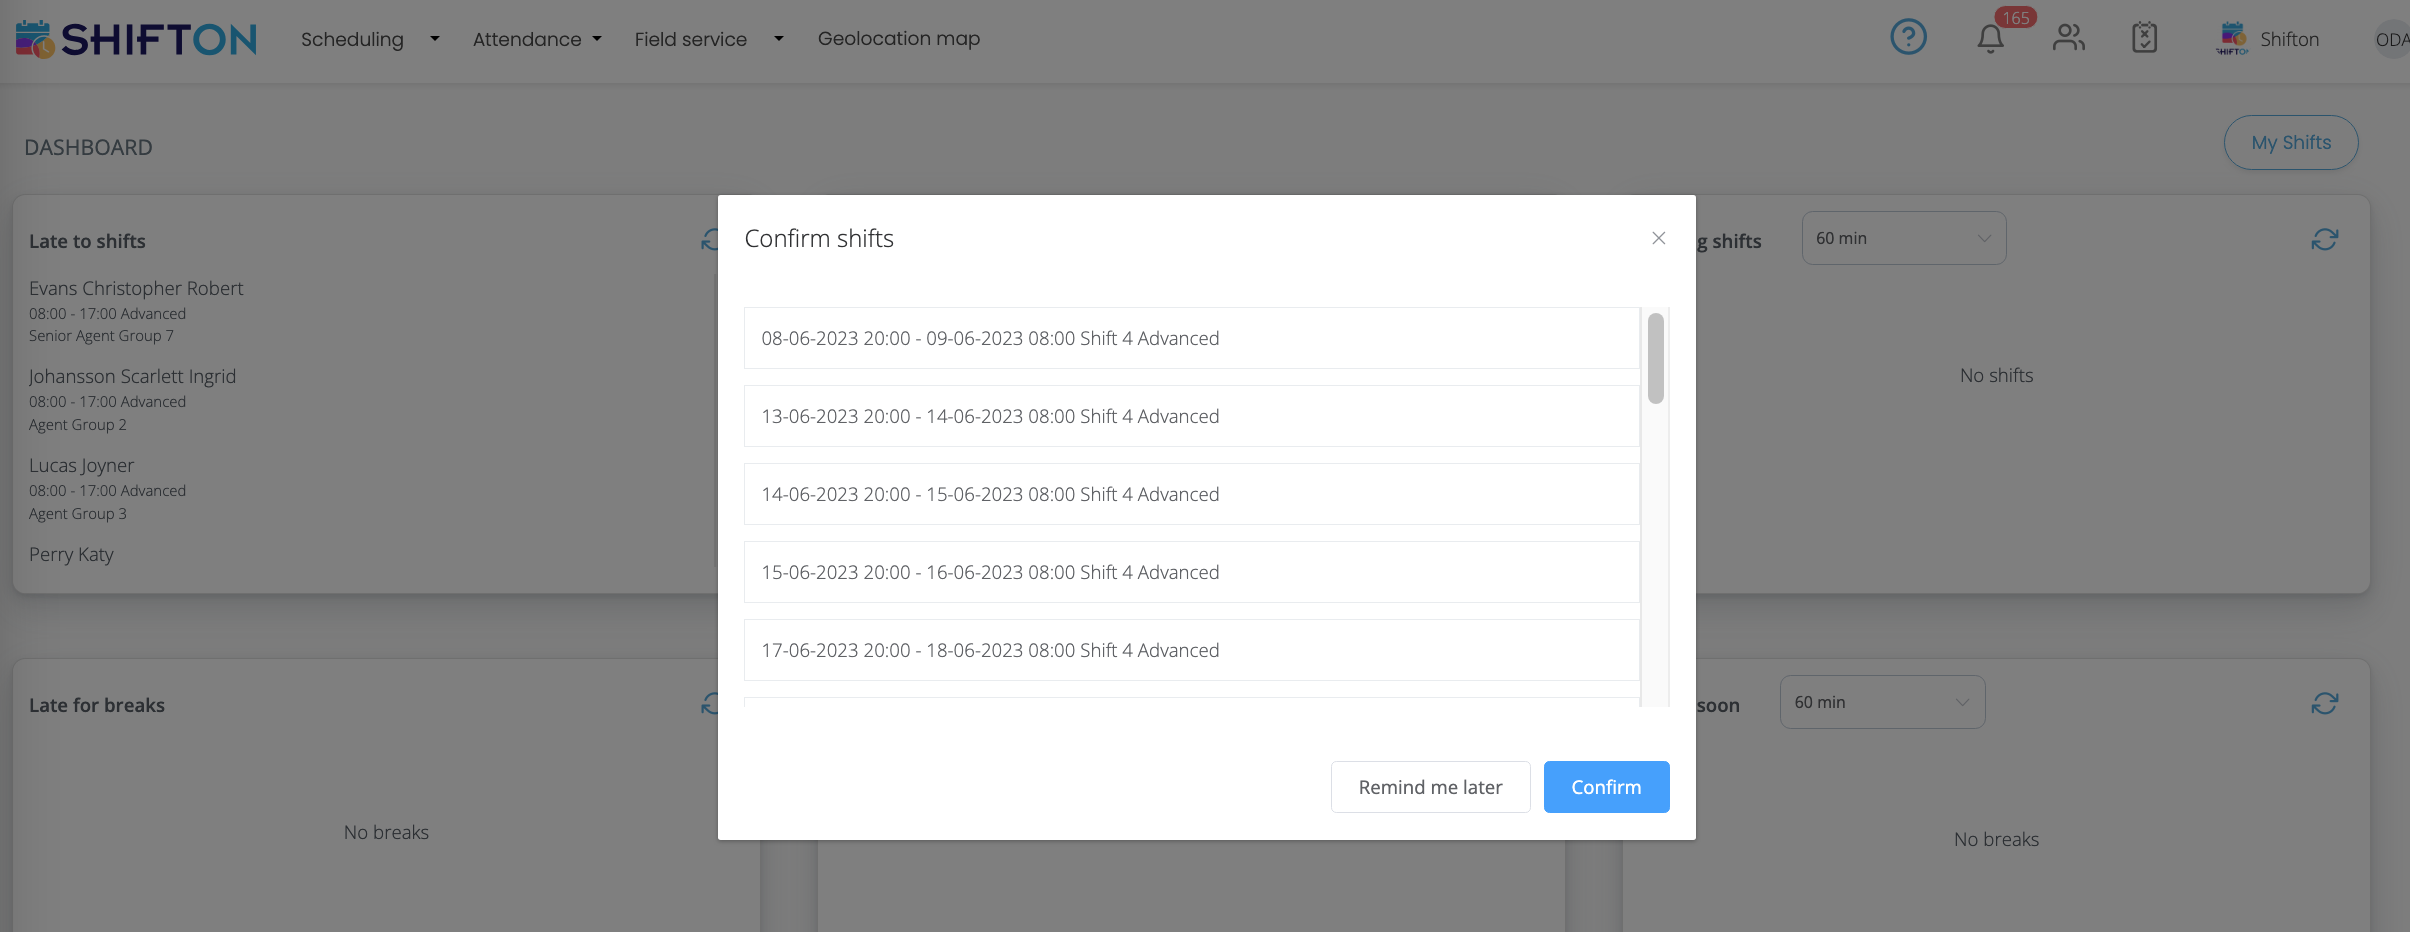
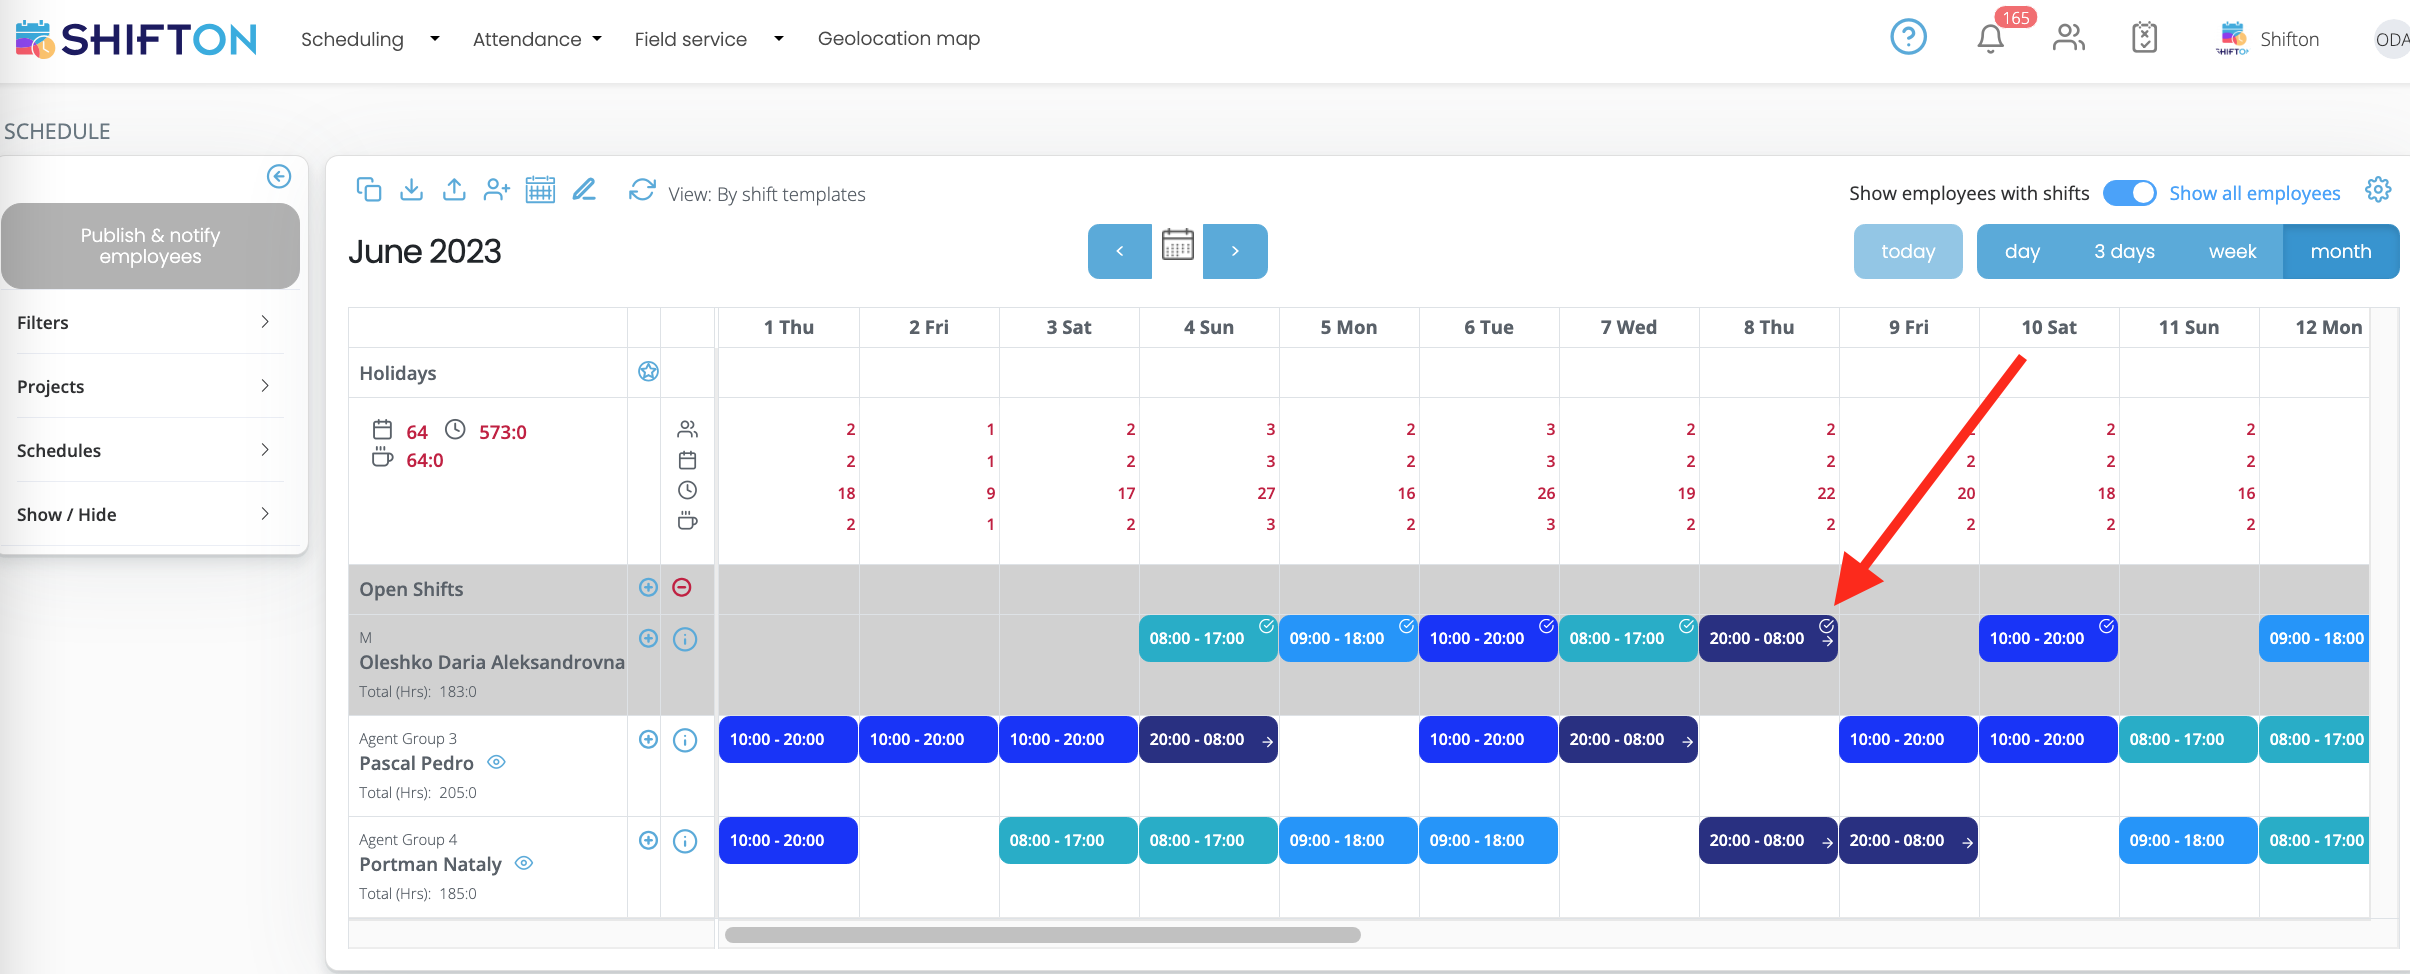
After confirmation of the shifts by the employee, owner/administrator/manager/employee on the “Company Schedule”, the shifts will display a “Checkmark” which means that the employee has familiarized himself with the shifts and confirmed them.
¶ 4. Forbid shift overlapping

In this setting, it is possible to prohibit the intersection of shifts by time: within the entire company, within the project, or allow the intersection of shifts by time.
- Prohibition of crossing shifts by time at the company level:

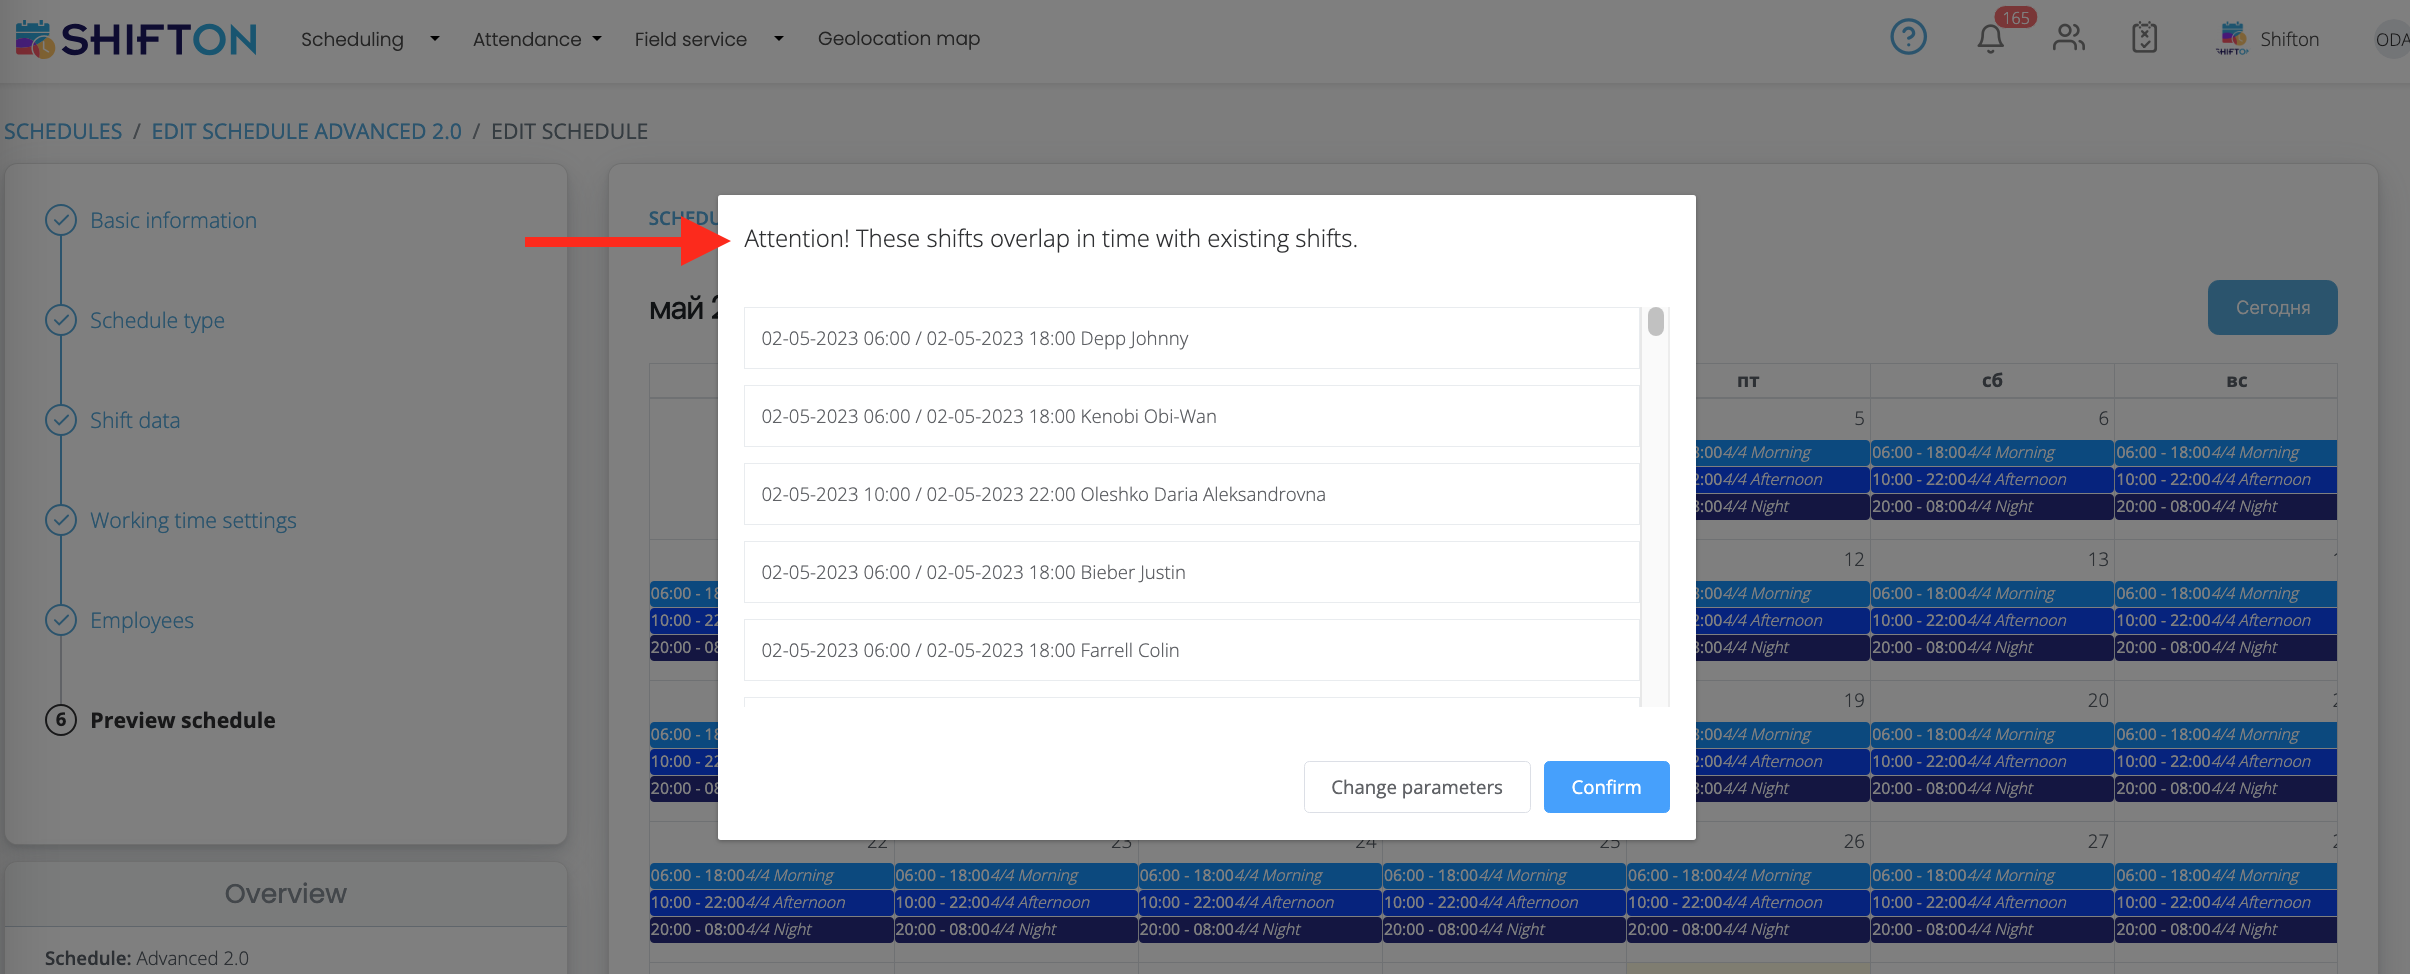
When creating a schedule, by selecting employees who have shifts at the company level, a warning will be displayed with information about employees whose shifts overlap with the existing ones. In the pop-up window, it is possible to confirm the action or change the parameters.
If an employee is in several projects, it will not be possible to create overlapping shifts for him, even if they are in different projects.
When creating a shift/request to create a shift, if there is an overlapping shift at the company level, the request or shift will not be created. A notification will be displayed.
Notice to company owner/administrator/manager:
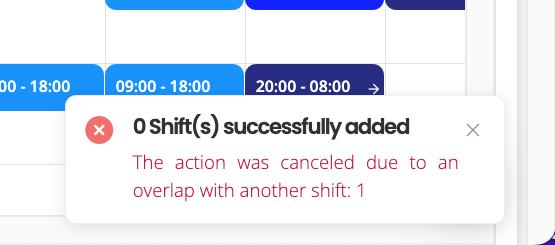
Notification to an employee when creating a shift:
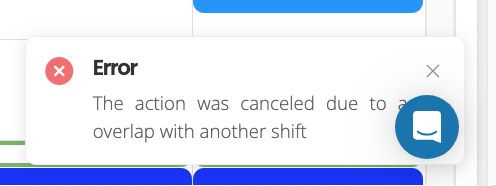
- By choosing to prohibit the intersection of shifts by time at the project level.

You cannot create overlapping shifts, but you can create a shift within another project

- If you select “Allow shifts to overlap by the time”, the employee, owner, manager, and administrator, when creating a schedule, or creating a shift, will not be shown a warning about shifts crossing by time, since all checks when creating shifts are disabled.

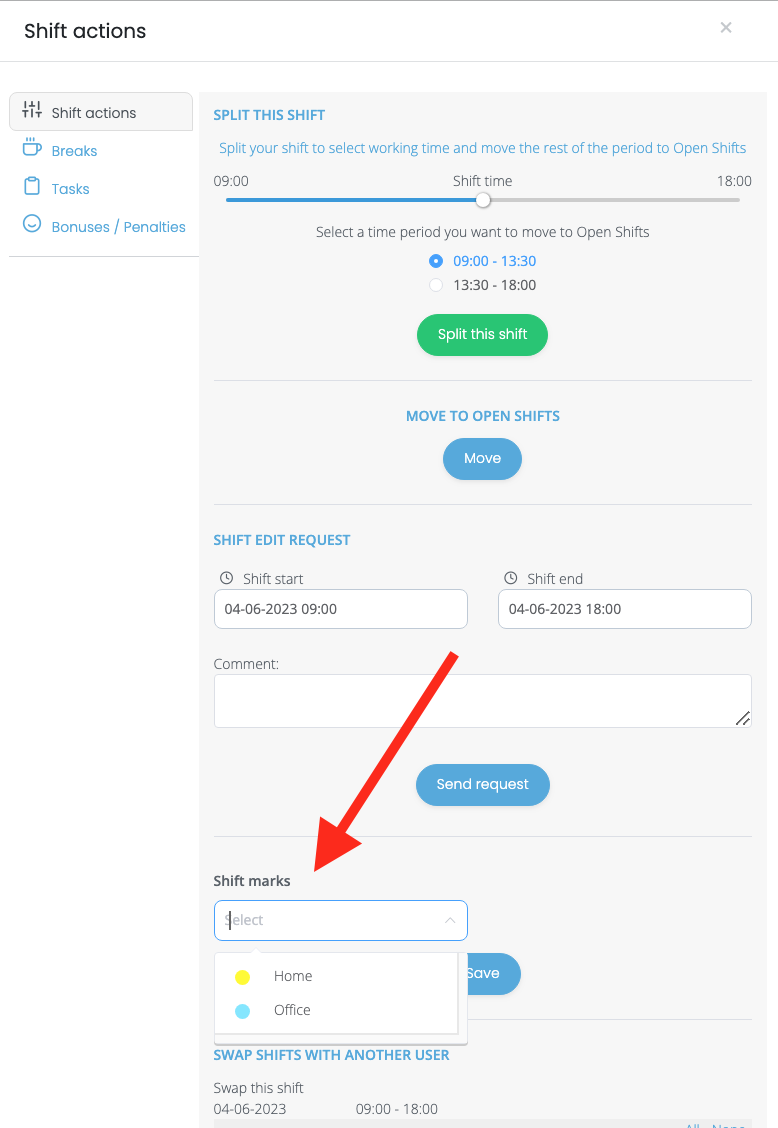
¶ 5. Allow employees to add/delete marks on shift
If the checkbox “Allow employees to edit marks on their shifts” is checked, then employees will be able to add and remove marks on their shifts without the confirmation of the manager.

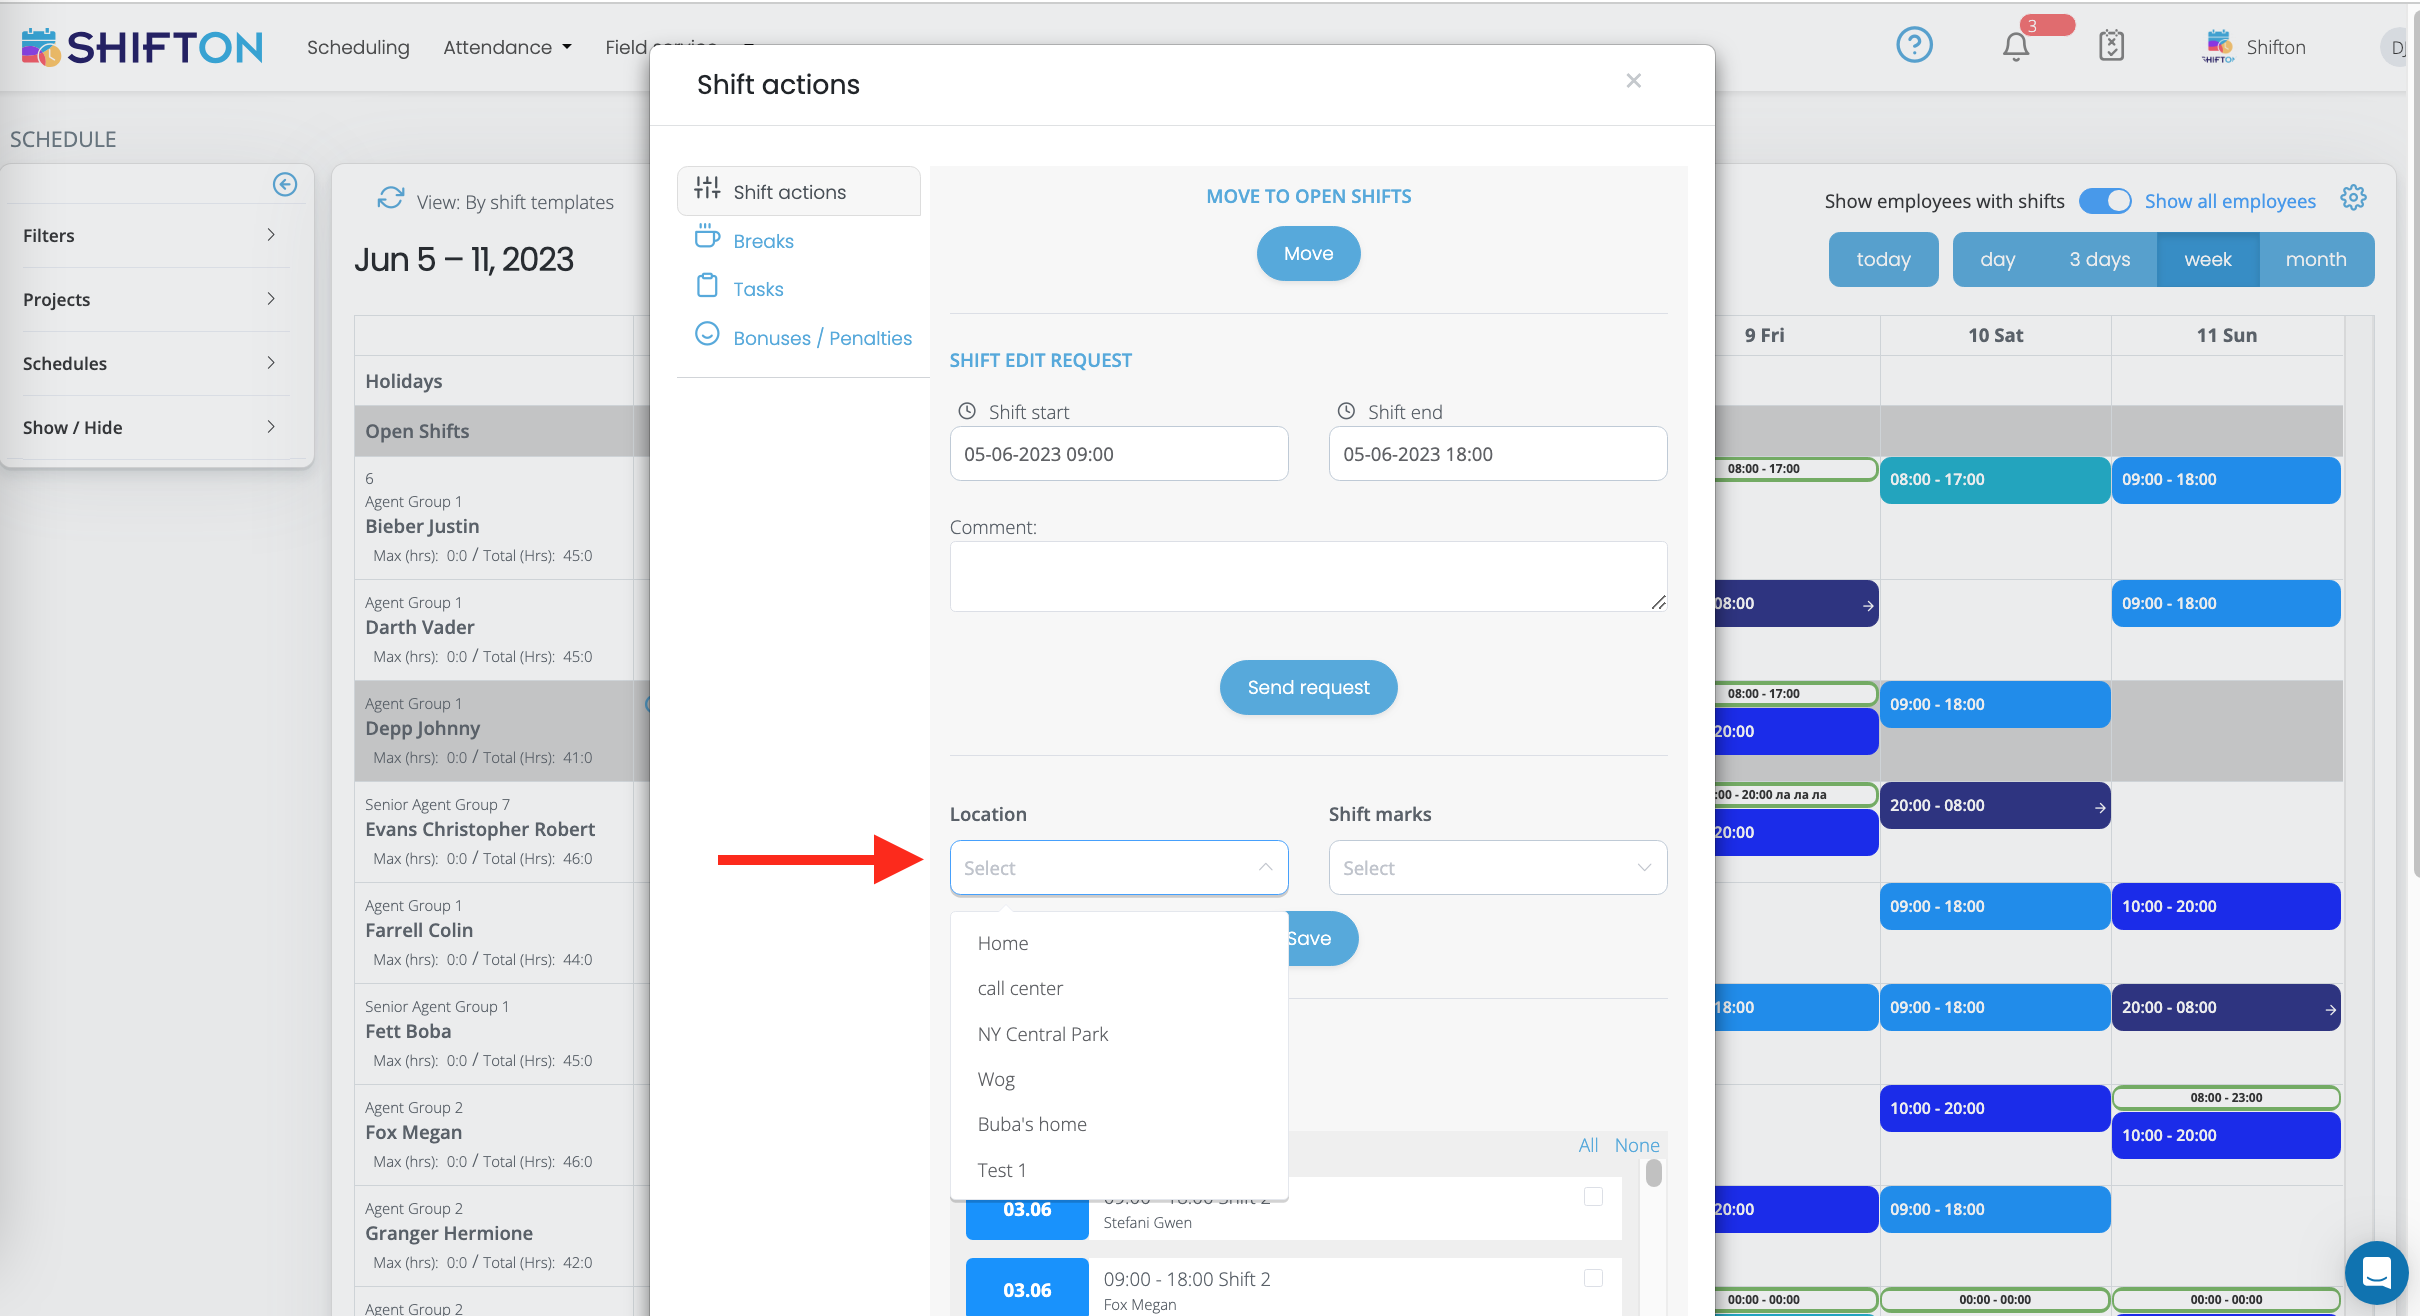
¶ 6. Allow employees to add/delete locations on shift
If the box “Allow an employee to edit the location on their shifts” is checked, then employees will be able to add and remove locations on their shifts without the confirmation of the manager.

¶ Settings for the "Breaks" module
In order to configure the settings for the "Breaks" module, you need to click on the "Breaks" tab in the left menu.
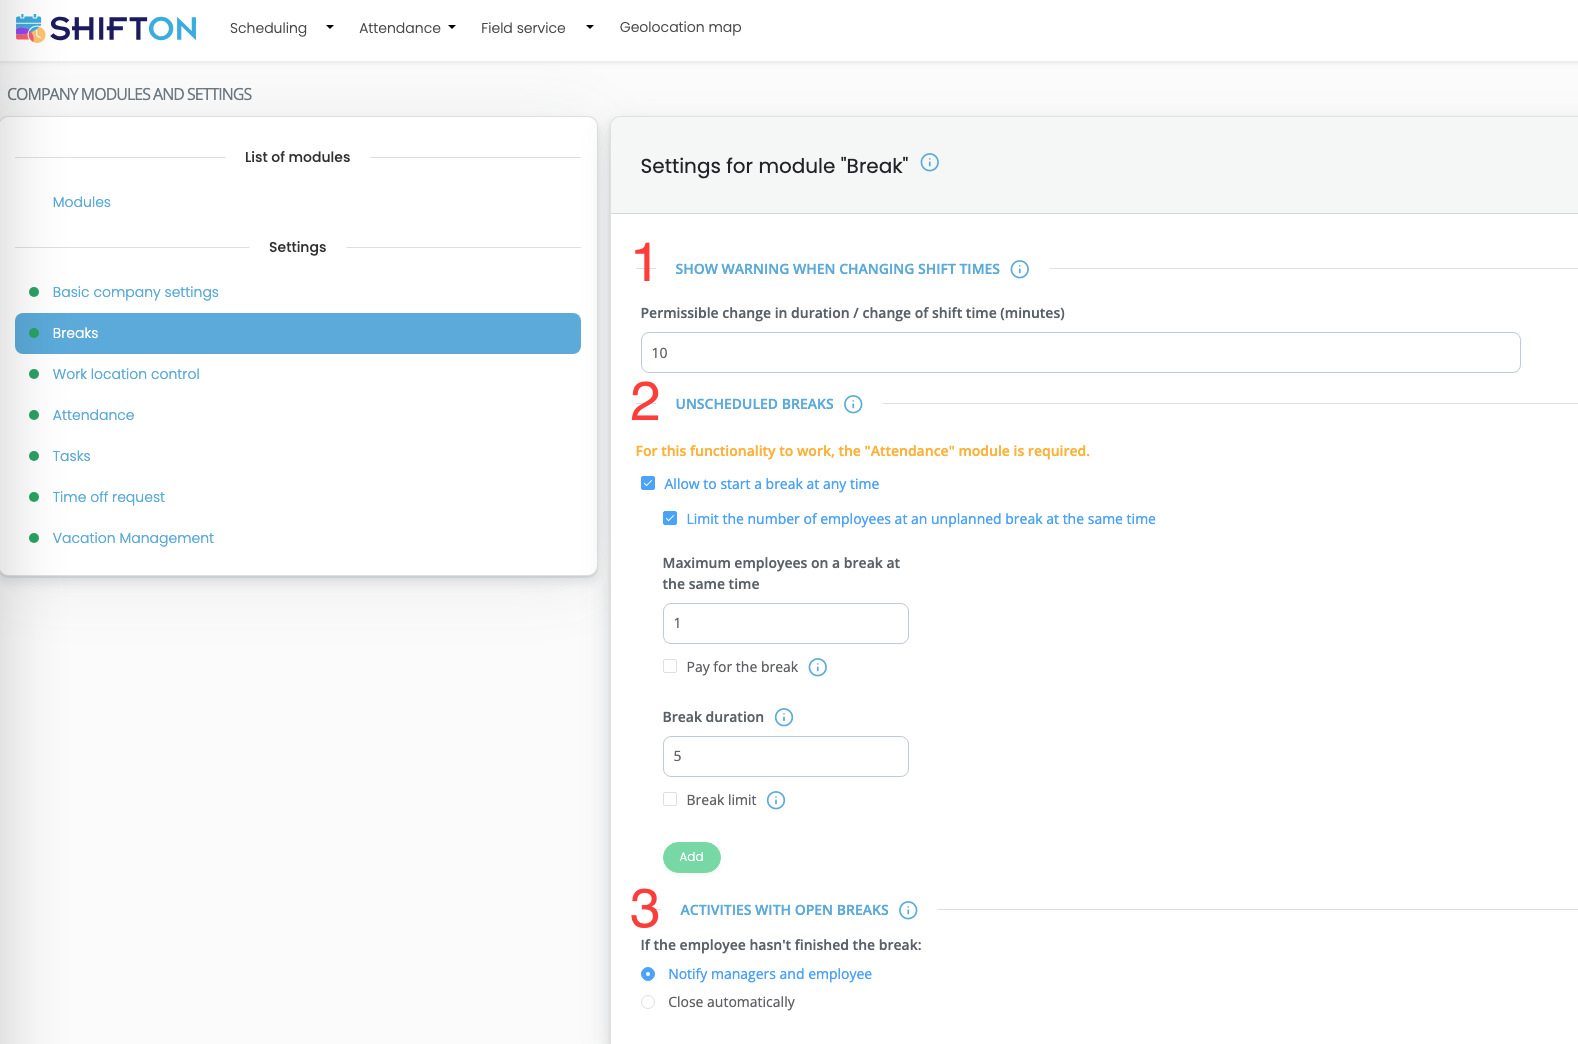
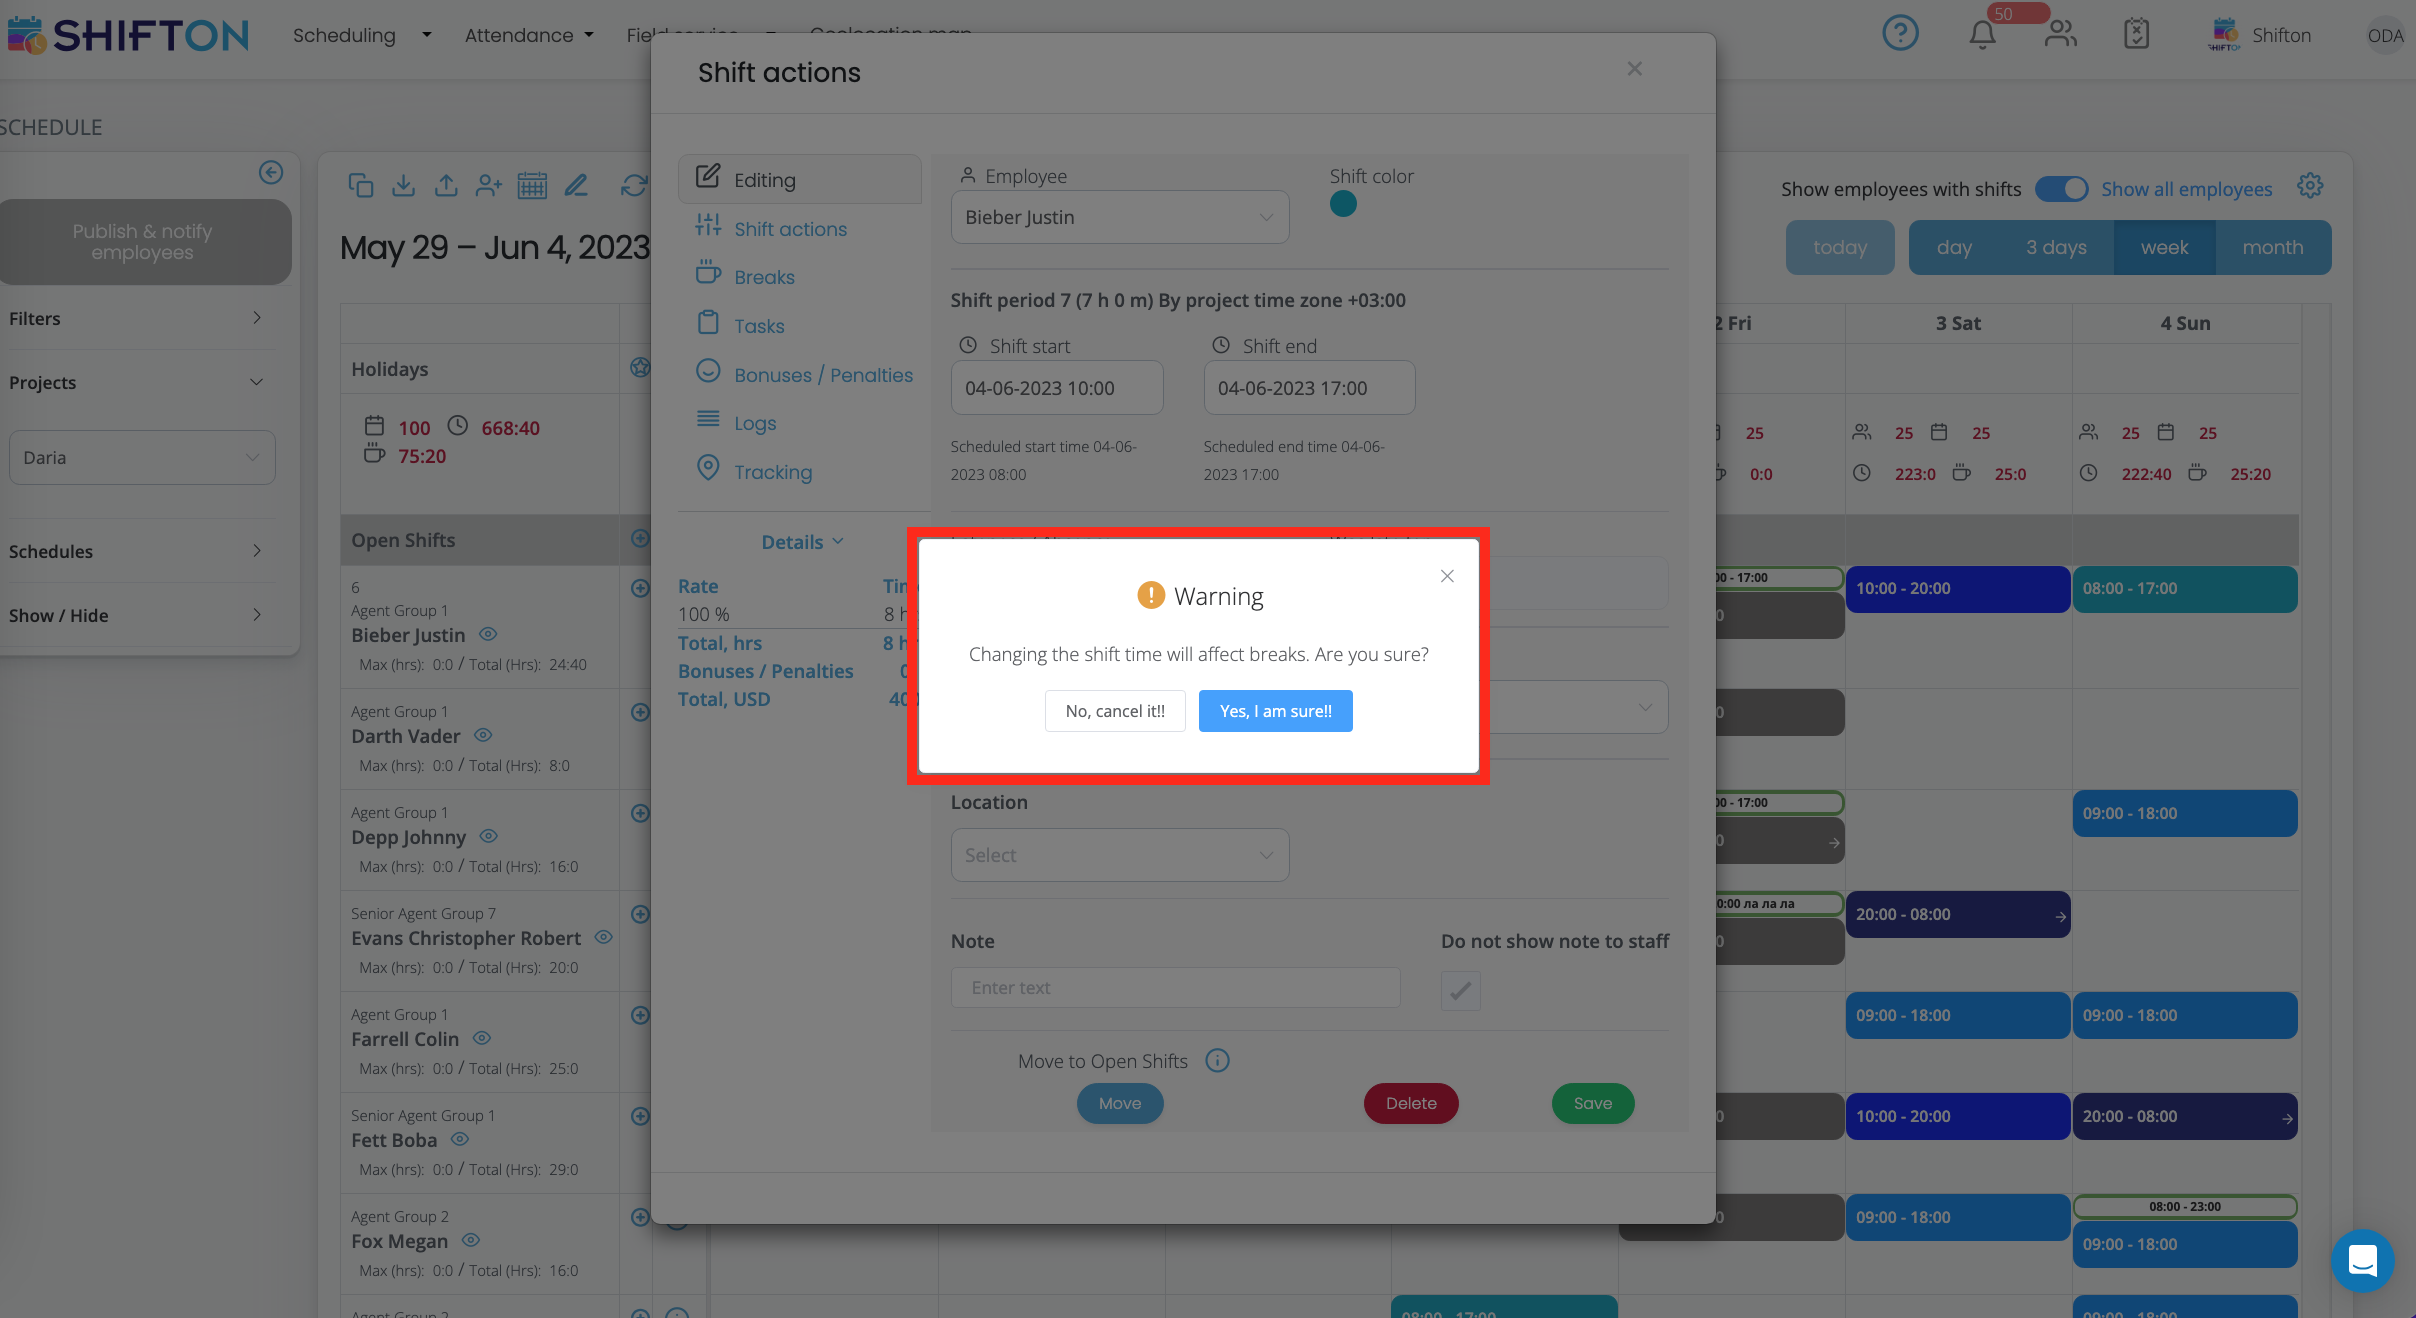
¶ 1. Show a warning when changing shift time

When changing the shift time, a warning will be displayed to correct the break times. If the shift time is changed or shifted by fewer minutes than in the setting (field - Permissible change in duration/shift time shift) - no warning will be displayed about the need to correct the break time.
¶ 2. Unscheduled breaks
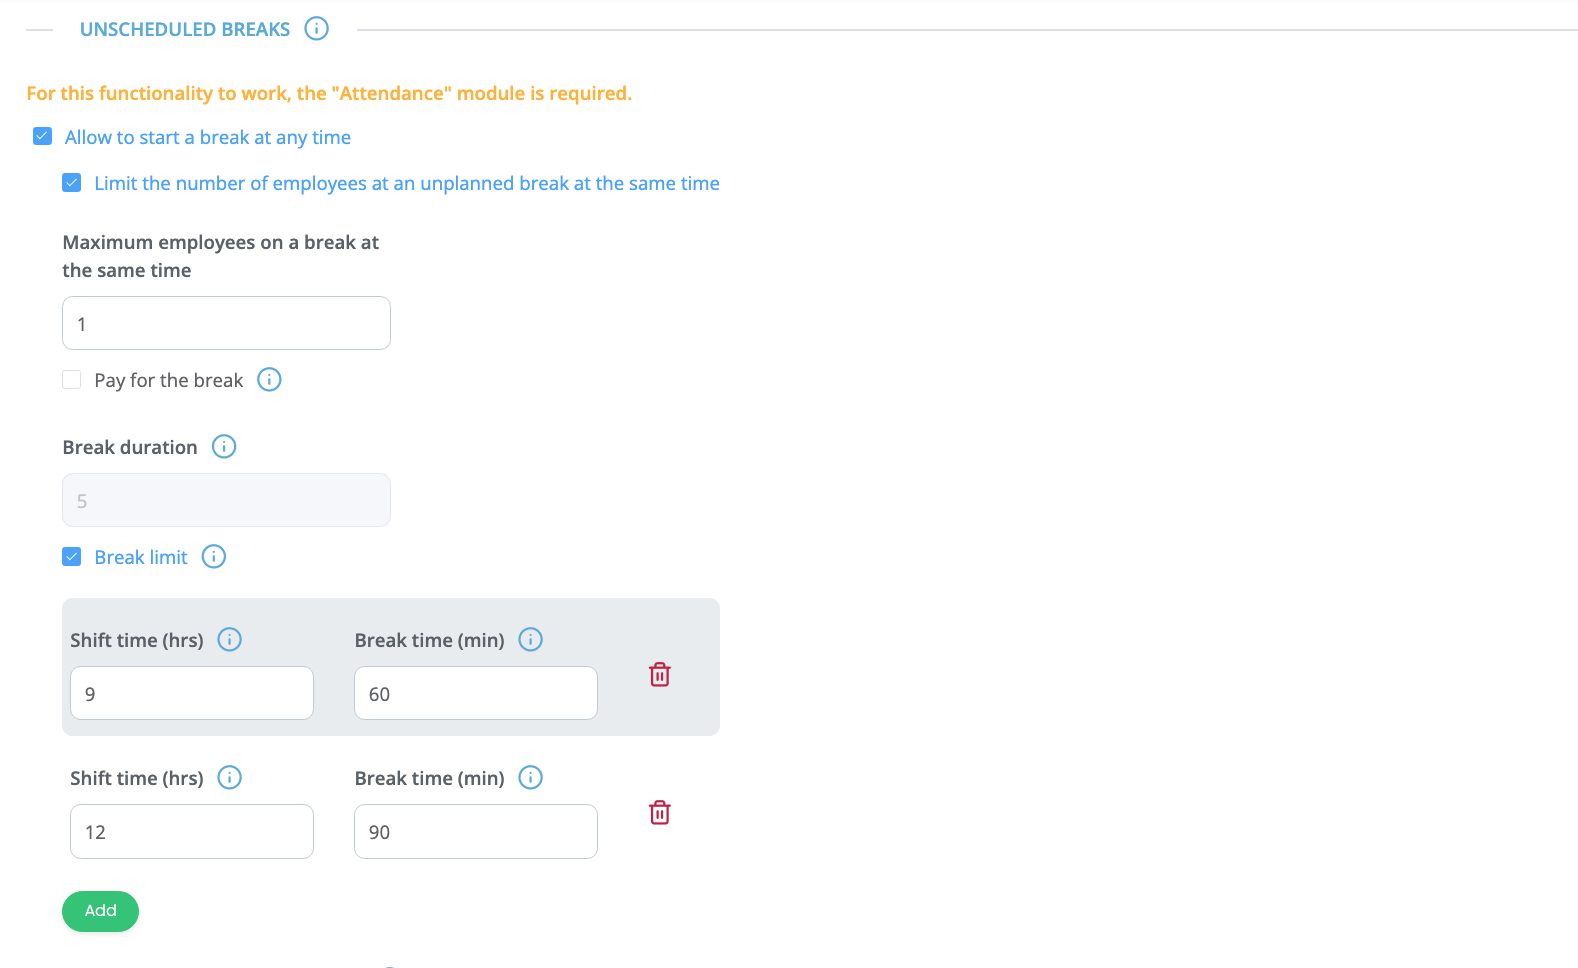
NOTE! For this functionality to work, the “Attendance” module is required.
If the “Allow break to start at any time” field is checked, the employee will be able to start a break at any time, even if there are no scheduled breaks on the shift.

In the settings of this option, you must specify:
- Pay or don't pay.
- Break duration.
*Additional option “Limit breaks”.
Depending on the length of the shift, you can specify the allowable break time that an employee can use for unscheduled breaks. An employee can go on a break an unlimited number of times but in time no more than the allowable limit.
“Limit the maximum number of employees on an unscheduled break at the same time" - this option allows you to specify the maximum number of employees who can be on a break at the same time.

¶ 3. Actions with open breaks

The “If the employee has not finished the break” setting allows you to notify managers and employees that the employee has not closed the breaks or the break can be closed automatically, provided that the “Close automatically” option is selected.
Manager Notification:

¶ Settings for the “Working location control” module
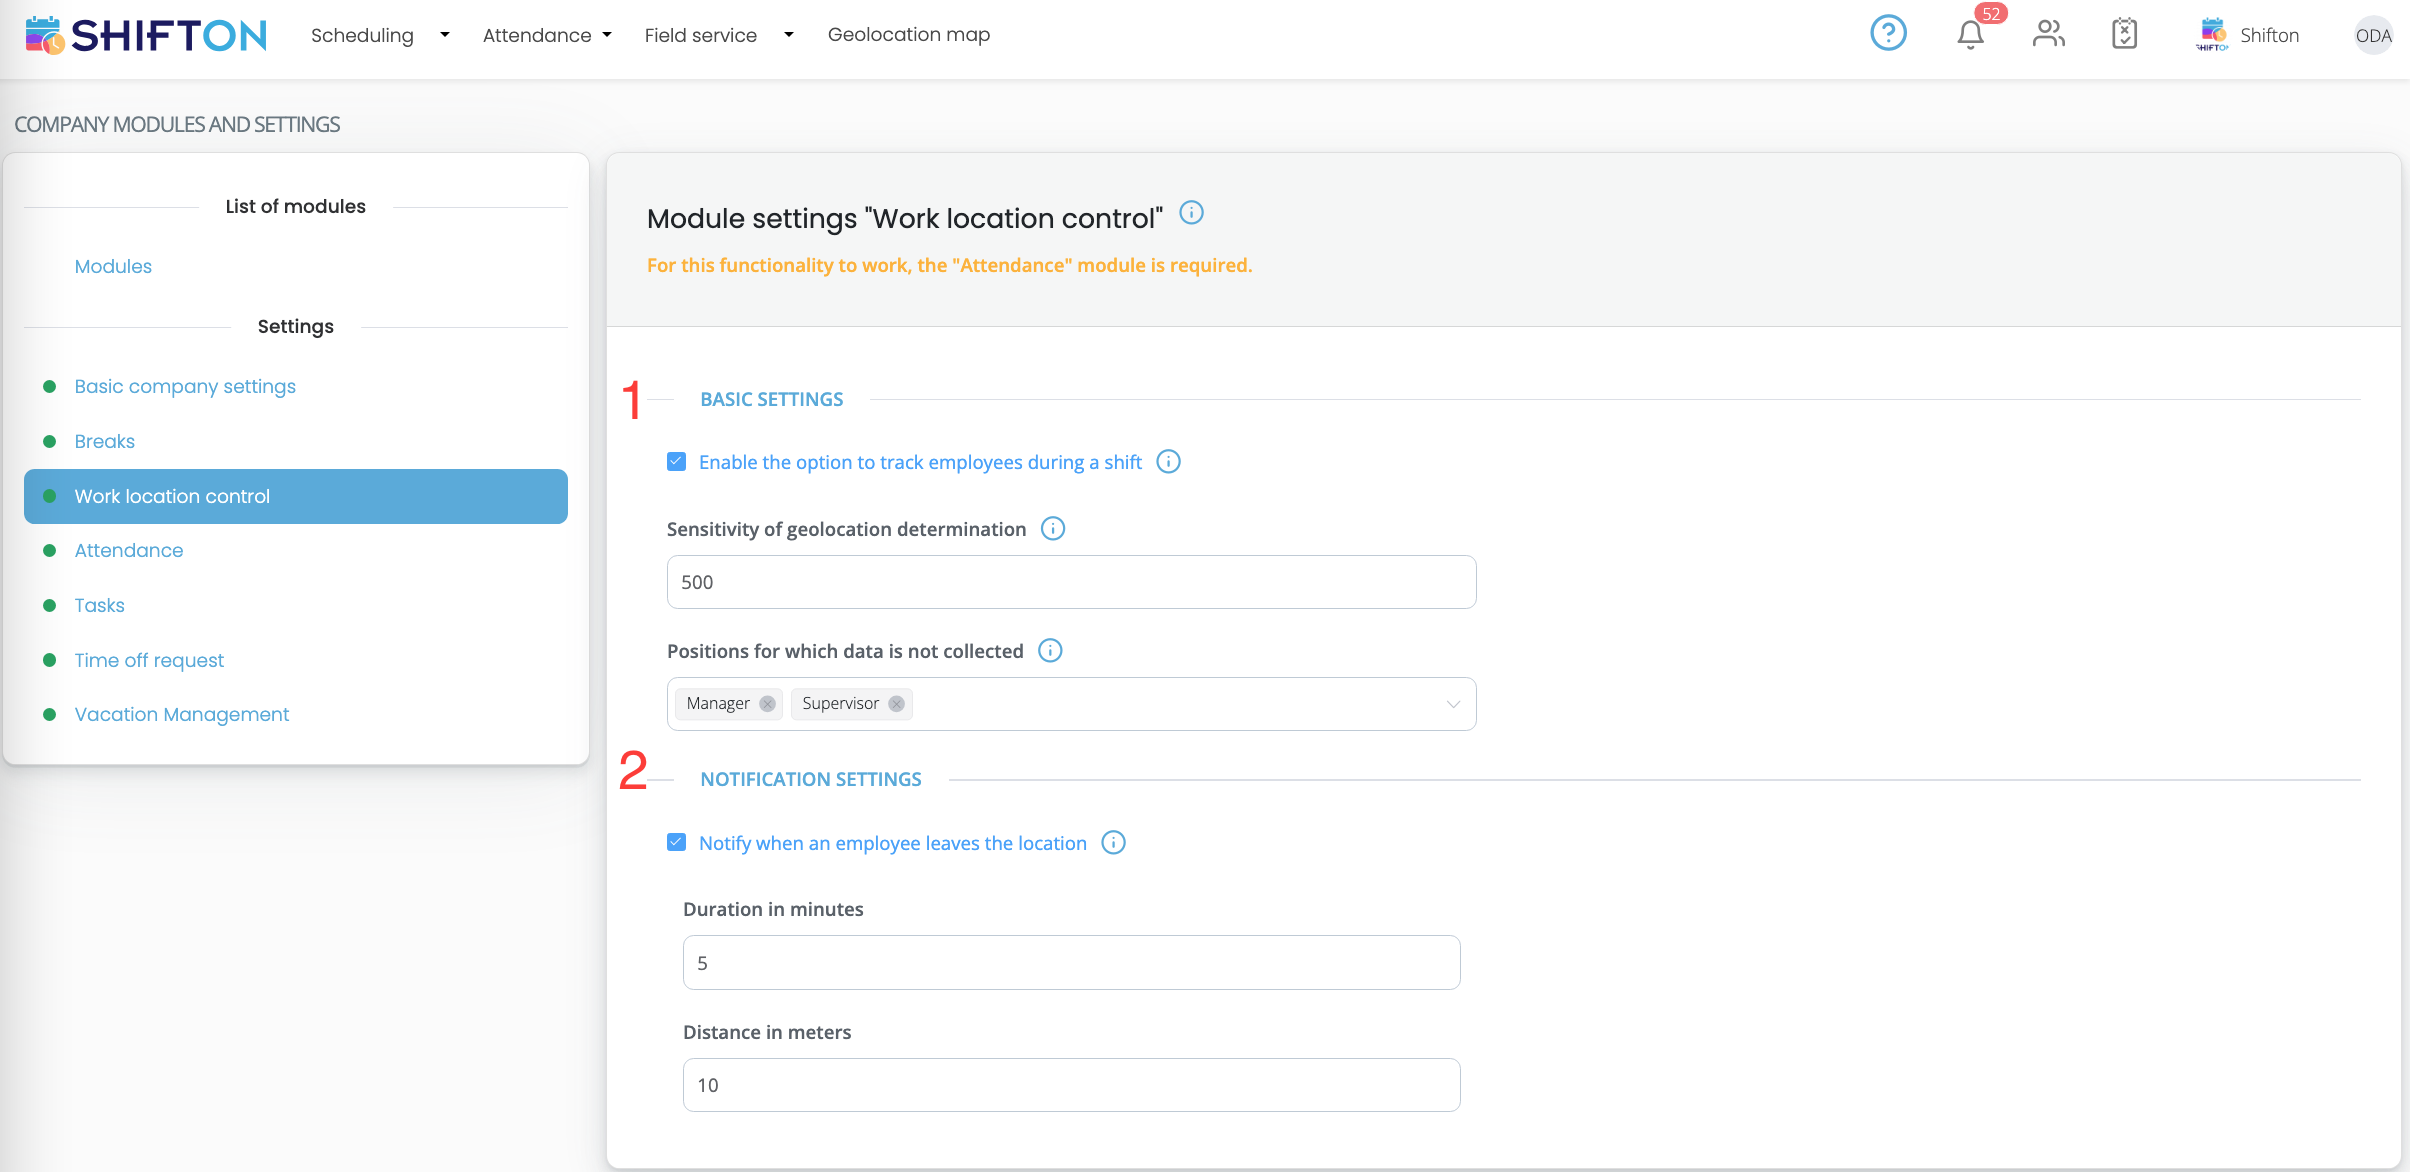
In order to configure the settings for the “Working location control” module, you need to click on the “Working location control” tab in the left menu.
¶ 1. Basic settings
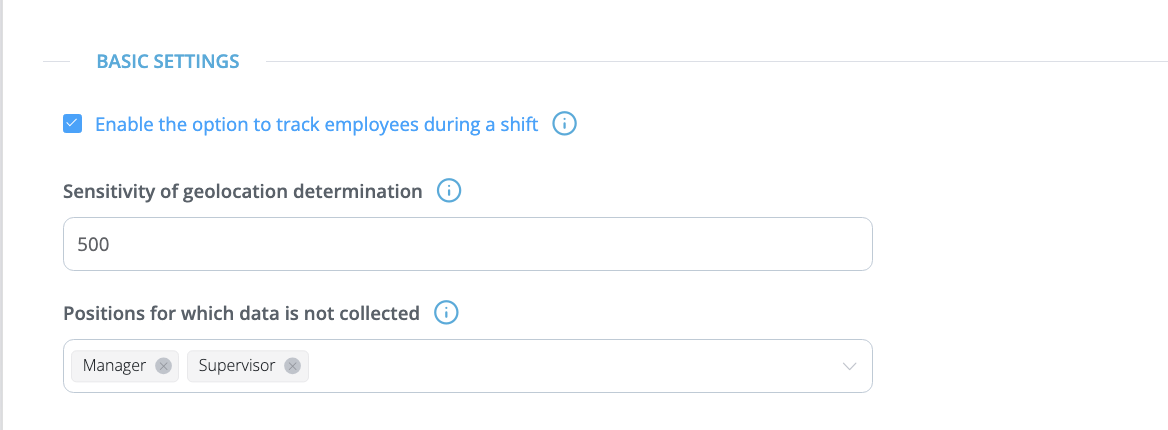
If the setting “Enable the option to track employees during a shift” is disabled, then no data will be collected, but old data will be available, and new ones will not be available.
When this option is enabled, the following setting must be filled in:
- Sensitivity of determining geolocation. When changing the location, this setting allows you to determine how far the employee has moved away from the previous point so that the coordinates are counted. We recommend that for employees working in one location, indicate from 50-100 m. For employees who travel by transport, indicate from 200-1000 m. If you specify 10 m, then after 10 m a new point will appear. This setting allows you to reduce the distance from one point to another.
*Additional setting “Positions for which data is not collected”. This setting allows you to select positions for which geolocation will be disabled, and data will not be collected. If the position is not specified, then data on the employee will be collected.
¶ 2. Notification settings
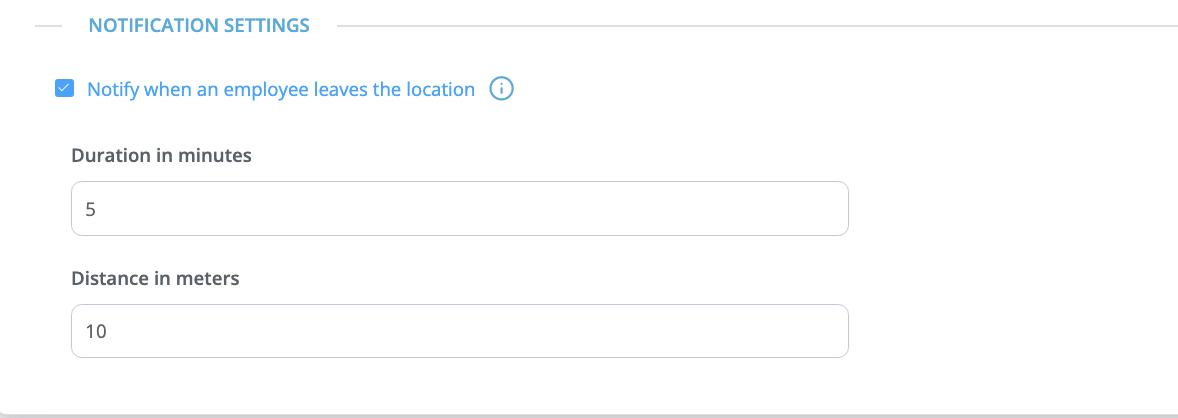
When the “Notify when an employee leaves the location” option is enabled, managers will receive notifications if the employee has left the location. Two parameters are used to regulate notifications: "Duration in minutes" - how long an employee must be outside the location in order for the manager to receive a notification. And the "Distance in meters" parameter is the distance in meters, how far the employee must move away from the set location in order for the manager to receive a notification. Only if these two parameters are met, a notification will be sent.
¶ Settings for the “Attendance” module
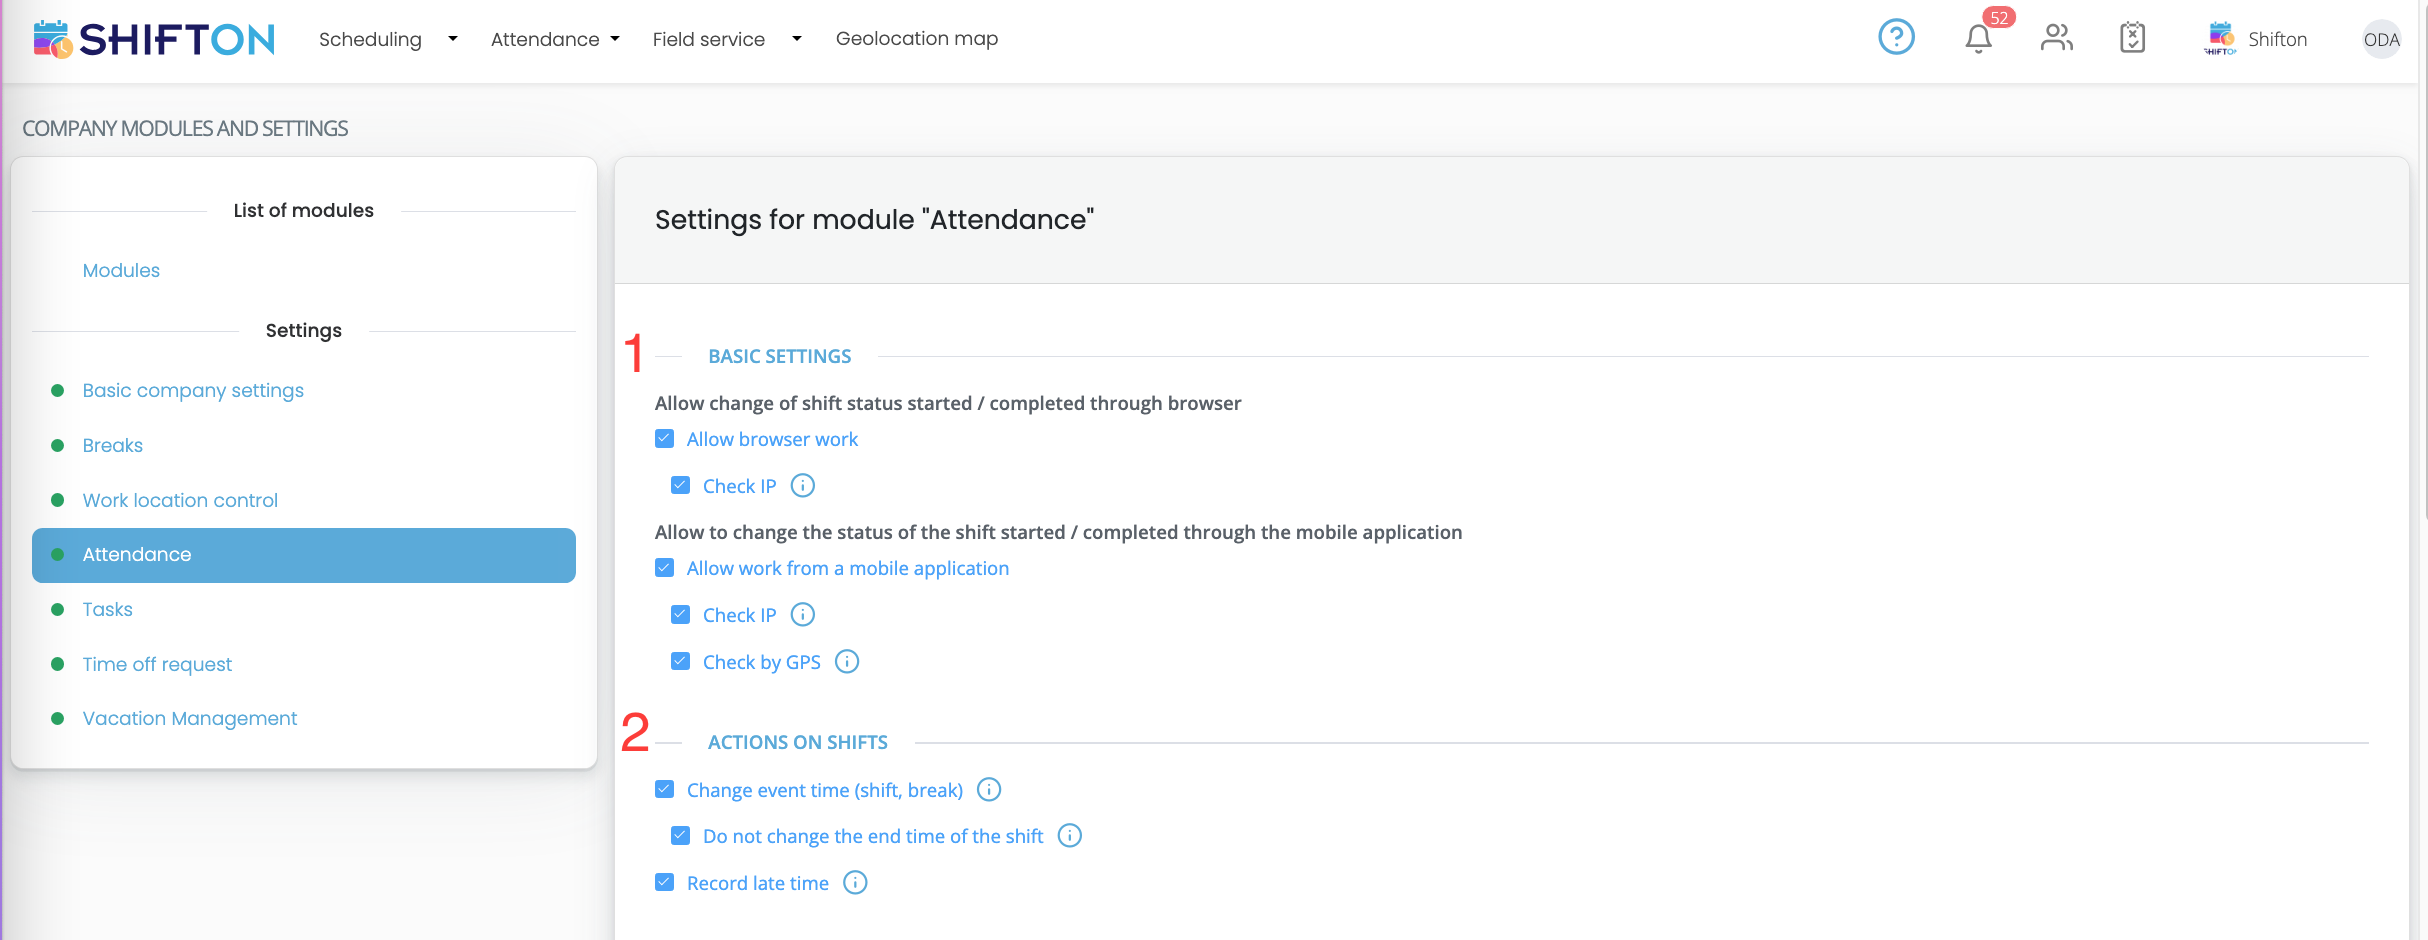
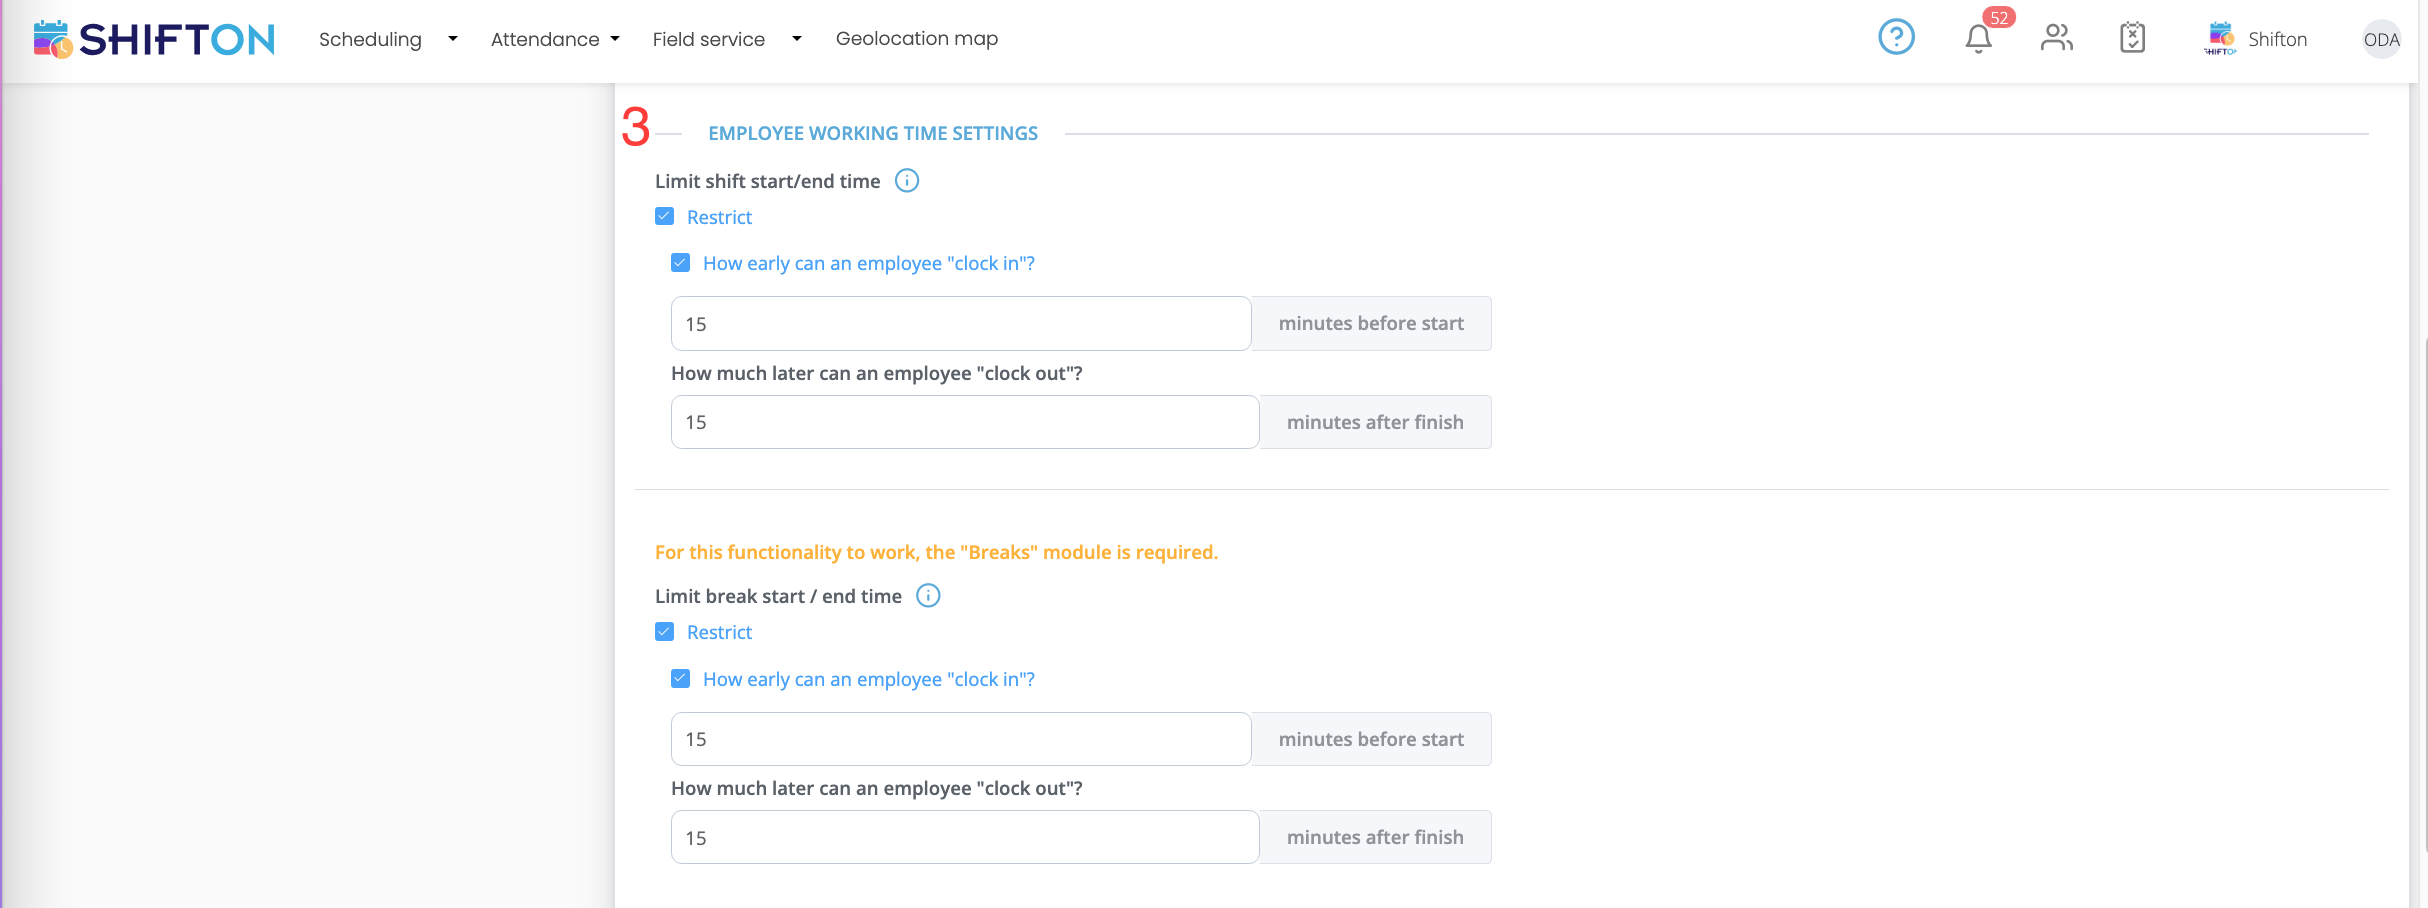


In order to configure the settings for the “Attendance” module, you need to click on the “Attendance” tab in the left menu.
¶ 1. Basic settings
If the “Allow work from the browser” option is enabled, the employee will have the “Start shift” button available when going to the account. Additionally, it is possible to set the check by IP address. This will allow an employee to start a shift only from a specific workplace.


When the "Allow work from the mobile application" option is enabled, the "Start shift" button will be active for the employee in the mobile application. Additionally, it is possible to set a GPS check, for this, you need to set the location for the shift, and after that, the employee will be able to start the shift, only in the set radius of the specified location.

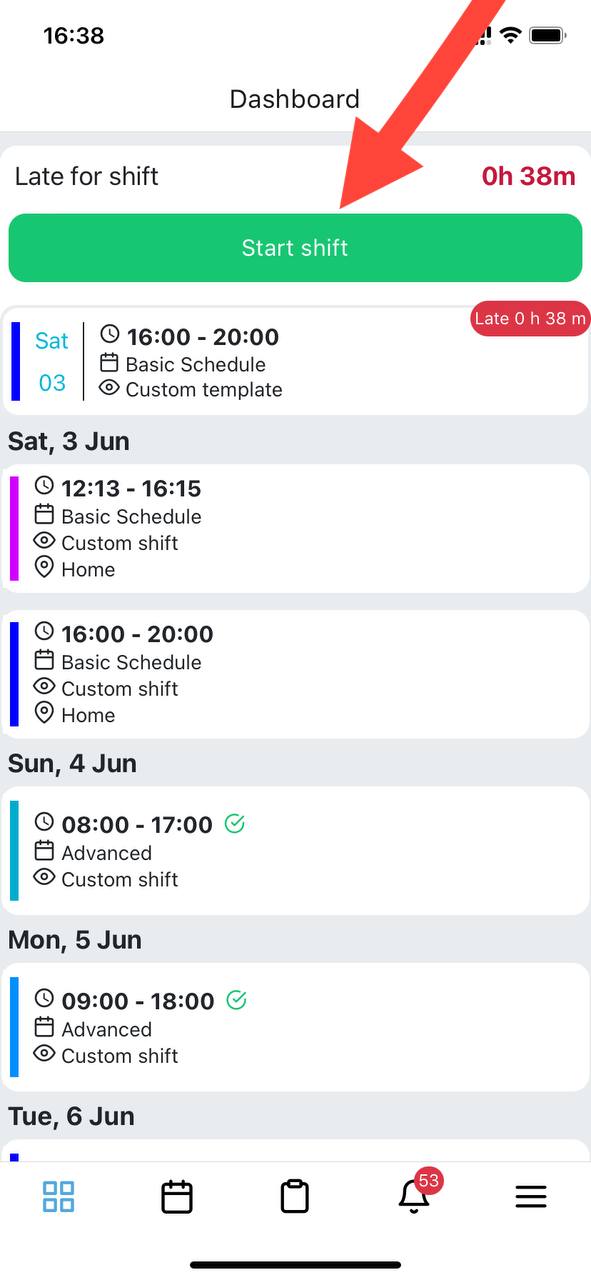
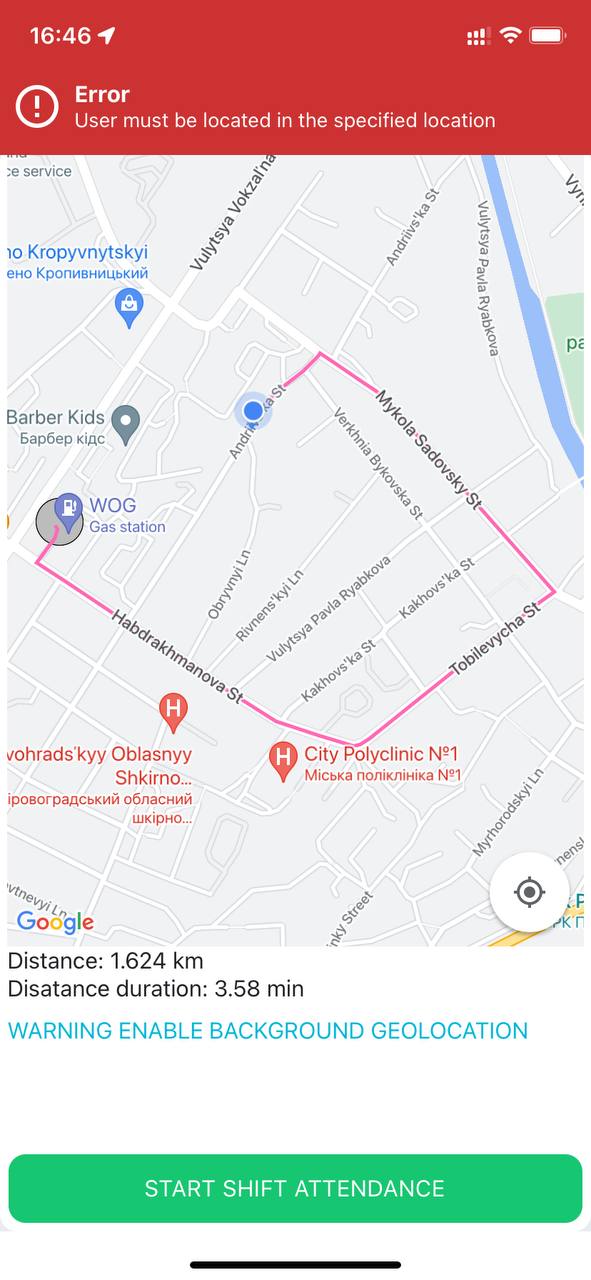
If the check by GPS option is enabled, and a location is attached to the shift, then when the employee clicks on the “Start shift” button, a notification will be displayed about permission to use geolocation.

In the next step, the employee will be shown his actual location.

If the employee is not located within the location specified on the shift, then when you click on the “Start shift” button, an error will be displayed, and the shift will not start.
¶ 2. Actions on shifts

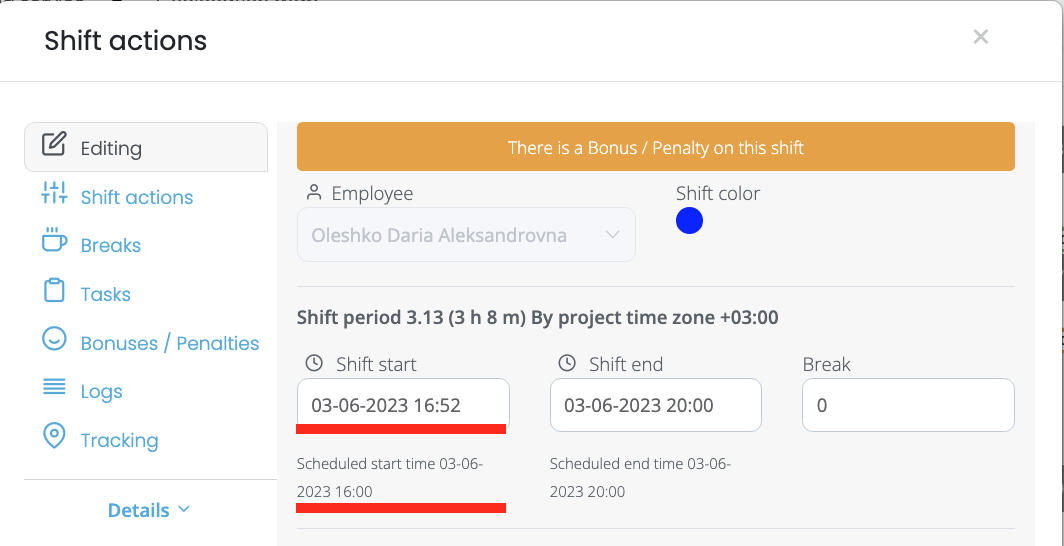
If the option “Change the time of the event (shift, break)” is enabled, then when an employee clicks on the start shift/break button, the shift will display the actual start and end time of the shift/break.
*Additional setting - Do not change the end time of the shift. When the shift status is changed to completed, the real-time (shift end time) will not change. For example, the end time of the shift is 17:00, and the employee ends at 17:20, when this option is enabled, the shift time will not be changed, and the end time will be displayed at 17:00 on the shift.
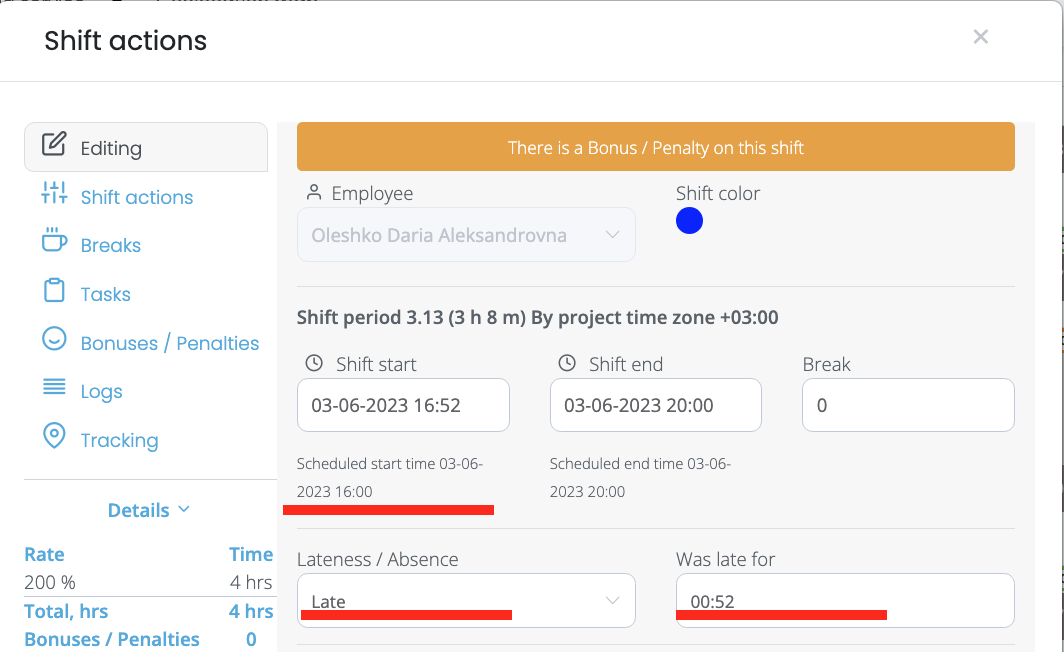
Setting “Fix late time”.
If the “Fix late time” checkbox is enabled, the employee’s late time will be automatically set for the shift, in the difference between the planned time and the actual time. The summed total of late arrivals can be seen in the Employee Working Hours report.
¶ 3. Employee working time settings
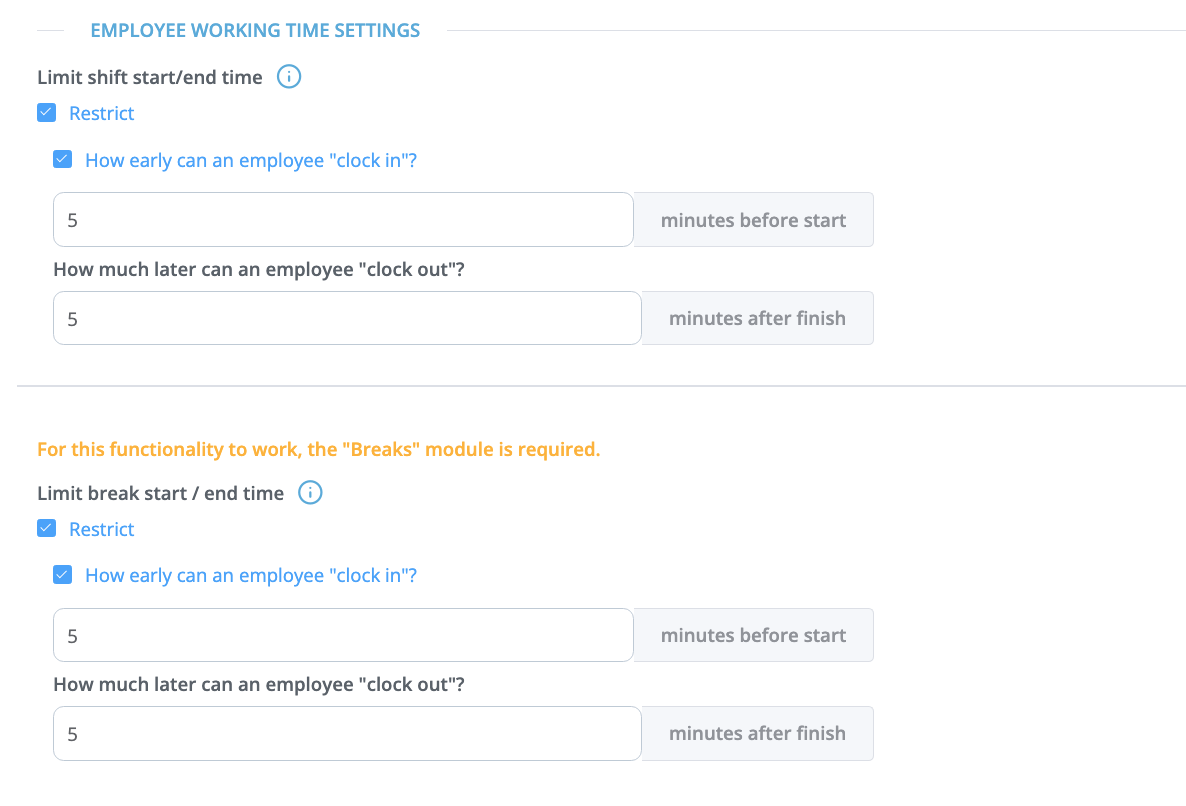
Limit shift start/end time:
If the “Limit” checkbox is enabled, the next step is to set up information on “How much an employee can start “earlier” the shift - in the number of minutes before the start, and “How much later the employee can “complete” the shift - in the number of minutes after the end"
Break start/end time limits:
If the “Limit” checkbox is enabled, the next step is to configure information on “How much earlier an employee can start a break - in the number of minutes before the start, and “How much later an employee can “complete” the break - in the number of minutes after the end".
These settings allow employees to start/end, shift/break earlier / later than the specified time on the shift.
¶ 4. Manager notification settings

If the checkbox is enabled, “Notify manager about employees who are late for more than the time specified below”, then managers will receive a message with information about employees who are late for their shift. In the “minutes after the start of the shift” field, you must specify how many minutes after the start of the shift, the manager should receive notifications about late employees.
¶ 5. Employee notification settings

When the options “Remind the employee about the start of the shift in advance, at the time specified below (min)” and “Remind the employee about the end of the shift in advance, at the time specified below (min)” is enabled, employees will receive notifications that they need to start or end the shift for N minutes. (The time you specify in the settings).
¶ 6. Actions with missed breaks

If you enable the “Mark breaks in gray” option, the break for which the employee did not go will be marked in gray, which will be visible when viewed on the calendar.
If the “Notify manager” option is enabled, if an employee has not taken a break, the manager will receive a notification with information about the employee missing a break.
¶ 7. Unscheduled shift settings

When the “Allow unscheduled shifts (min)” option is enabled, employees can start unscheduled shifts at any time. To start a shift, an employee must be in at least one schedule.
¶ 8. Settings for automatic penalties for being late
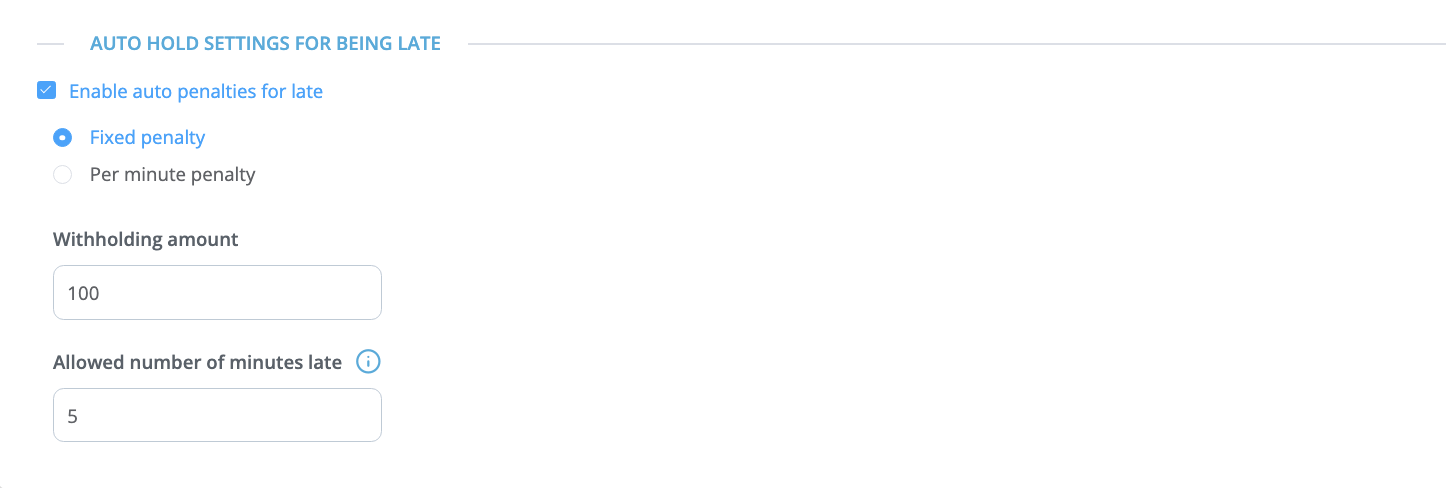
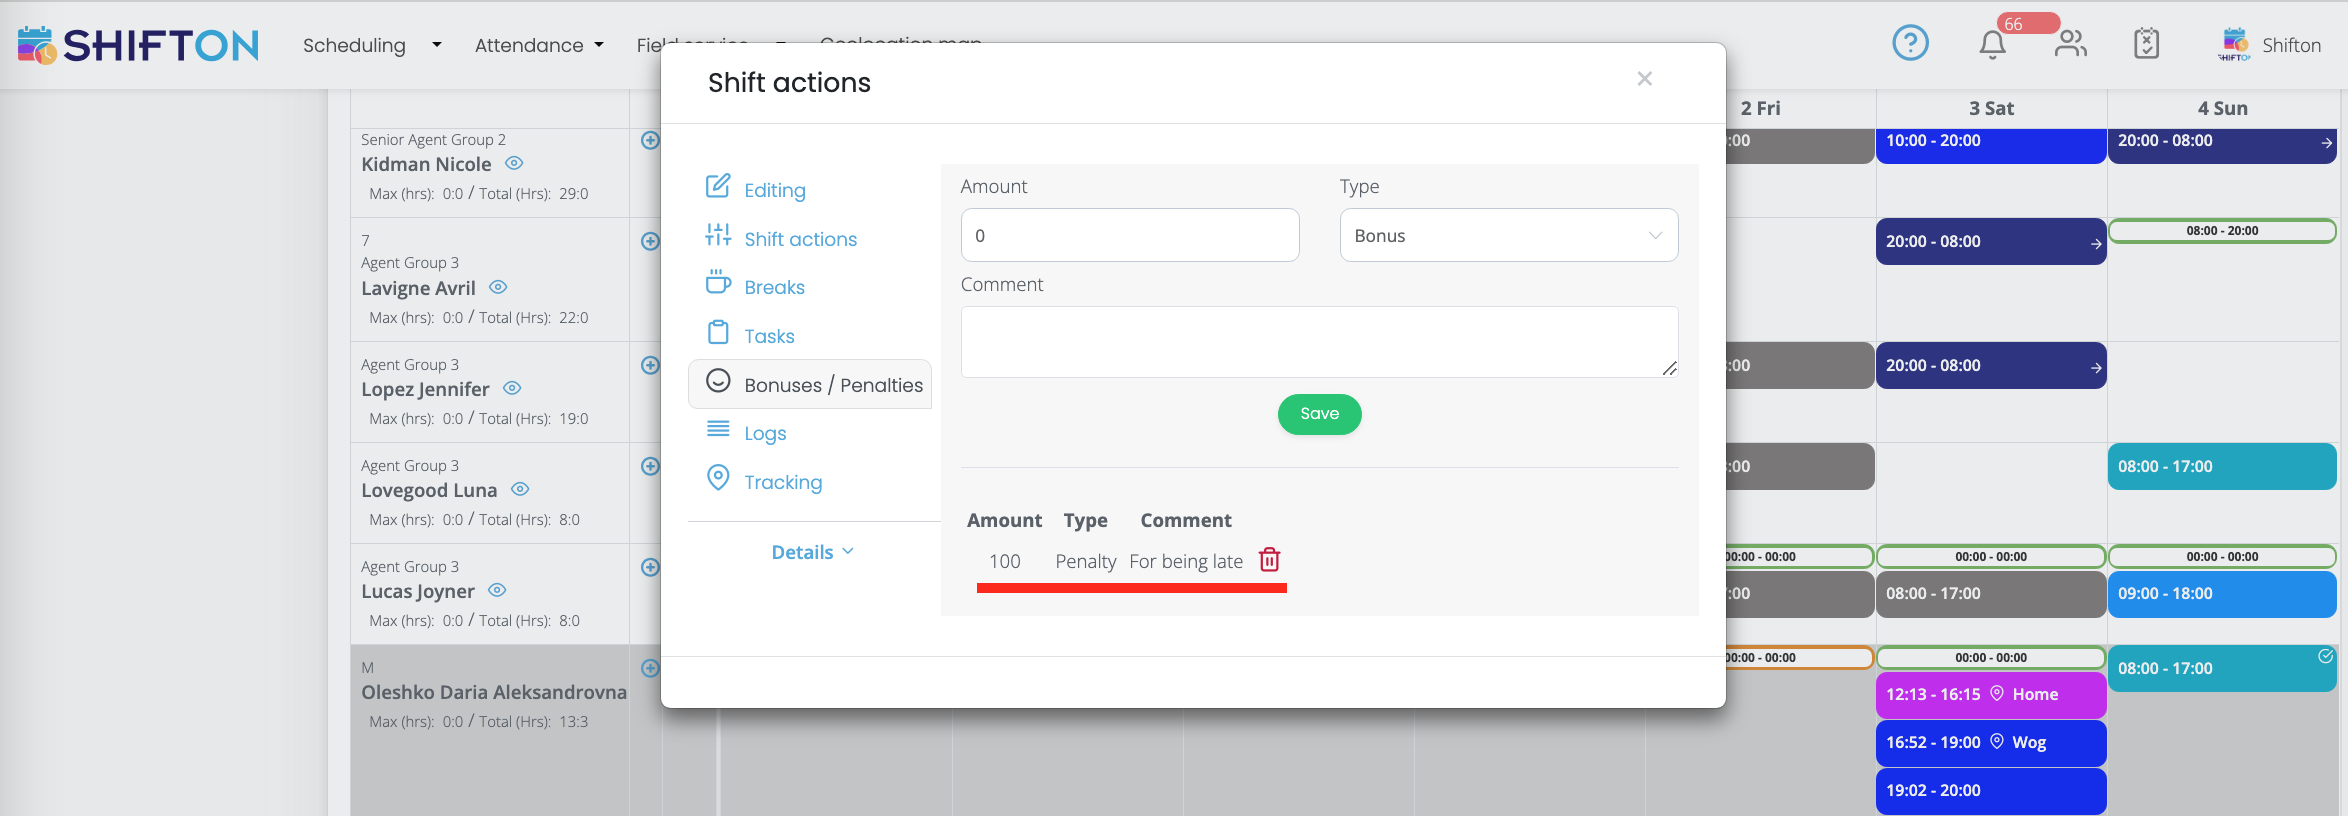
This setting allows you to automatically set late penalties for shifts. To do this, check the box “Enable automatic fines for being late”. The next step is to specify:
1. Which type of penalty should be used: Fixed or per minute?
- Fixed fine - the amount of the fine will be charged once, regardless of the number of minutes of being late.
- Per-minute fine - the amount of the fine will be charged from the specified amount of the fine, for each minute of delay.
2. The amount of the fine.
3. Allowed number of minutes late. (From what minute after the start of the shift will the penalty for being late be applied).
¶ Settings for the “Tasks” module
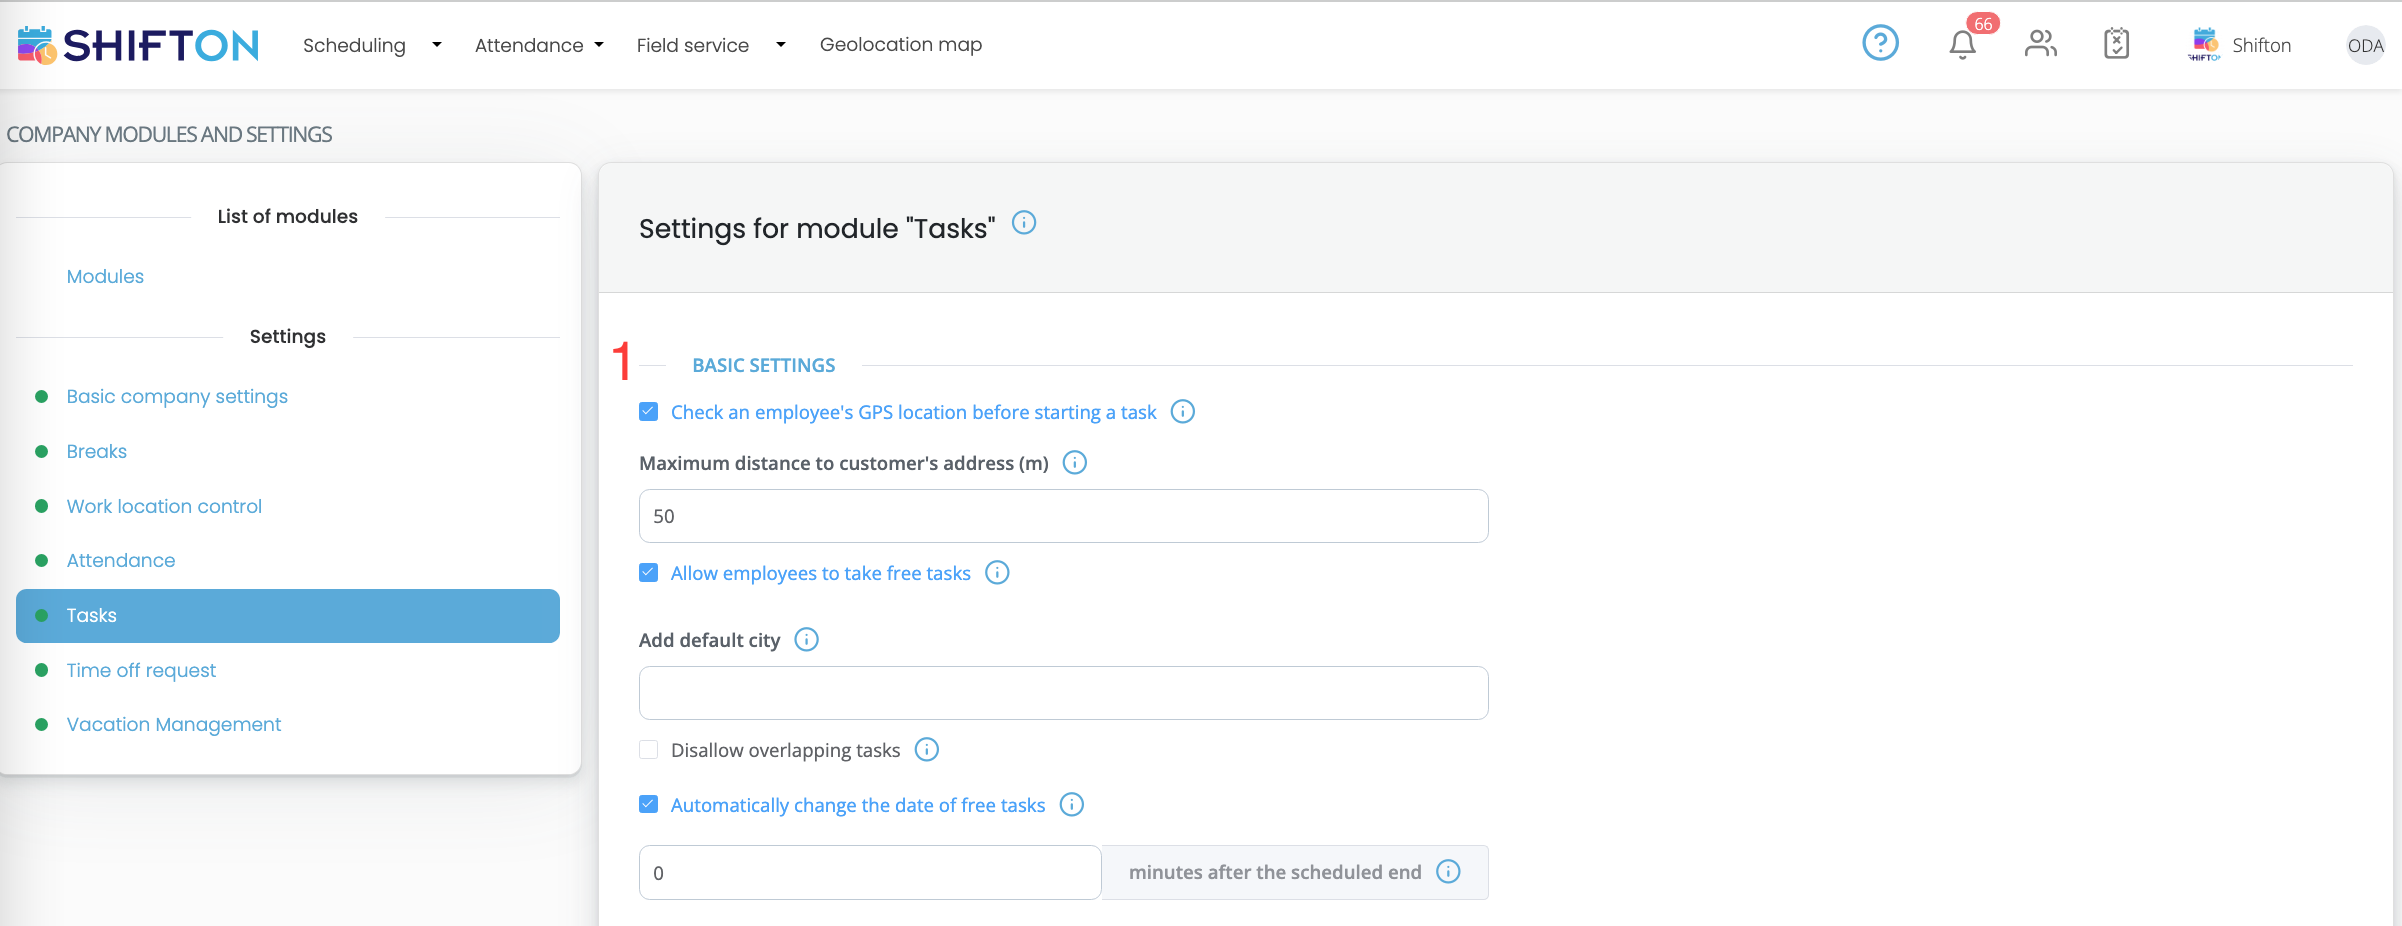

In order to configure settings for the “Tasks” module, you need to click on the “Tasks” tab in the left menu.
¶ 1. Basic settings
The permissible radius from the client's address is indicated in meters.
When the “Allow employees to take free tasks” option is enabled, employees will be able to independently take free tasks from the task bank.
If the "Prohibit overlapping tasks" option is enabled, then it will not be possible to assign tasks to the same employee if the task times overlap.
When you enable the “Automatically change the date of free tasks” option, free tasks, those that were not assigned to employees and that were not taken into work by employees, will be transferred to the next day at the end of the scheduled time. (Only the date changes, and the appointed time remains the same).
¶ 2. Access level settings

The option “Minimum access rights for creating tasks” will allow you to select the rights of employees who will have access to create/edit/delete tasks.
When configuring this option, access to create tasks will be provided:
Administrator - the right to create tasks will be given to: the owner of the company, an employee who has administrator rights.
Manager - the right to create a task will be given to: the owner of the company, an employee who has the rights of administrator and manager.
Employee - create tasks will have the right: the owner of the company, administrator, manager and employee.
By giving the right to create tasks to an employee, it is possible to additionally select positions, and then only those employees who have the selected position will be able to create tasks.

¶ Settings for the module “Requests for time off”
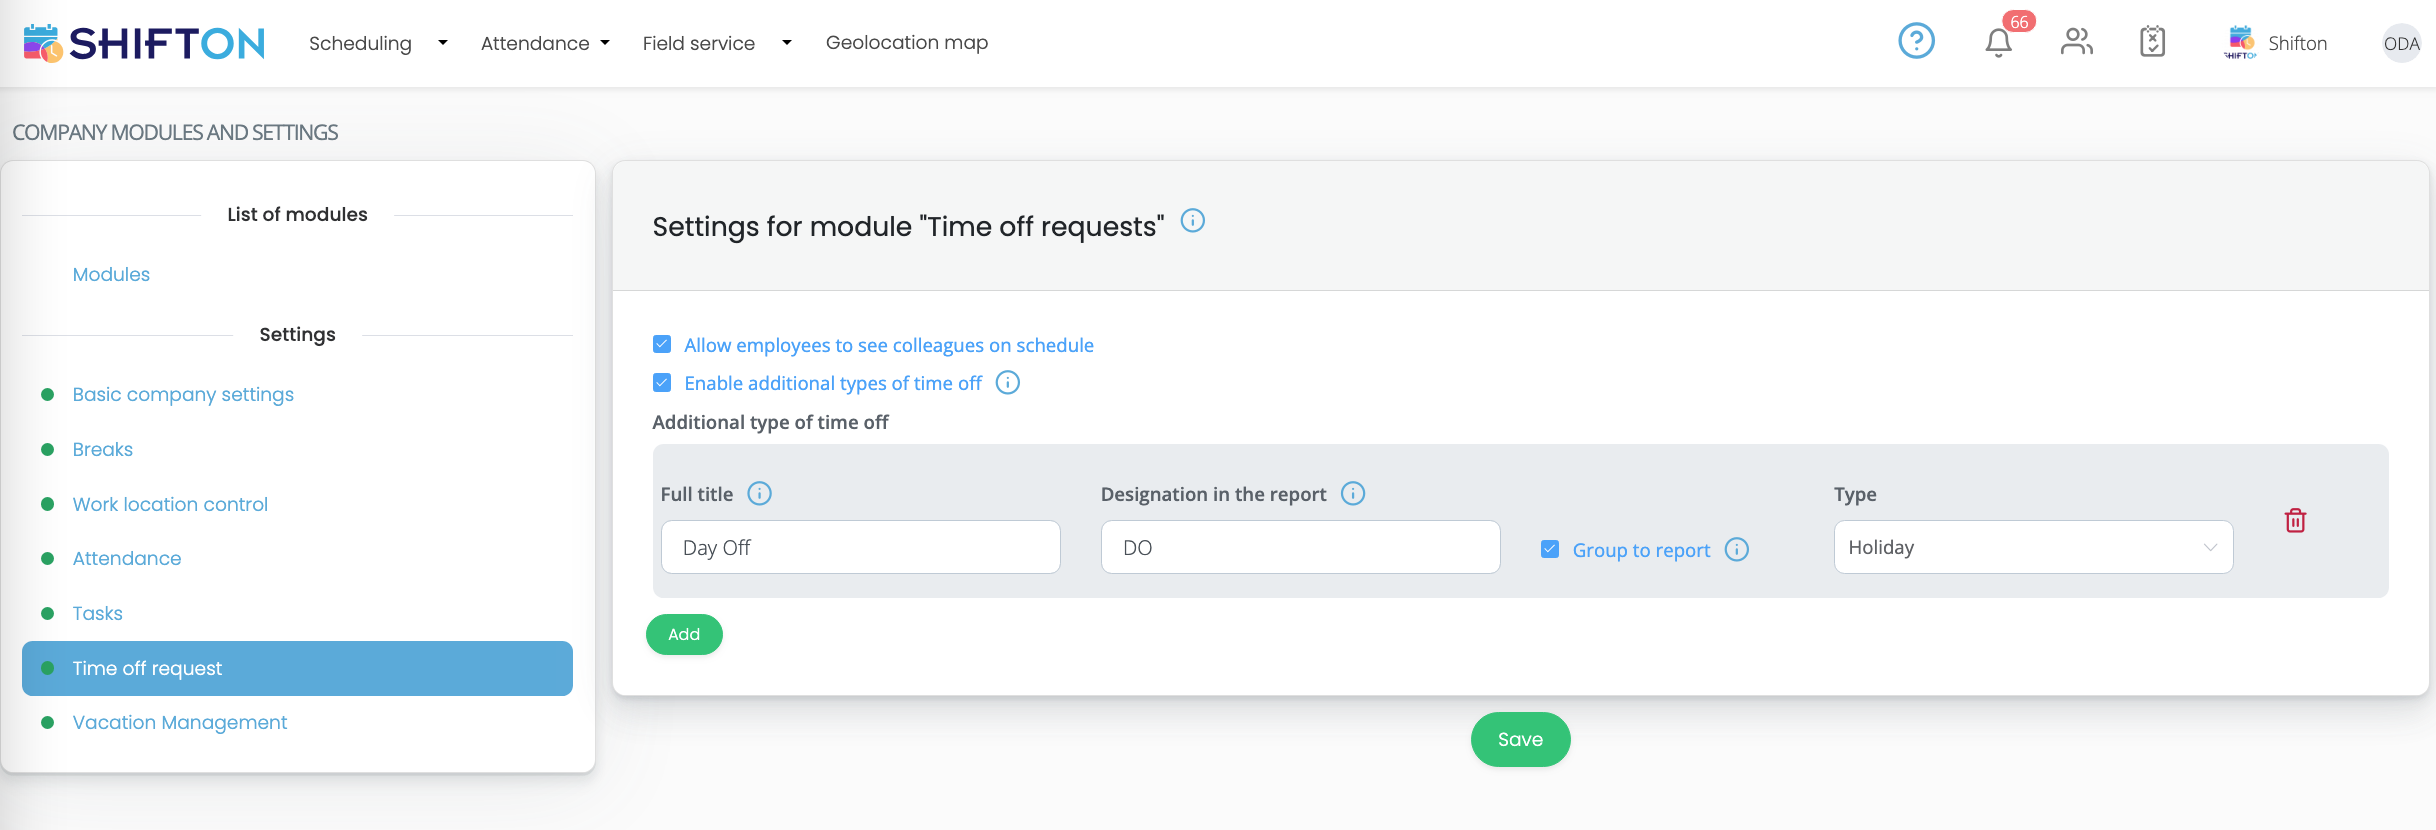
In order to configure the settings for the “Time off requests” module, you need to click on the “Time off requests” tab in the left menu.
If the option “Allow employees to see the time off of colleagues on the schedule" is enabled - employees on the schedule (if the option: see shifts of their colleagues is enabled in the schedule/project settings) will see the time off of colleagues.
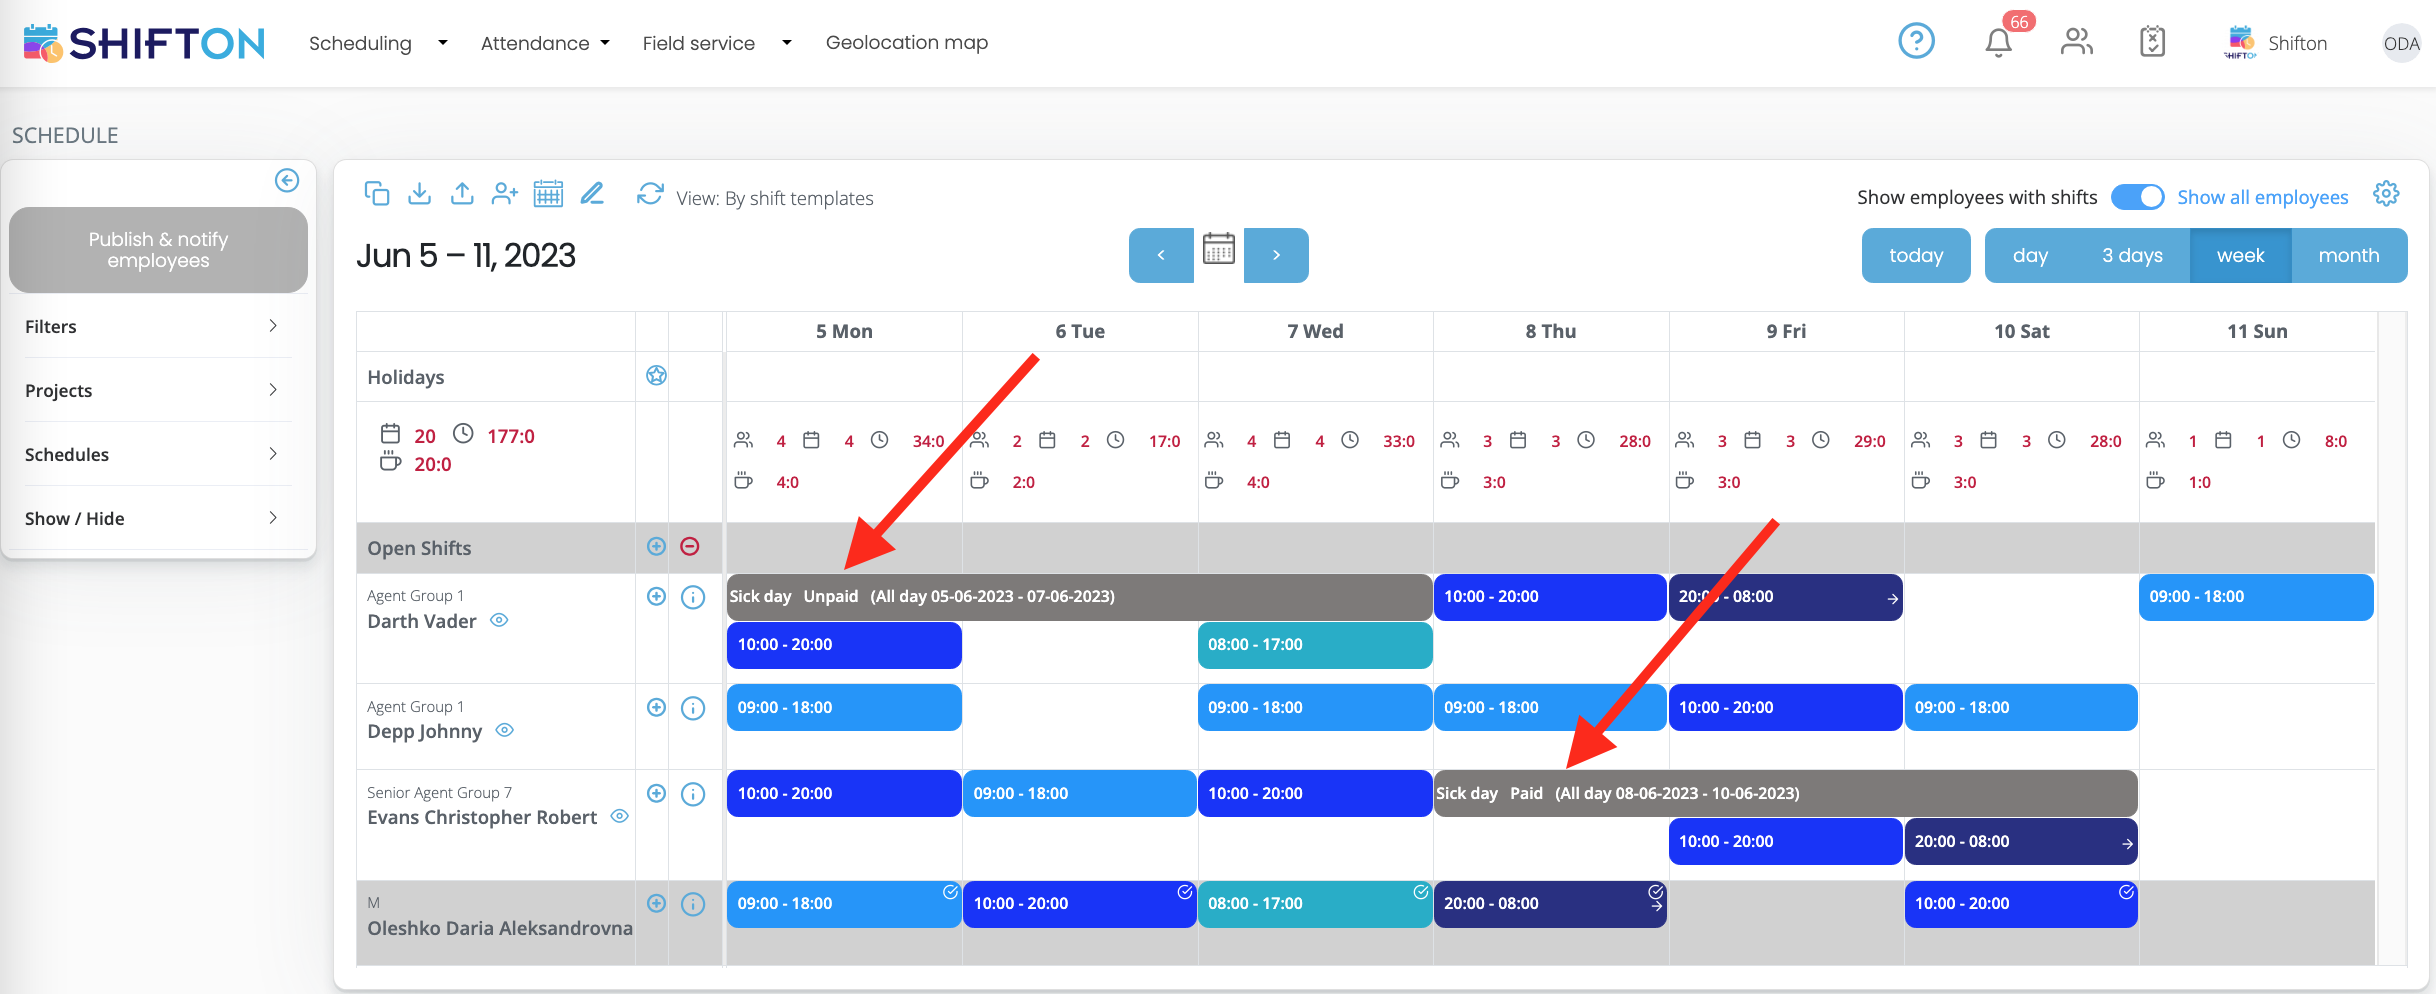
If the "Include additional type of time off" option is enabled - the owner of the company, the administrator, will be able to create a new additional type of time off by entering the full name, it is also possible to specify a short name, and specify which type of time off the additional type of time off will belong to.
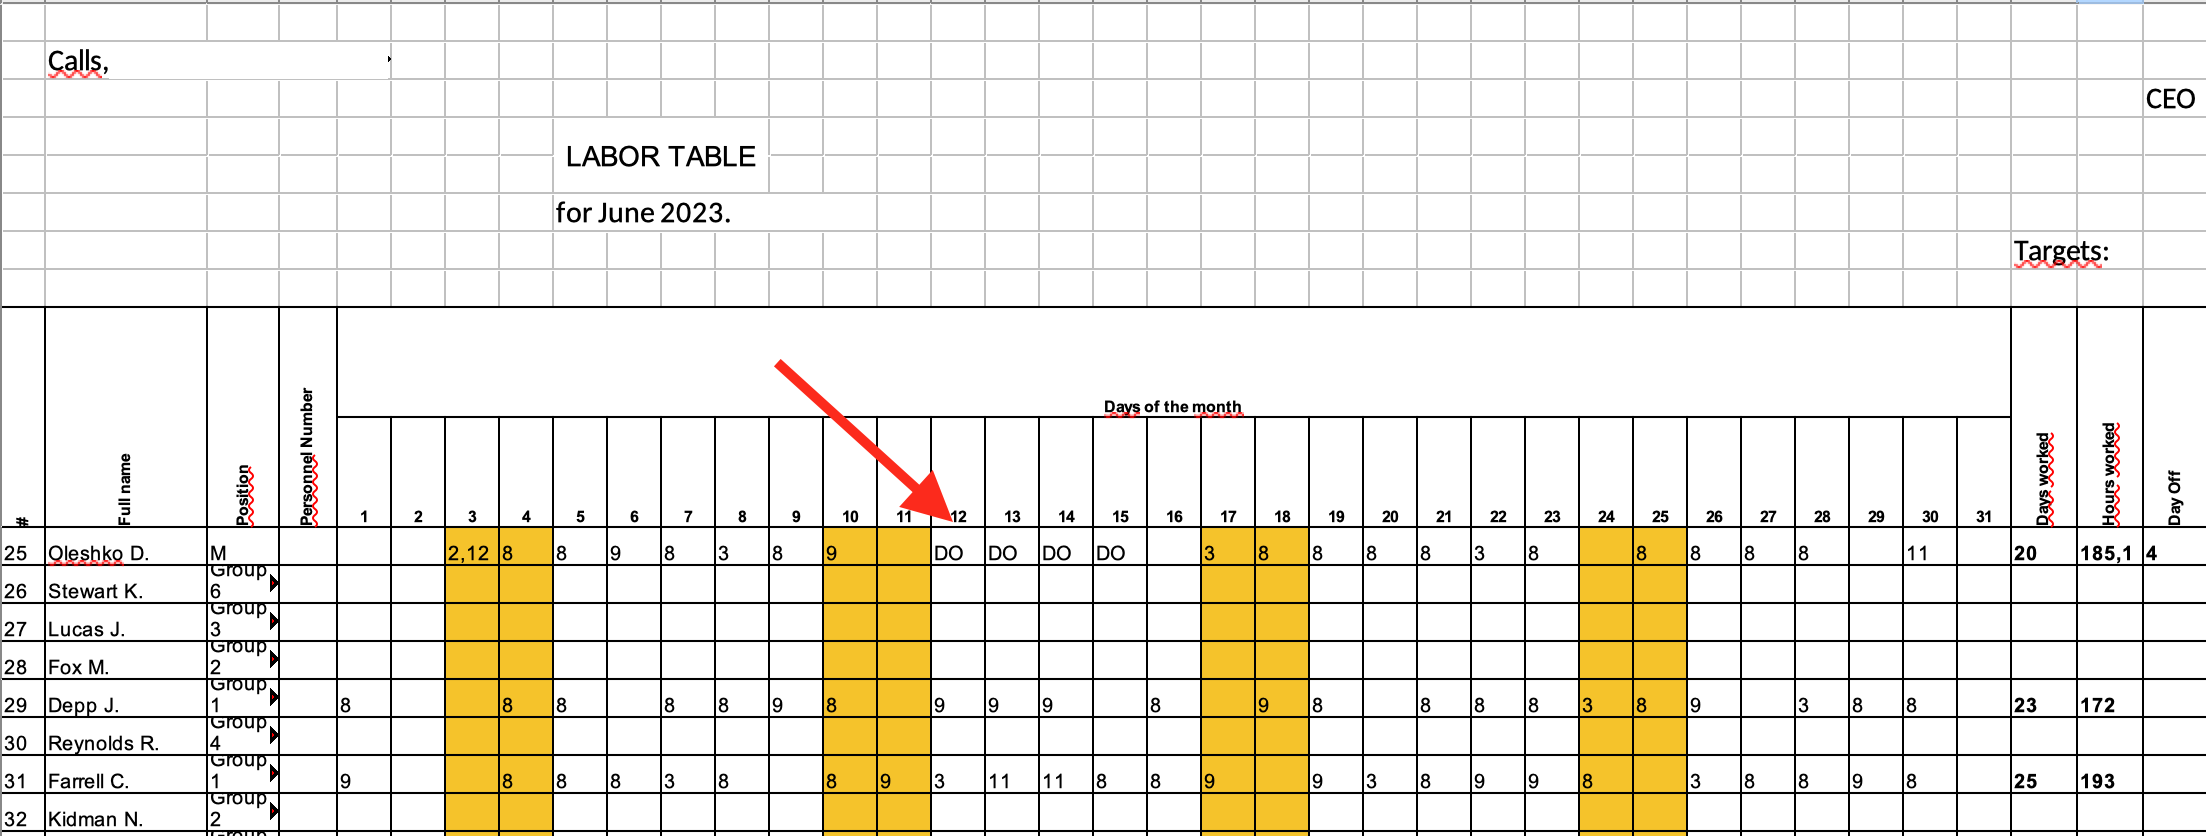
If the “Other holidays” option is enabled, then this subtype of time off will be displayed in the "Employee working hours" report when exporting "Time sheet". For all rows, entries will be grouped into columns.
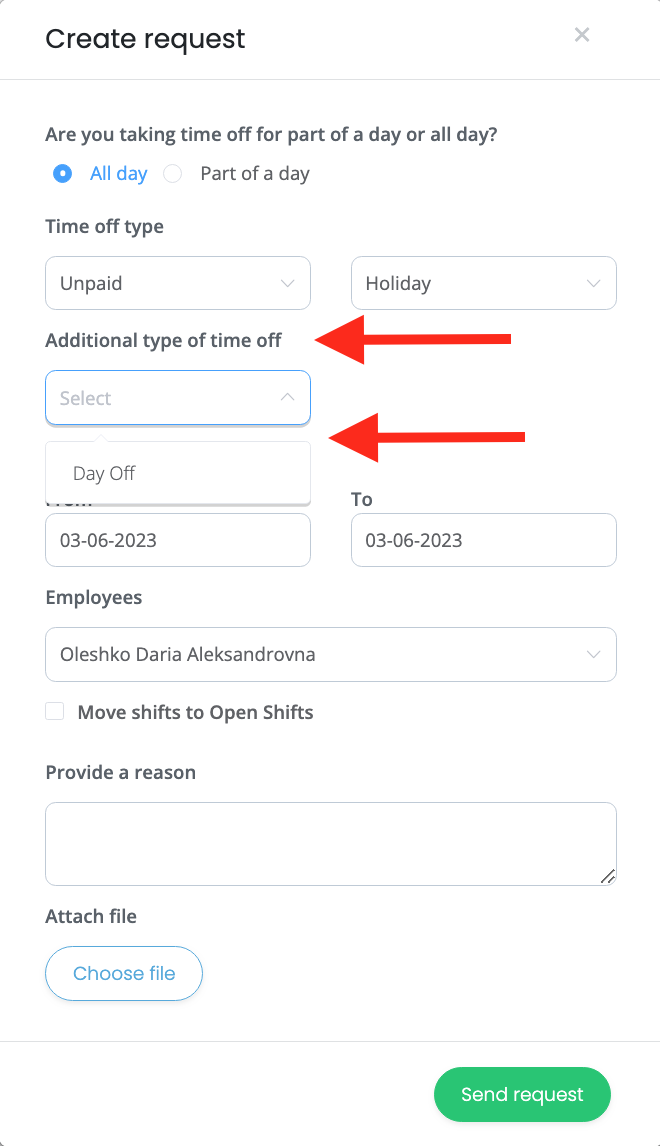
An additional type of time off can be specified when creating a request:
An additional type of time off is displayed when the timesheet is exported:
¶ Settings for the "Vacation management" module

In order to configure the settings for the "Vacation Management" module, you need to click on the "Vacation Management" tab in the left menu.
The “What to do with excessive use of vacations” setting will allow you to control actions in case of excessive use of vacation by an employee.
If the “Block Requests” option is enabled, then when you try to create a vacation request in the absence of a valid vacation limit, such requests will be blocked.
When using the “Show warning to manager” option, if the employee has reached the limit for time off, requests will be created, but with a warning about the use of the allowable vacation limit. A corresponding message will also be displayed when viewing requests.