¶ Departments, projects
Company owners can add and configure additional functionality. The "Departments, projects" module automatically activates when employers register on the platform.
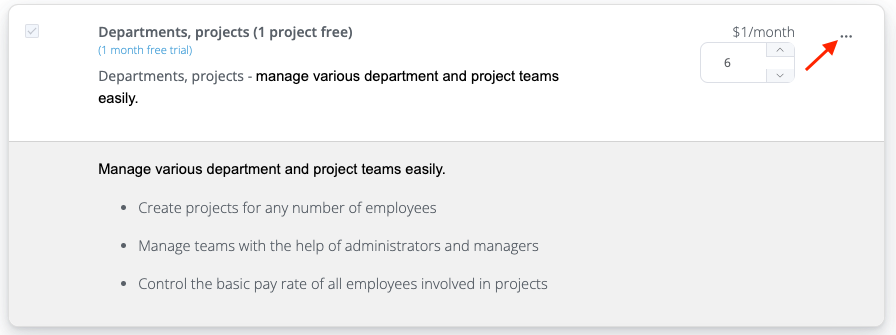
Initially, one autoconfigured project is provided with the option to add another one. Editing a module allows you to increase or decrease the number of available projects.
To activate the module, do the following:
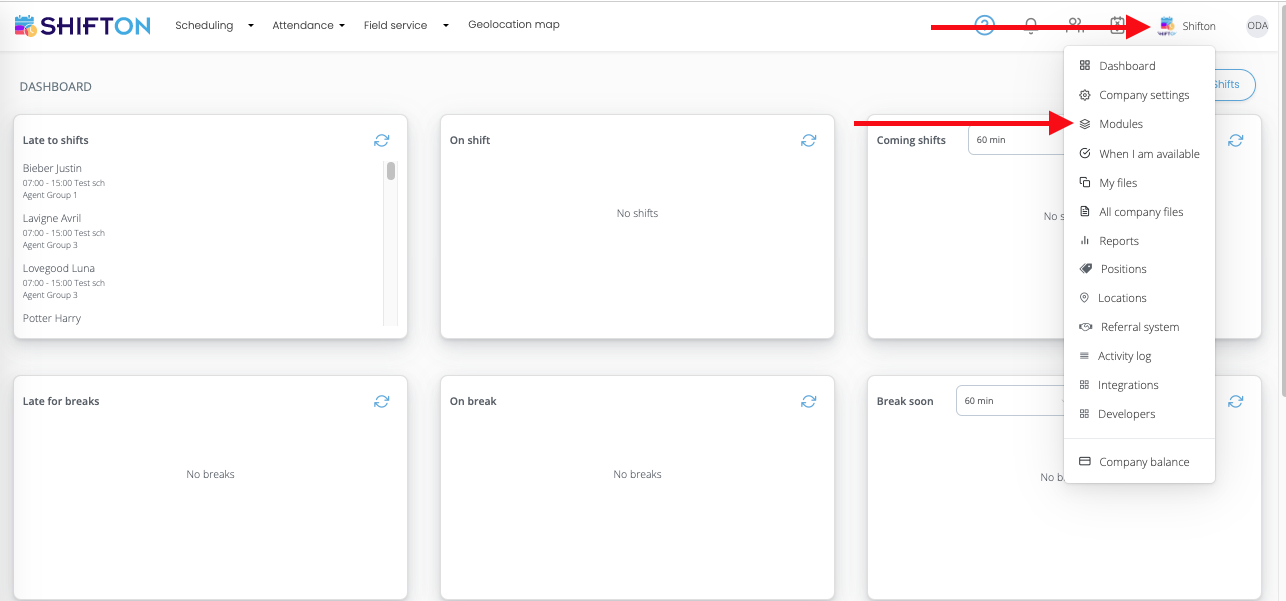
- Click on the icon with the avatar (in the upper right corner).
- Select the "Modules" section.
The "Departments, projects" module is activated automatically and cannot be disabled.
You can change the number of available projects in the corresponding field.
To create additional projects, do the following:
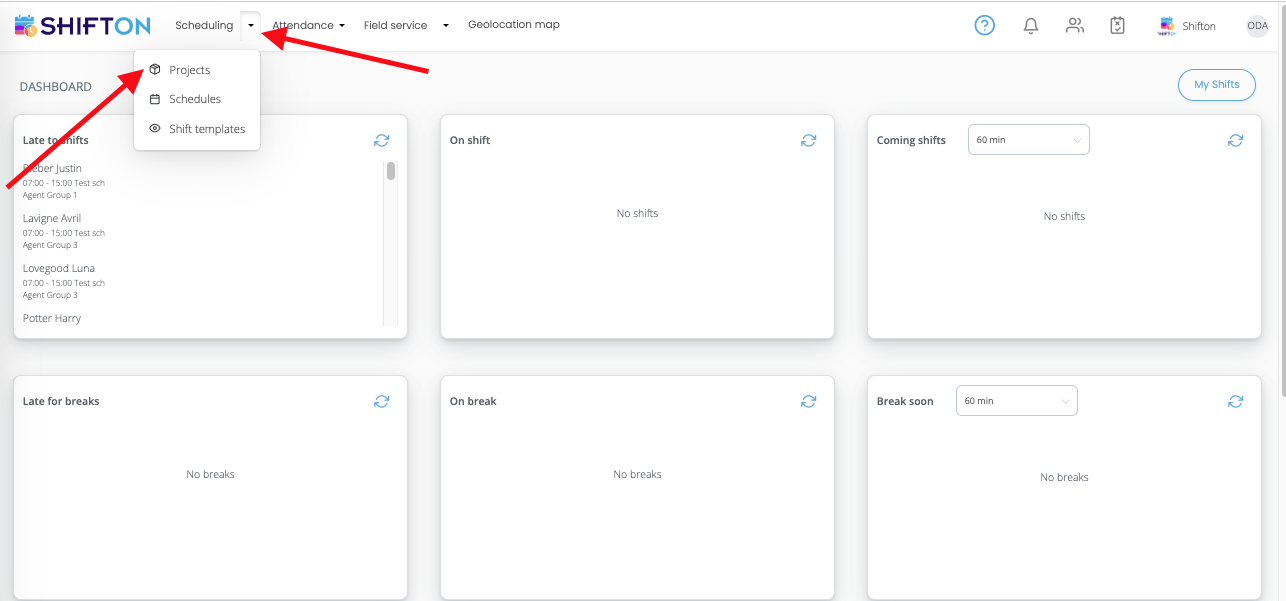
- Click on the dropdown menu button.
- Select the “Projects” section.
On the page that appears, click on the “Create Project” button.

¶ Minimum weekly work time report
How to set up the “Minimum Weekly Working Time Report" module
The Weekly Minimum Working Hours Report module allows you to track how employees adhere to the set minimum weekly hours. Before activating the module, you must do the following:
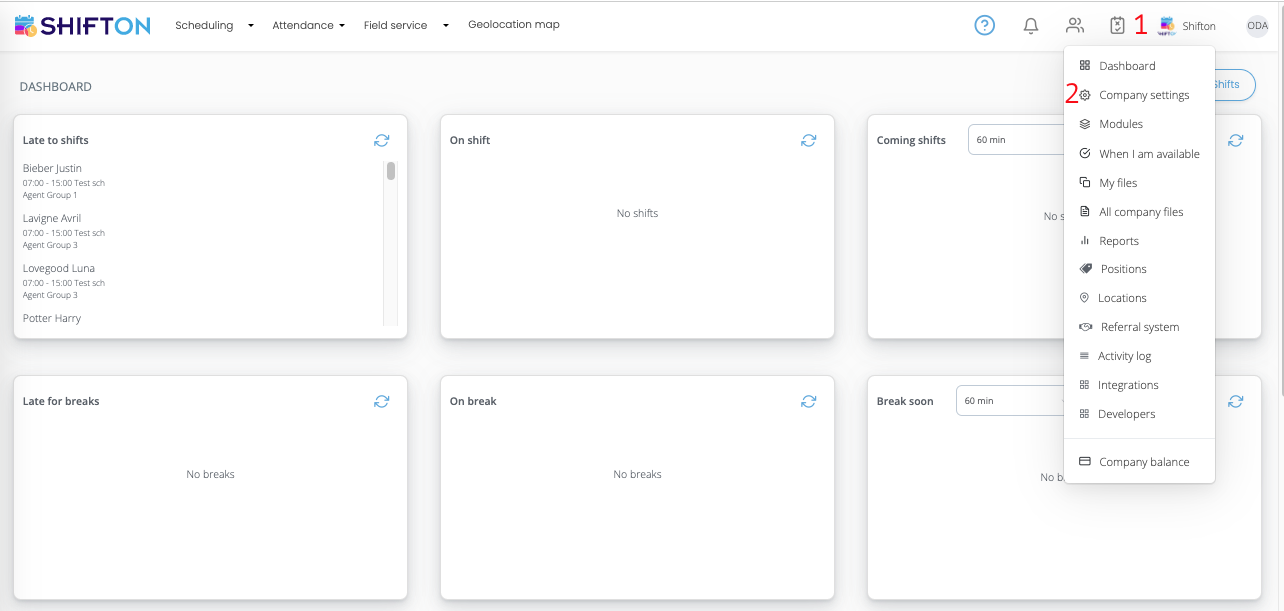
- Click on the avatar icon (upper right corner).
- Select the "Company Settings" section.
In the company profile settings, go to the “Salary settings” tab.
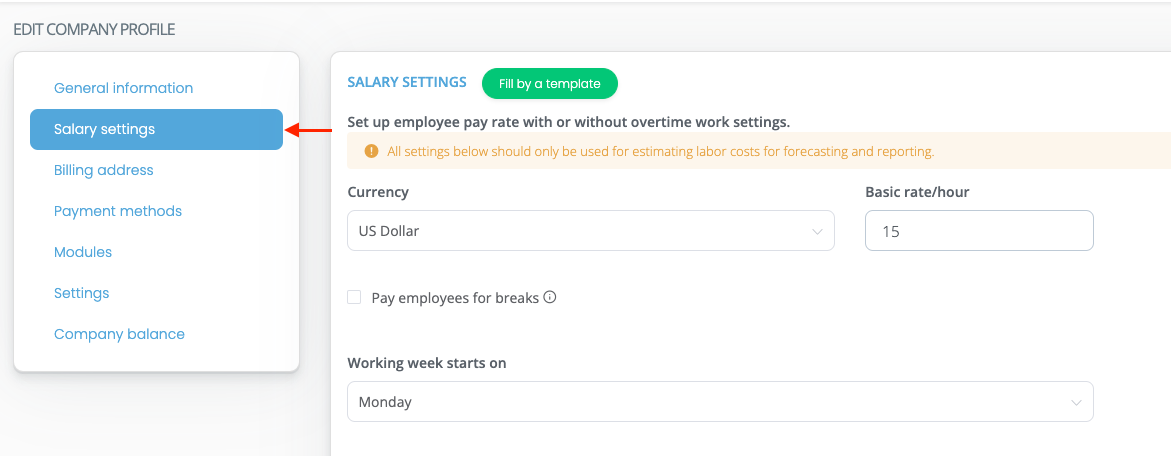
Then specify the minimum working hours for employees per week. Typically, if employees work 8 hours a day, 5 days a week, the number “40” is entered in this field, but you can enter any value.

The option “Set for all employees of the company” allows you to set the same number of minimum weekly hours for all employees.
After completing the settings, click "Save".
1. Click on the avatar icon (upper right corner).
2. Select the "Modules" section.

In the list that appears, check the item "Minimum working hours per week report".
Then go to the "Modules" tab.
In the list that appears, check the item "Minimum working hours per week report".
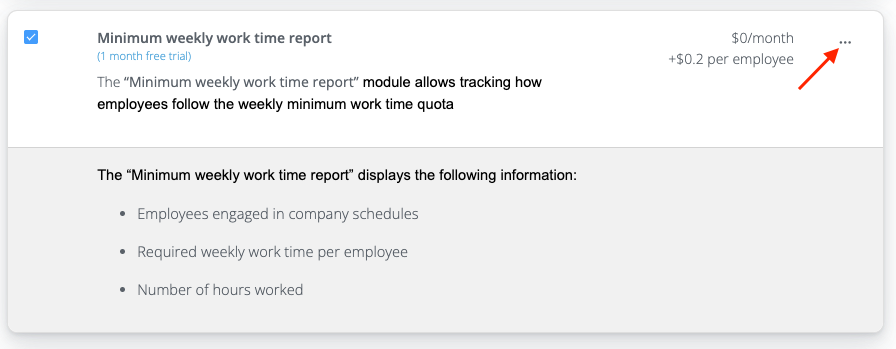
Click on the "..." icon to see detailed information about the module.
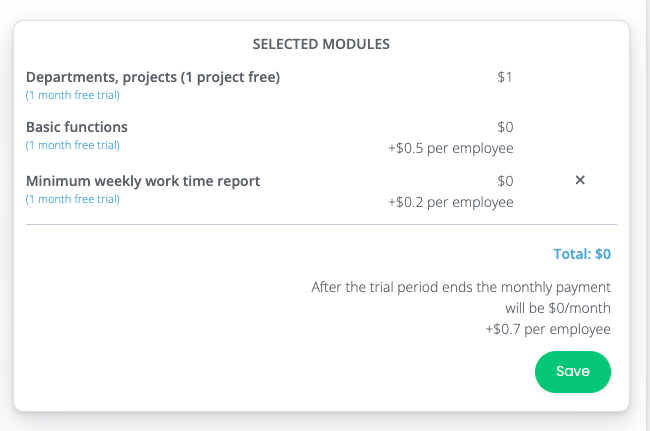
After choosing a module, click the "Save" button to activate it.
To see the information provided by this module, do the following:
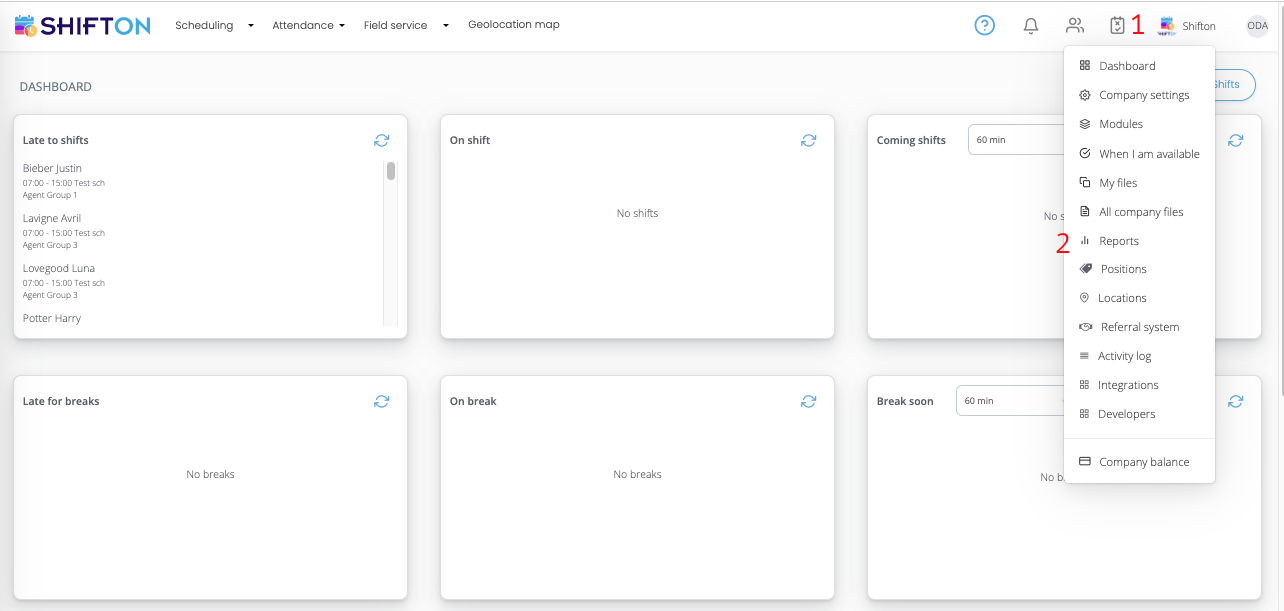
- Click on the avatar icon (upper right corner).
- Select the “Reports” section.
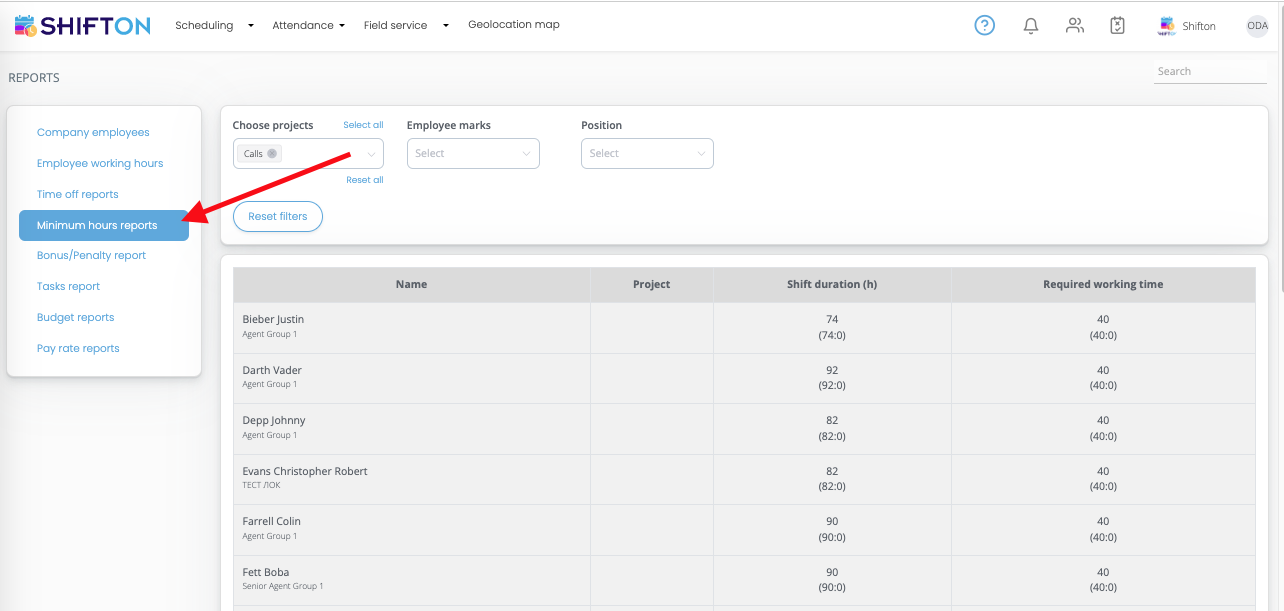
In the list that appears, select the "Minimum working hours report" module.
¶ Employee working hours
How to set up the “Employee Working Hours Report” module
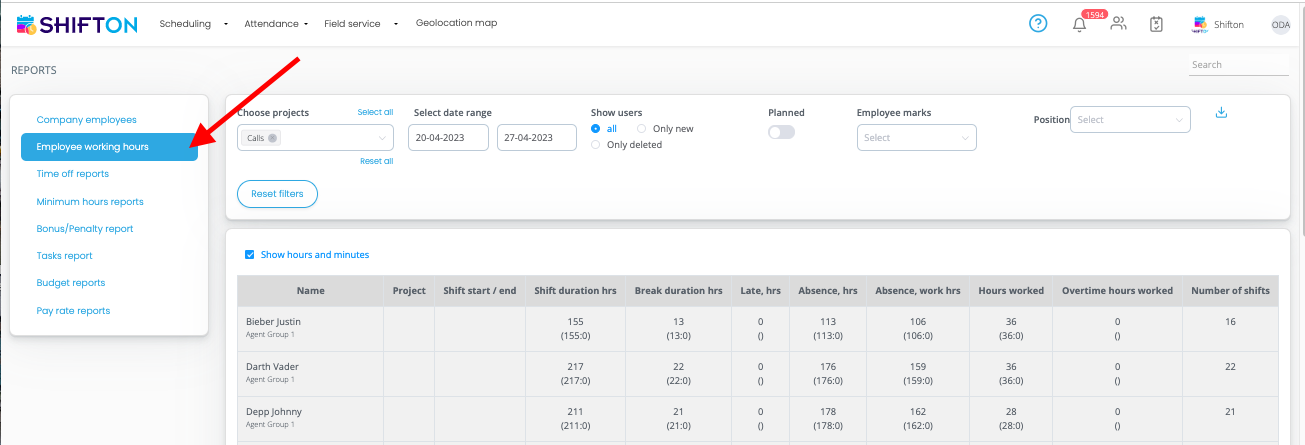
The "Employee Working Hours Report" module provides the following information:
- Names and surnames of employees
- The name of the project to which the shifts belong
- Start and end times for employee shifts
- Shift duration
- Break duration
- Number of bases and overtime hours worked
To activate the module, do the following:

- Click on the avatar icon (upper right corner).
- Select the "Modules" section.
On the company settings page, go to the "Modules" tab.
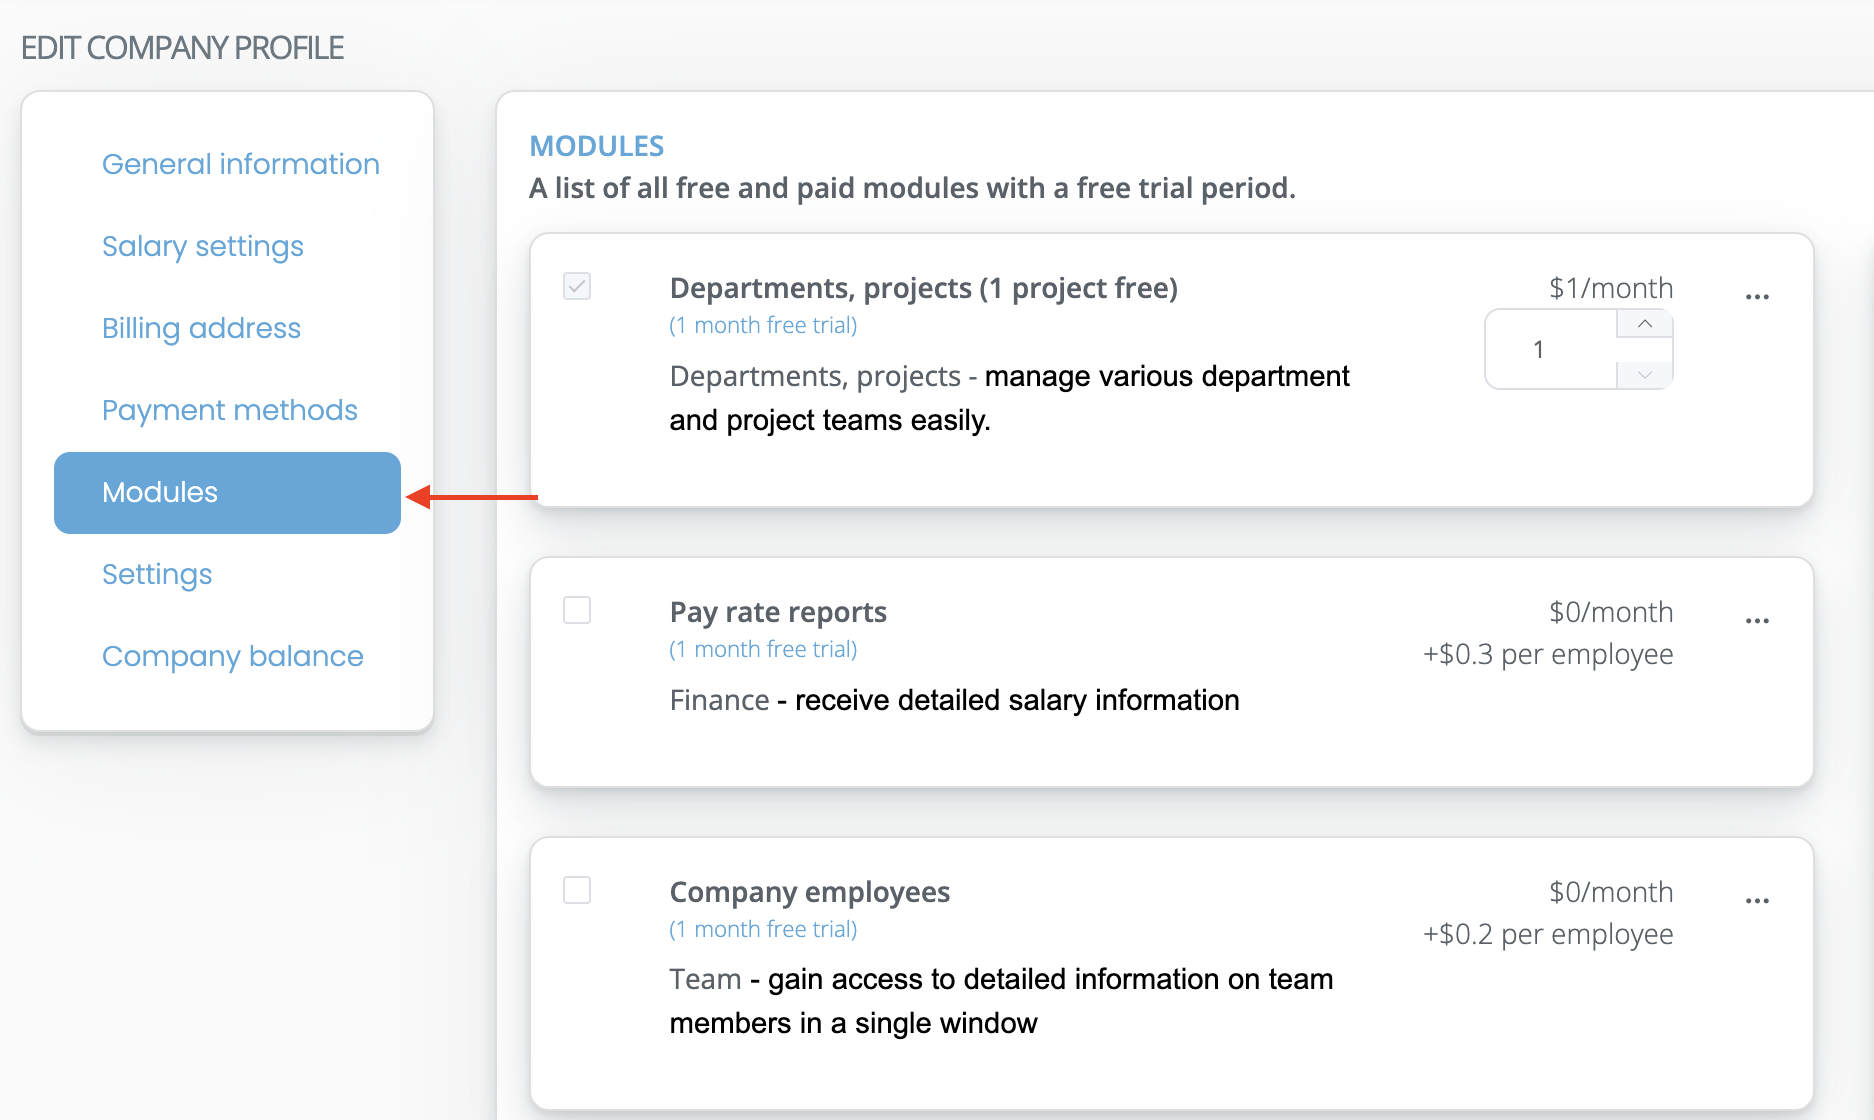
In the list that appears, check the item "Employee working hours".
Click on the "..." icon to see detailed information about the module.
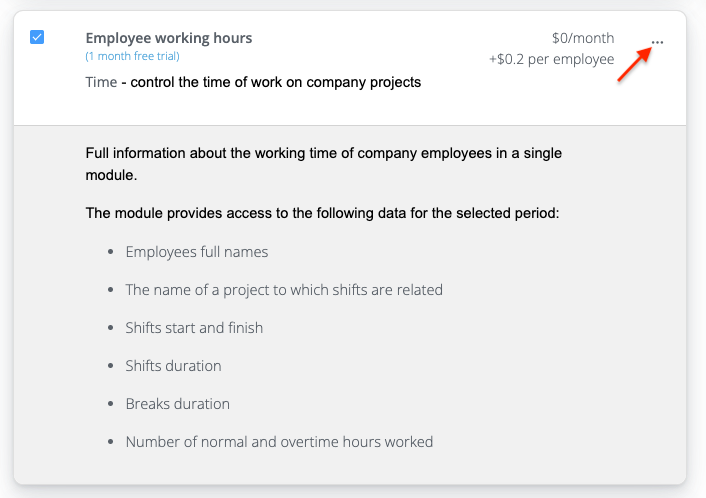
After selecting the module, click the "Save" button to activate it.
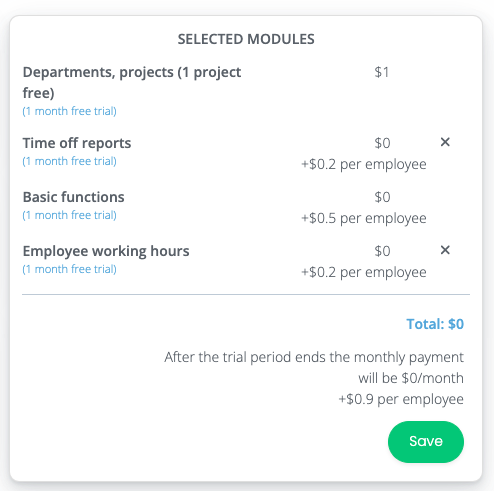
To access module statistics, do the following:

- Click on the avatar icon (upper right corner).
- Select the "Reports" section.
In the list that appears, select the "Employee working hours" module.
¶ Pay rate reports
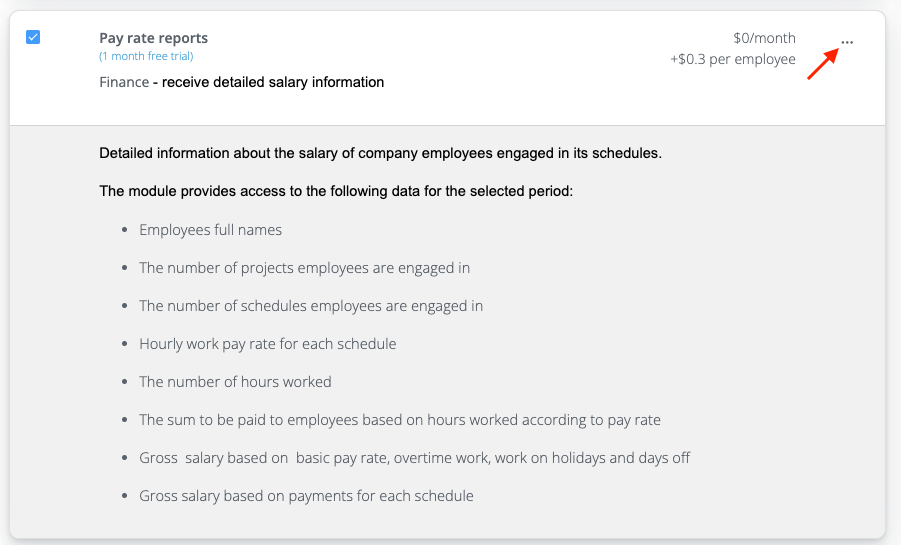
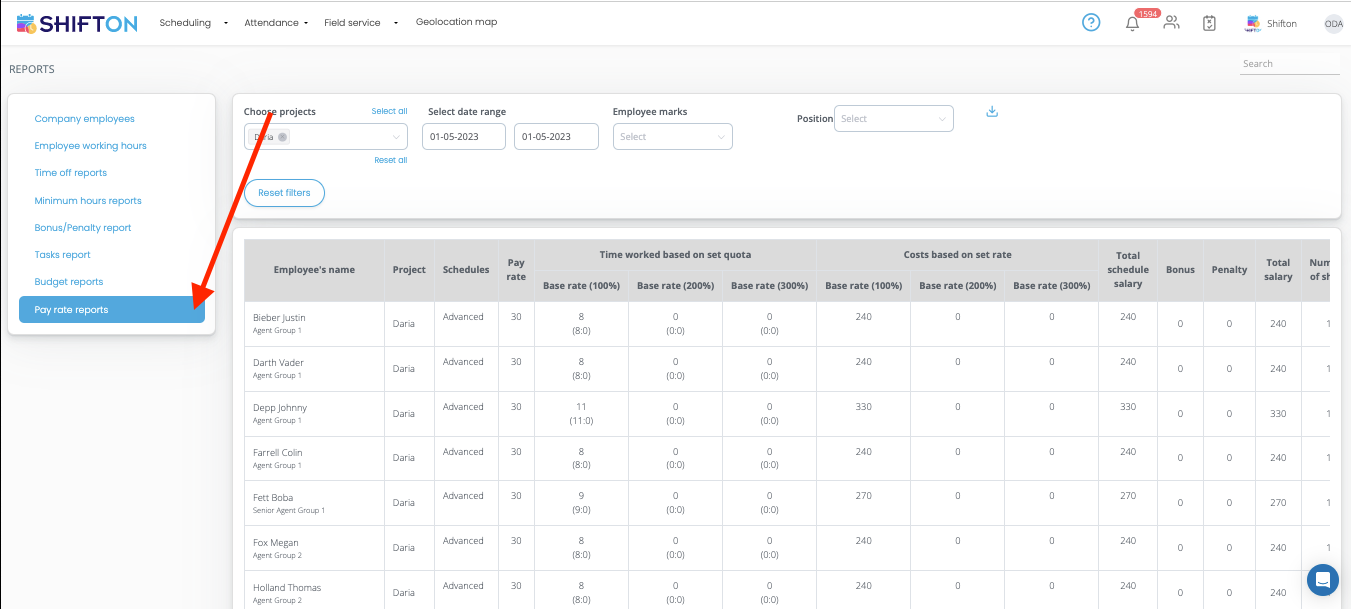
The “Pay Rate Reports” module automatically calculates payroll data for employees assigned to project schedules.
To activate it, do the following:

- Click on the avatar icon (upper right corner).
- Select the "Modules" section.
In the list that appears, check the item "Pay rate reports".
Click on the "..." icon to see detailed information about the module.
To access the data offered by this module, do the following:

Click on the avatar icon (upper right corner).
Go to the "Reports" section.
In the list of reports, select the “Pay rate reports” tab.
¶ Time off reports
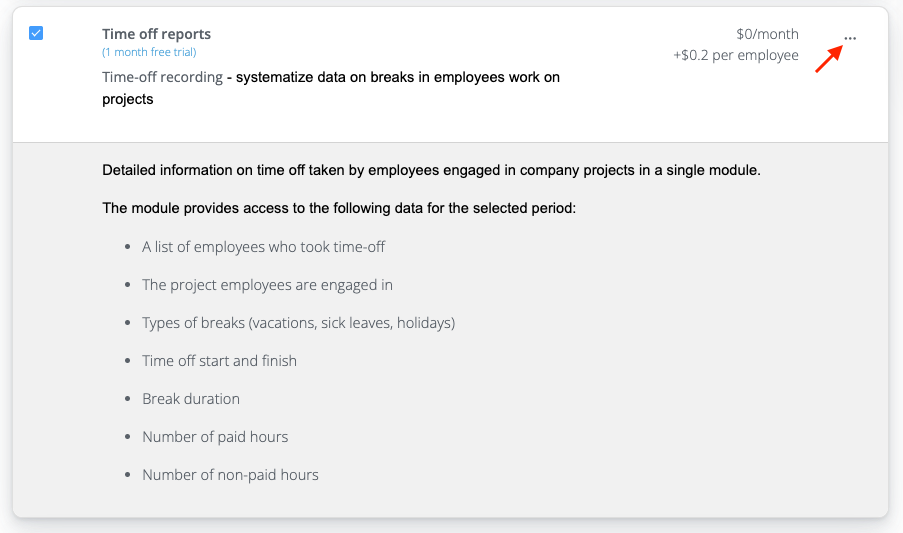
The Time Off Reports module provides the following information:
- List of employees who took time off
- The project in which the employees are
- Types of days off taken (holidays, sick days, and holidays)
- Holiday start and end dates
- The duration of the day off
- Number of paid hours
- Number of unpaid hours
To activate the module, do the following:

- Click on the avatar icon (upper right corner).
- Select the "Modules" section.
In the list that appears, check the item "Time off reports".
Click on the "..." icon to see detailed information about the module.
After choosing the module, click the "Save" button to activate it.
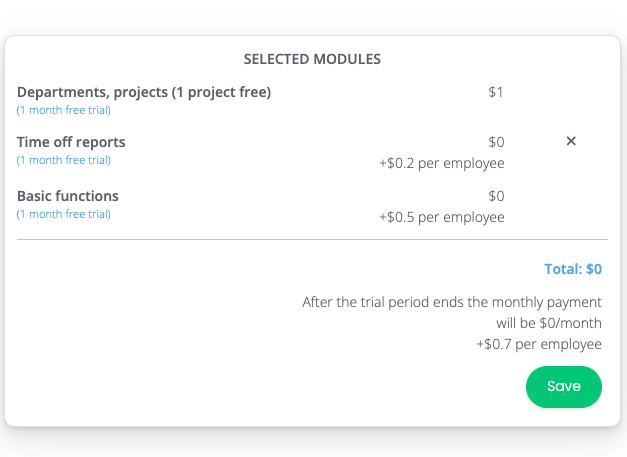
To access module statistics, do the following:

- Click on the avatar icon (upper right corner).
- Select the "Reports" section.
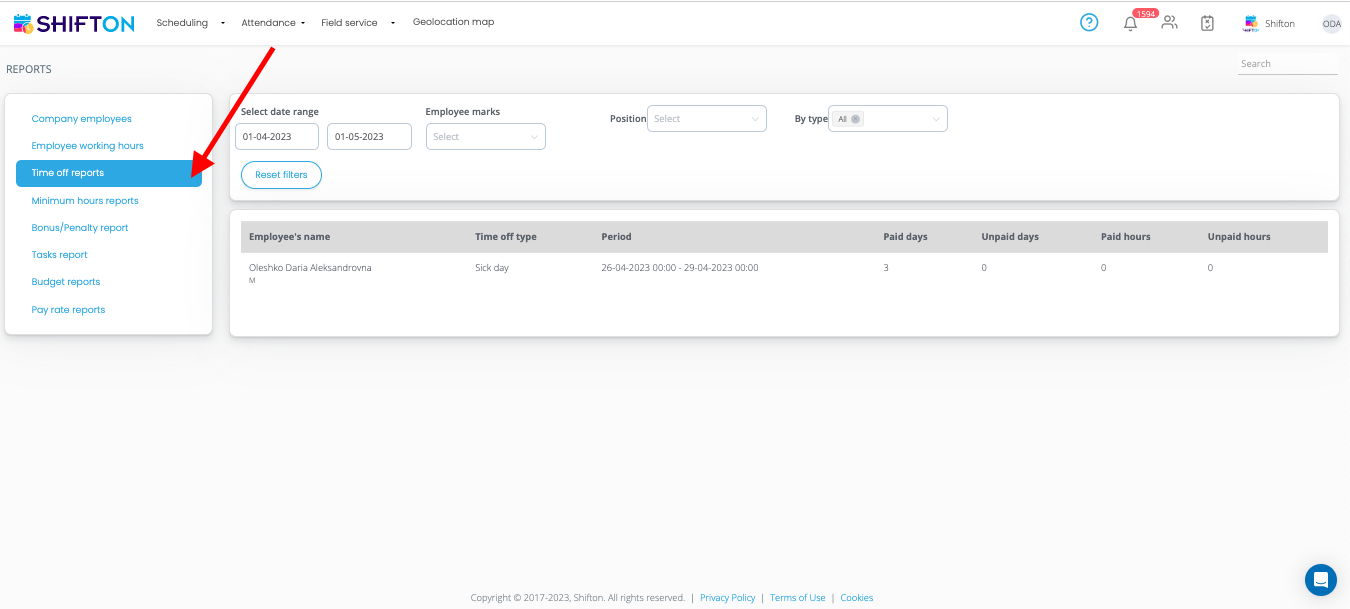
On the page that appears, select the "Time off reports" module.
¶ Budget reports
How to set up the “Budget Reports” module
The “Budget Reports” module provides the following information:
- List of dates on which the projects were running.
- Employee statistics on schedules.
- Working hours statistics.
- Employee cost statistics.
To activate the module, do the following:

- Click on the avatar icon (upper right corner).
- Select the "Modules" section.
In the list that appears, check the item "Budget reports".
Click on the "..." icon to see detailed information about the module.
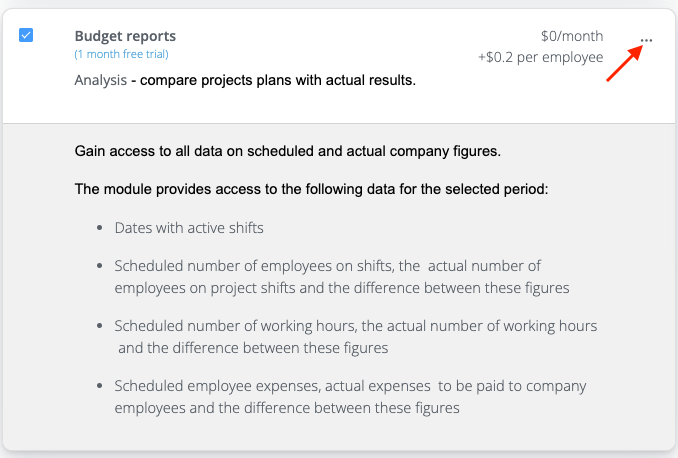
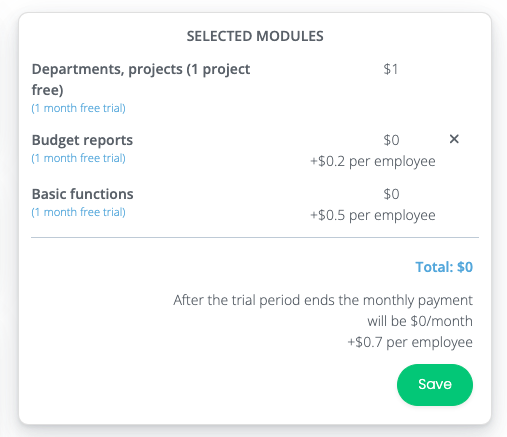
After selecting the module, click the "Save" button to activate it.
To access module statistics, do the following:

- Click on the avatar icon (upper right corner).
- Select the "Reports" section.
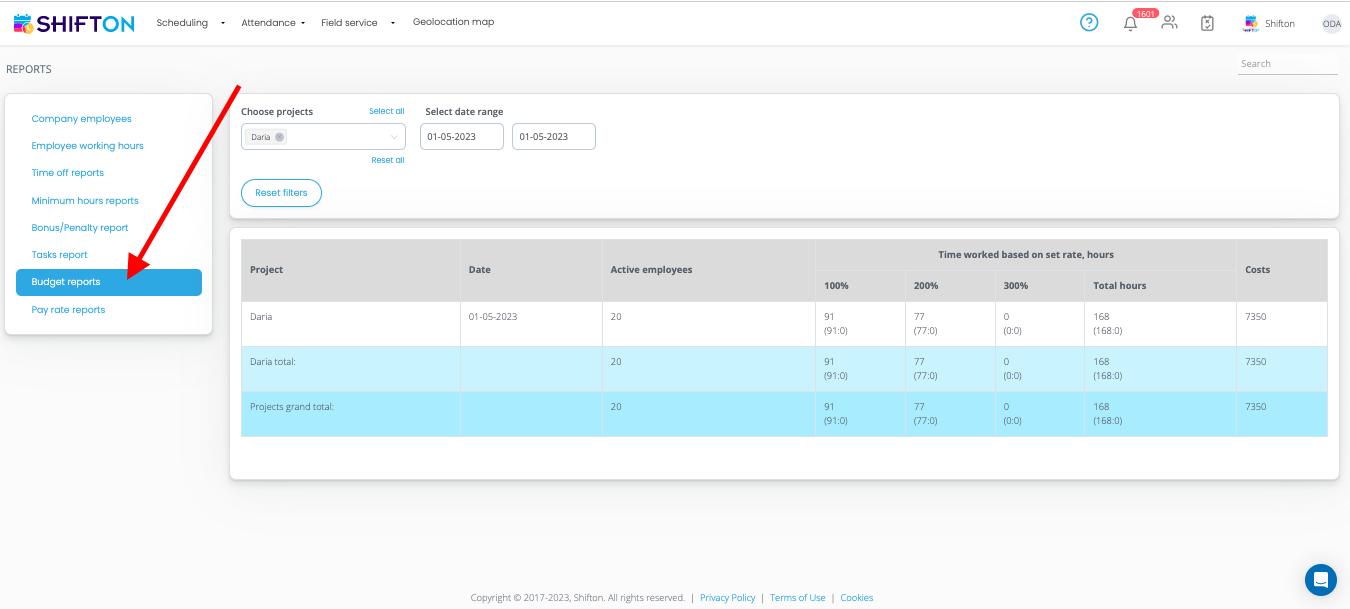
In the list that appears, select the "Budget reports" module.
¶ Company employees
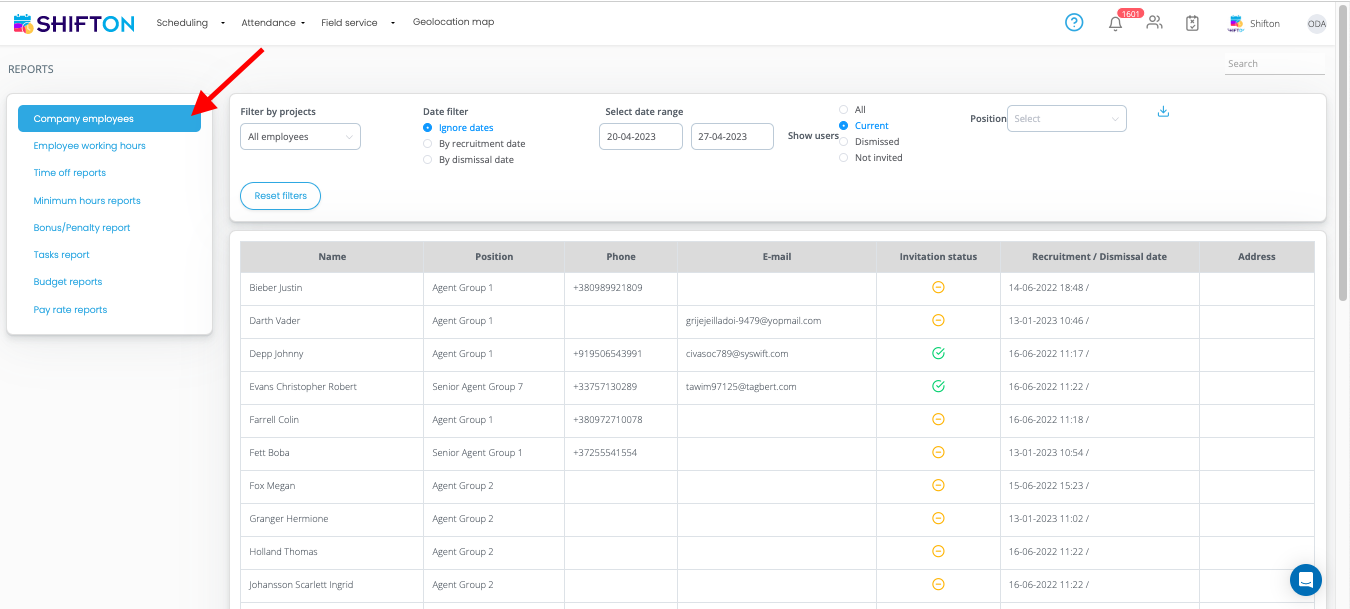
The "Company employees" module provides the following information about employees:
- First names and last names.
- Email addresses.
- Mobile phone numbers.
- Dates of hiring and firing.
- Home Addresses
- Positions
To activate the module, do the following:

- Click on the avatar icon (upper right corner).
- Select the "Modules" section.
In the list that appears, check the item "Company employees".
Click on the icon "..." to see the detailed information about the module.
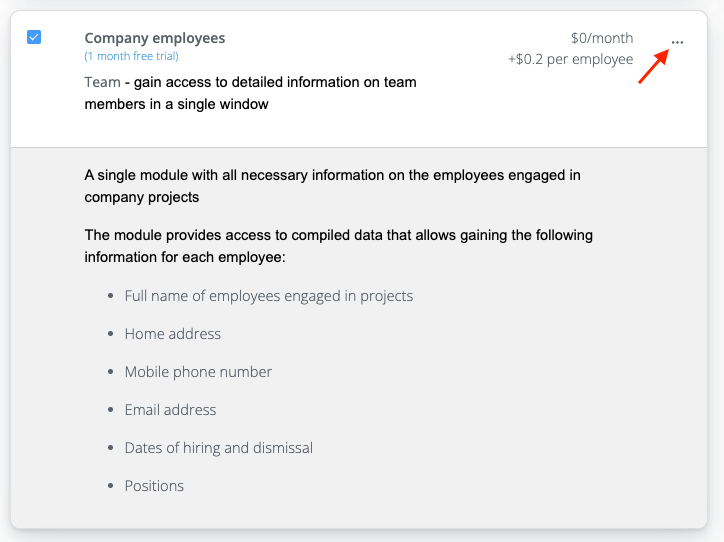
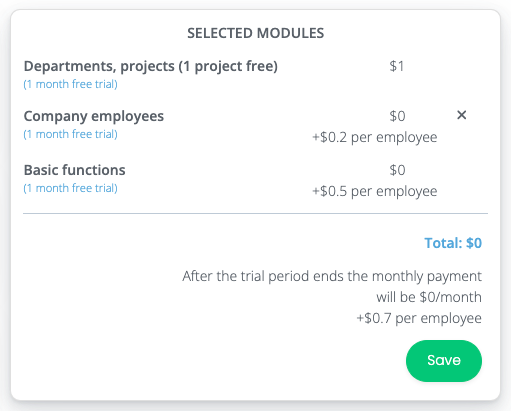
After selecting the module, click the "Save" button to activate it.
To access the data offered by this module, do the following:

- Click on the avatar icon (upper right corner).
- Select the "Reports" section.
On the page that appears, select the "Company Employees" tab.
¶ Breaks
The Breaks module allows you to set up, create and manage breaks.
To activate the module, do the following:

- Click on the avatar icon (upper right corner).
- Select the "Modules" section.
On the company settings page, go to the "Modules" tab.
Click on the "..." icon to see detailed information about the module.
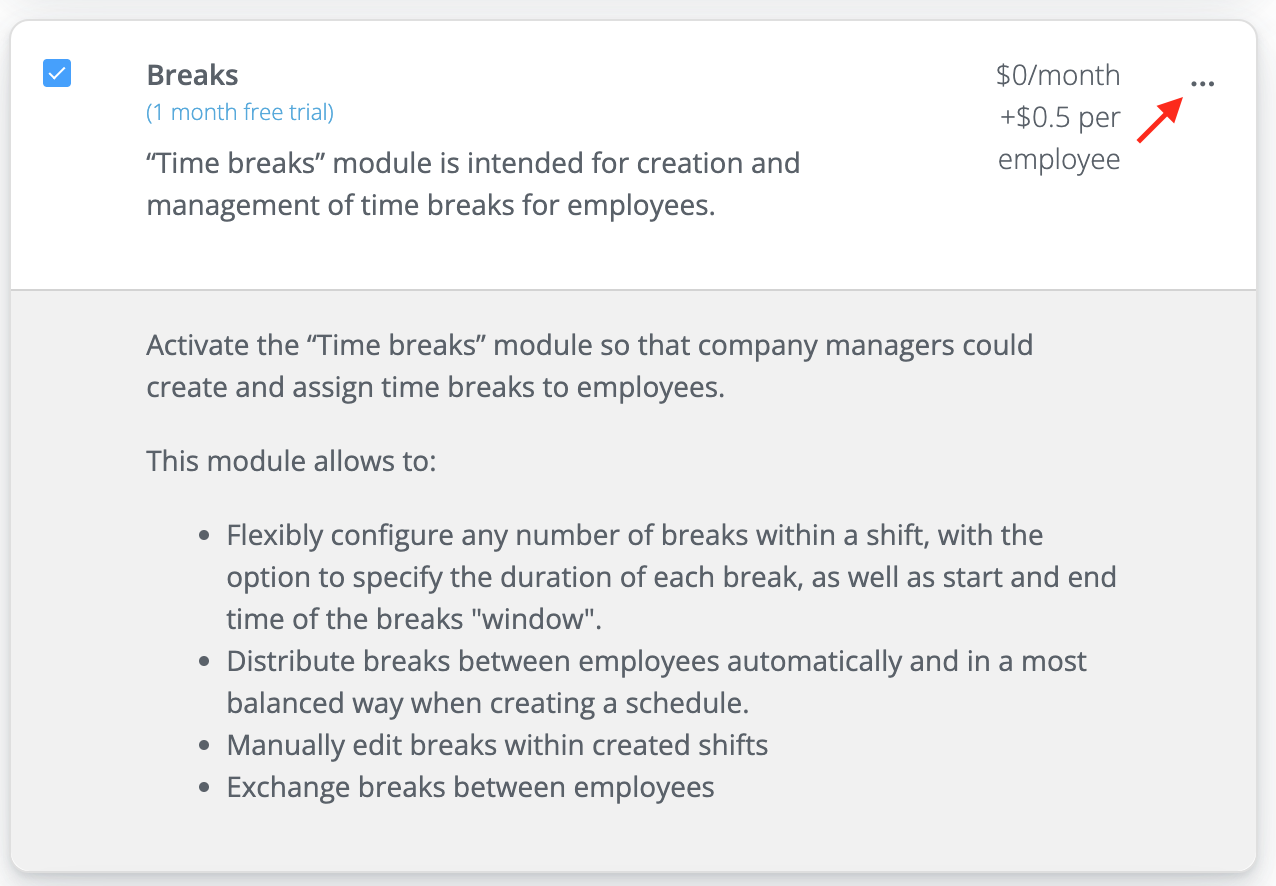
After selecting the module, click the "Save" button to activate it.
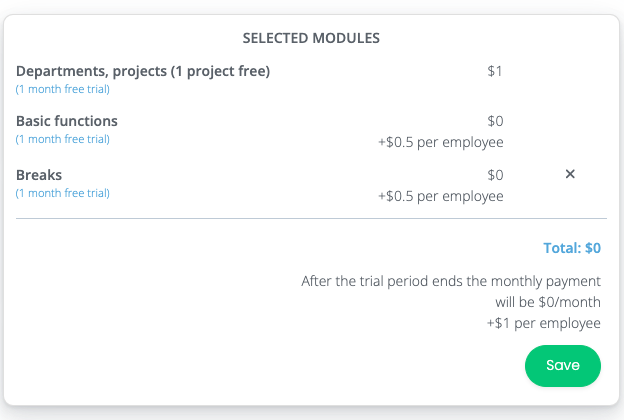
After activating this module, employees will be able to request breaks from the manager.
¶ SMS Notifications
The "SMS Notifications" module allows you to activate SMS notifications for all employees of the company.
To activate the module, do the following:

- Click on the avatar icon (upper right corner).
- Go to the Modules" section.
In the list that appears, check the "SMS Notifications" item.
Click on the "..." icon to see detailed information about the module.
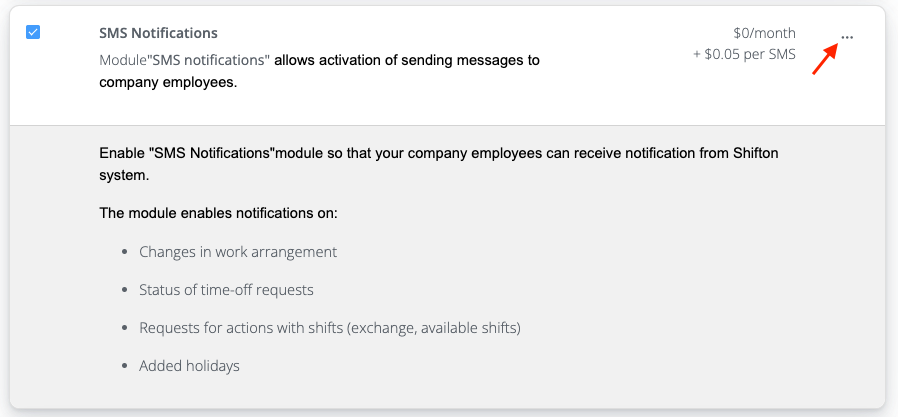
After selecting the module, click "Save" to activate it.
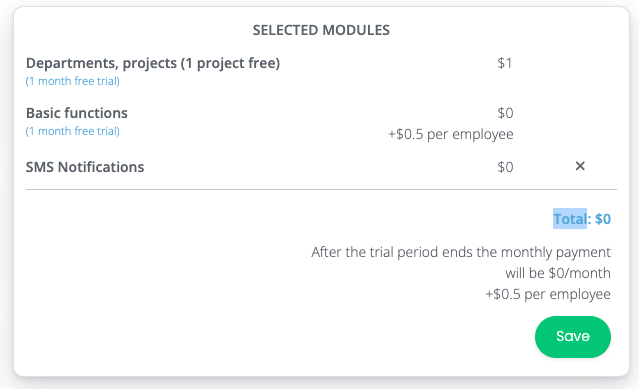
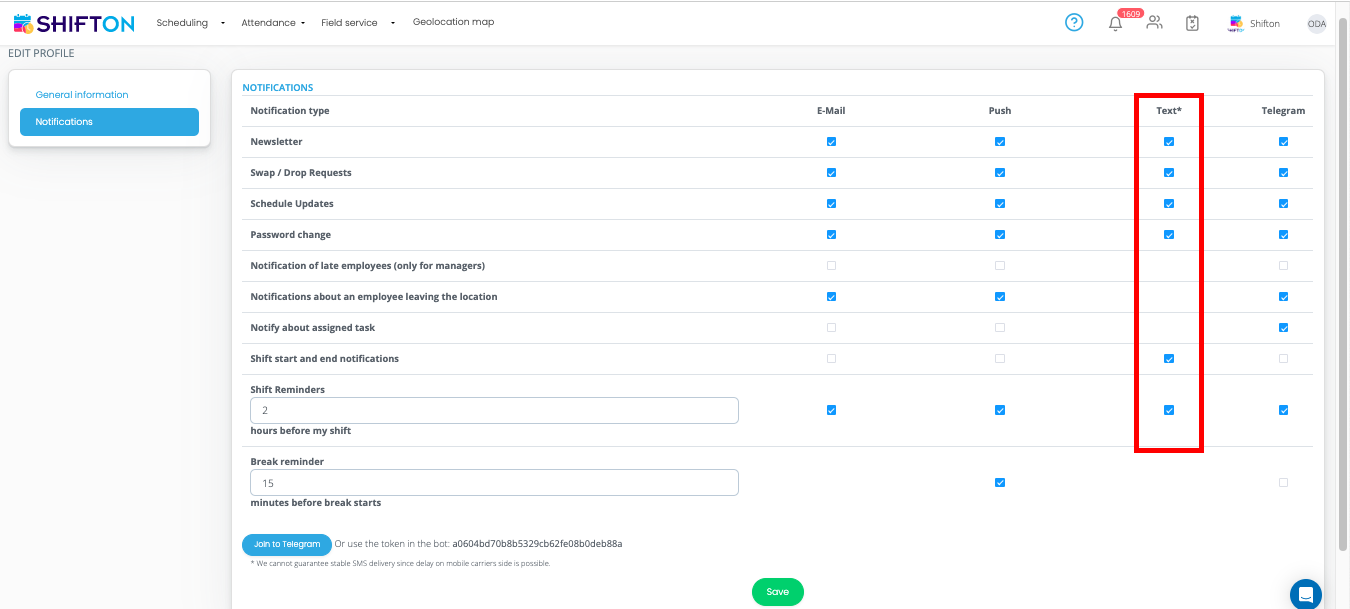
After activating the module, employees can set up SMS Notifications in their profiles.
To do this, they need to do the following:
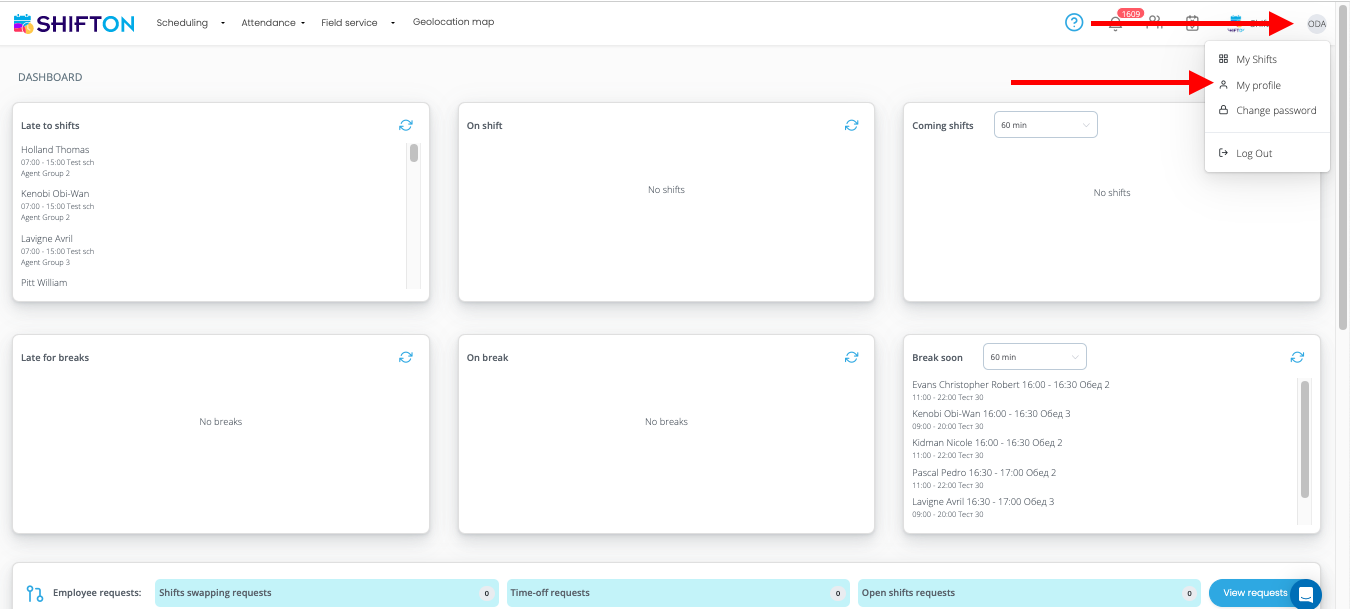
- Click on a custom avatar
- Select the "My profile" section
Then, in the "Notifications" tab, mark the required types of notifications in the "SMS" column and click the "Save" button.
¶ Company files
The Company Files module allows employees to upload files and share them with company management. In turn, employers can download documents and remove them from the public domain.
To activate the module, do the following:

- Click on the avatar icon (upper right corner).
- Go to the "Modules" section.
In the list that appears, check the "Company Files" item.
Click on the "..." icon to see detailed information about the module.
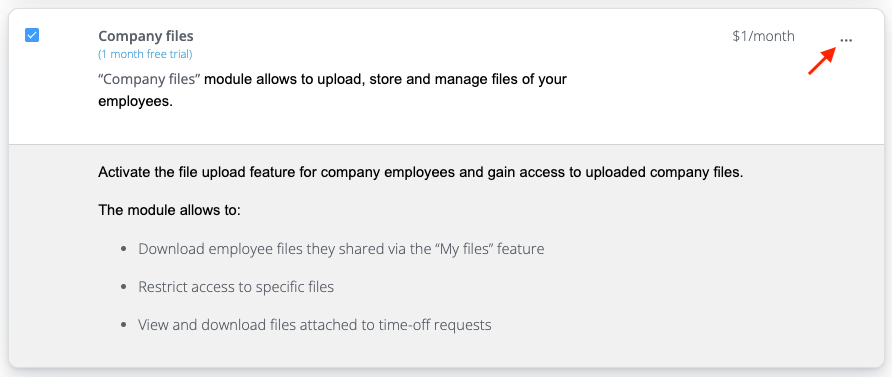
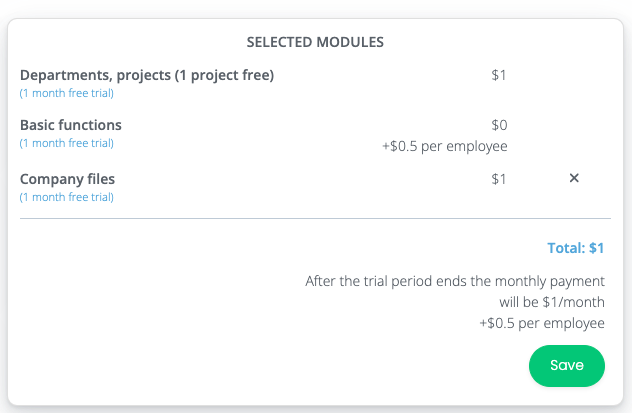
After selecting the module, click the "Save" button to activate it.
To access the uploaded files, the business owner needs to do the following:
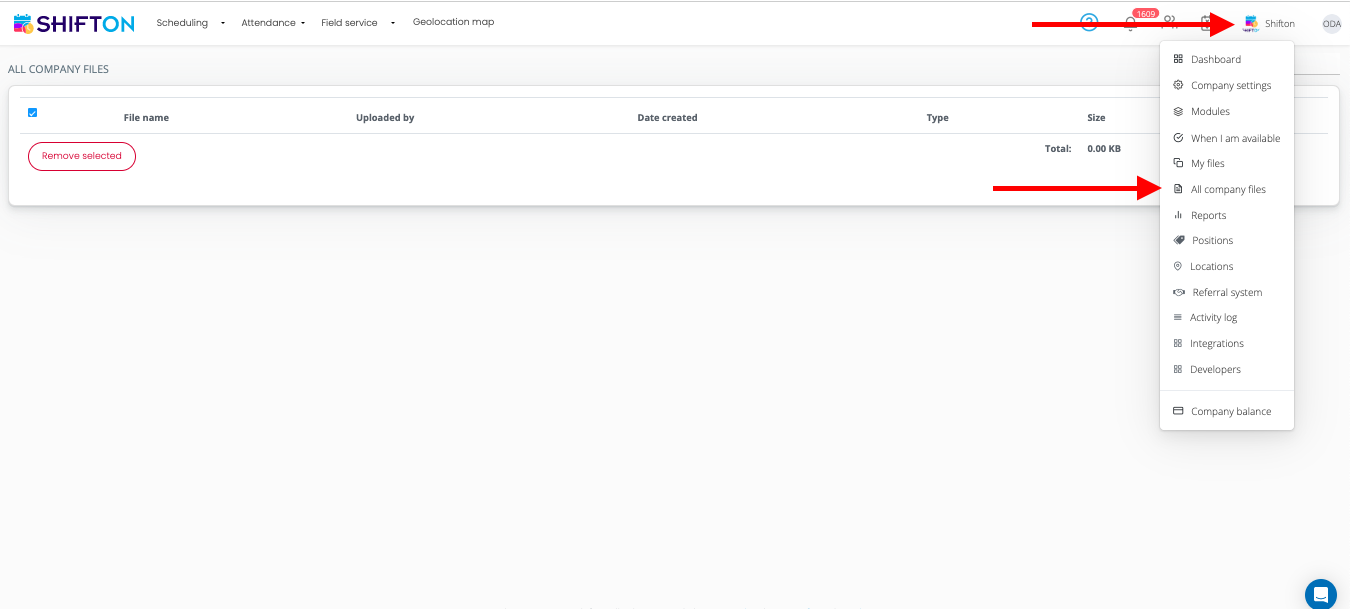
- Click on the avatar icon (upper right corner).
- Select "All company files"
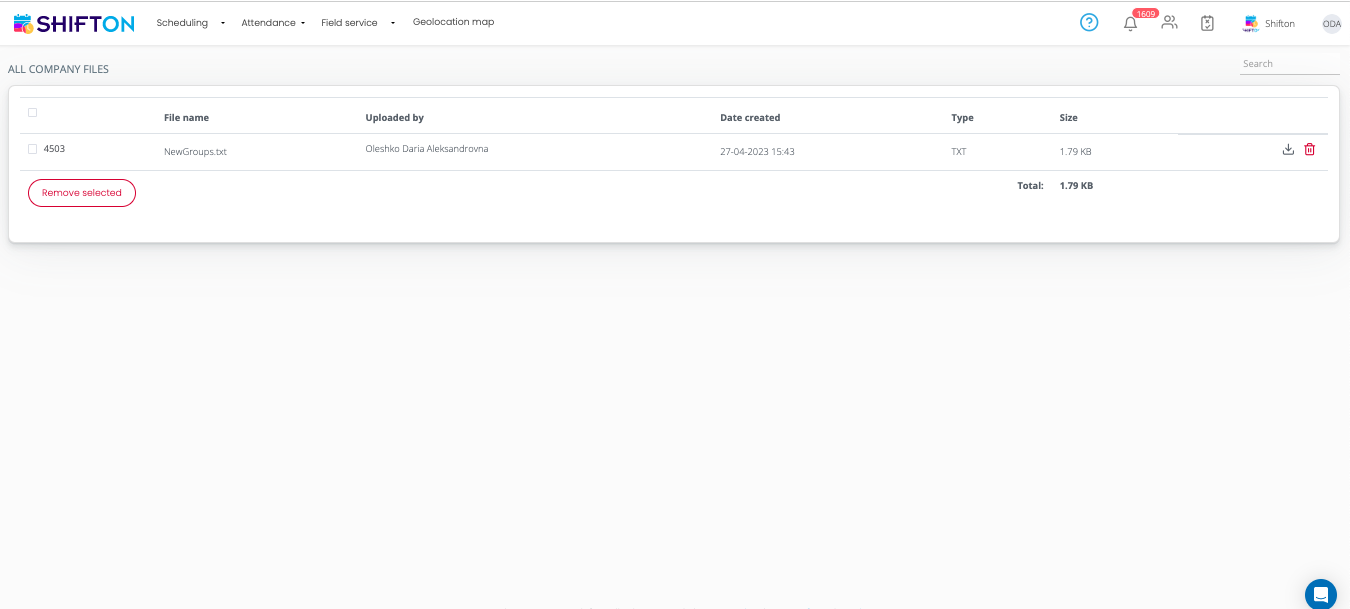
On the page that appears, the employer will see a list of company files that can be downloaded or removed from the public.
¶ Attendance
How to set up the "Attendance" module
The "Attendance" module is designed to monitor the actual compliance with the established schedule by employees.
Before activating the module, you must do the following:

- Click on the avatar icon (upper right corner).
- Select the "Modules" section.
In the list that appears, check the "Attendance" item.
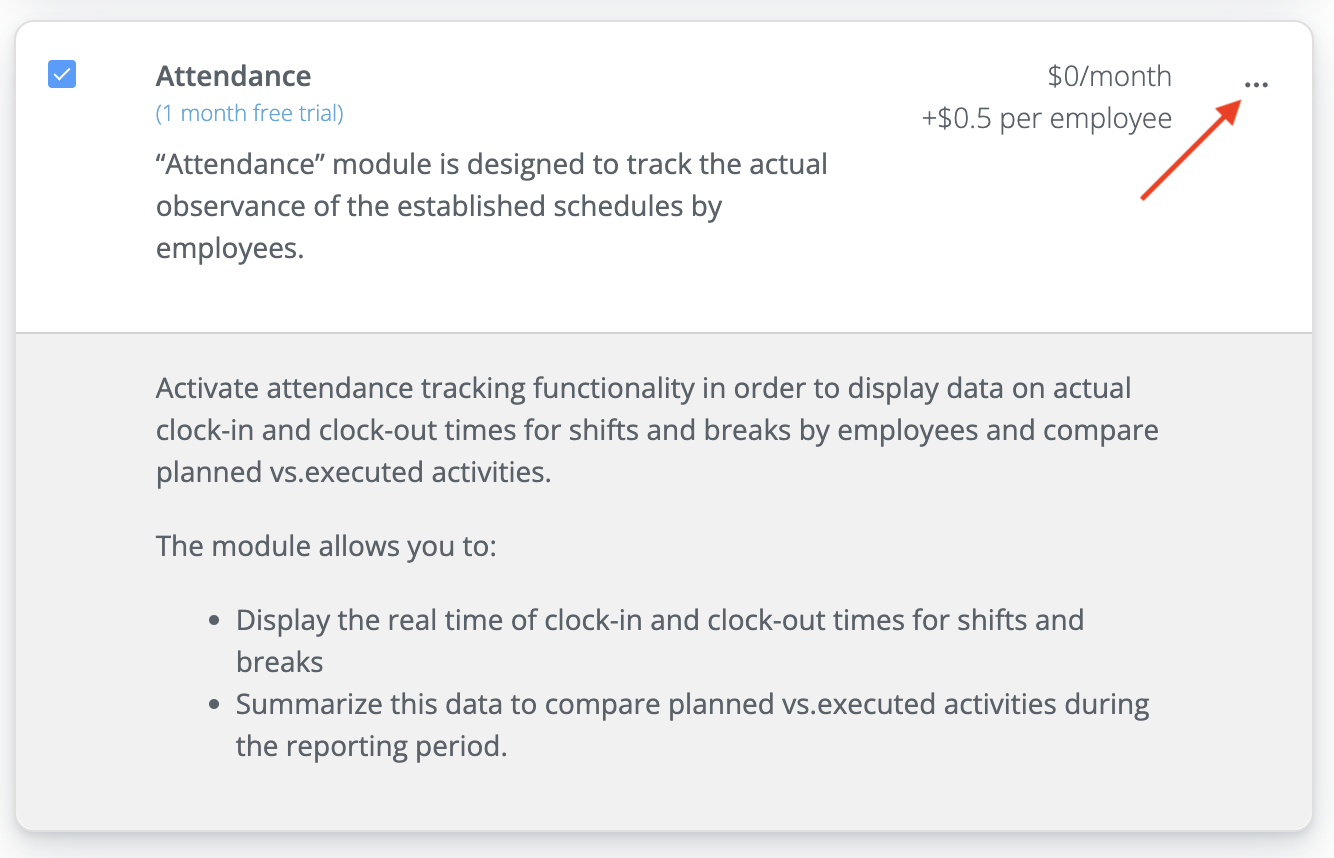
Click on the "..." icon to see detailed information about the module.
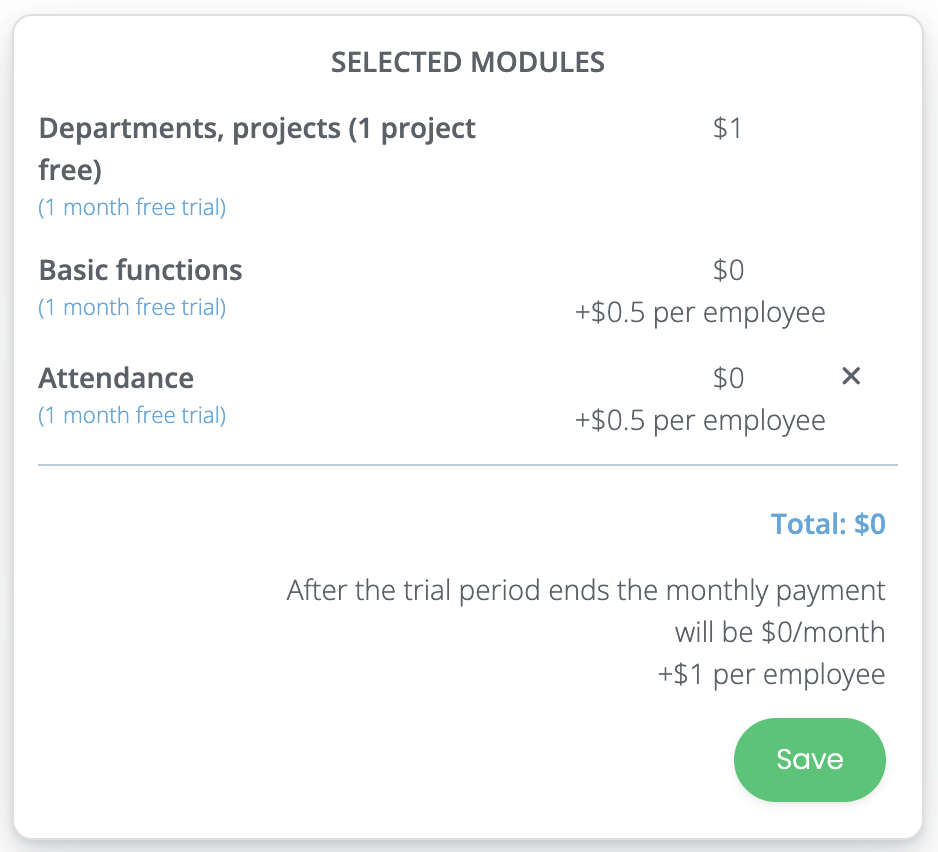
Then select the module and click the “Save” button to activate it.
After activating this module, employees will see the “Start shift” button.

Get acquainted with the settings of the “Attendance” module, possibly by clicking on the link.
¶ Tasks
How to set up the “Tasks” module.
The "Tasks" module is designed to create and manage work tasks for employees.
Before activating the module, you must do the following:

- Click on the icon with the avatar (in the upper right corner).
- Select the "Modules" section.
In the list that appears, select the "Tasks" item.
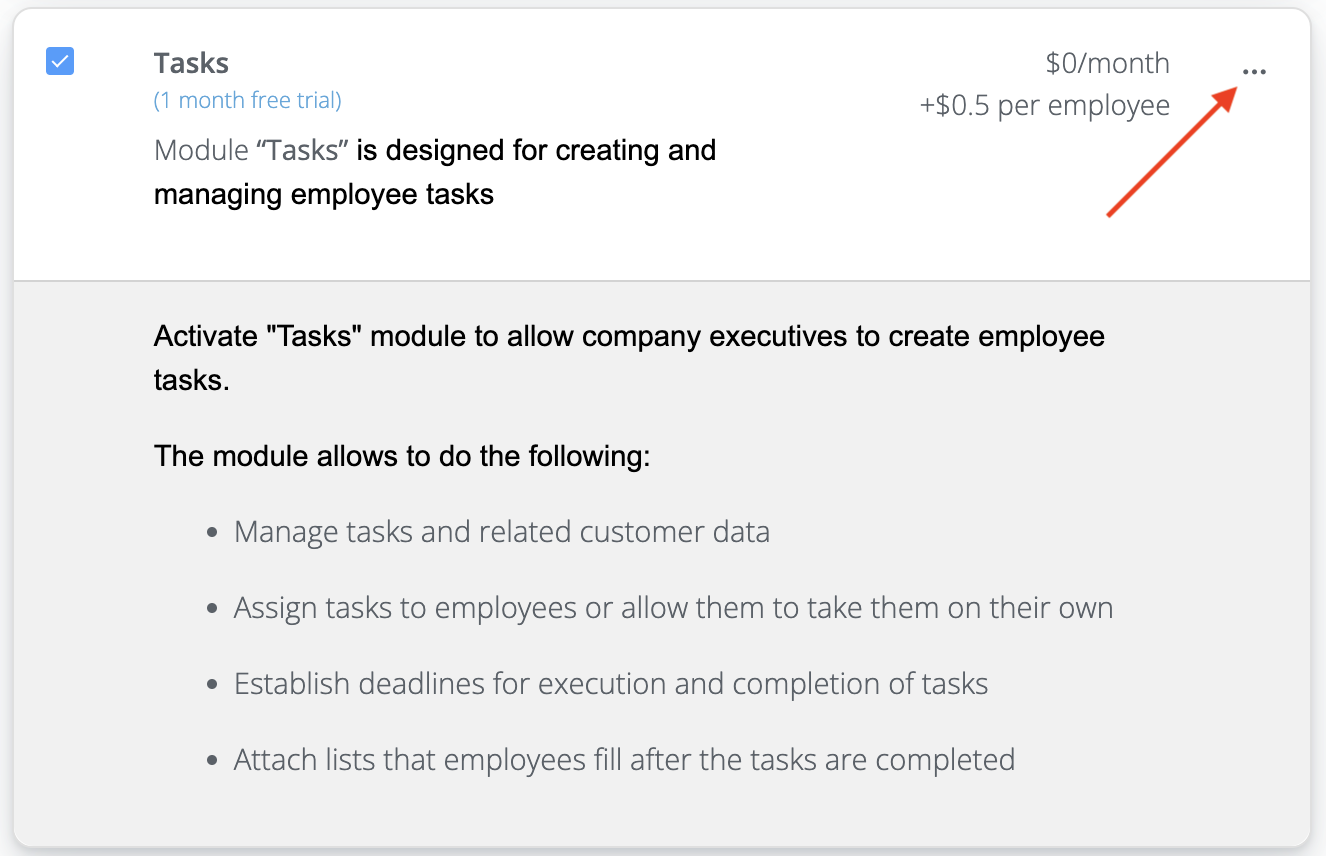
Click on the "..." icon to see detailed information about the module.
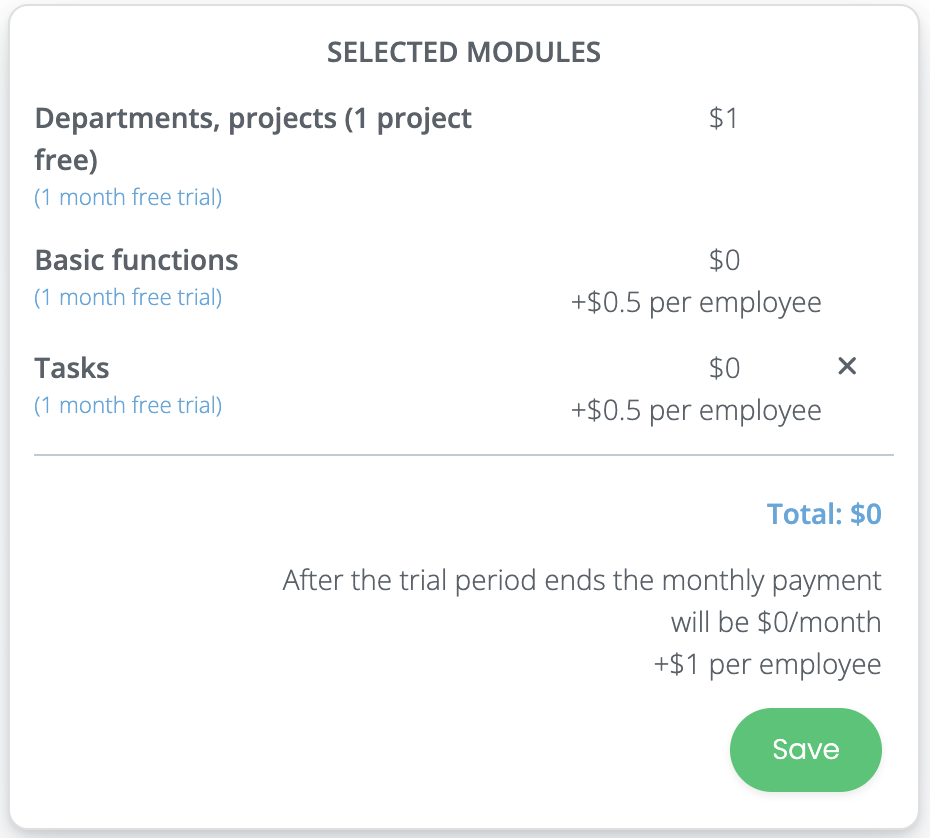
After selecting the module, click the “Save” button to activate it.
After activating this module, managers will be able to create tasks for employees by clicking on the “Tasks” button.

You can get acquainted with the settings of the “Tasks” module by clicking on the link.
¶ Work location control
How to set up the "Work location control" module.
The Work location control module allows you to track an employee's movement during a shift.
To activate this module, you need to:

- Click on the icon with the avatar (in the upper right corner).
- Select the "Modules" section.
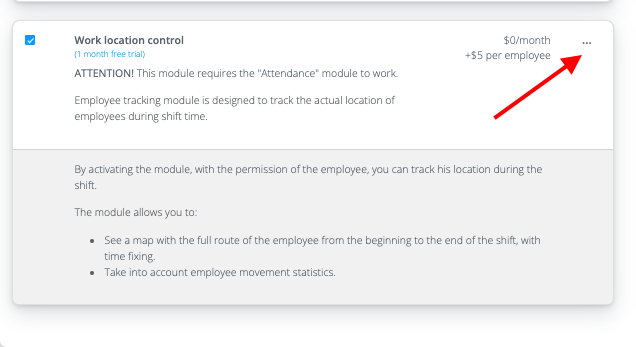
In the list that appears, check the item "Work location control".
Click on the “…” icon for detailed information about the module.
NOTE! This module requires the Attendance module to work.
You can get acquainted with the settings of the "Attendance" module by clicking on the link.
IMPORTANT! In the settings of the "Attendance" module, you must allow starting the shift from the mobile application. To get acquainted with the module settings, you can follow the link.
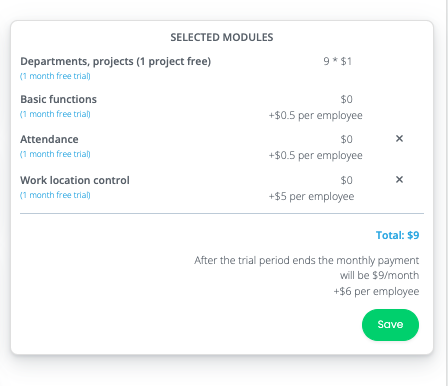
After choosing modules, click the "Save" button to activate them.
Setting up the “Work location control” module. (It turns on automatically when you turn on the module).
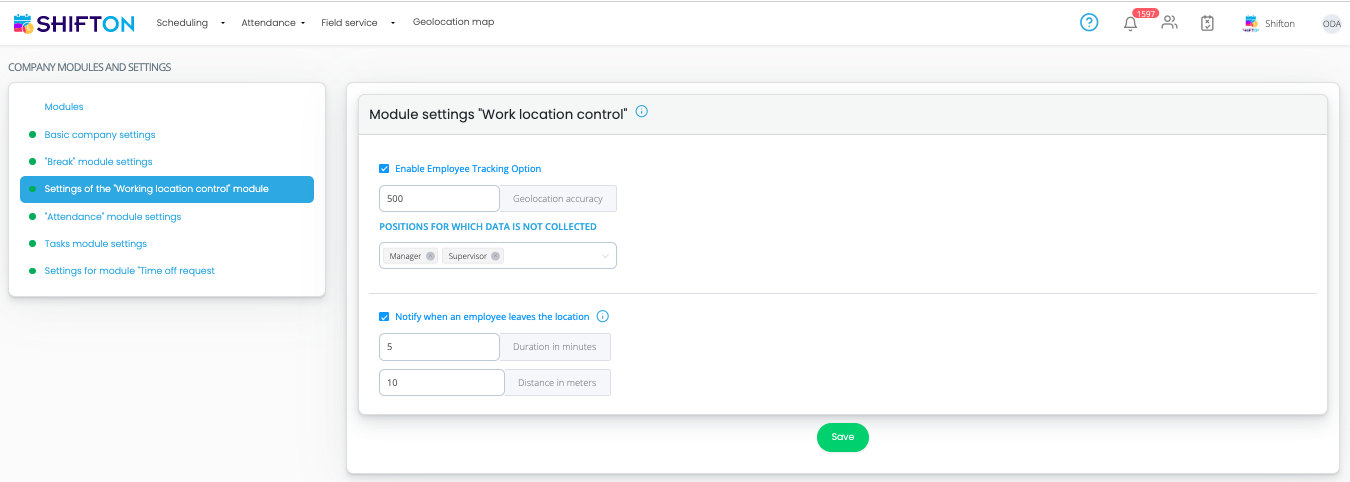
To set up the recording of coordinates, the "Geolocation determination accuracy" setting is used, the parameter specified in it indicates the distance that you need to move away from the previous coordinate recording in order for the application to perform a new geolocation fixation.
IMPORTANT! We recommend several options for committing data:
*️⃣ If the employee does not use transport and/or the working radius is small, the optimal frequency of fixing points will be 50-100 m
*️⃣ If an employee travels by transport during work and/or the radius of work is large, the optimal frequency of fixing points will be 200-1000 m.
How to start a shift from iOS devices:
1. Go to the Control Panel screen.
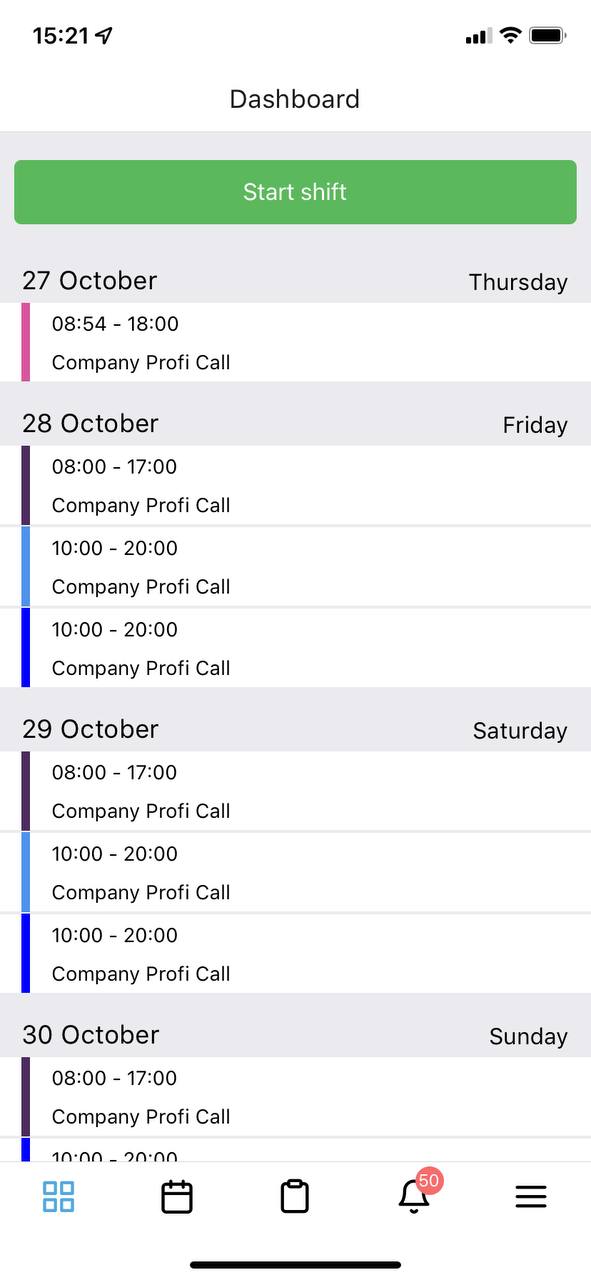
2. Click on the “Start shift” button.
3. Give permission to use geolocation. Specifying "Allow While Using App".

4. On the Attendance screen, press the Start Shift button.

5. Allow the application to use geolocation, even when not working in it. Selecting “Change to ”Always Allow"".
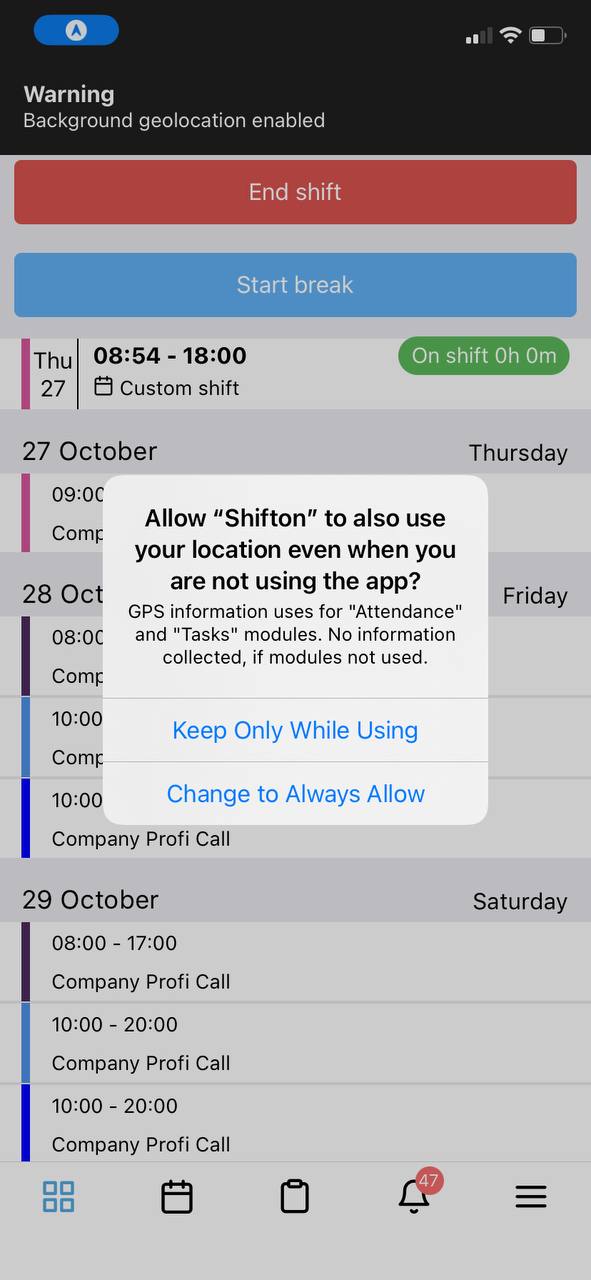
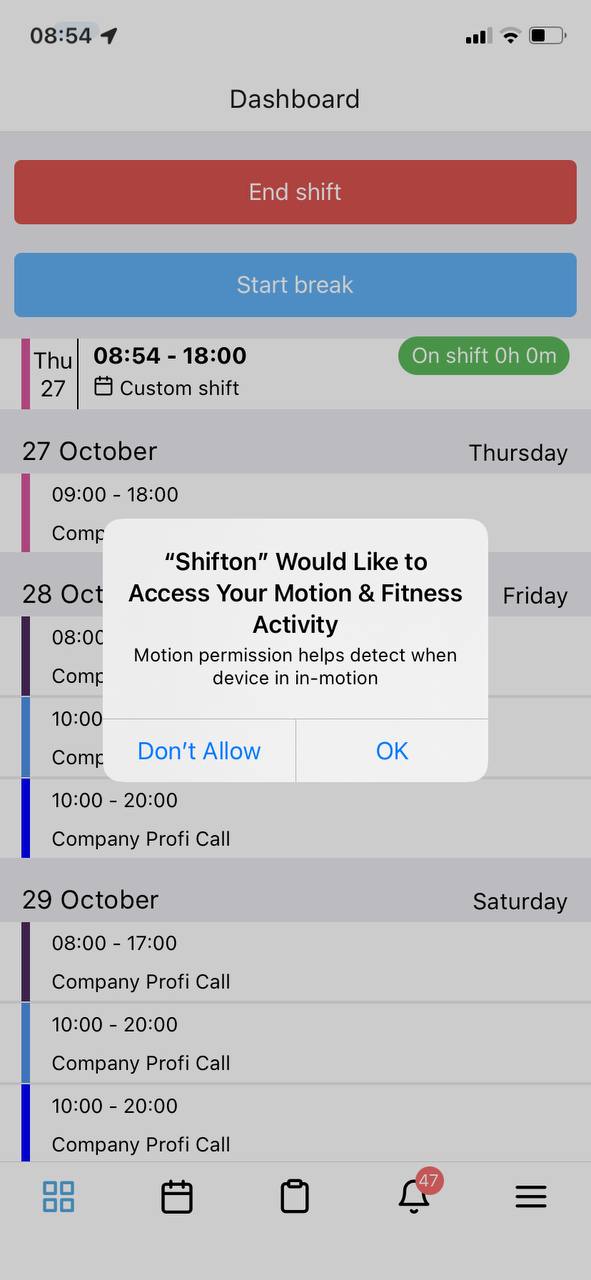
6. Allow the app to ask you to access your movements. Click on the “OK” button.
How to start a shift from Android devices:
1. Go to the Control Panel screen.
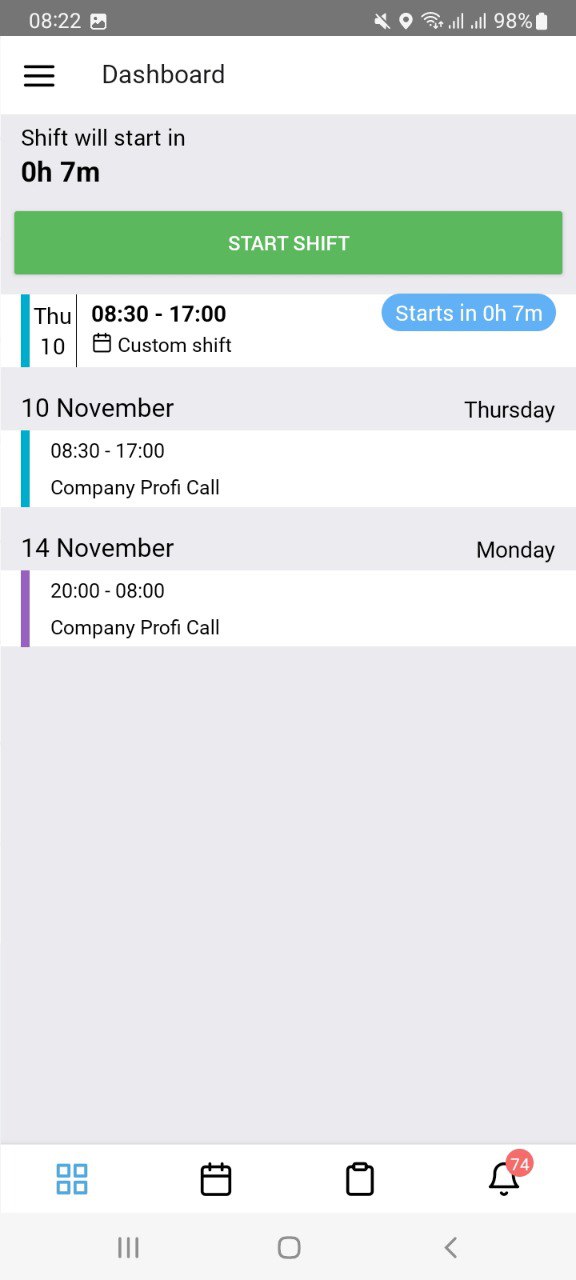
2. Click on the “Start shift” button.
3. Give permission to access device location data. Specifying "When using the application".
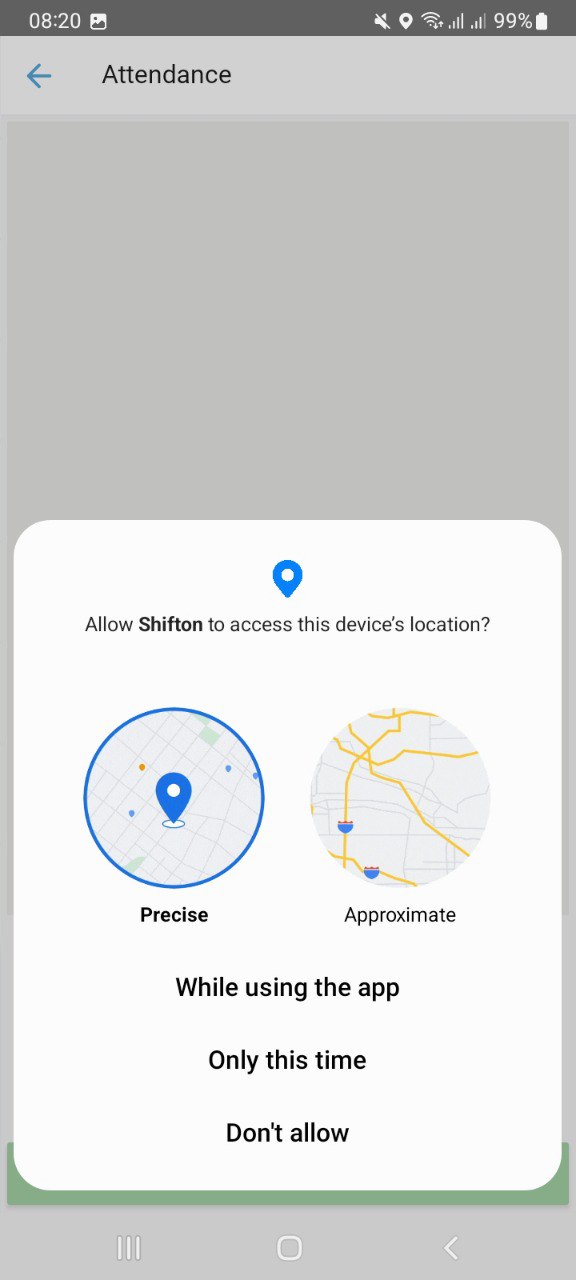
4. On the Attendance screen, click on the Start Shift button.
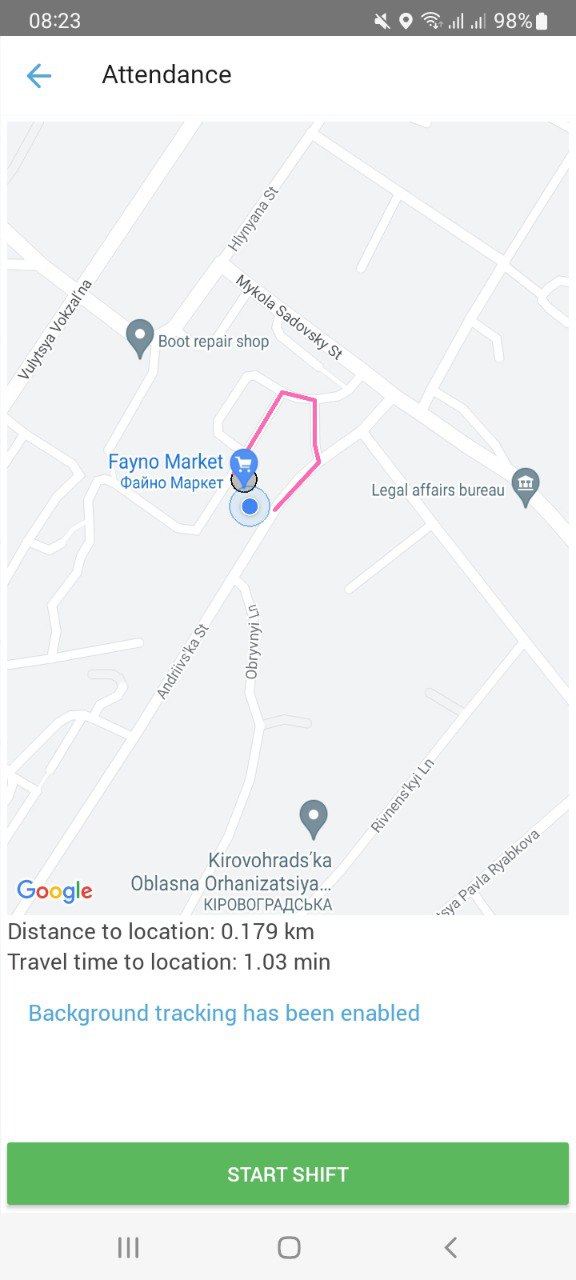
You can also set the location for the shift (only being within the radius of the location will it be possible to start the shift)
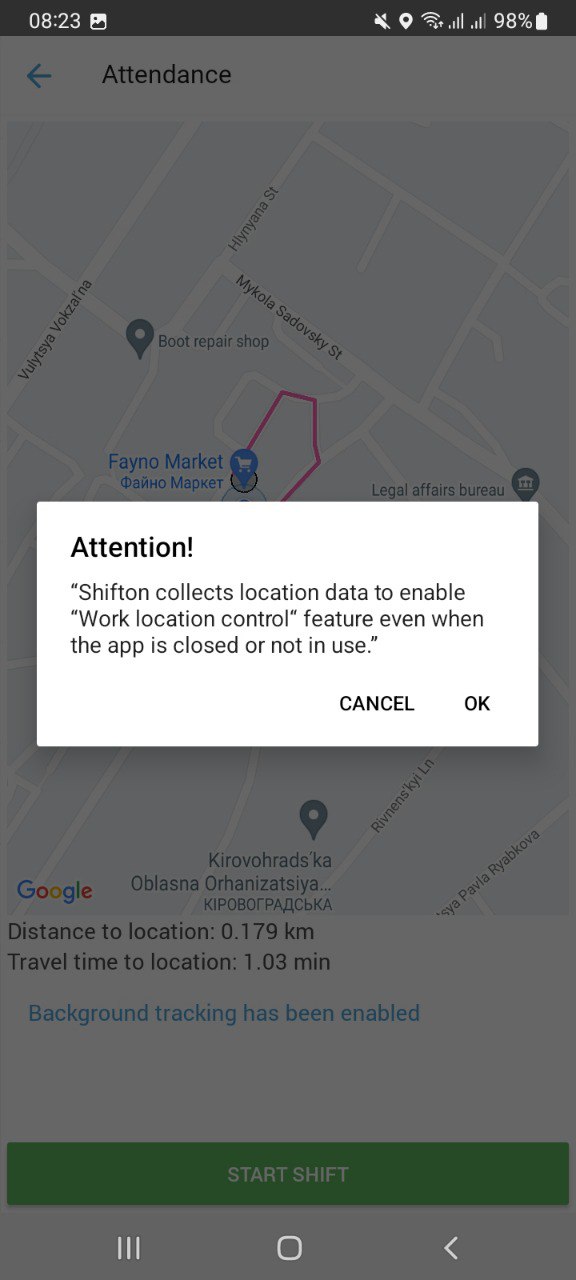
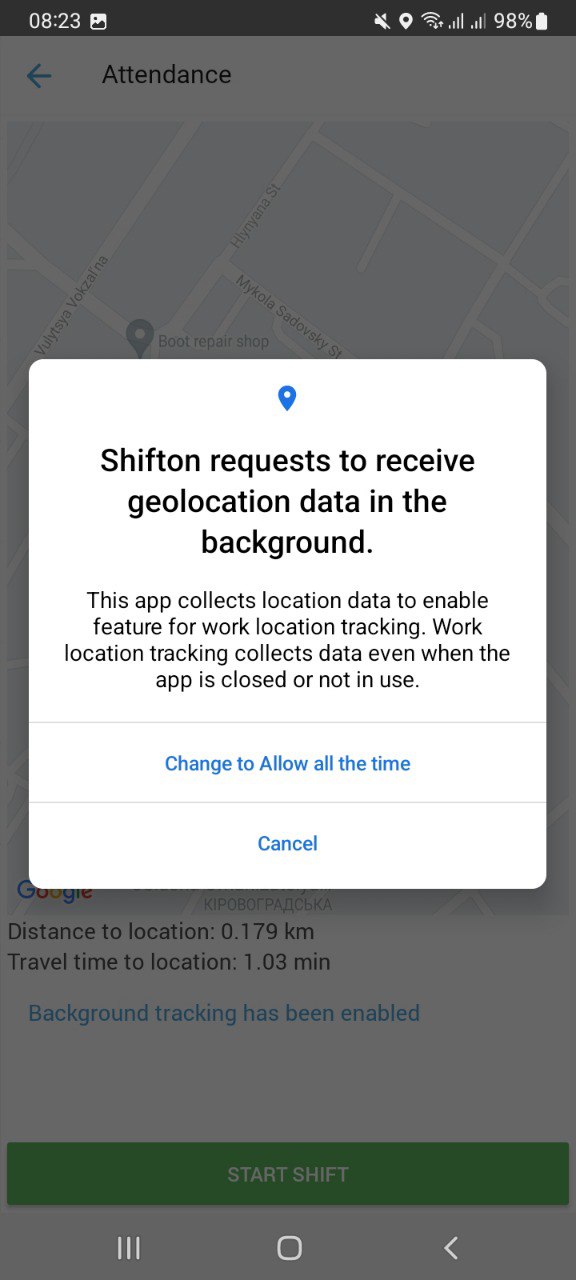
5. Allow the app to collect location data even when the app is closed or not in use. By clicking on the “OK” button
6. Allow the app to request access to your activity data. By clicking on the "Allow" button.
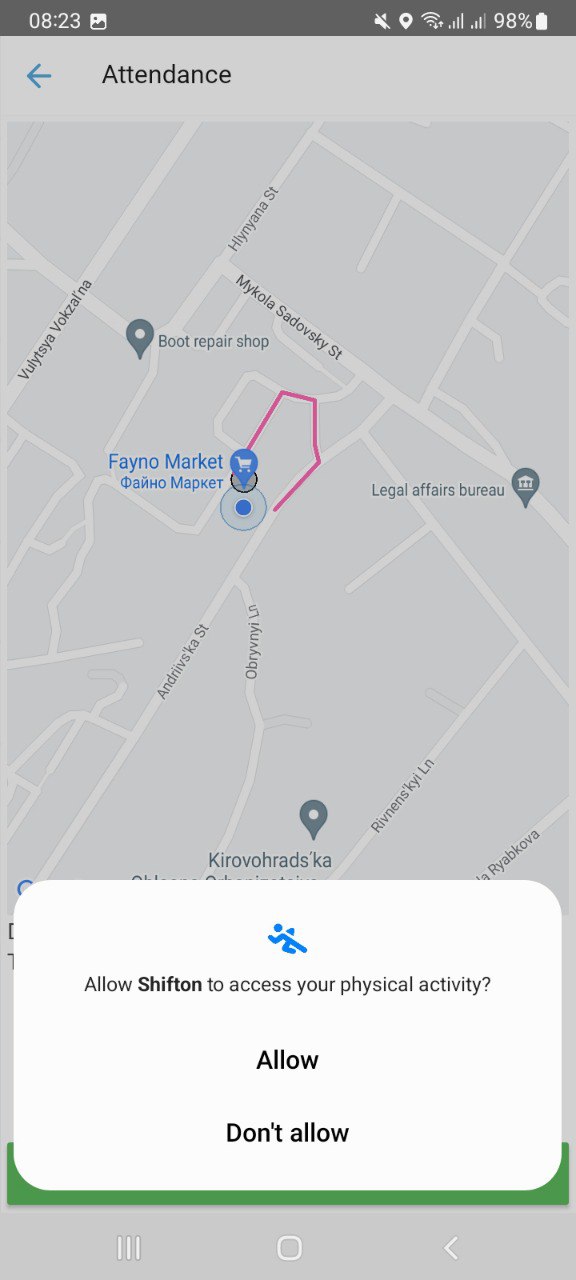
7. Allow the app to collect geolocation data in the background, even when the app is closed or not in use. Selecting "Allow in any mode"
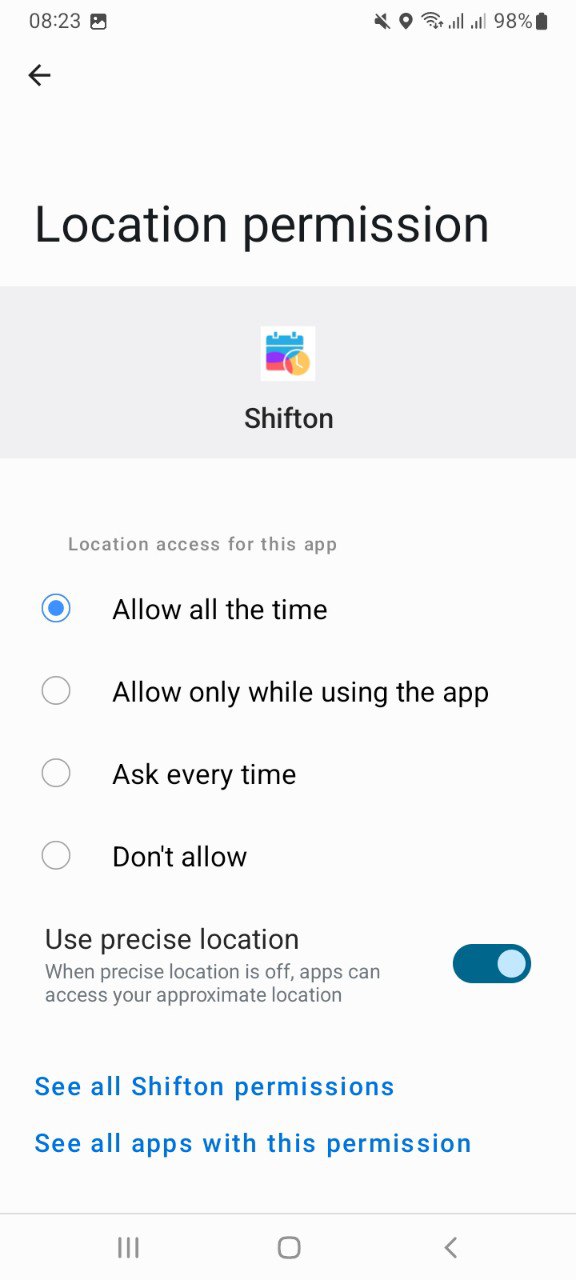
8. On the “Location Permission” screen, select “Allow in any mode”. After clicking on the “Arrow” in the left corner, return to the application to the “Control Panel” screen.
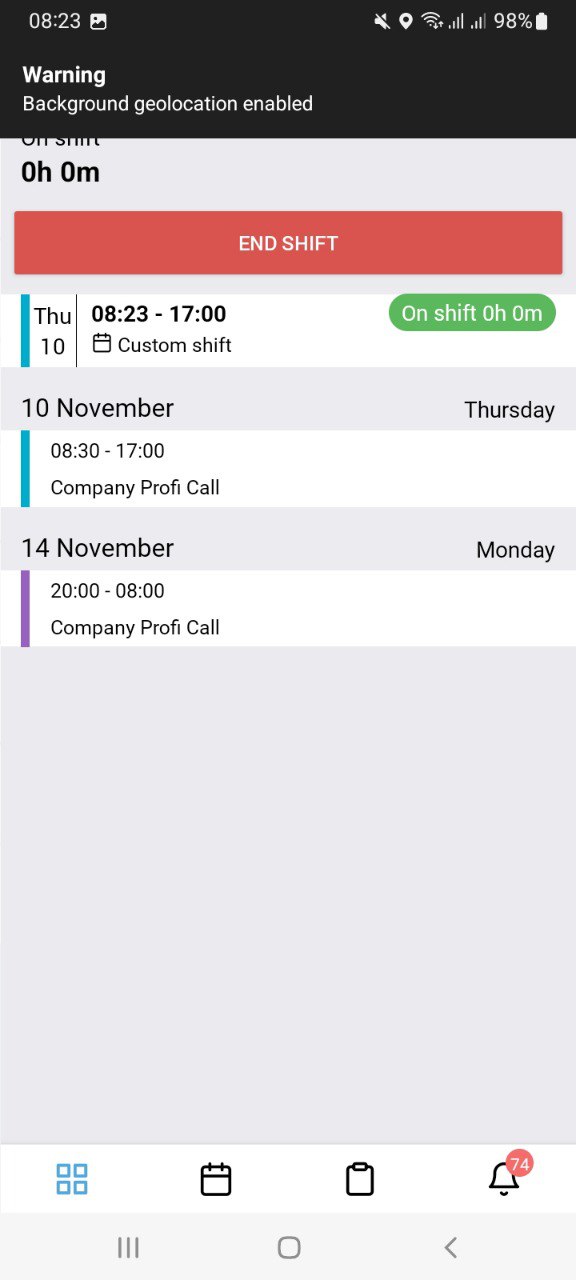
To view information about the movement of an employee in the mobile application, you must do the following:
Important: The owner of the company, administrator, and manager can view information about the movements of employees in the mobile application.
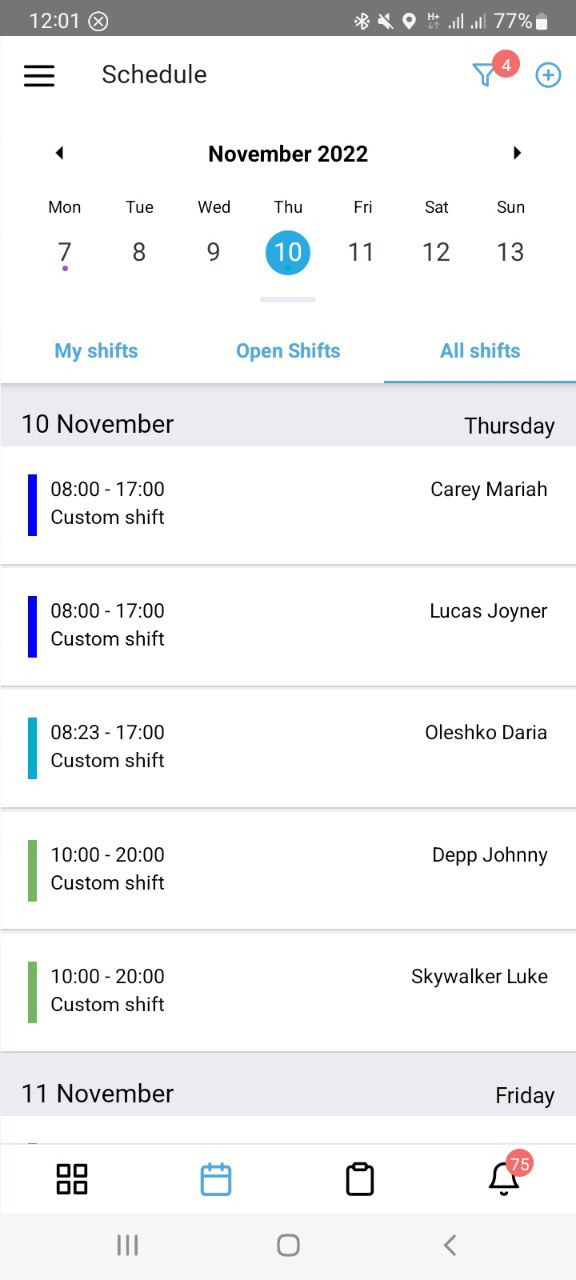
On the "Schedule" screen, click on the shift of the employee whose location you want to see.
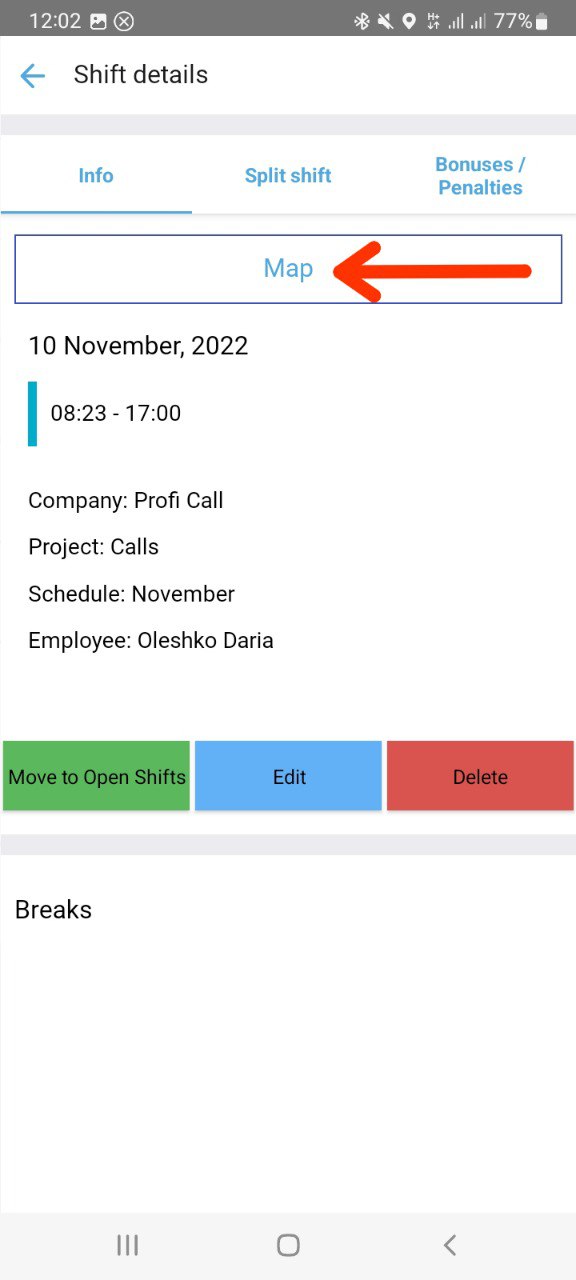
2. On the shift, click on the “Map” button.
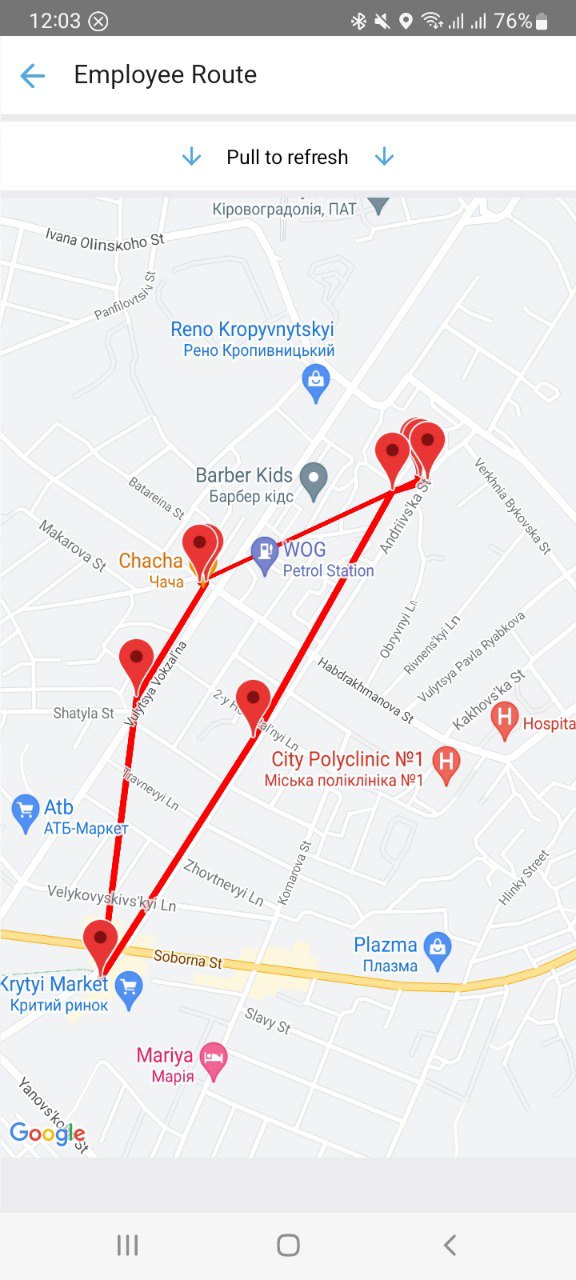
3. On the “Employee Route” screen, you can see the movement of the employee.
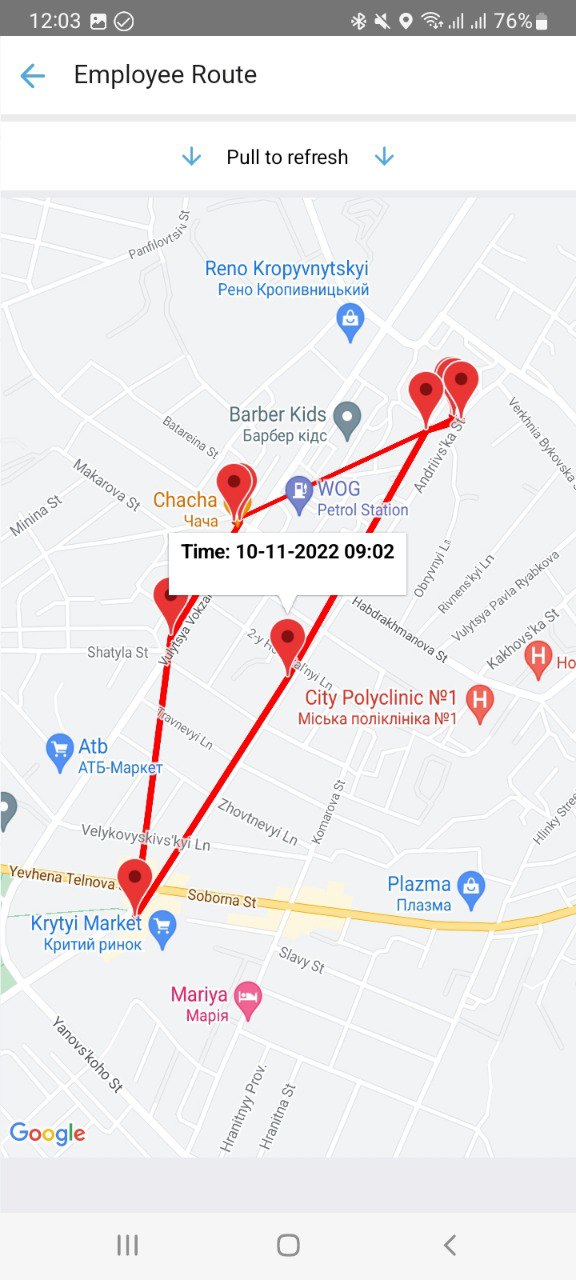
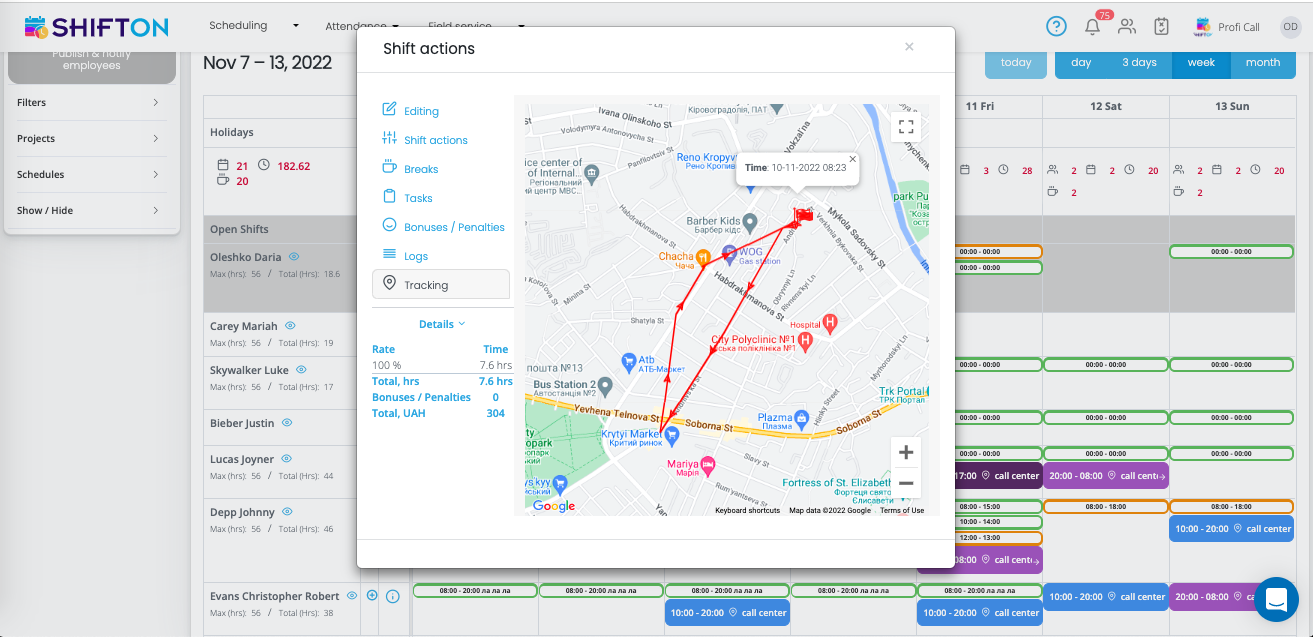
4. When hovering over points, the date and time at which the employee was at this point are displayed.
On the web, the employee's movement points will be displayed on the shift that the employee started.
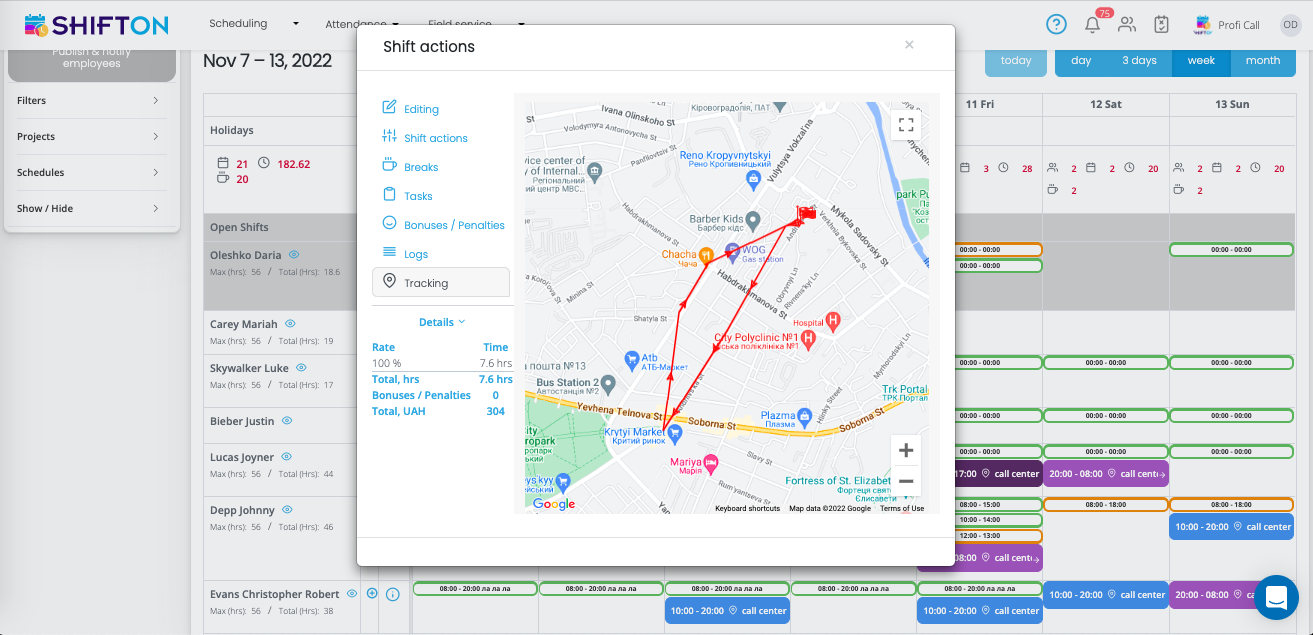
When you hover over the points, the date and time the employee was at this point are displayed.
¶ Time off requests
The "Time off requests" module allows you to create, view, confirm / reject requests for time off, sick leave, holidays.
To activate the module, do the following:

- Click on the icon with the avatar (in the upper right corner).
- Select the "Modules" section.
In the list that appears, check the item "Time off request".
Click on the "..." icon to see detailed information about the module.
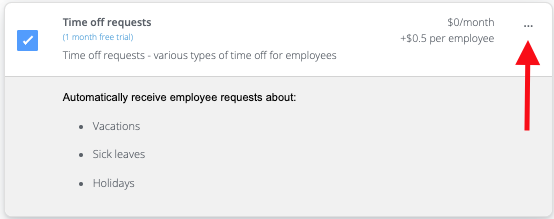
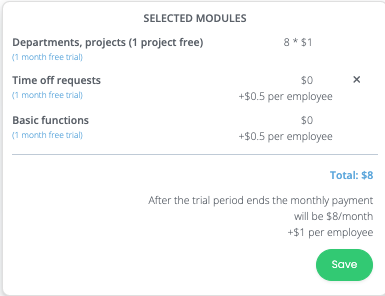
After selecting the module, click the "Save" button to activate it.
In order to create a request for time off / sick leave / holiday, the owner of the company / administrator / manager / employee must:
1. Click on the “Requests” tablet.
2. Click on the button “Request time off”
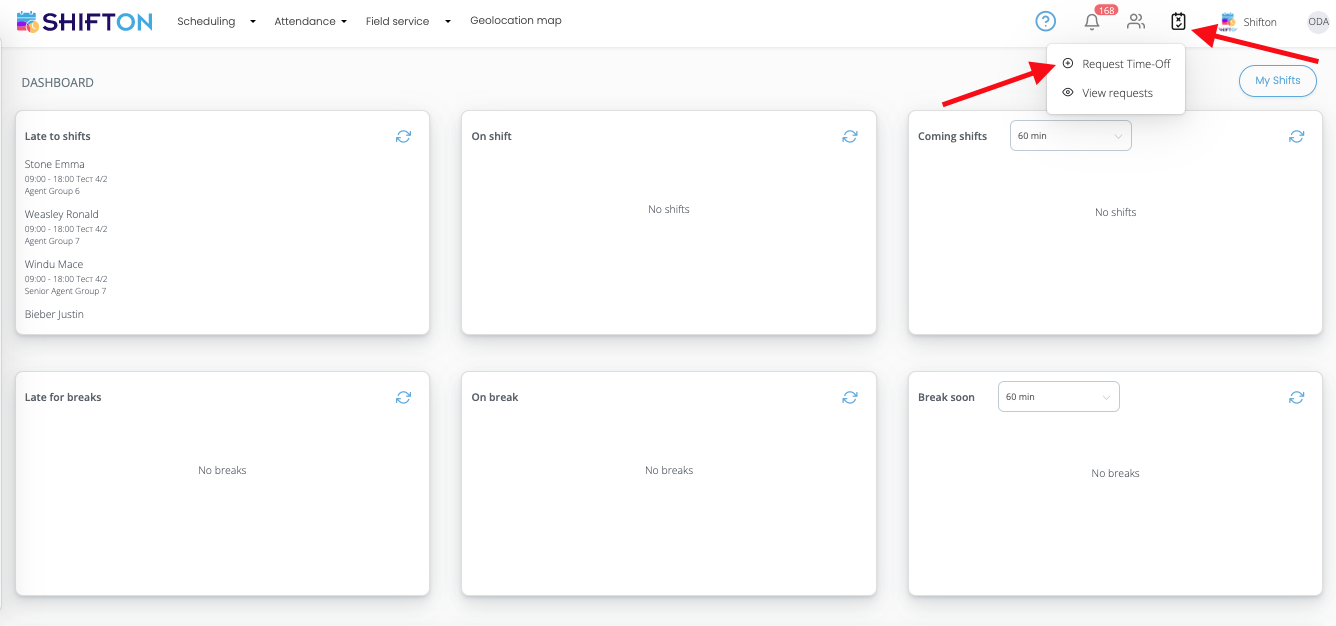
In the window that appears, you can choose:
- The period for which you need to create a request: all day, or part of the day.
- Paid/Unpaid
- Sick leave / vacation / holiday
- The duration of the day off
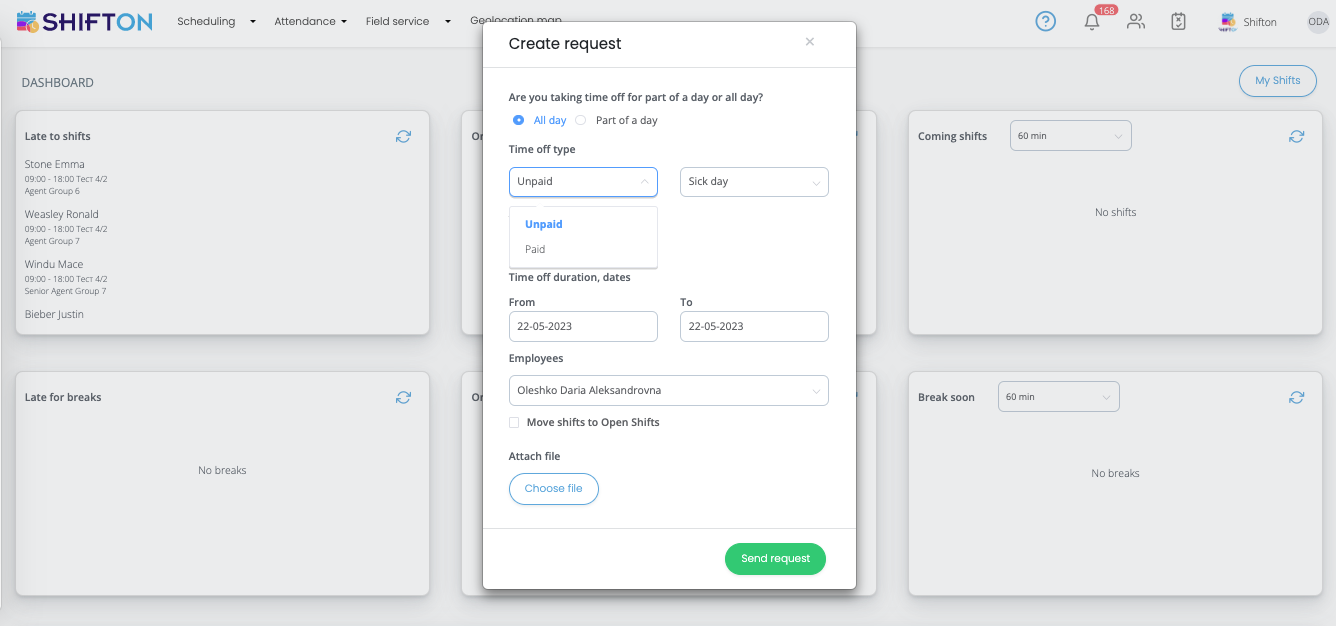
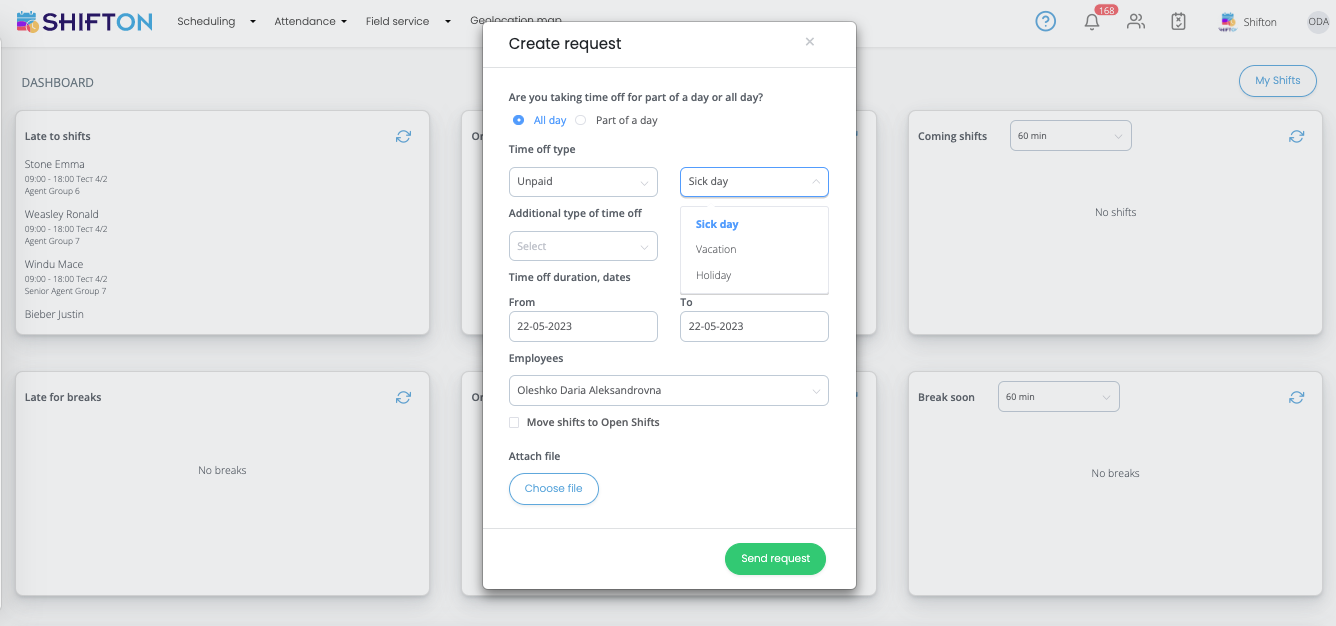
After filling in all the data, the owner of the company/administrator/manager/employee must click on the “Send request” button.
Attention! If the request is created by the owner of the company / administrator / manager, then such requests will be automatically confirmed. If the request is created by an employee, then such requests are transferred to the manager for consideration (the owner of the company / administrator can also view the request and confirm or cancel them).
To view information about unconfirmed requests:
- Click on the "Requests" tab.
- Click on the View Requests tab.
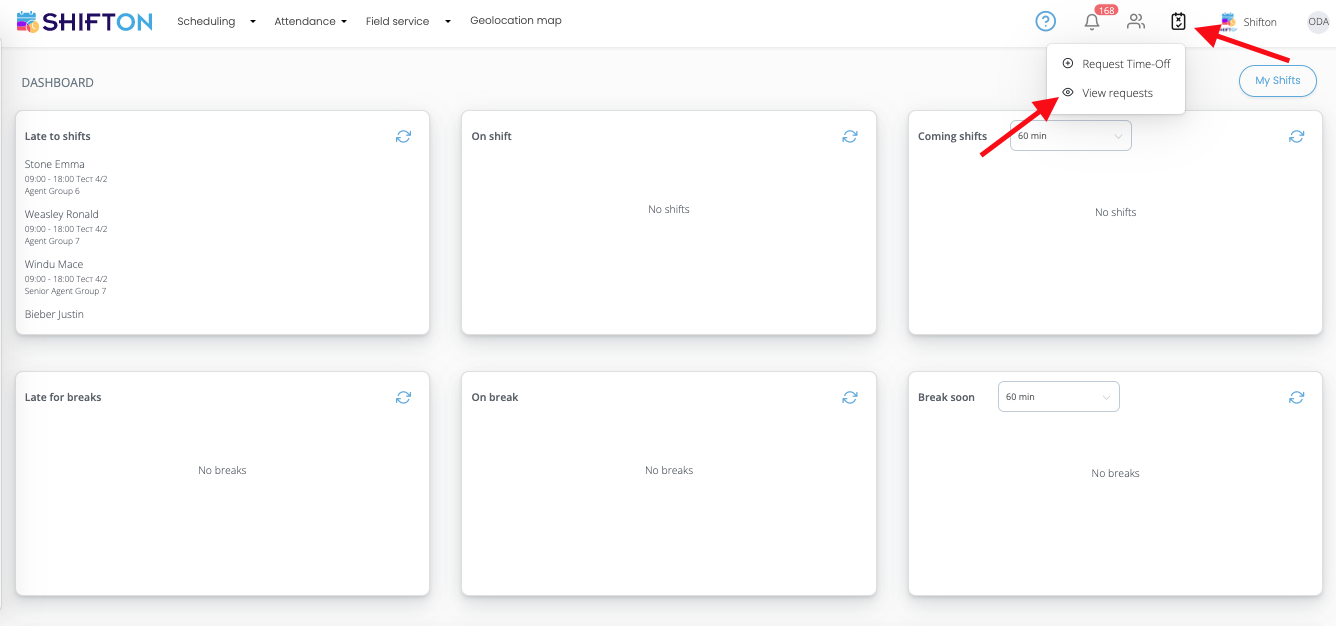
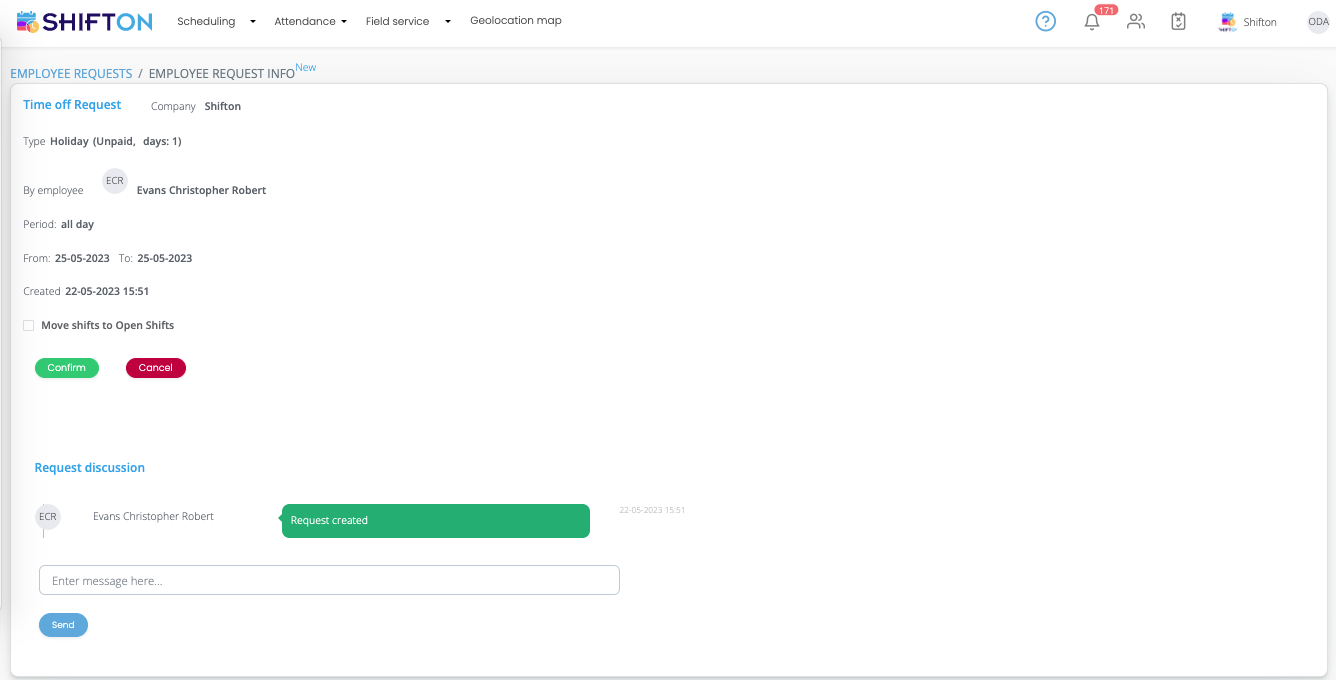
The page that appears displays all unconfirmed requests (type of request, initiator, date and time at which the request was created, request status), in order to view the full information, you must click on the “Eye” sign next to the request.

On this page, you can see the full information about the request:
- Request type (vacation, sick leave, holiday).
- The person who created the request.
- The time period for which the request was created. (All day, part of the day).
- The date and time at which the request was created.
- Whether it is necessary to transfer shifts to the open shift list. (If an employee has a shift on the date of the created request, then when this option is selected, the shift will be sent to the free list).
- Request discussion.
After confirming or canceling, the request goes to the archive.

The "Archive" page displays all company requests.
¶ Bonuses and Penalties
The "Bonuses and Penalties" module allows you to display information on bonuses and penalties in shift cards.
To activate the module, do the following:

- Click on the icon with the avatar (in the upper right corner).
- Select the "Modules" section.
In the list that appears, check the item "Bonuses and Penalties".
Click on the "..." icon to see detailed information about the module.
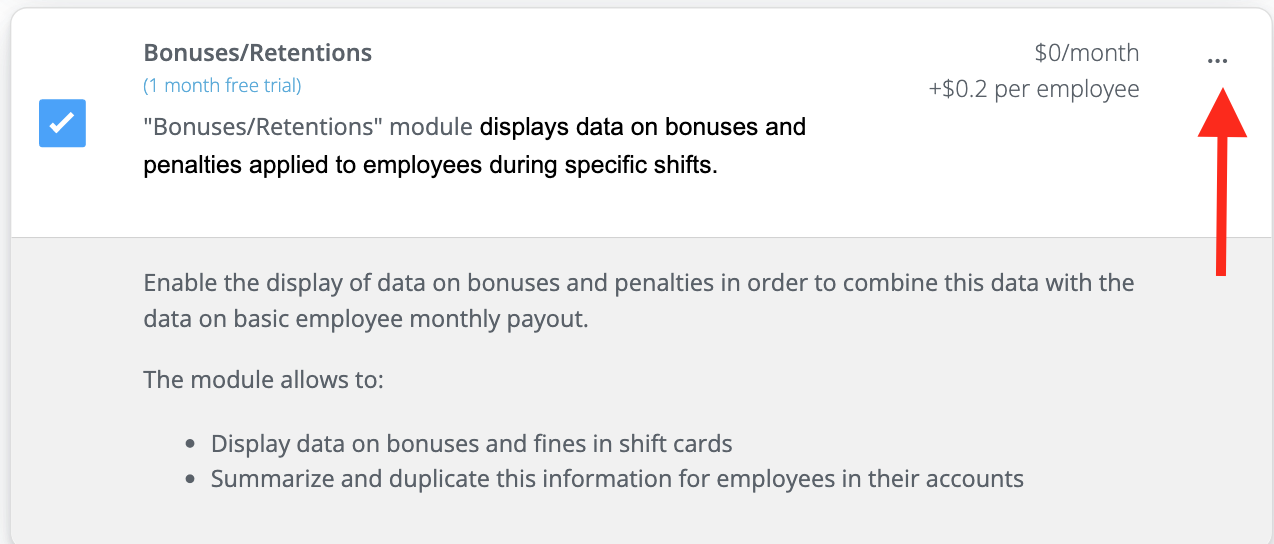
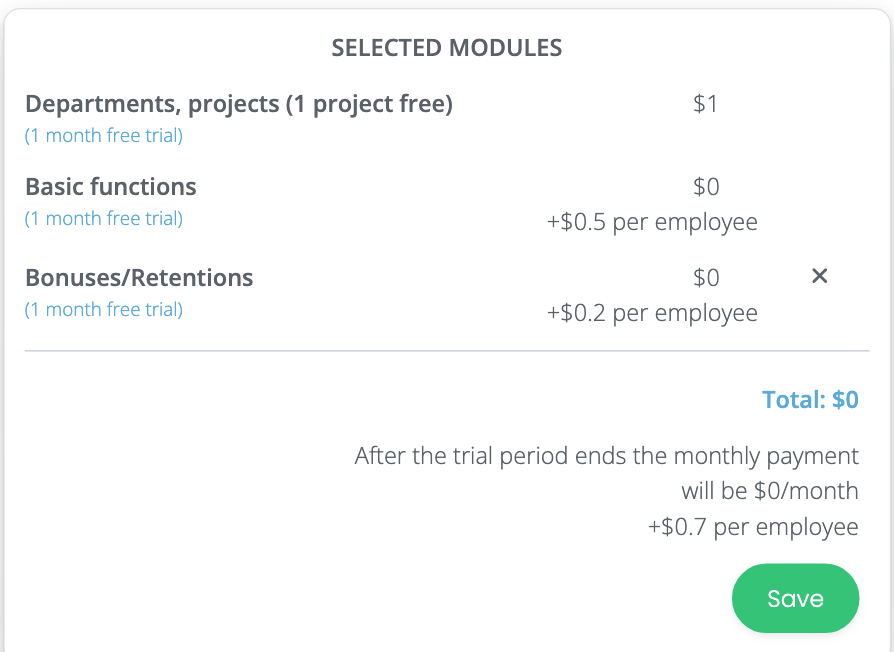
After selecting the module, click the "Save" button to activate it.
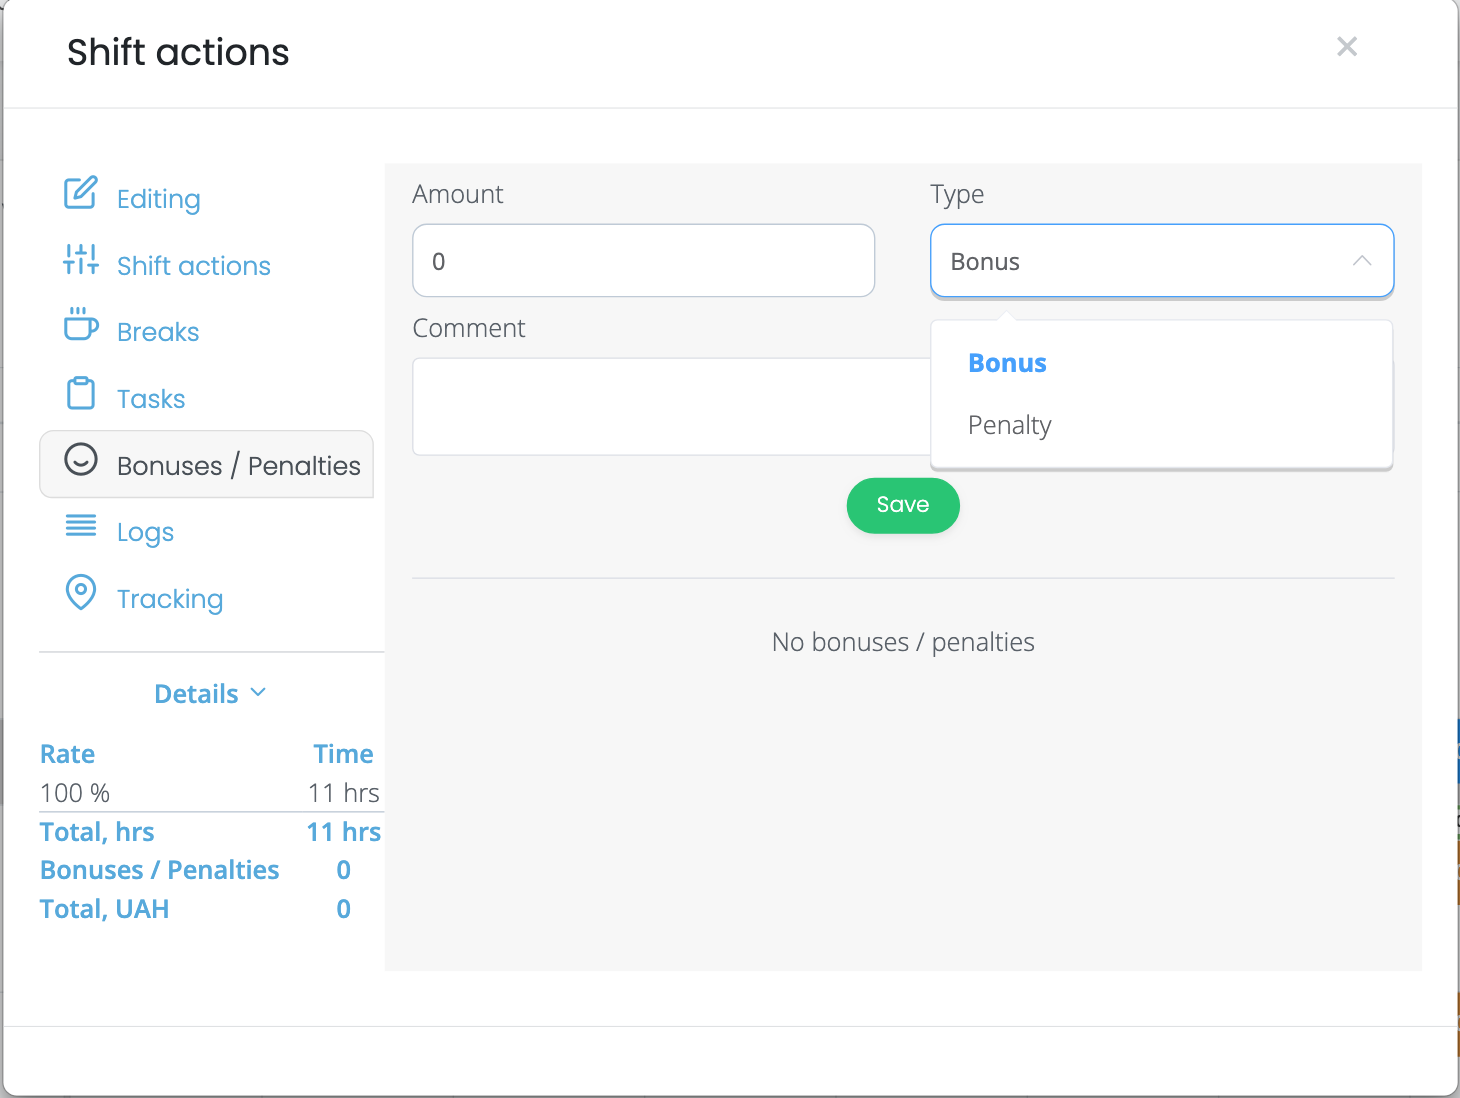
To add bonuses or penalties, you must click on the shift to which you want to add a bonus/penalty.
Click on the “Bonuses/Penalties” tab.
On this tab, you must specify the amount, type of Bonus, or Penalty.
It is also possible to specify a comment on the bonus/penalty, for example, a penalty for being late, etc.
Then you need to click on the “Save” button.
¶ Vacation management
How to set up the Vacation Management module.
The "Vacation Management" module allows you to control, limit employees in creating requests for time off. Before activating the module, you must do the following:

- Click on the icon with the avatar (in the upper right corner).
- Select the "Modules" section.
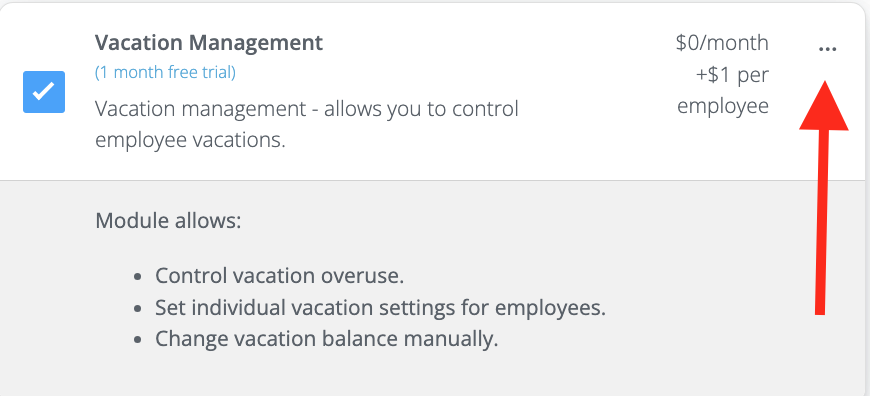
In the list that appears, check the item "Vacation Management".
Click on the "..." icon to see detailed information about the module.
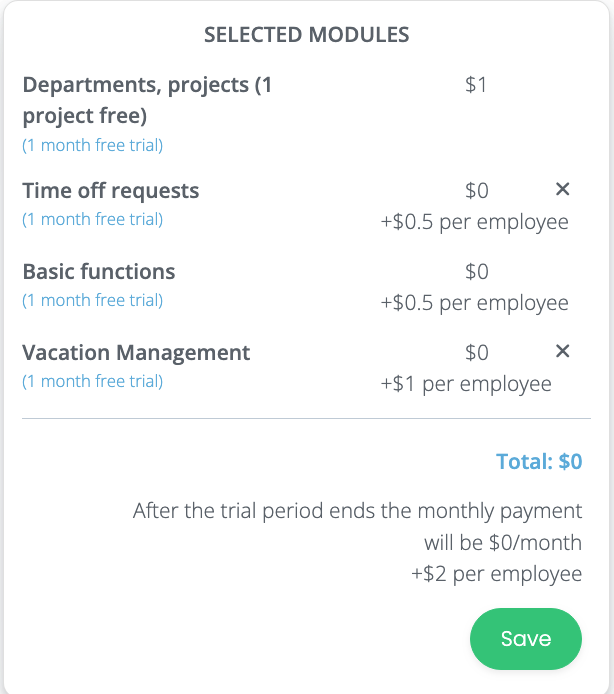
After selecting the module, click the "Save" button to activate it.
Note! For this module to work, you need the “Requests for time off” module.
To set up employee vacations, you need to:
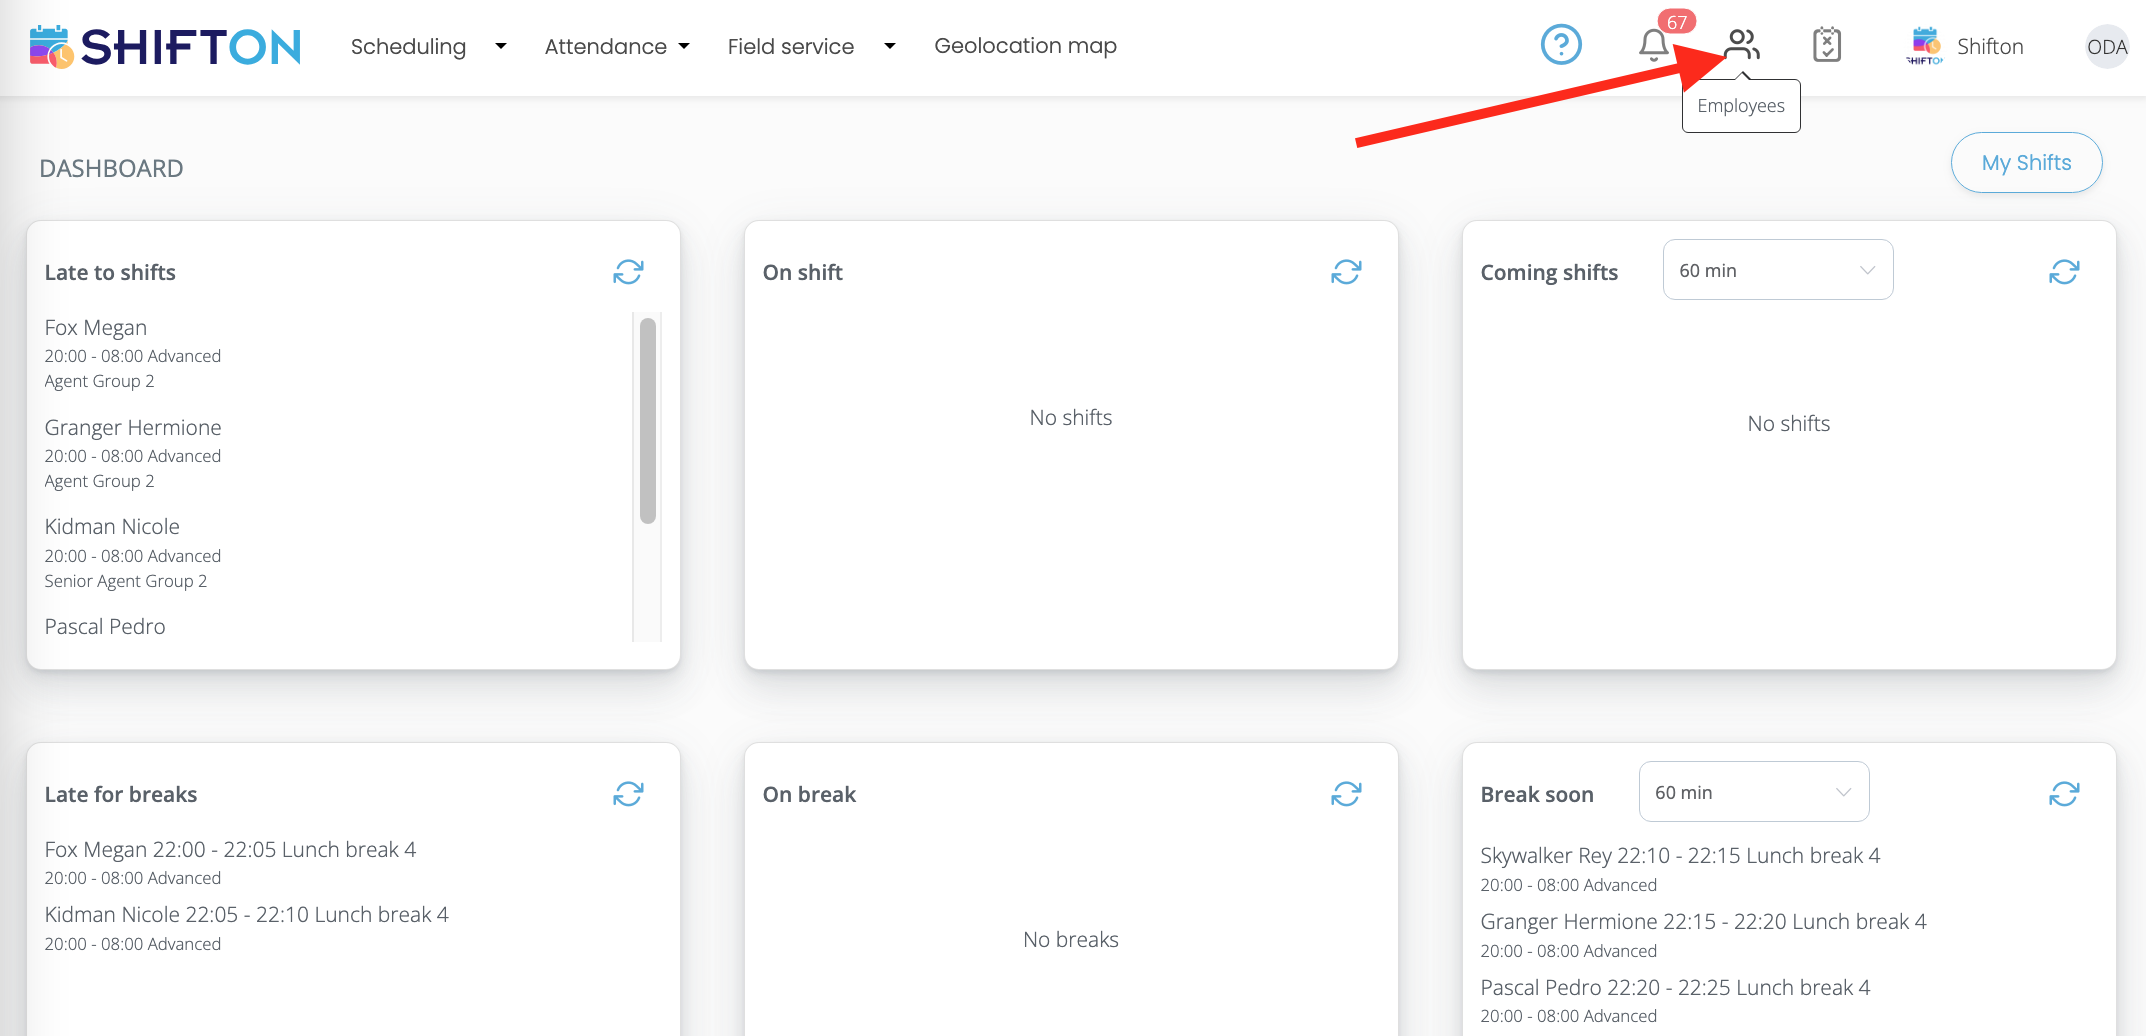
- Click on the "Employees" icon.
- Near the employee, click on the “Eye” icon.
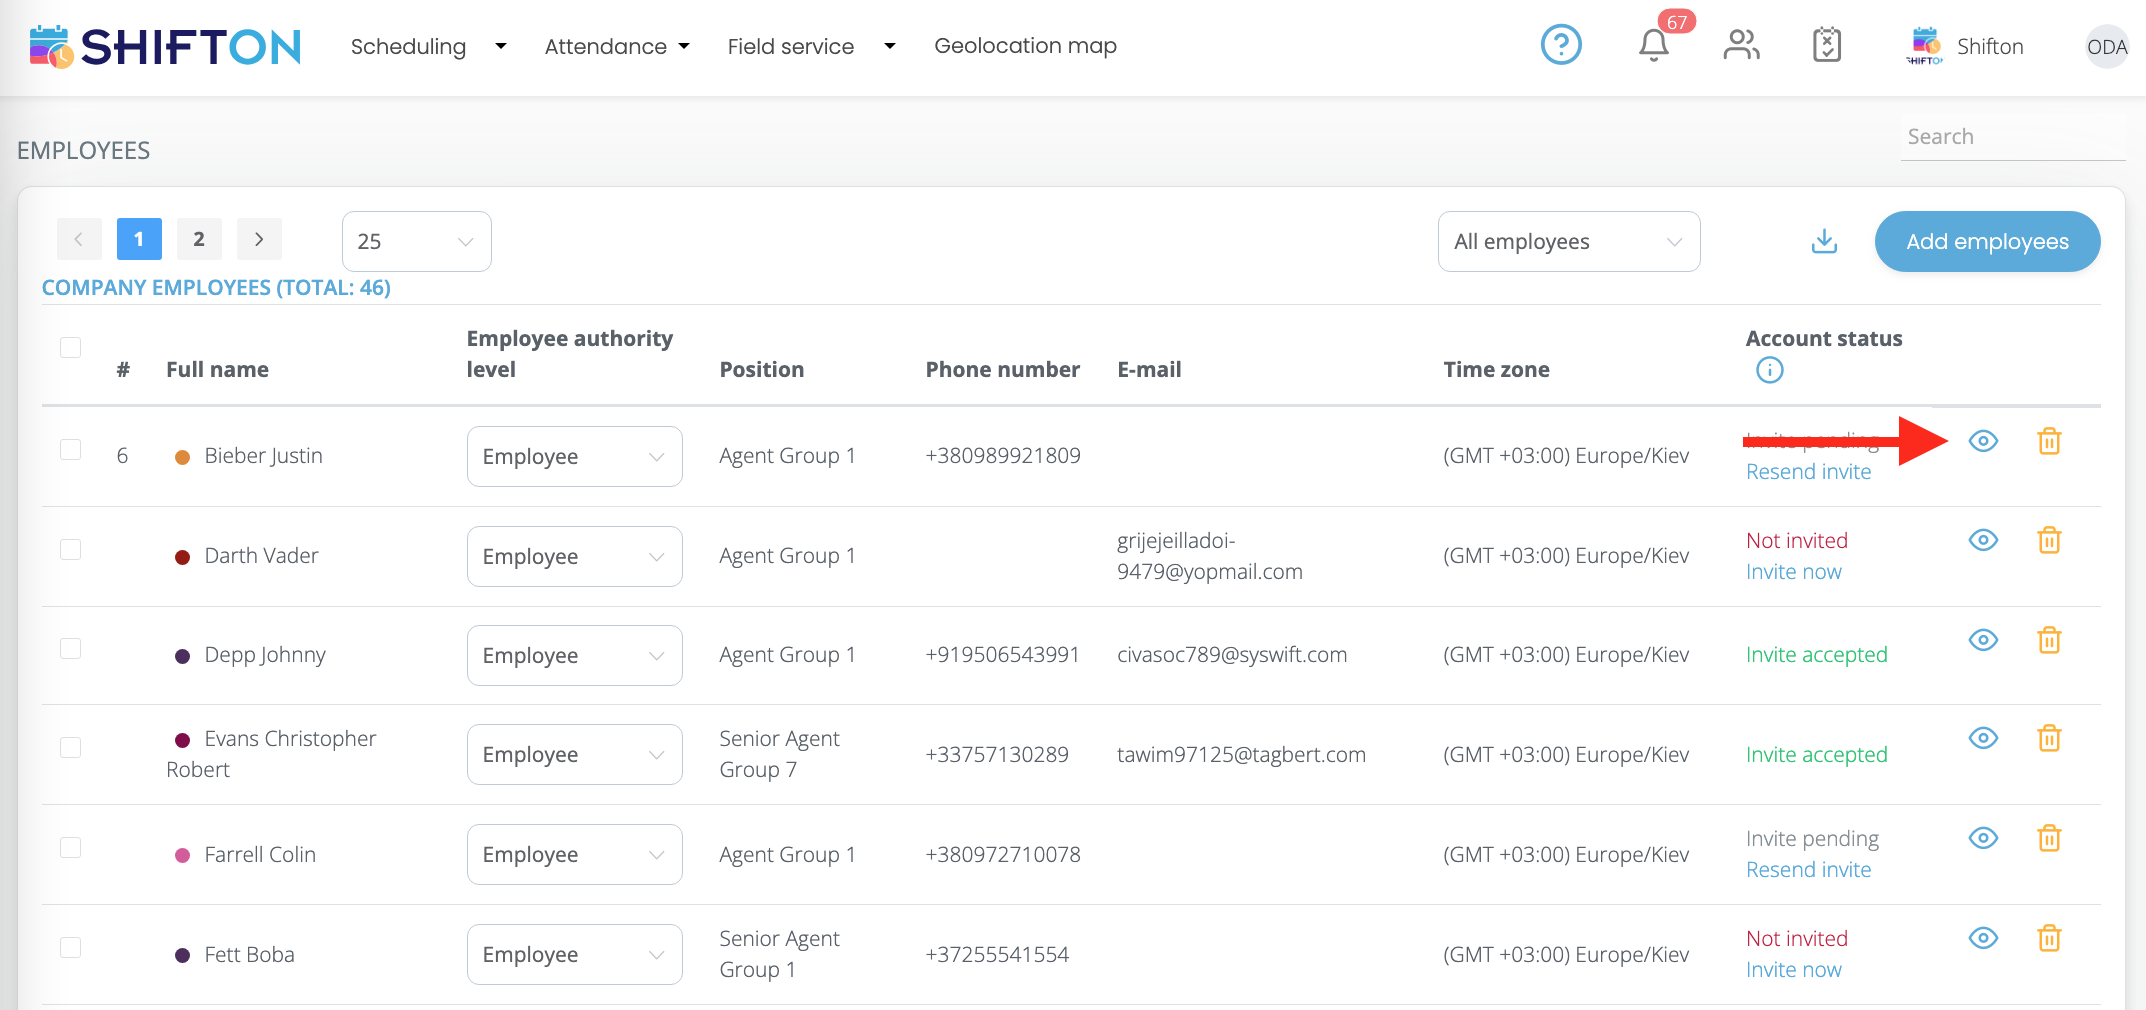
On the page that appears, click on the “Vacations” tab.
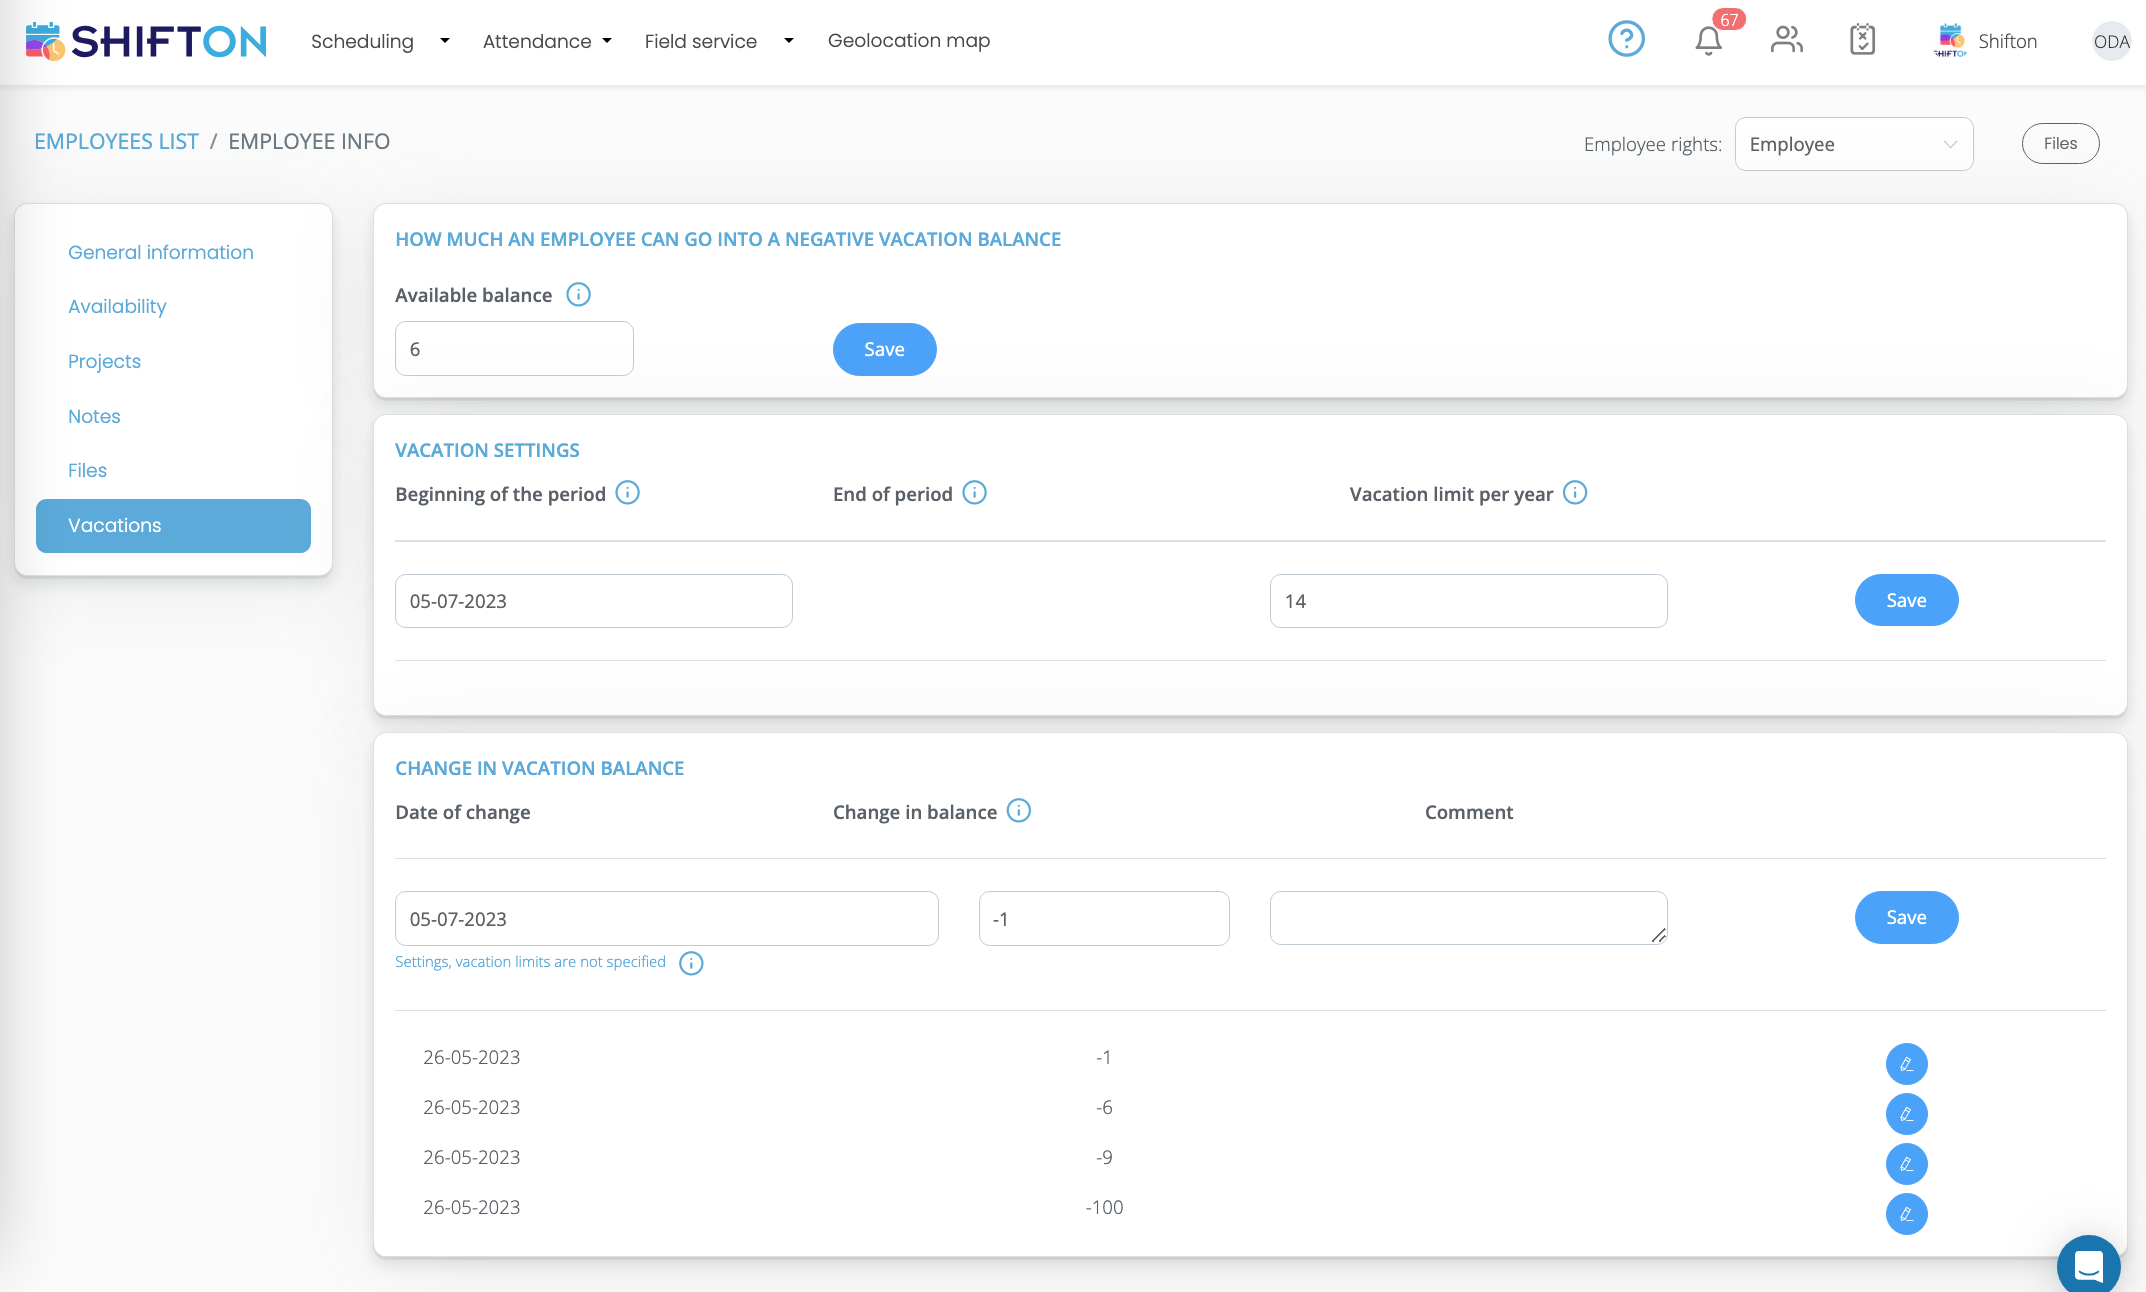
On this page, you need to fill in the following information:
1. Available balance. In this parameter, you can specify for how many days an employee can enter a negative vacation balance. For example, if you specify 5 days, and the employee has 3 vacation days available, then the total number of allowable vacation days will be 8 days.
2. Vacation settings
Start of period: This parameter specifies the start of the period for the holiday setting. For example, you can specify the date when the employee was hired or the beginning of the period when new changes in vacation take effect for the employee (the number of allowable vacation days per year changes).
Vacation limit per year: this parameter specifies the allowed number of vacations per year in the selected period. The final number of available days depends on this setting and the specified period. For example, specifying 24 days of vacation, and the period starting from January 1 of the current year, then by June, the employee will have 12 days of vacation available (2 days of vacation are given per month according to the formula: 24 days / 12 months = 2 days in a month).
3. Change in the balance of holidays. This parameter records all transactions that were created manually and that were created when creating queries. Each change affects the total number of vacation days allowed for an employee.
To configure the settings for the "Holiday management" module.
- Click on the avatar icon (upper right corner).
- Select the "Modules" section.

On the page that appears, click on the “Vacation Management” tab.
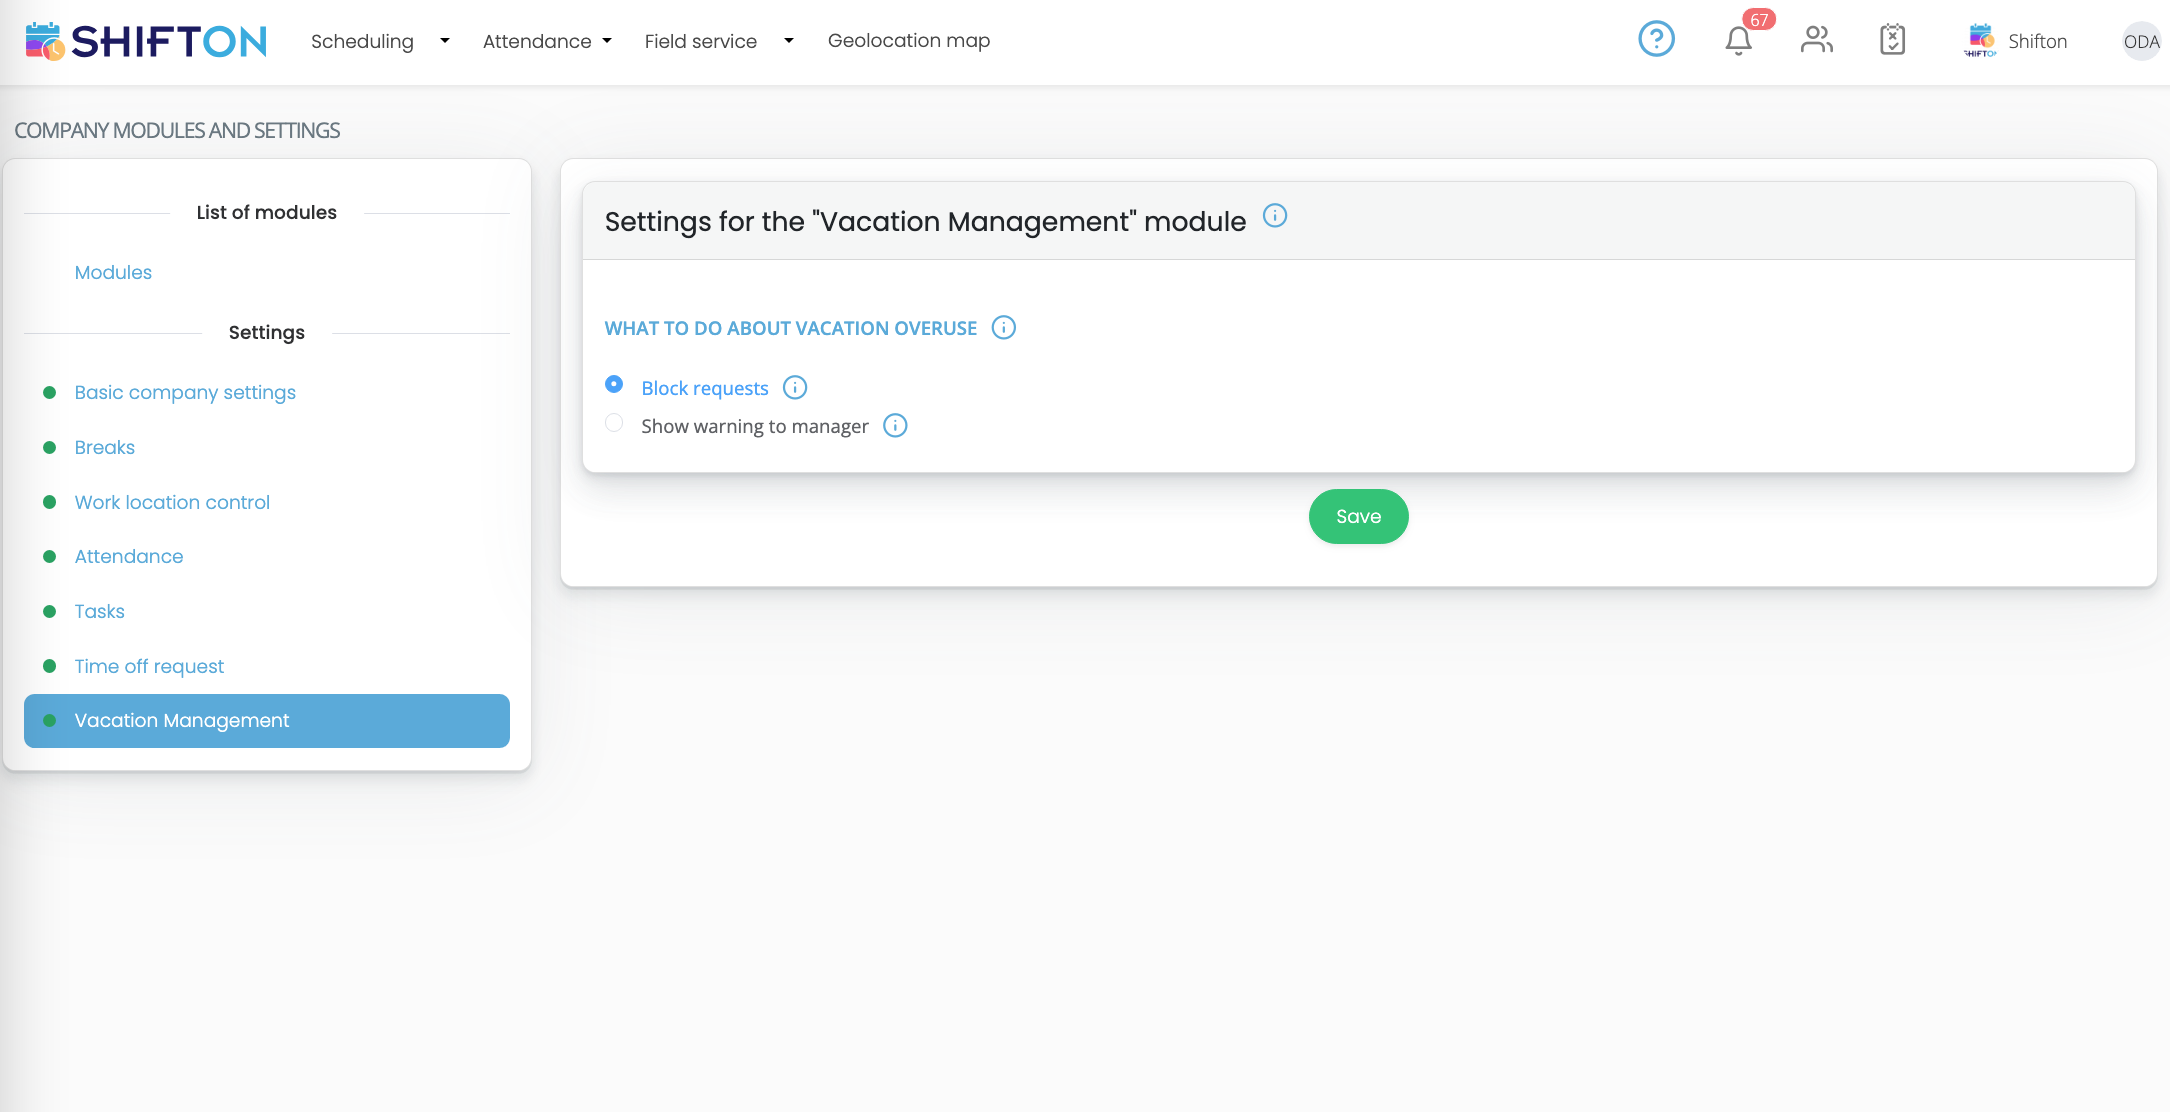
In order for requests that go beyond the limit to be blocked, select the “Block requests” option.
In order for requests that go beyond the limit to be created, but a warning about limit overuse is displayed to the manager, select the “Show warning to manager” option.
For the changes to take effect, click on the “Save” button.