¶ Scheduling
¶ “Basic”
Before you start
If you are not registered in Shifton, create an employer account here.
Here is the link for the registration guide.
If you are registered in Shifton, sign in.
Worktime schedule setting
Click on the icon.
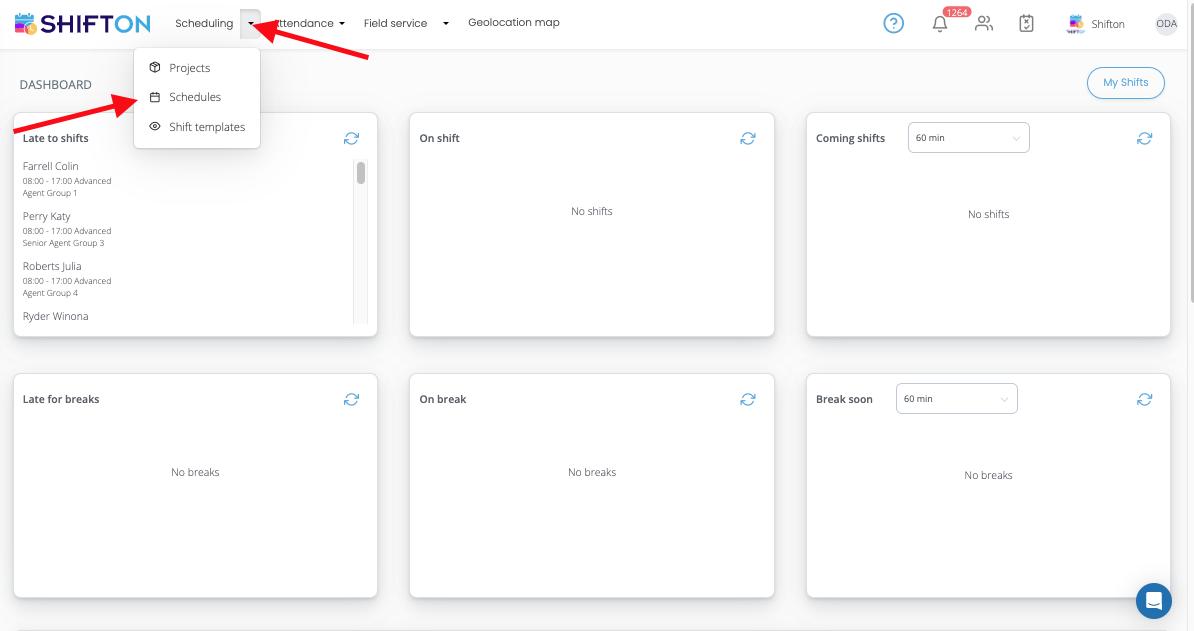
In a dropdown list select “Schedules”
To create a new schedule click on "Add schedule"
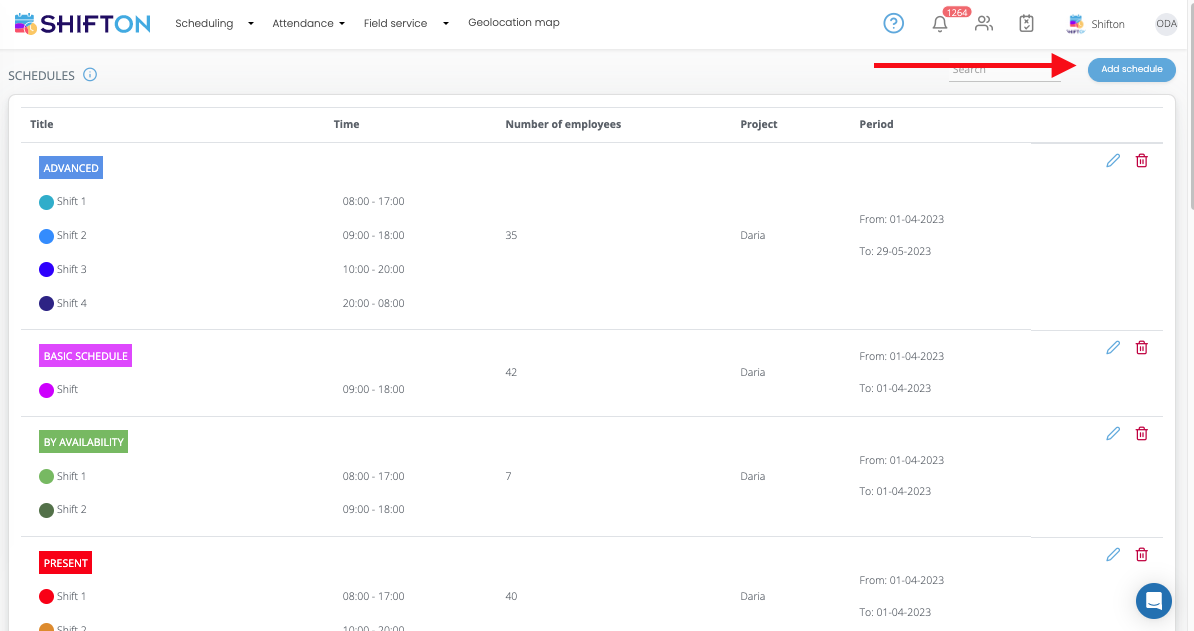
Schedule creation is separated into a few steps:
General Information
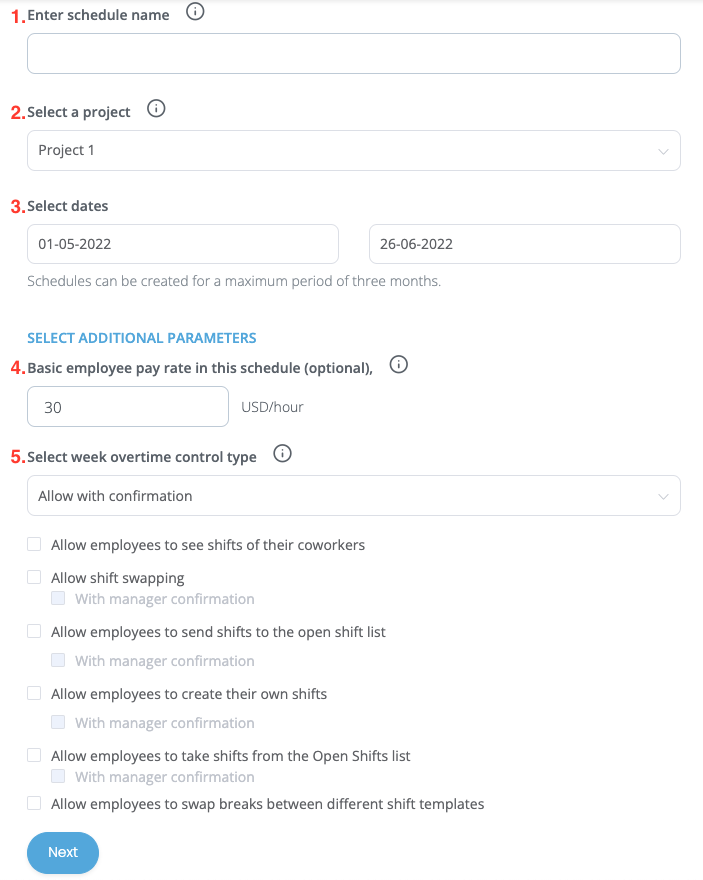
Here you have to:
- Put the schedule`s name
- Select a project for this schedule
- Select a period, during which this schedule will be active
- Set the basic pay rate for employees in a chosen currency.
*You can allow shift swapping for employees and a lot more (with the manager`s confirmation or not)
Once you are done with the first step - you reach the second one.
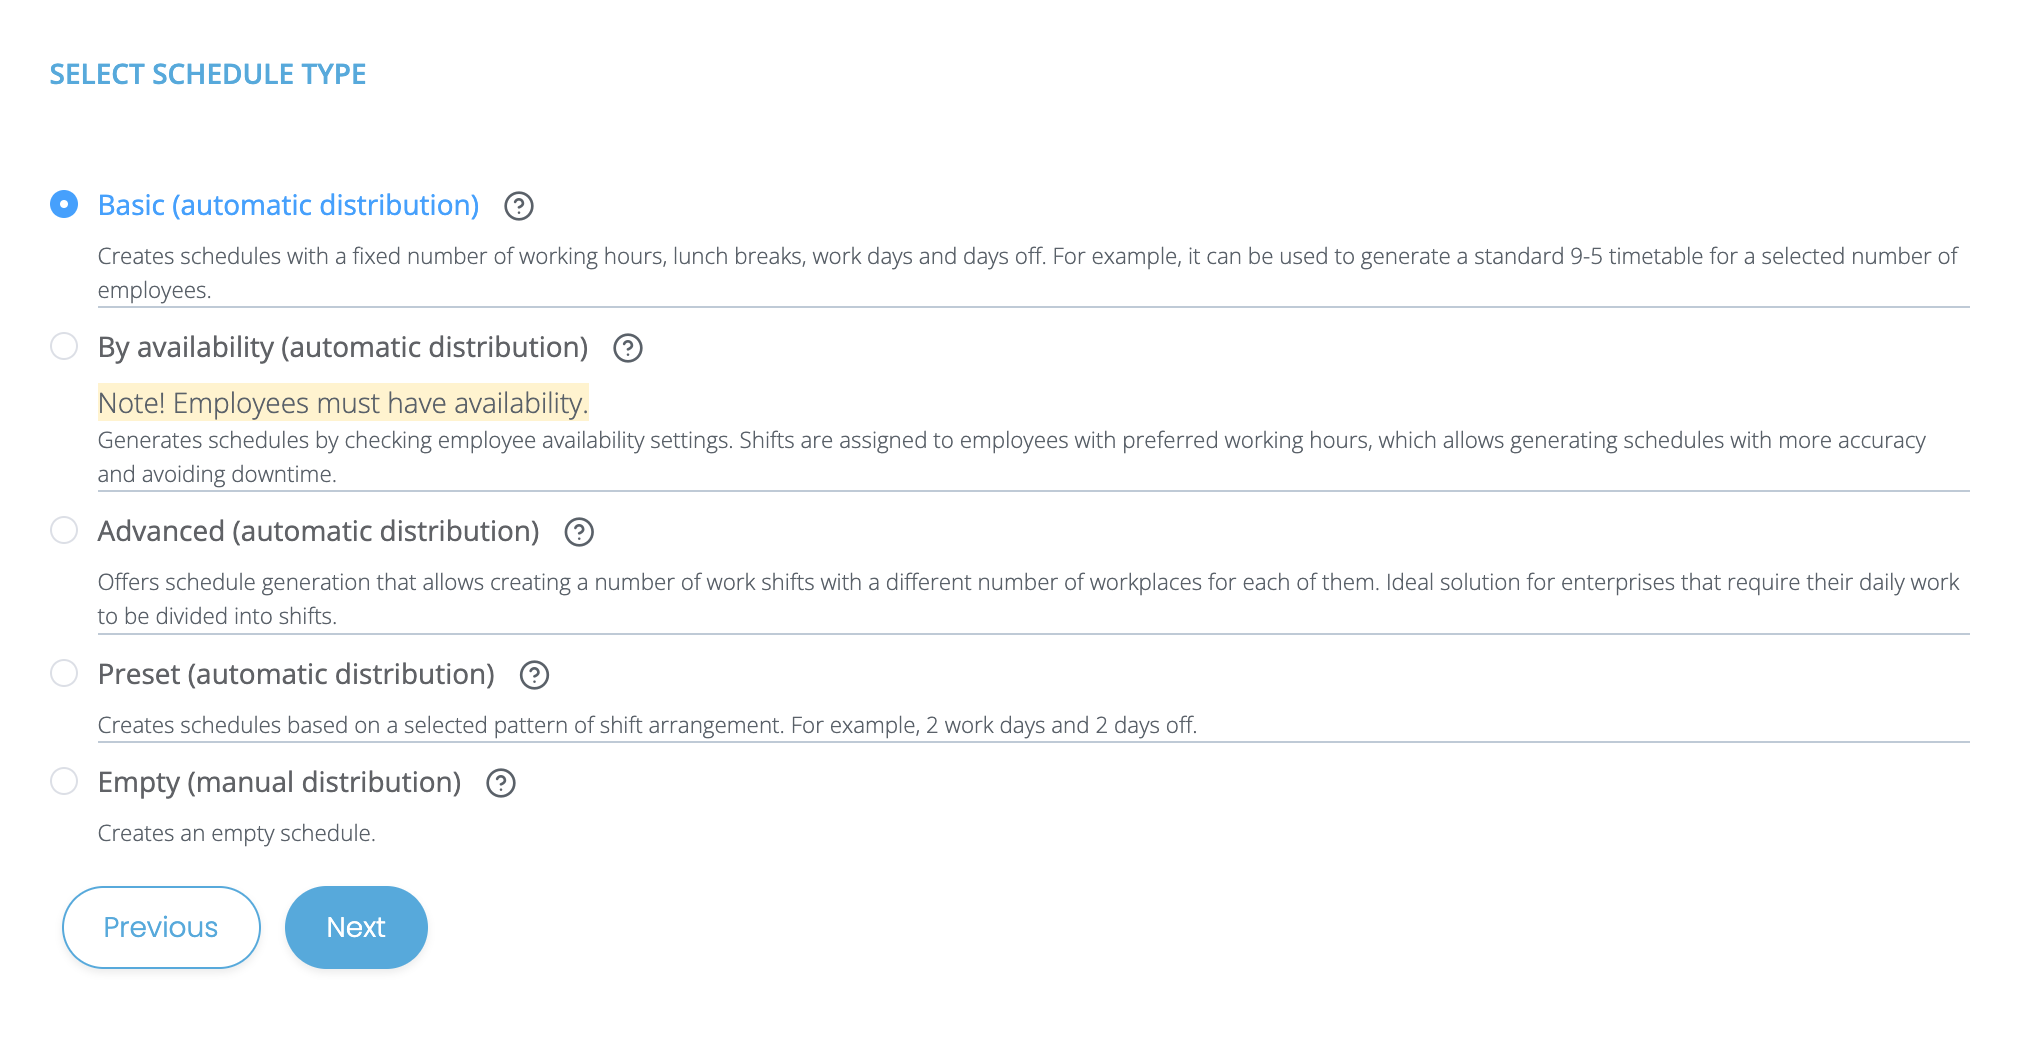
Schedule type
In this tab, you have to choose the “Basic” schedule type in this list.
Shifts data
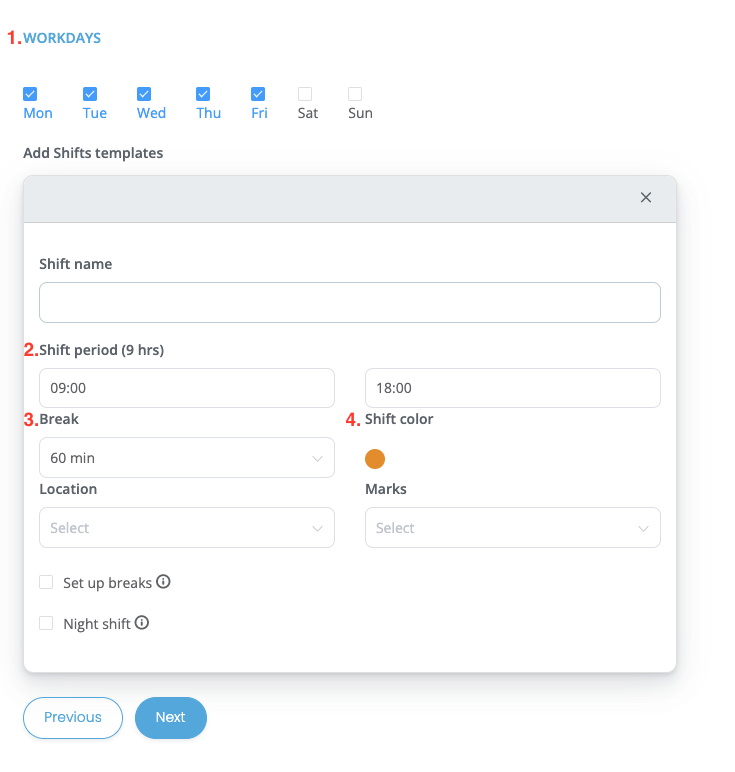
Here you have to:
- Select work days and off days of this schedule.
- Select or create shift templates.
During the template creation:
- Put the template`s name
- Set the start and end of this shift.
- Set up the duration of the break
- Select the shifting color on the schedule.
In a “Basic” schedule type only one shift template uses.
Employees
At this step you have to choose employees from the projects, that will be added to a new schedule. The schedule can be created for some or all of the employees.
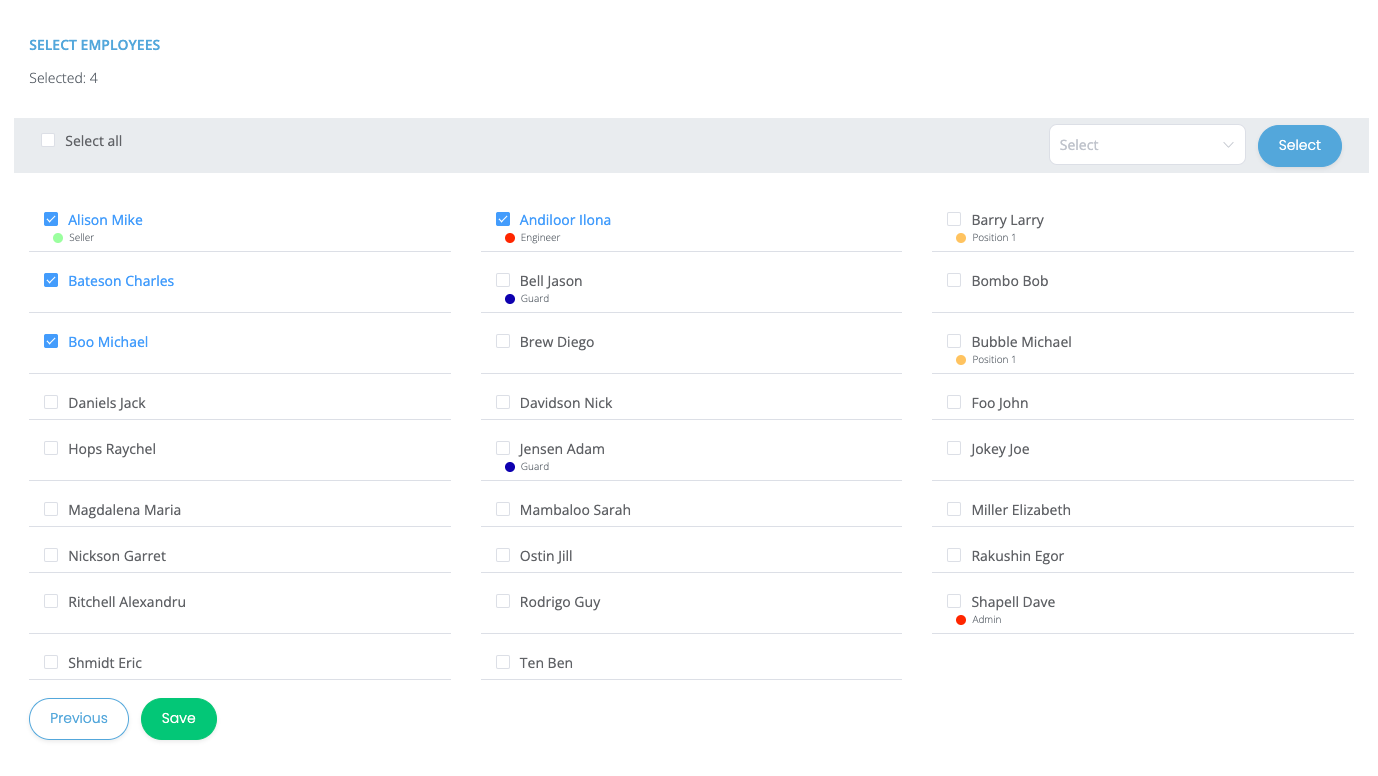
Click “Save” and during the next minutes on the “Company Schedule” page, the new shift will appear.
¶ “Empty”
Before you start
If you are not registered in Shifton, create an employer account here.
Here is the link for the registration guide.
If you are registered in Shifton, sign in.
Worktime schedule setting
Click on the icon.

In a dropdown list select “Schedules”
To create a new schedule click on "Add schedule"
Select "Schedule List" from the list that appears.
To create a new schedule, click on the “Add schedule” button.

Creating a work schedule is divided into several stages:
Basic information
In this section, you need to do the following:

- Assign a title to the schedule.
- Select the project that this schedule applies.
- Specify the period during which the schedule will be valid.
- Set the base salary rate for employees in the selected currency.
*If necessary, you can allow the exchange of shifts between employees and other functions (with or without manager confirmation).
After completing these settings, you will be taken to the second stage of scheduling.
Schedule Type
In this tab, select “Empty” from the list of options.
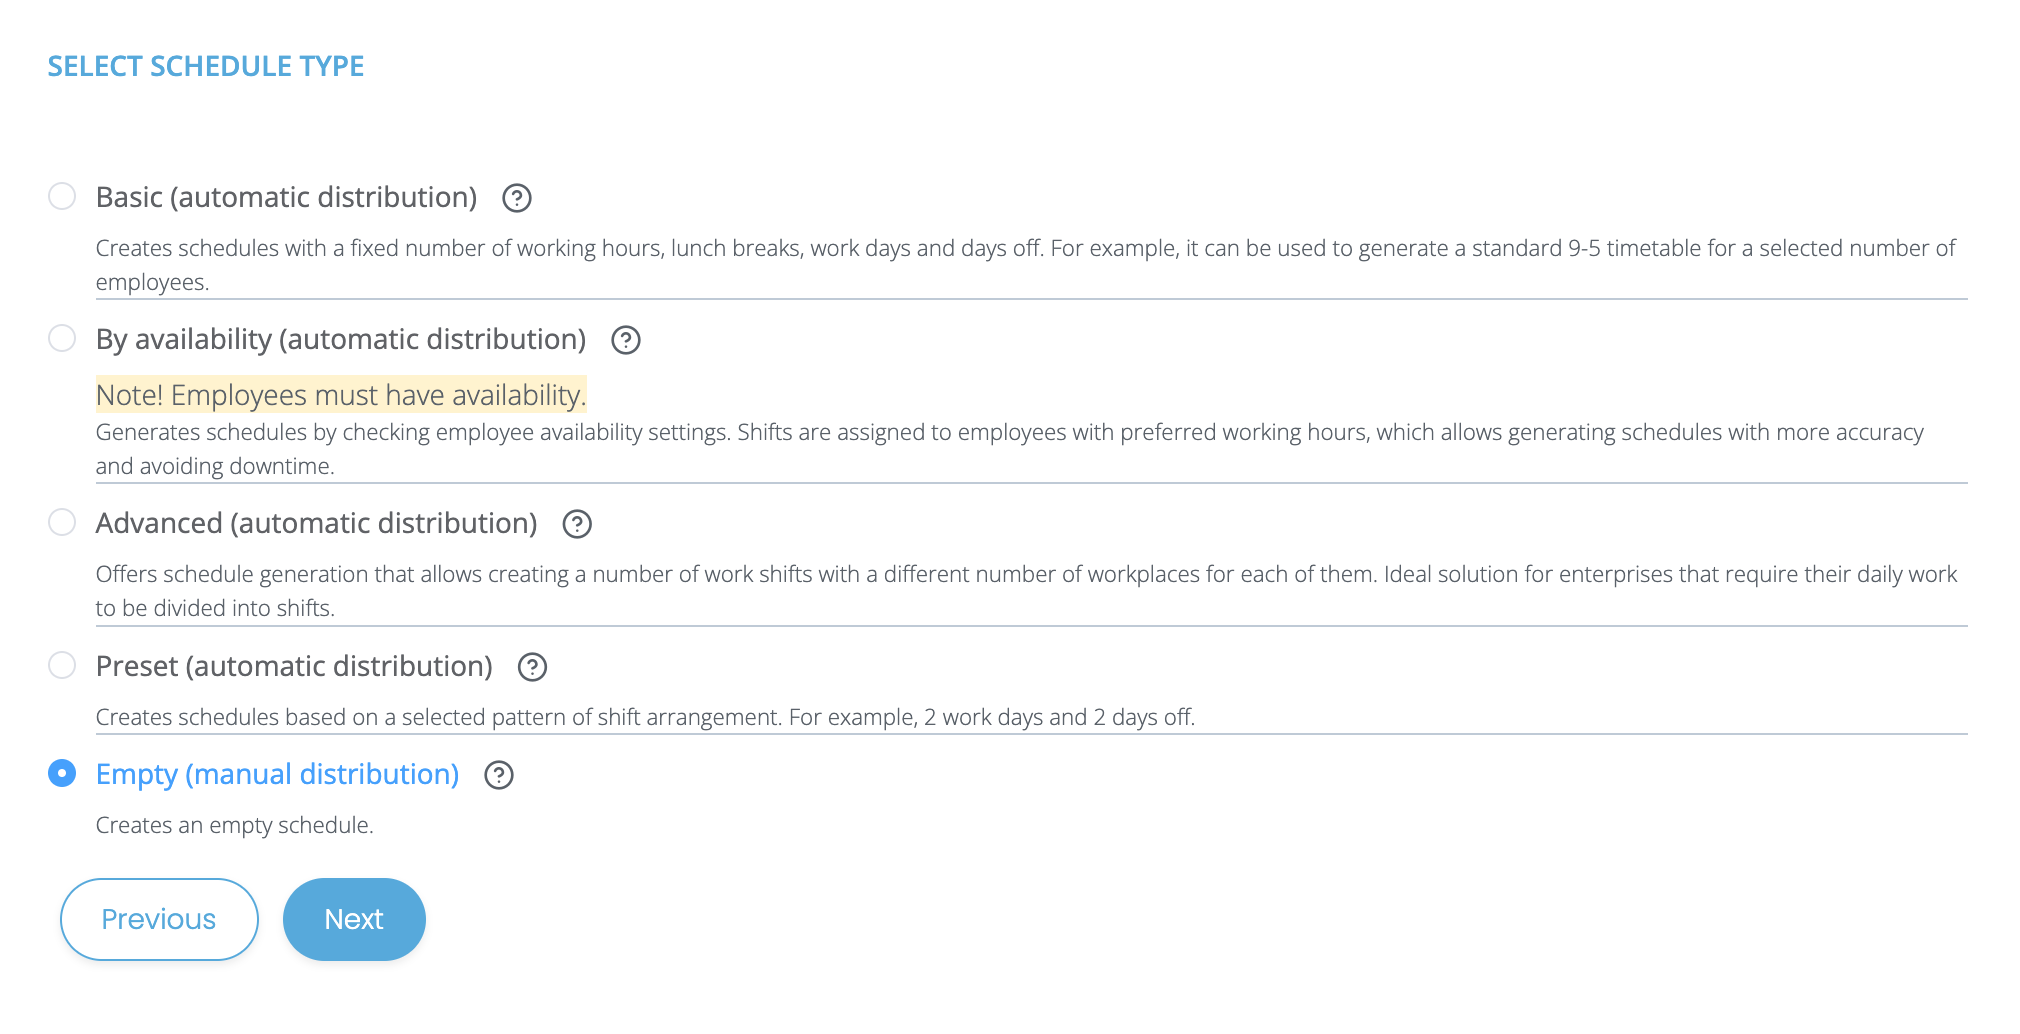
The schedule will be created after you click on the “Next” button.
On the “Company Schedule” page, you must manually create employee shifts.
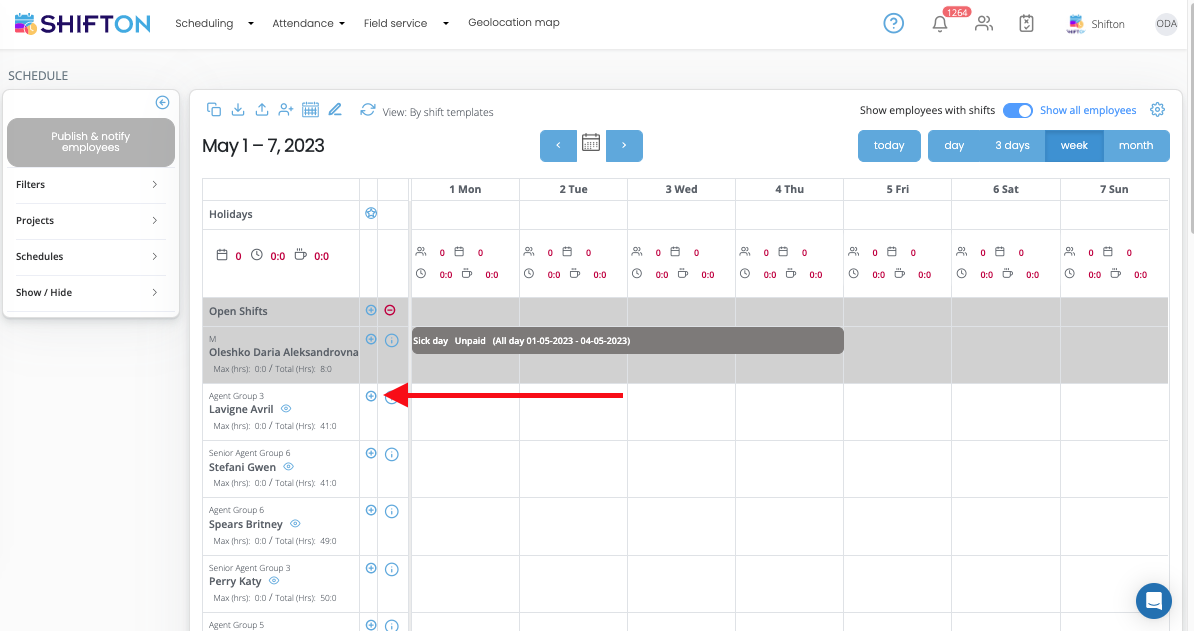
To do this, click on the “+” icon to the right of the employee’s name.
In the window that appears, do the following:
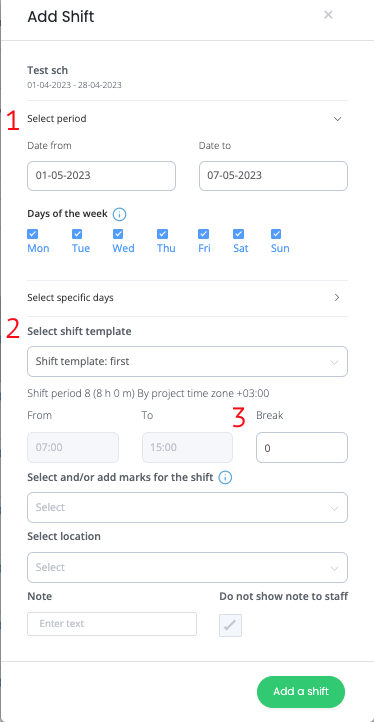
- Select the period for which you want to add shifts.
- Set the start and end time of the shift.
- Specify break duration
You can find more detailed instructions on adding shifts by clicking on the link.
Then click on the "Add Shift" button.
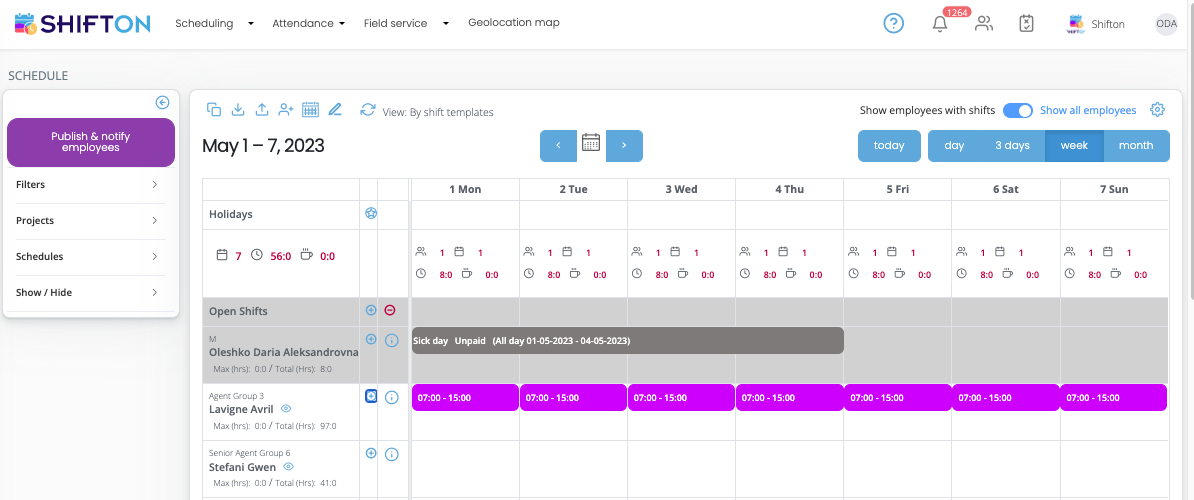
After that, the added shifts will appear in the company's schedule.
¶ “By availability”
Before you start
If you are not registered in Shifton, create an employer account here.
Here is the link for the registration guide.
If you are registered in Shifton, sign in.
Setting the Availability of Employees
Before setting up the “By Availability” schedule, you need to set the available time for the employees you are going to add to the schedule.
If the employee is not registered, click on the “Employees” icon.

Click on the "eyes" icon.

Click on the "Availability" button
On the next page, you need to add accessibility/unavailability.
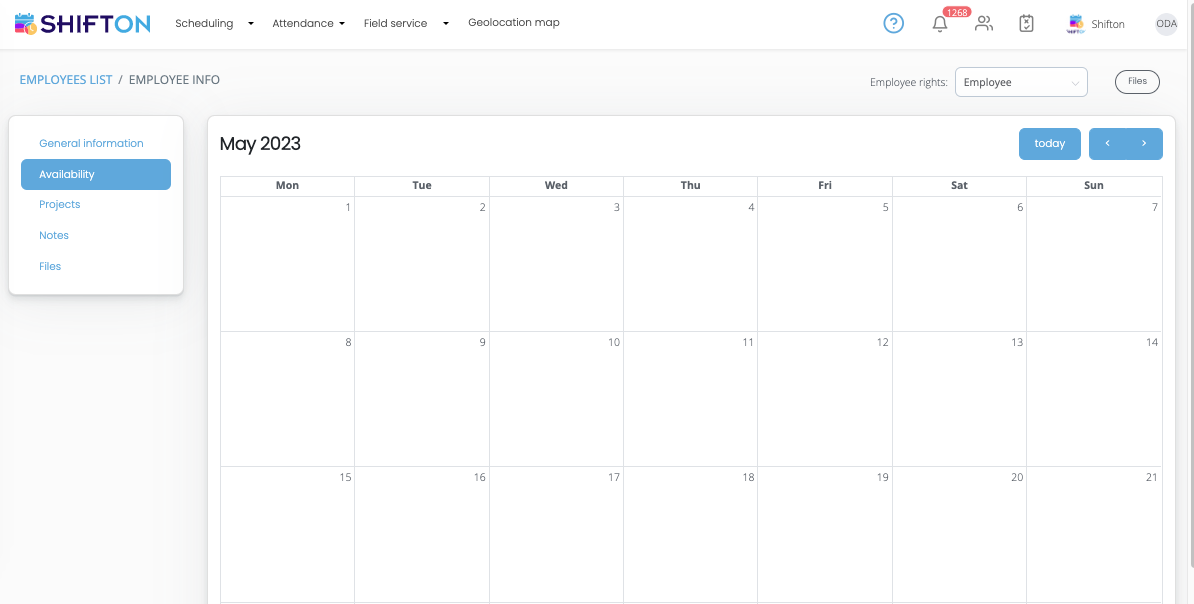
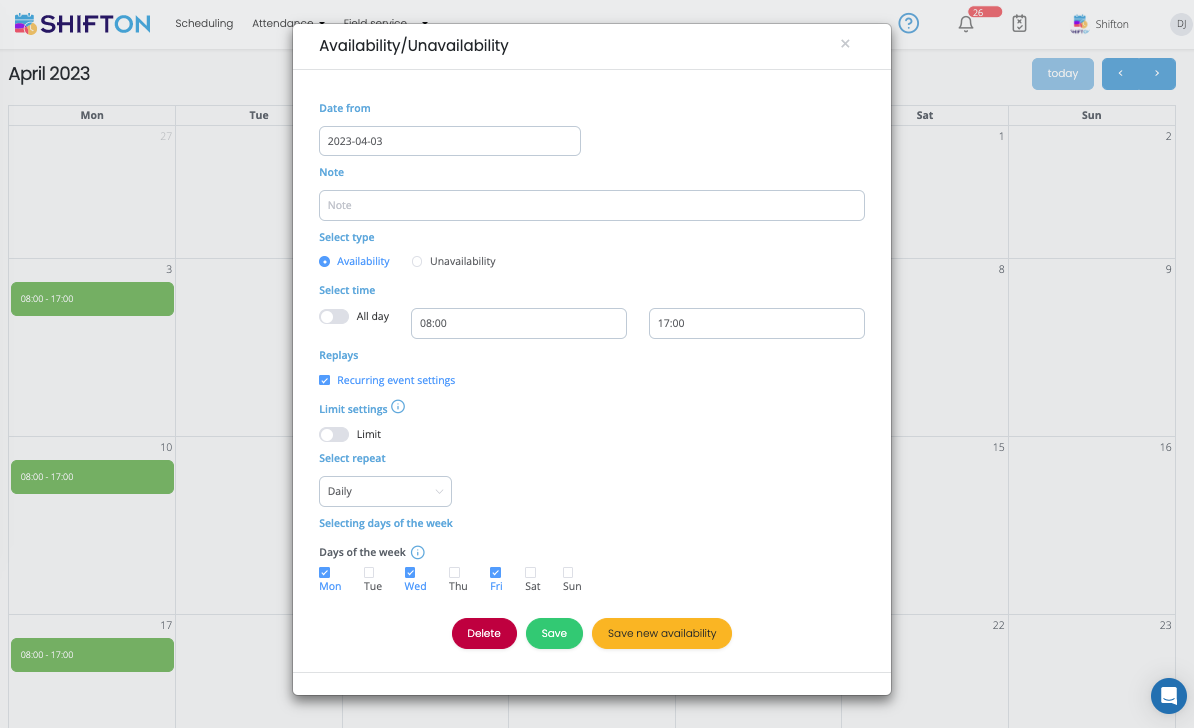
In the window that appears, fill in the data:
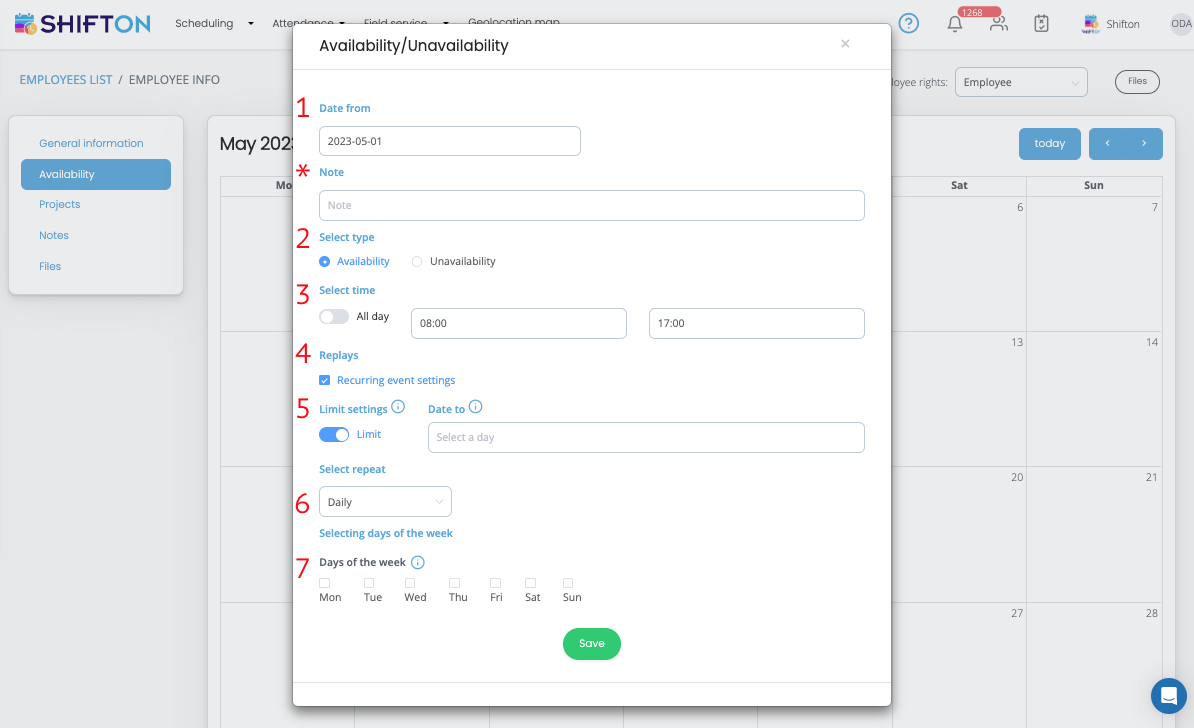
1. The date from which you want to add availability/unavailability.
2. Select the type “Accessible” / “Unavailable”.
3. Select the time for which the availability / unavailability will be created. "All day" or the time for which you want to create availability/unavailability.
4. If you need to set repetitions, then for this you need to enable the option “Settings of recurring events”.
5. If you need to set a limit on the date until which you want to set the availability / unavailability, enable the “Limit” option, then specify the “Date until”.
6. Select the frequency of repetitions for which “Availability / Inaccessibility” will be set: Daily, Weekly, 2 weeks.
7. Select the days of the week on which events will repeat
After completing the settings, click on the “Save” button.
Registered employees can independently set the available time.
To do this, they must do the following:
- Click on the company settings icon
- Click on the "When I'm available" button
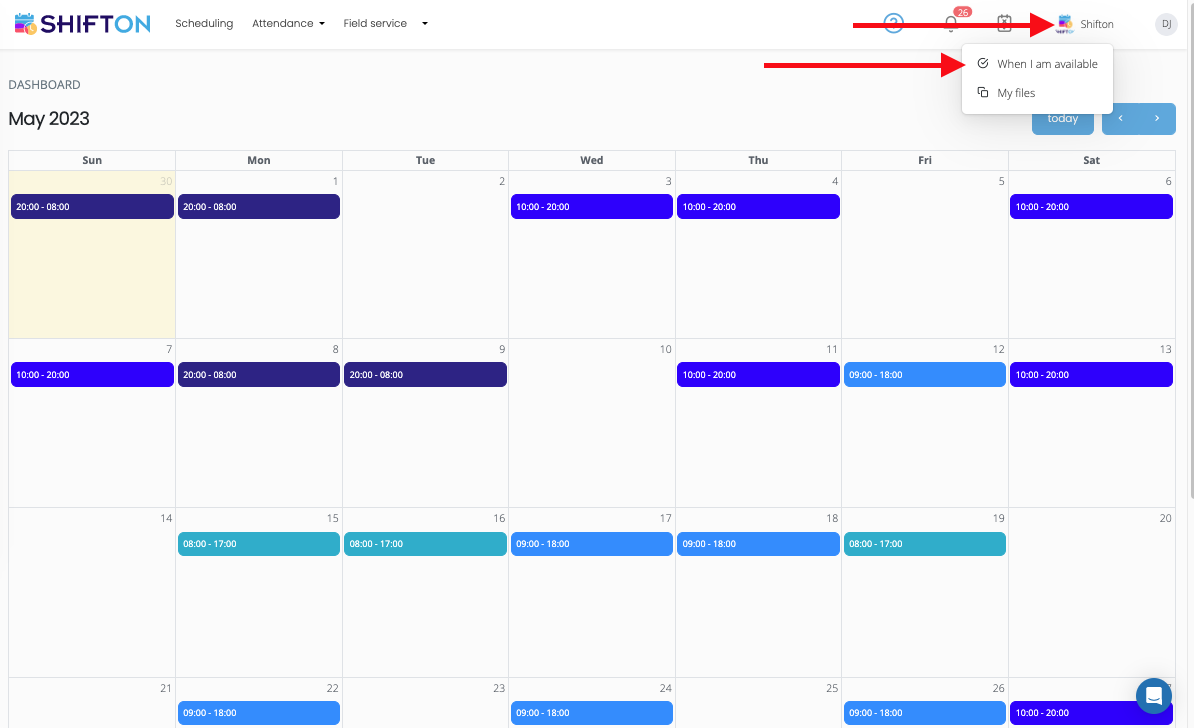
On the page that appears, click on the day for which you want to add availability / unavailability.
Availability/Unavailability periods can also be removed by clicking on an existing availability/unavailability.
And in the pop-up window, you must click on the "Delete" button.
Setting up a work schedule
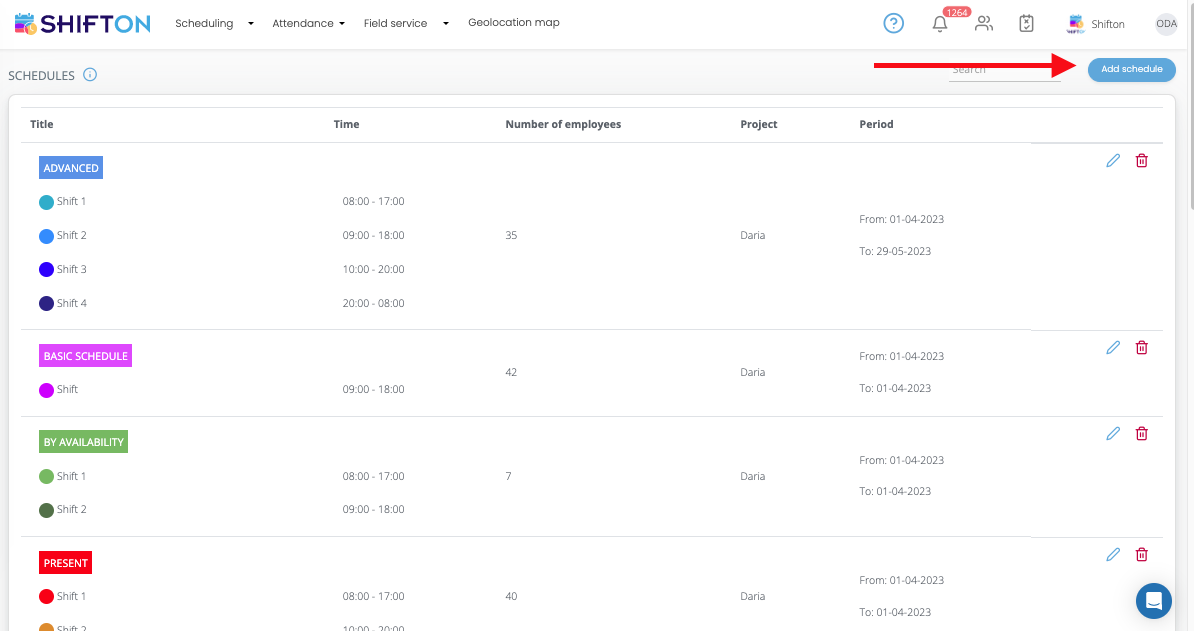
Click on the icon.

Select "Schedules" from the list that appears.
To create a new schedule, click on the “Add schedule” button.
Creating a work schedule is divided into several stages:
Basic information
In this section, you need to do the following:

- Give the schedule a name.
- Select the project to which this schedule applies.
- Set the period during which the schedule will be valid.
- Set the base wage rate for employees in the selected currency.
*If necessary, you can allow the exchange of shifts between employees and other functions (with or without manager confirmation).
After completing these settings, you will be taken to the second stage of creating a schedule.
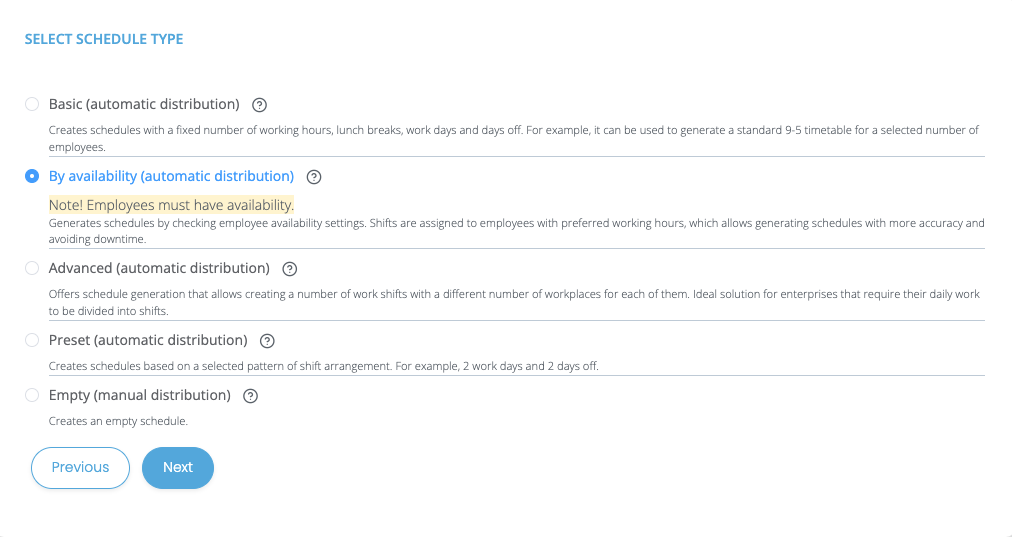
Schedule Type
At this stage, select "As available" in the list of schedule types.
Shift Data
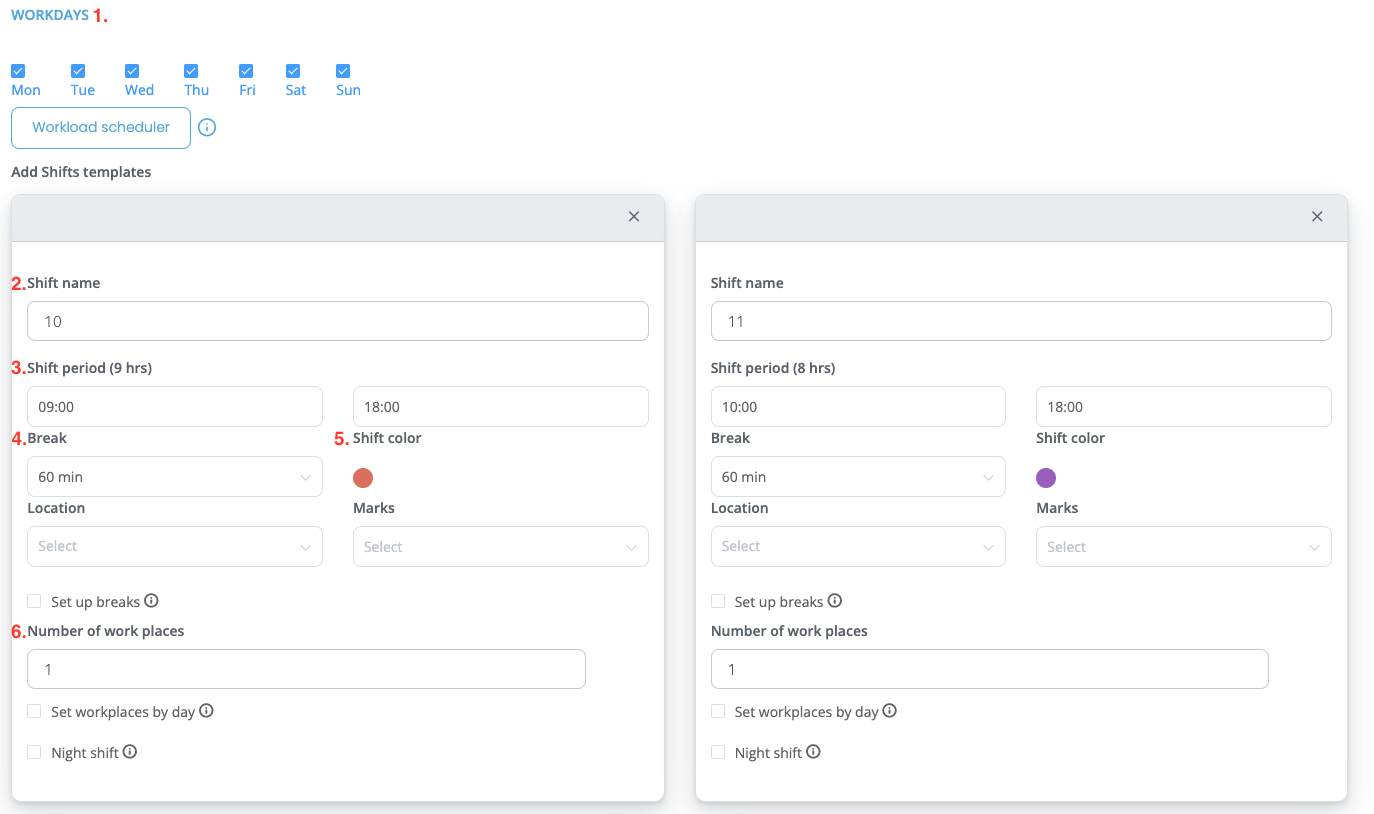
In this section of schedule settings, do the following:
- Set working and weekend schedules.
- Select or create shift templates
When creating new templates:
- Name your templates
- Set start and end times for shifts
- Adjust the length of your lunch break
- Choose the color of the shifts on the schedule
- Set the number of workers on each shift
*Optionally, you can create a note or add a location.
*Option "Number of workplaces/day" allows you to set a different number of workplaces for each day of the week.
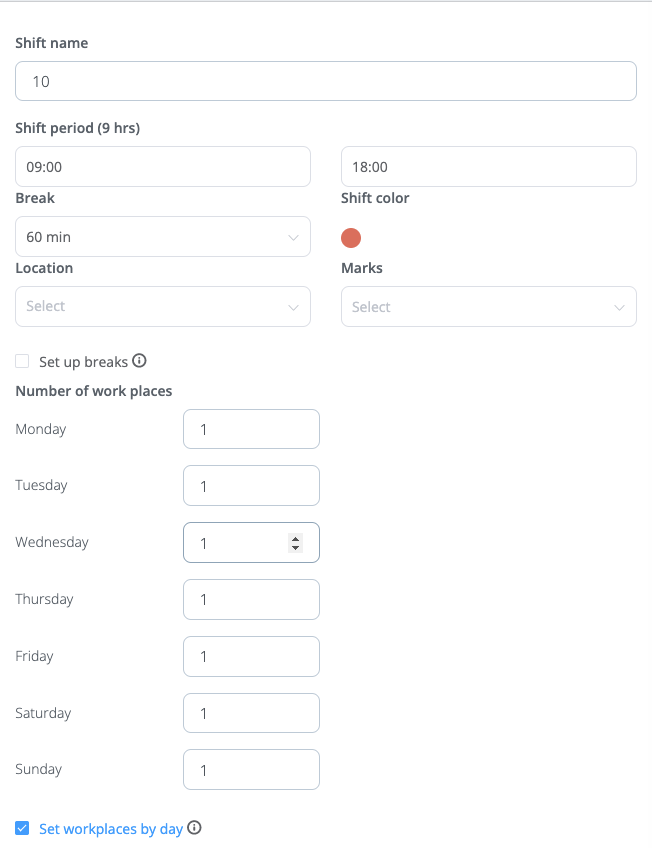
In the “Available” type, you can use several shift templates.
Working time setting
On this page, you need to select the appropriate options for the schedule.
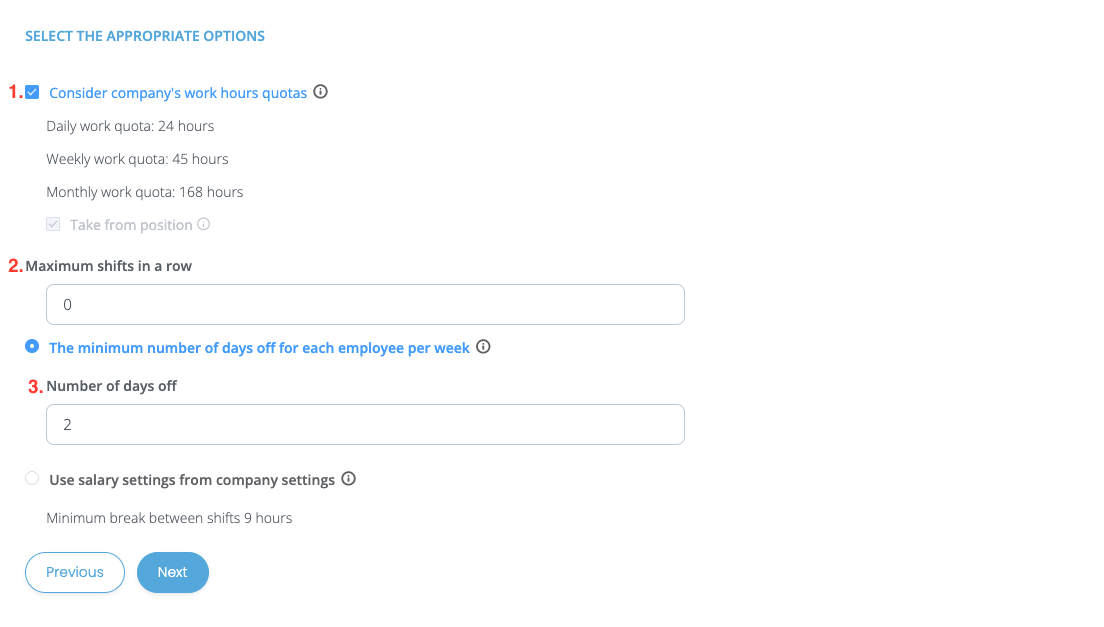
- For the system to generate schedules according to the norms specified earlier in the company, you must tick the box: "Take into account the norm of working hours in the company"
- Specify the maximum number of shifts in a row.
- Select which settings to take into account:
- The minimum number of days off for each employee per week. (Enter the number of days off which must be taken into account when generating the schedule).
- Use the salary settings from the company settings.
*Put a selection in the required field.
Employees
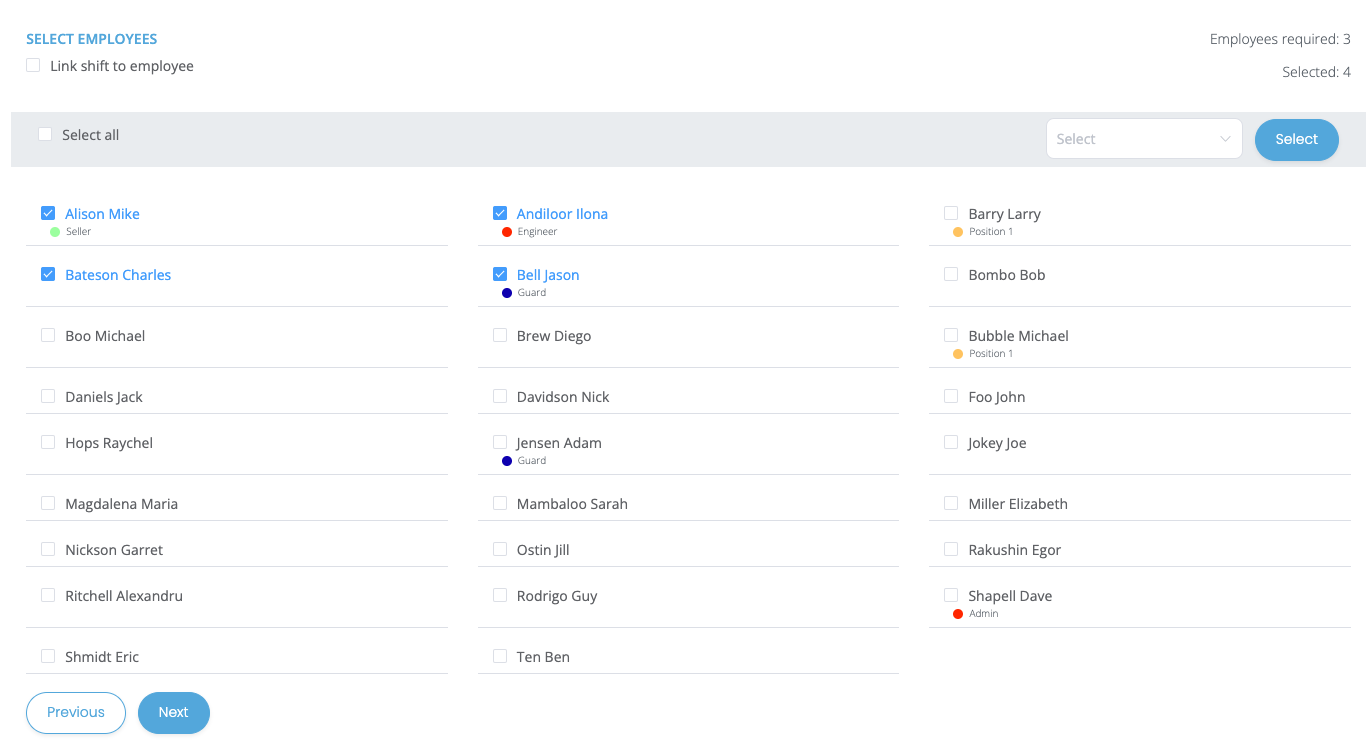
At this stage, you need to select the project employees who will be added to the work schedule. You can create a schedule for several or all employees.
Schedule Preview
Here you can see the time of created shifts, as well as how many of the required employees are assigned to each of them.
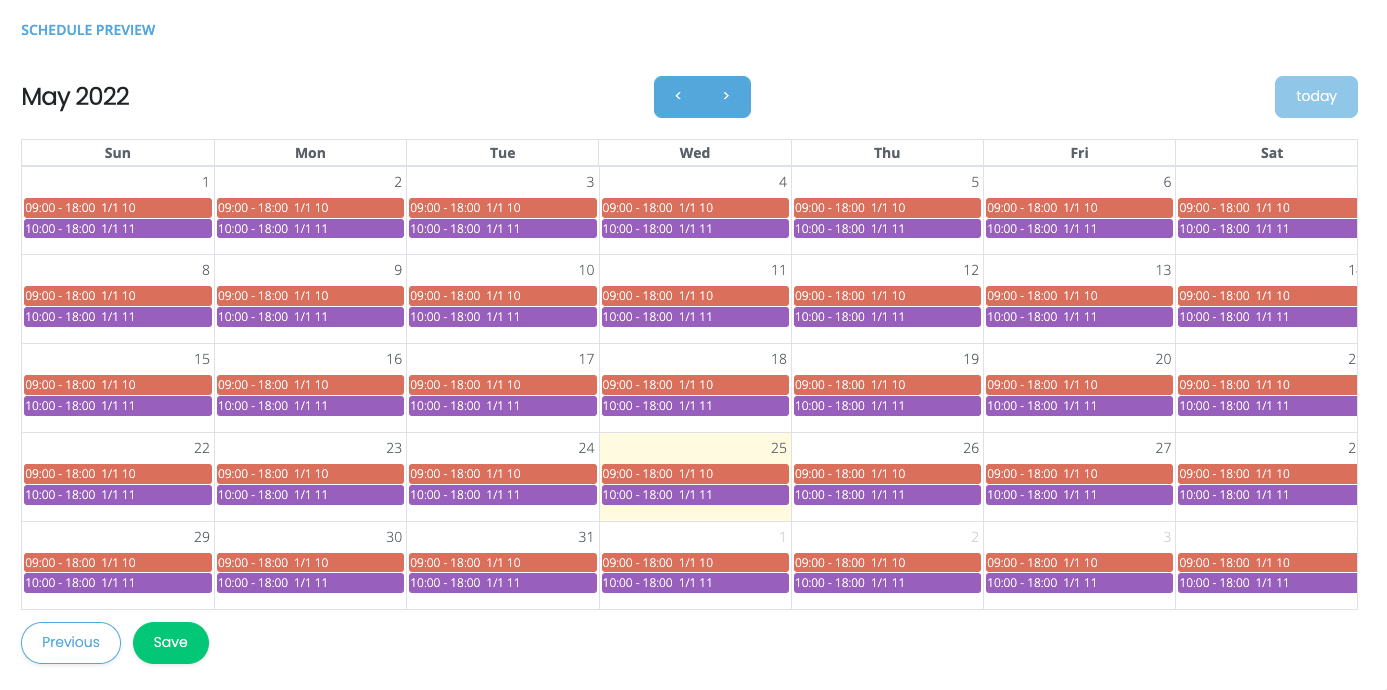
If the shifts are placed correctly, click on the “Save” button.
¶ “Preset”
Before you start
If you are not registered in Shifton, create an employer account here.
Here is the link for the registration guide.
If you are registered in Shifton, sign in.
Worktime schedule setting
Click on the icon.
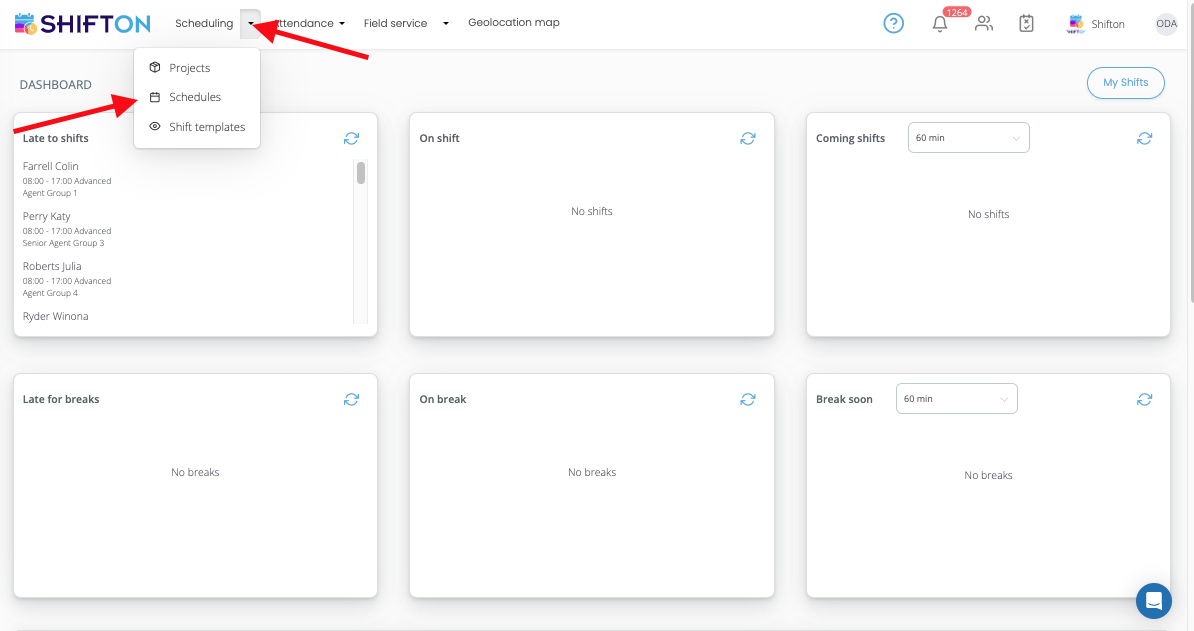
Select "Schedules" from the list that appears.
To create a new schedule, click on the “Add schedule” button.

Creating a work schedule is divided into several stages:
Basic information
In this section, you need to do the following:

- Give the schedule a name.
- Select the project to which this schedule applies.
- Set the period during which the schedule will be valid.
- Set the base wage rate for employees in the selected currency.
*If necessary, you can allow the exchange of shifts between employees and other functions (with or without manager confirmation).
After completing these settings, you will be taken to the second stage of creating a schedule.
Schedule Type
In this tab, you must select the “Preset” option from the list.
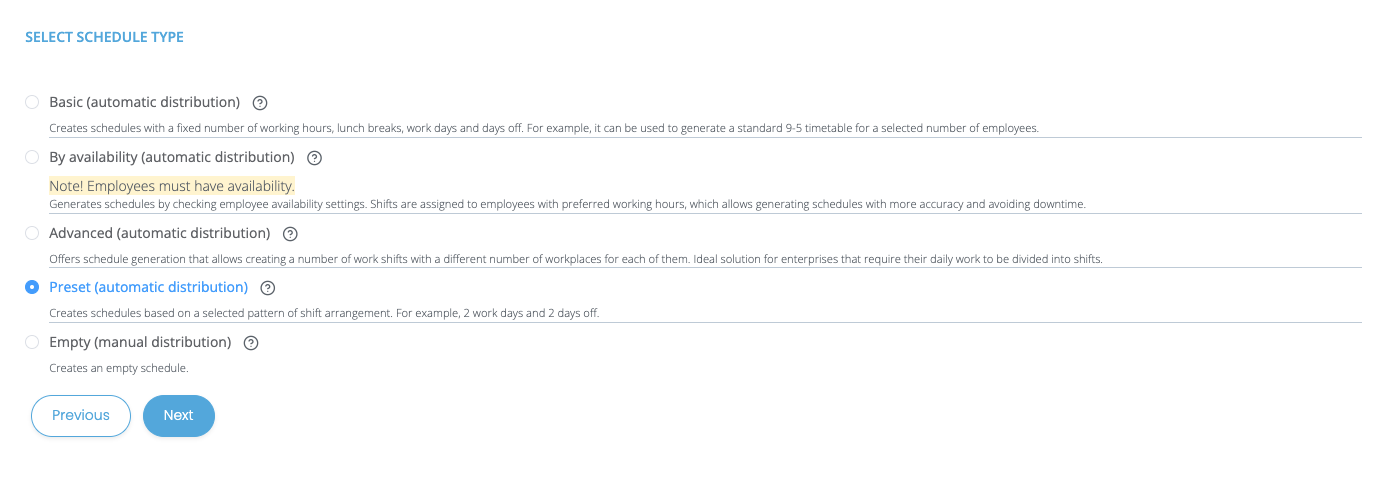
Then a template is selected from the list, according to which the working days and days off of employees will alternate.

Shift Data
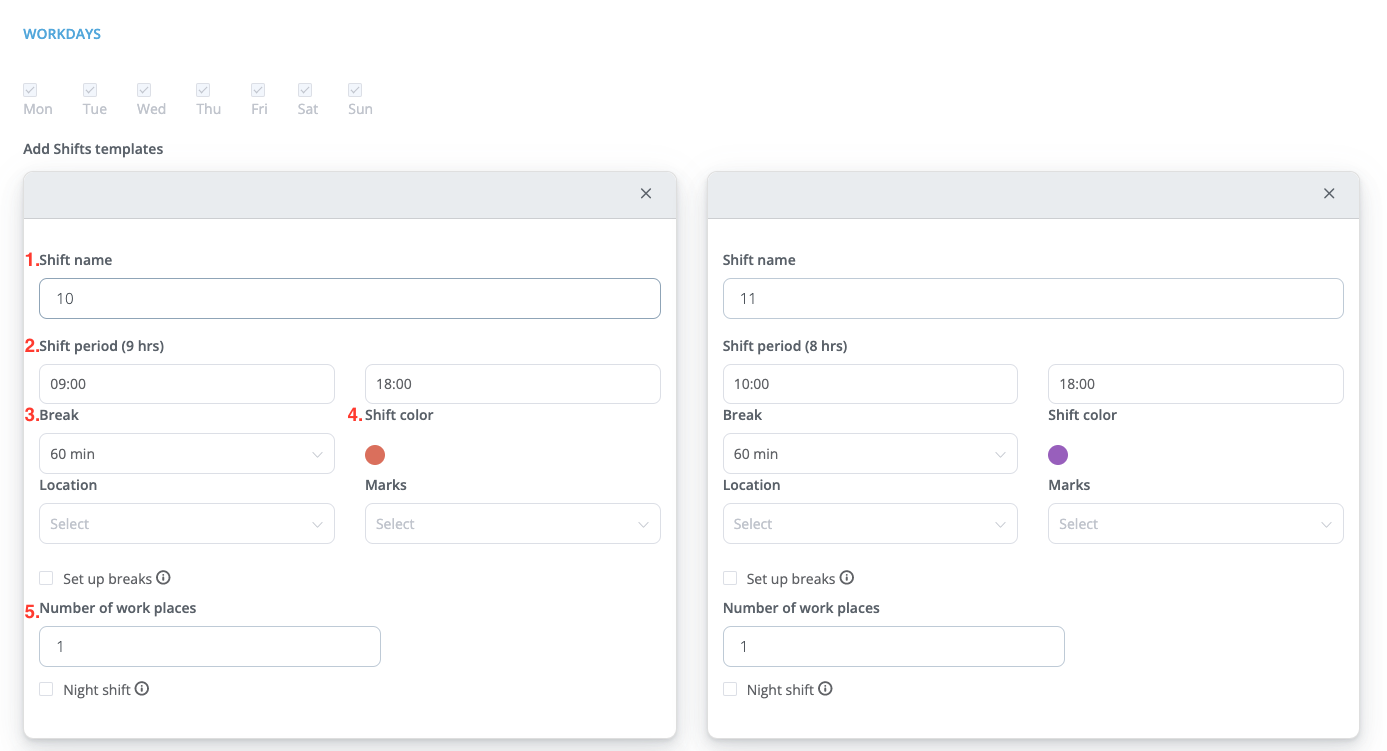
In this section of schedule settings, do the following:
- Select or create shift templates
When creating new templates:
- Name your templates
- Set start and end times for shifts
- Adjust the length of your lunch break
- Choose the color of the shifts on the schedule
- Set the number of workers on each shift
In the "By template" type, you can use several shift templates.
Employees

Schedule Preview
Here you can see the time of created shifts, as well as how many of the required employees are assigned to each of them.
If all shifts are placed correctly, click on the “Save” button.
¶ “Advanced”
Before you start
If you are not registered in Shifton, create an employer account here.
Here is the link for the registration guide.
If you are registered in Shifton, sign in.
Worktime schedule setting
Click on the icon.

Select "Schedules" from the list that appears.
To create a new schedule, click on the “Add schedule” button.

Creating a work schedule is divided into several stages:
Basic information

In this section, you need to do the following:
- Give the schedule a name.
- Select the project to which this schedule applies.
- Set the period during which the schedule will be valid.
- Set the base wage rate for employees in the selected currency.
*If necessary, you can allow the exchange of shifts between employees and other functions (with or without manager confirmation).
After completing these settings, you will be taken to the second stage of creating a scheduleка.
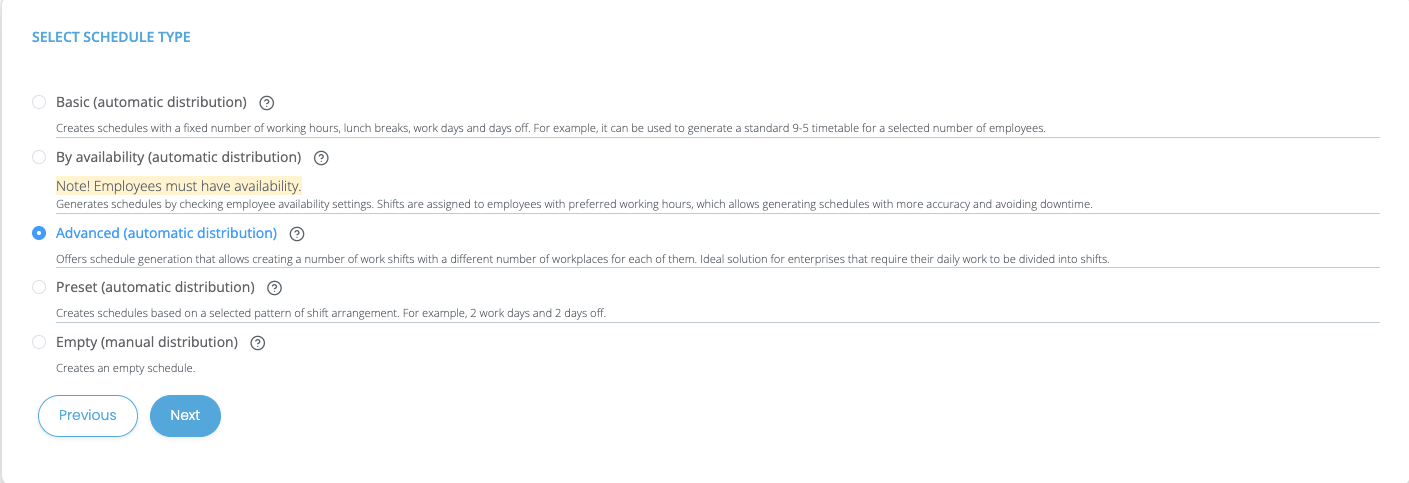
Schedule Type
In this tab, you must select the “Advanced” type of schedule from the list of suggested options.
Shift details

In this section of schedule settings, do the following:
- Set working and weekend schedules.
- Create shift templates
When creating new templates:
- Name your templates
- Set start and end times for shifts
- Adjust the length of your lunch break
- Choose the color of the shifts on the schedule
- Set the number of workers on each shift
*Option "Number of workplaces/day" allows you to set a different number of workplaces for each day of the week.

Working time setting
On this page, you need to select the appropriate options for the schedule.

- For the system to generate schedules according to the norms specified earlier in the company, it is necessary to put a tick in the field: "Take into account the norm of working hours in the company.
- Specify the maximum number of consecutive shifts.
- Select which settings to take into account:
- The minimum number of days off for each employee per week. (Enter the number of days off which must be taken into account when generating the schedule).
- Use the salary settings from the company settings.
*Put a selection in the required field.
*Minimum number of days off for each employee per week
If all days of the schedule are working days, the system will automatically arrange the required number of days off per week for each added employee.

If several days are marked as holidays, such as Saturday and Sunday, and the field says 2 days off per week, then all employees will have rest on those days.

Employees
At this stage, you need to select the project employees who will be added to the work schedule. You can create a schedule for several or all employees.

Schedule Preview
Here you can see the time of created shifts, as well as how many of the required employees are assigned to each of them.

If all shifts are placed correctly, click on the “Save” button.
¶ Schedule extension
Initially, a schedule can be created for up to 3 months. To be able to make changes to the schedule, it must be extended in subsequent months.
Schedule extension is available to the company owner, administrator, and manager - only schedules within their project.
To extend the schedule, do the following:

- Click on the icon.
- Select the Schedules section
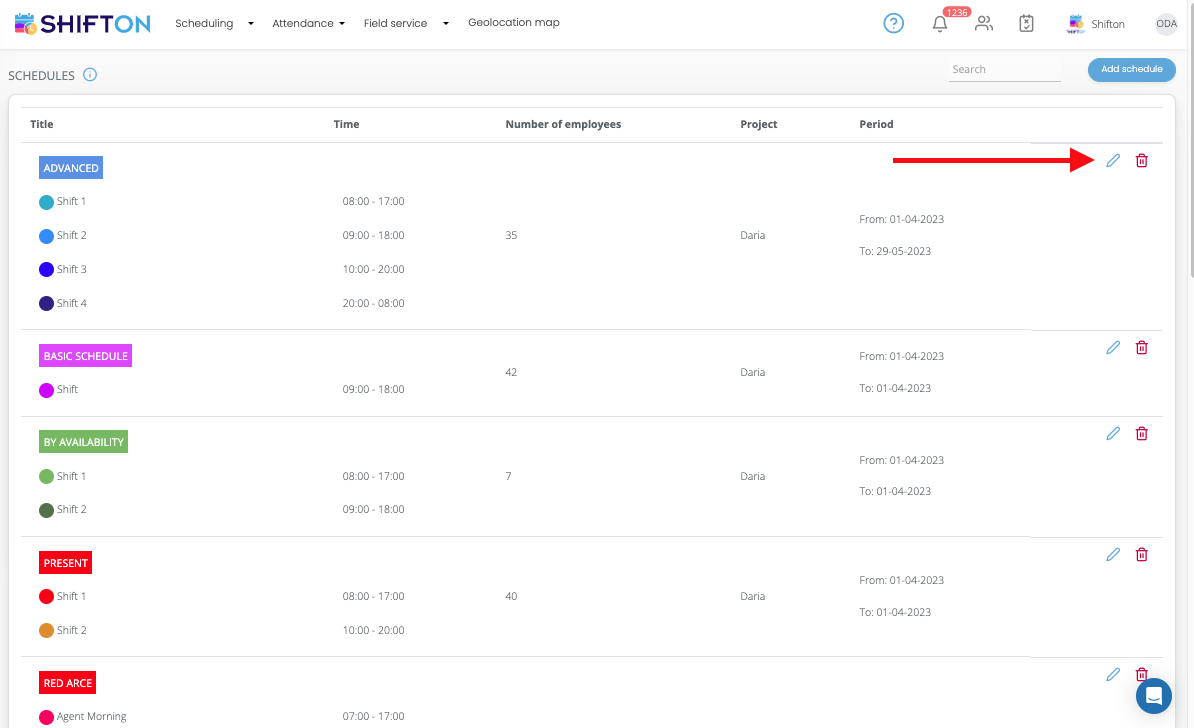
- In the window that appears, next to the schedule that you want to extend, click on the “Pencil” sign.
- In the left window, select the section "Reduce/extend the schedule"
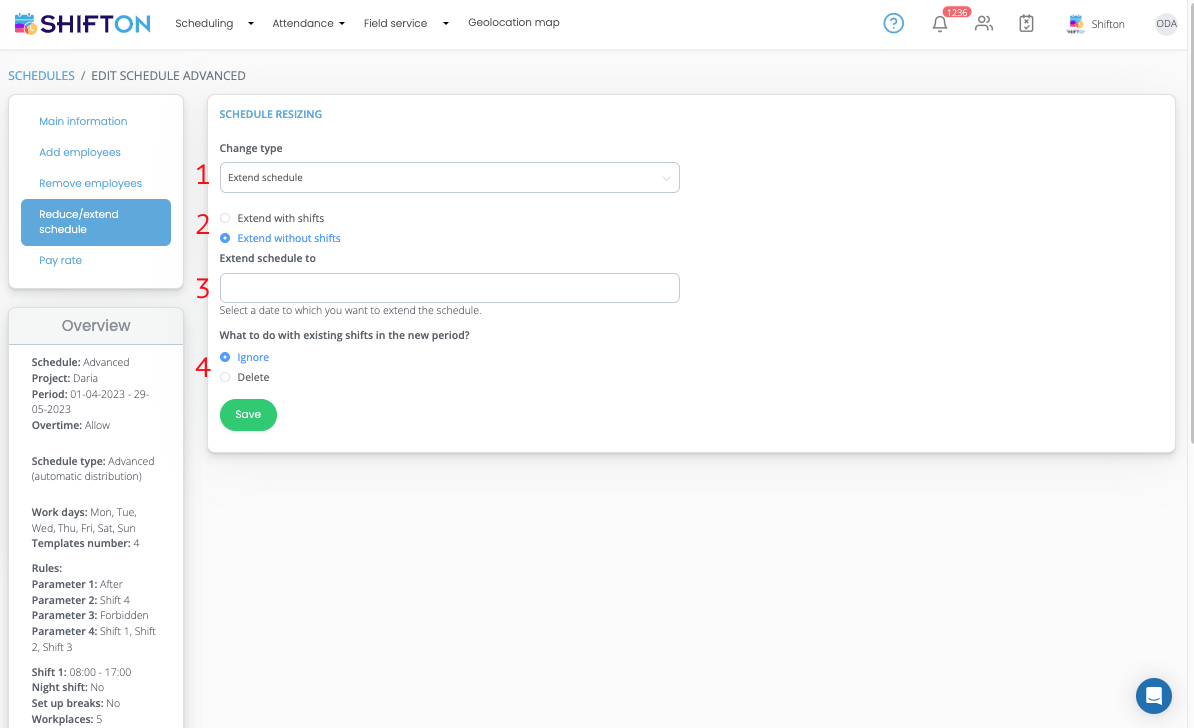
- On this page, do the following:
- Select Schedule Extension
- Choose to extend with shifts or no shifts.
- Specify the date until which you want to extend the schedule.
- Choose what to do with existing shifts in the new period: Ignore or delete.
Click "Save" to apply the changes.
¶ Schedule reduction
How to reduce your schedule.
This article will tell you how to reduce the created schedule.
To reduce the schedule, you must first click on the icon 🔽.
Click on the "Schedules" tab

- Next to the schedule, you want to reduce, click on the “Pencil” icon

- In the left window, click on the section "Reduce/extend the schedule"
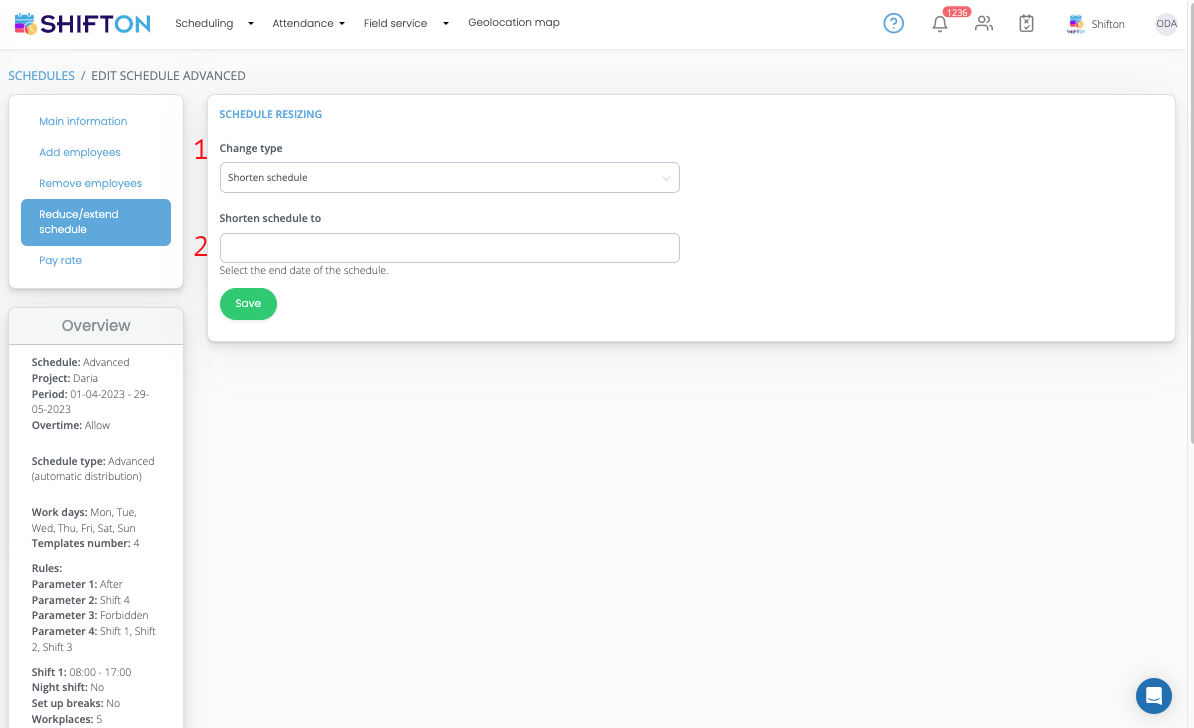
On this page, you need:
- Select reduce schedule.
- Select the date to which you want to reduce the schedule.
After making changes, click on the “Save” button.
¶ Changing created schedules
Changing created work schedules
This article talks about editing already created work schedules.
To edit a work schedule, you must first create at least one schedule for the project.
After that, return to the Control Panel and do the following:

- Click on the icon
- Click on the "Schedules" button.
Select the required schedule from the list and click on the pencil icon.

The schedule edit menu is divided into 5 sections:
- Basic information.
- Add employees.
- Remove employees.
- Reduce/extend the schedule.
- Pay rate.
In the first section, you can do the following:
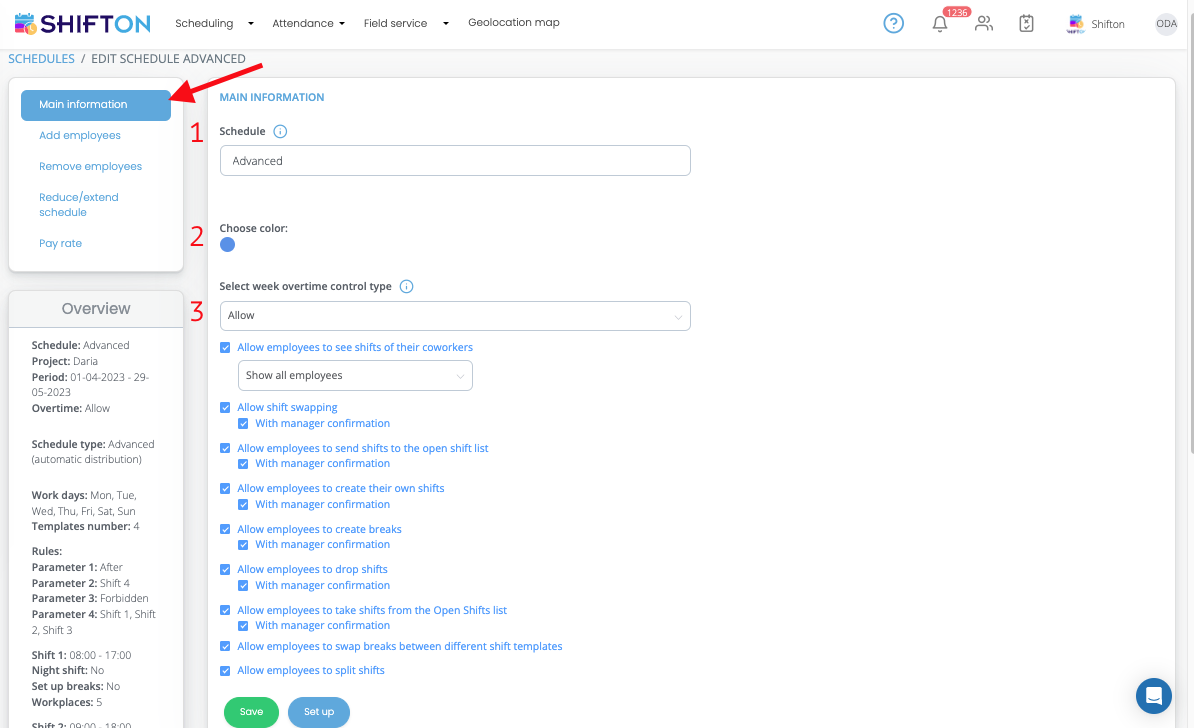
- Rename schedule.
- Change schedule color
- Set up various schedule settings for example: shift exchange between employees.
- Completely change its settings by clicking on the "Customize" button.
The second segment of the schedule settings allows you to add employees from the project to an already-created schedule. On this tab, do the following:
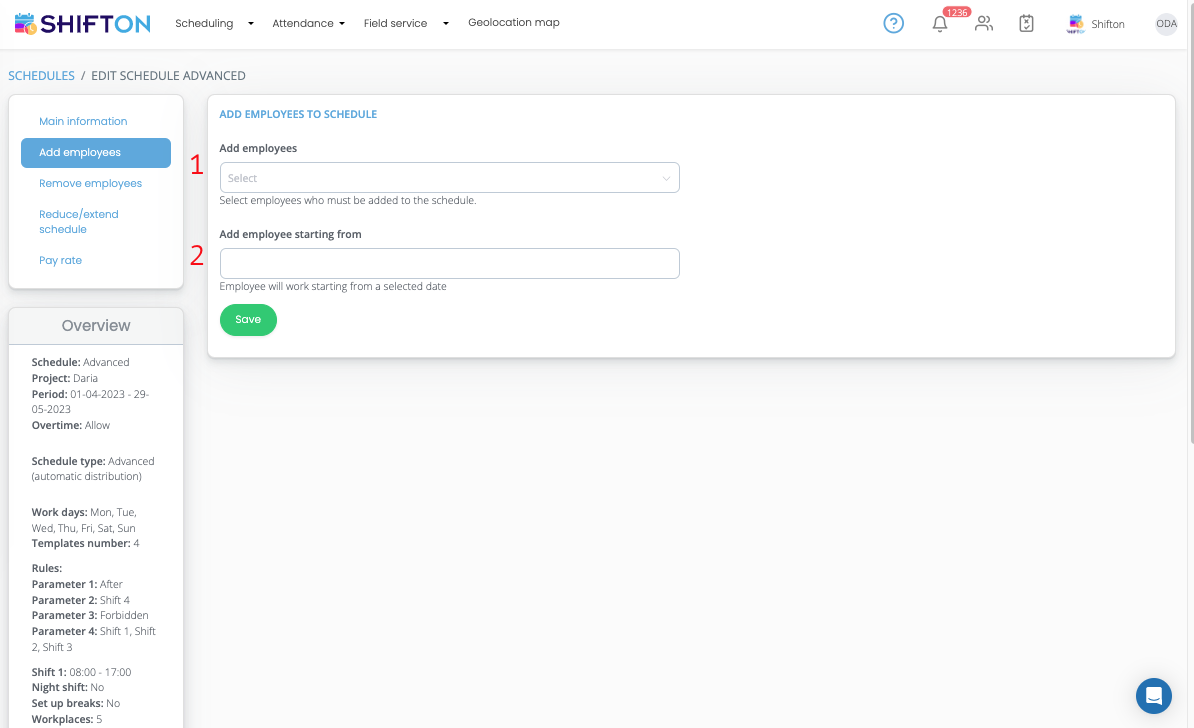
- Select the project employees you want to add.
- Choose the date from which they will be added to the schedule.
The third segment of the settings allows you to remove employees from the work schedule. Here you can do the following:
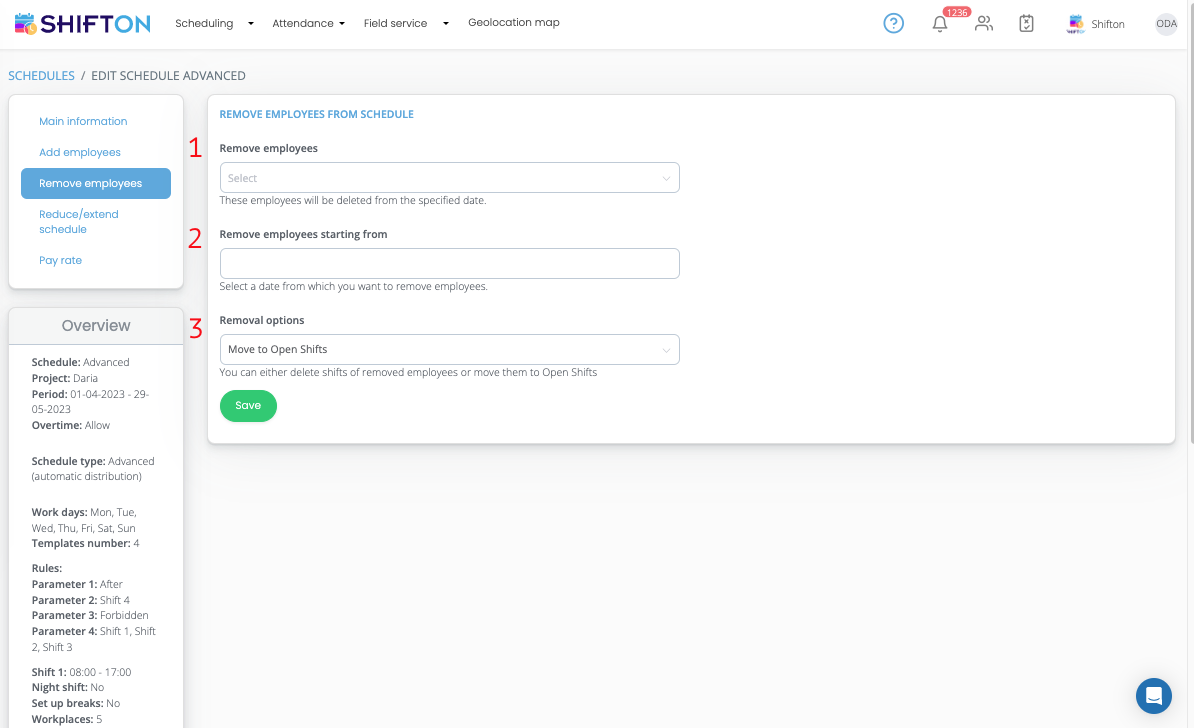
- Select the employees you want to remove from the schedule.
- Select the date from which they will stop working on the schedule.
- Choose what to do with the employee's remaining shifts (remove from the schedule or move to the free list).
The fourth section of the schedule settings allows you to extend or shorten the created work schedule. On this page, you can do the following:
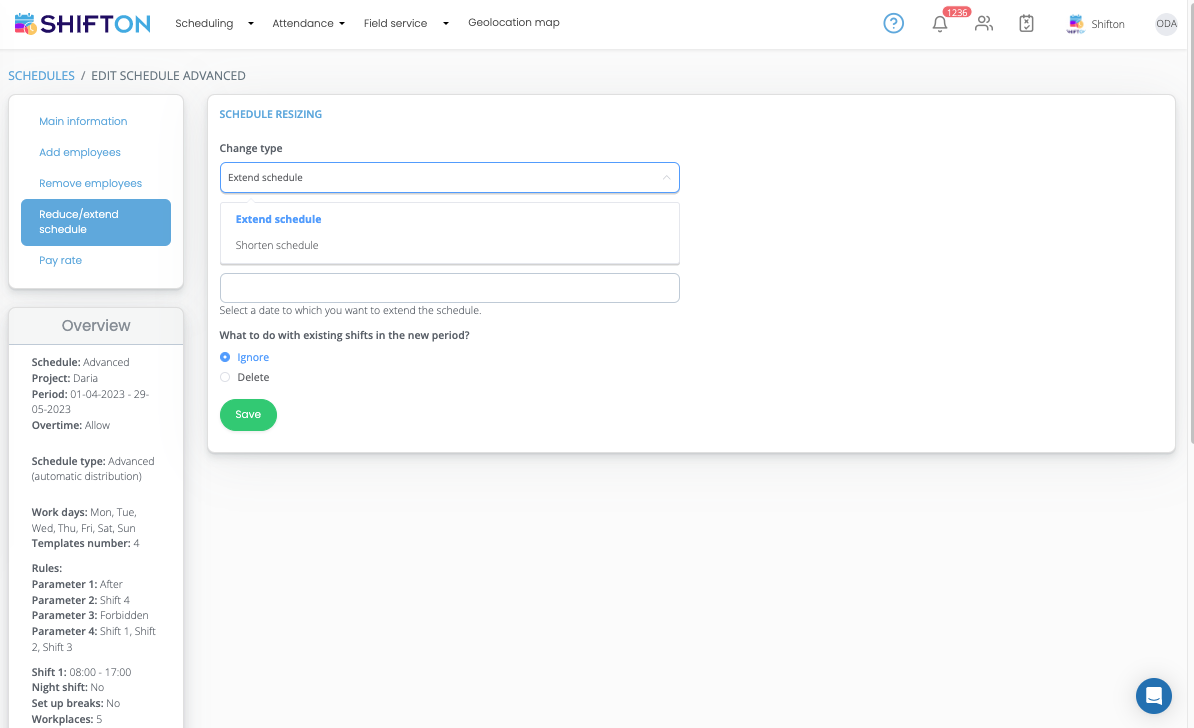
- Choose the type of schedule change (reduction/extension).
- Select until what date the schedule is extended or reduced.
*When renewing, you can choose what to do with existing shifts in the new period. (Ignore or delete)
The fifth section of the settings is intended for editing the salary of employees who work on a schedule. In this segment, you can:
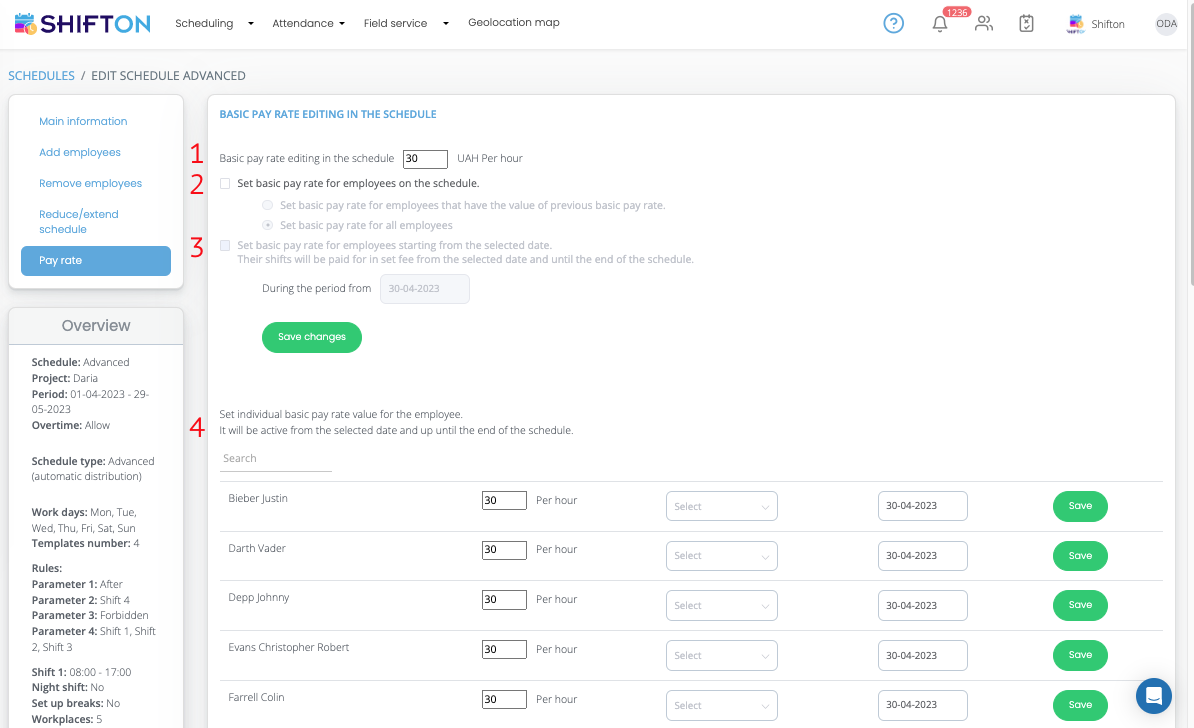
- Change the base rate in the schedule. For this:
- Enter a new amount for hourly wages.
- Check the option “Set the base rate for employees on the schedule”.
*The option “Set the base rate for employees starting from the selected date” allows you to make changes in wages from a specific date. For example, if you want to increase the salary of employees from the middle of next month.
2. Set an individual pay rate for each employee. For this you need:

- Specify the hourly wage rate for a specific employee.
- *Additionally, you can select marks. (The changed rate will be applied to shifts with the selected mark).
- Select the date from which these changes will take effect.
- Click on the “Save” button.