

Shifton Field Service lets you use the Invoicing module to create financial documents — estimates, work orders, invoices, receipts and proofs of service — based on your field tasks, send them to clients, convert one document into another and track payments.
Important: Invoicing is a paid module. Enable it in the Company settings → Modules section. Once it is enabled, it appears in the left side panel (in Tasks / Field Service mode) as “Invoicing”.
What it is
Every document type has a tab of its own. Inside the tab you create documents, edit their line items, issue them (draft → final), and then send them to the client, download them as a PDF or convert them into a document of another type. The payments received are recorded on the Payments tab.
Document types (tabs)
| Tab | Purpose |
|---|---|
| Estimate | A preliminary calculation prepared before the work starts. |
| Work Order | An order with the instructions for carrying out the work. |
| Invoice | A bill for the work done (contains the issue date and the payment due date). |
| Receipt | Confirmation of a payment received. It is created automatically when a payment is registered and is not created manually. |
| Proof of service | A completion document confirming that the work has been done. |
| Payments | A log of the payments received (see the “Registering a payment” section). |
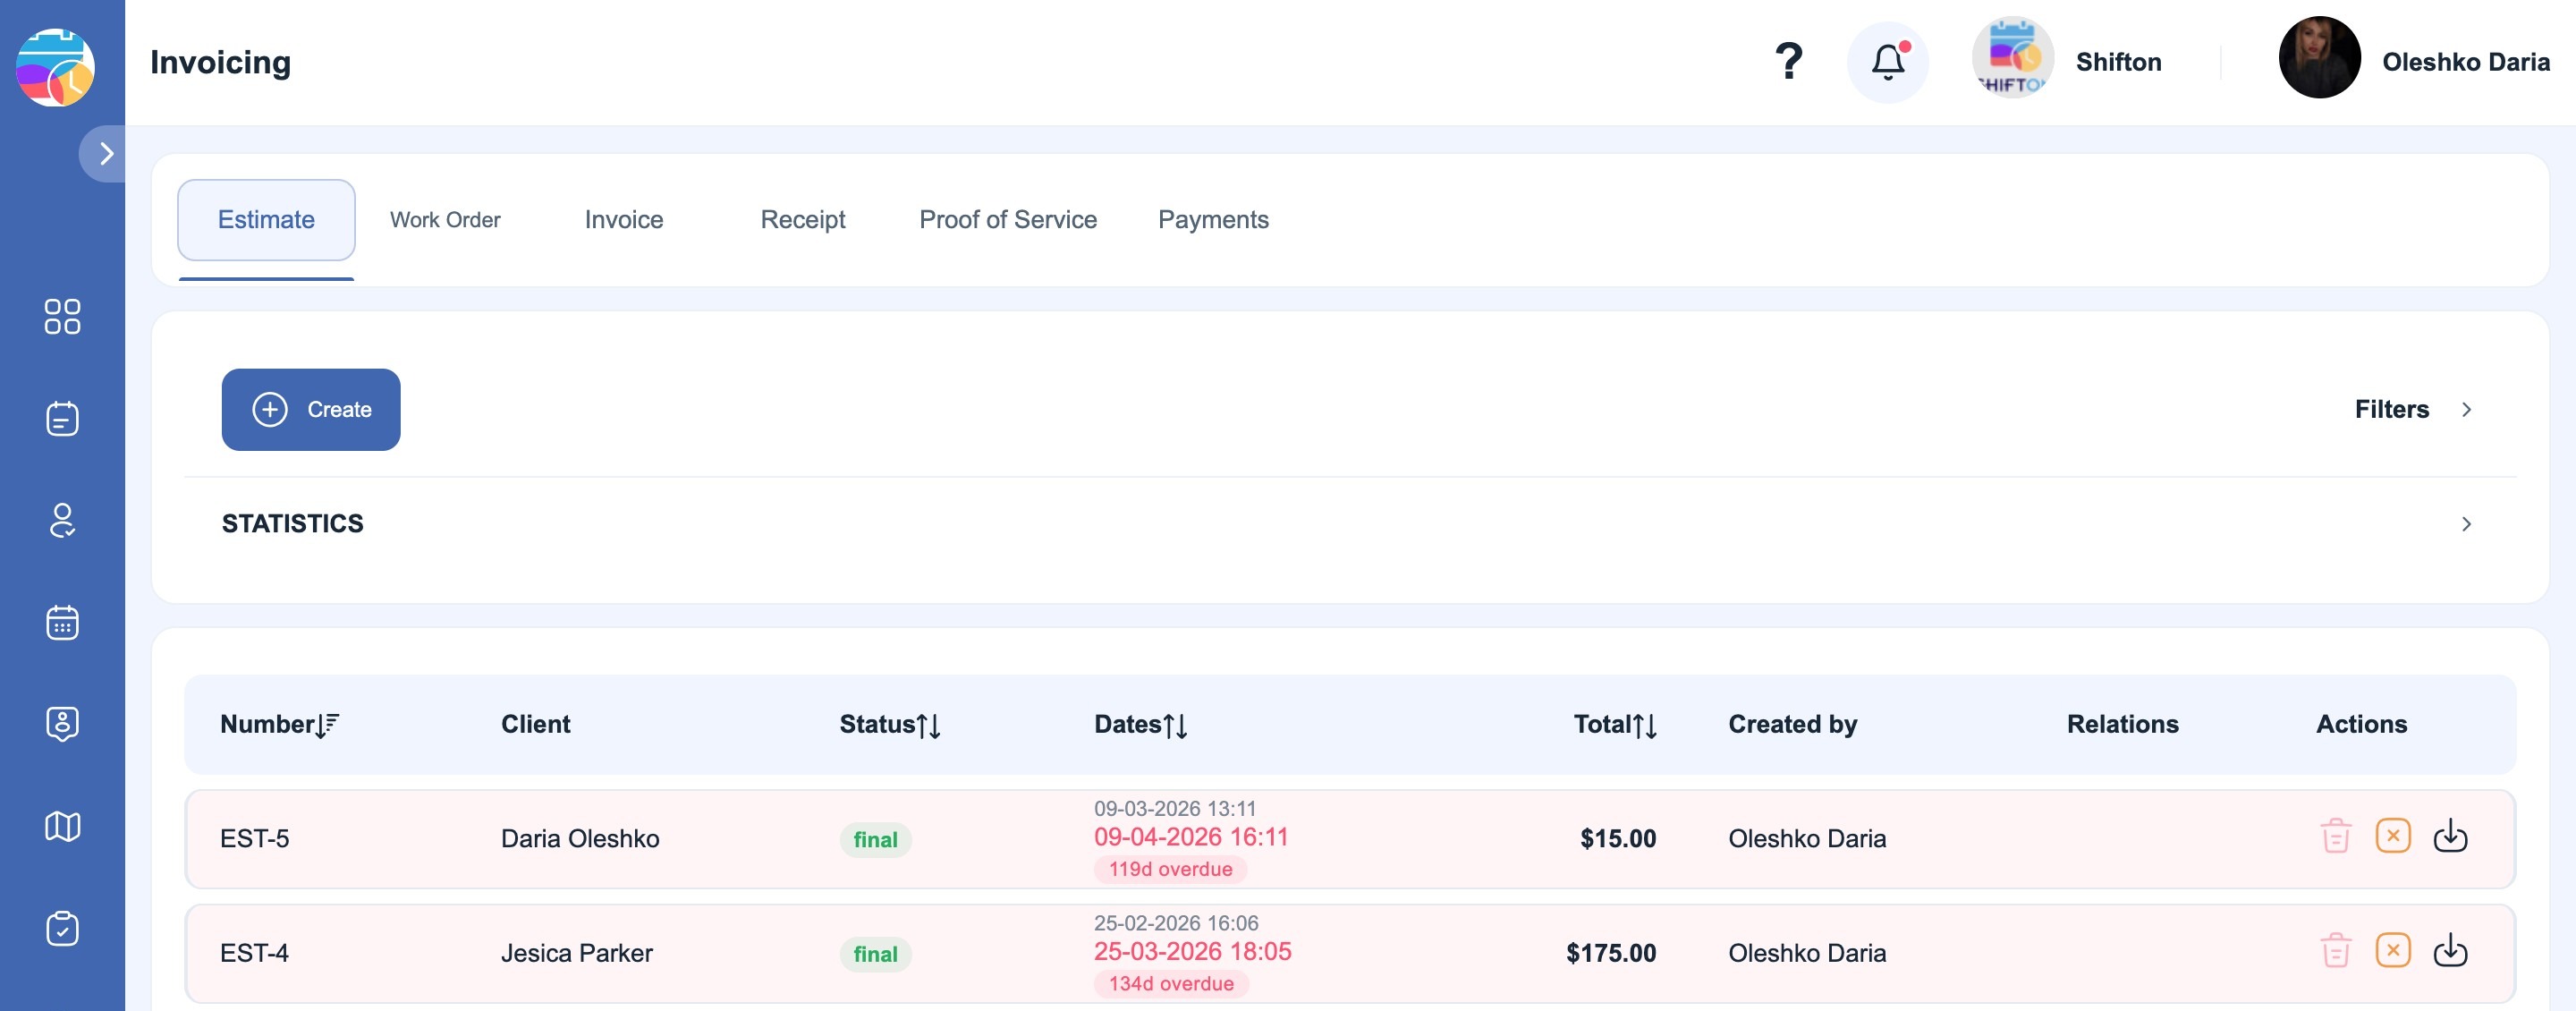
Every type has its own tab with its own list of documents.
Estimate
Work Order
Invoice
Receipt
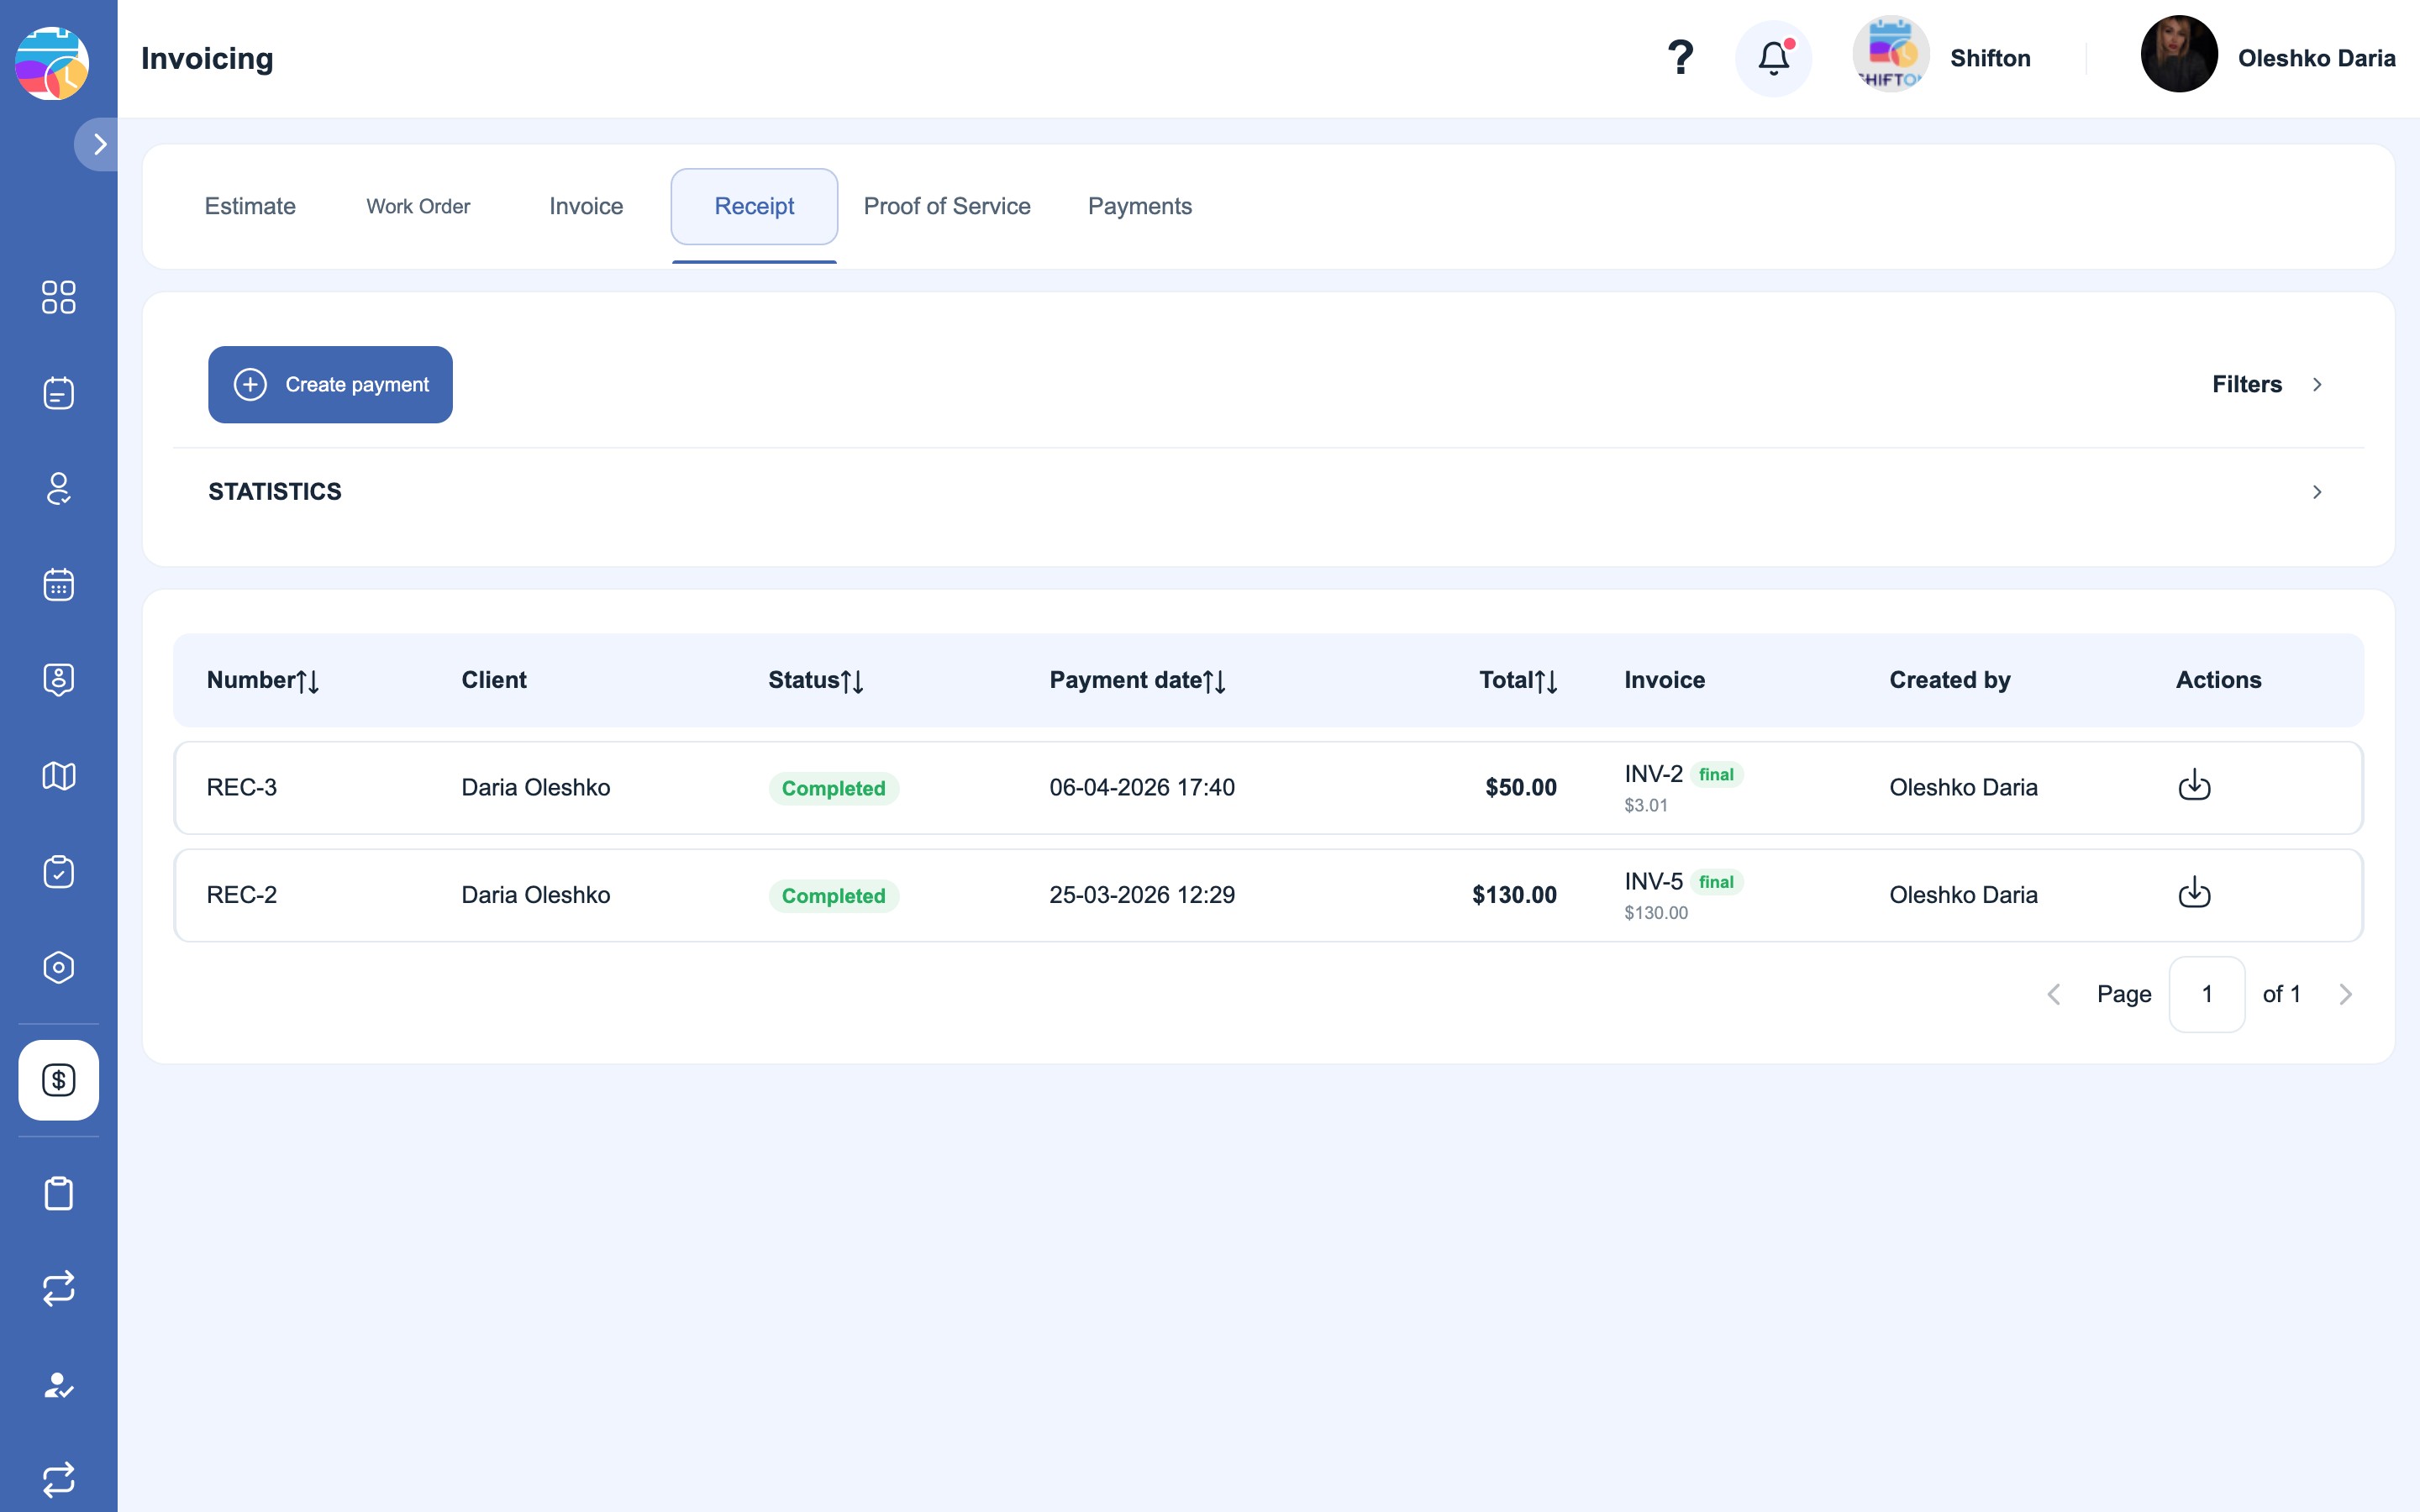
On this tab, instead of the “Create” button there is “Create payment” — receipts appear on their own when a payment is registered.
Proof of service
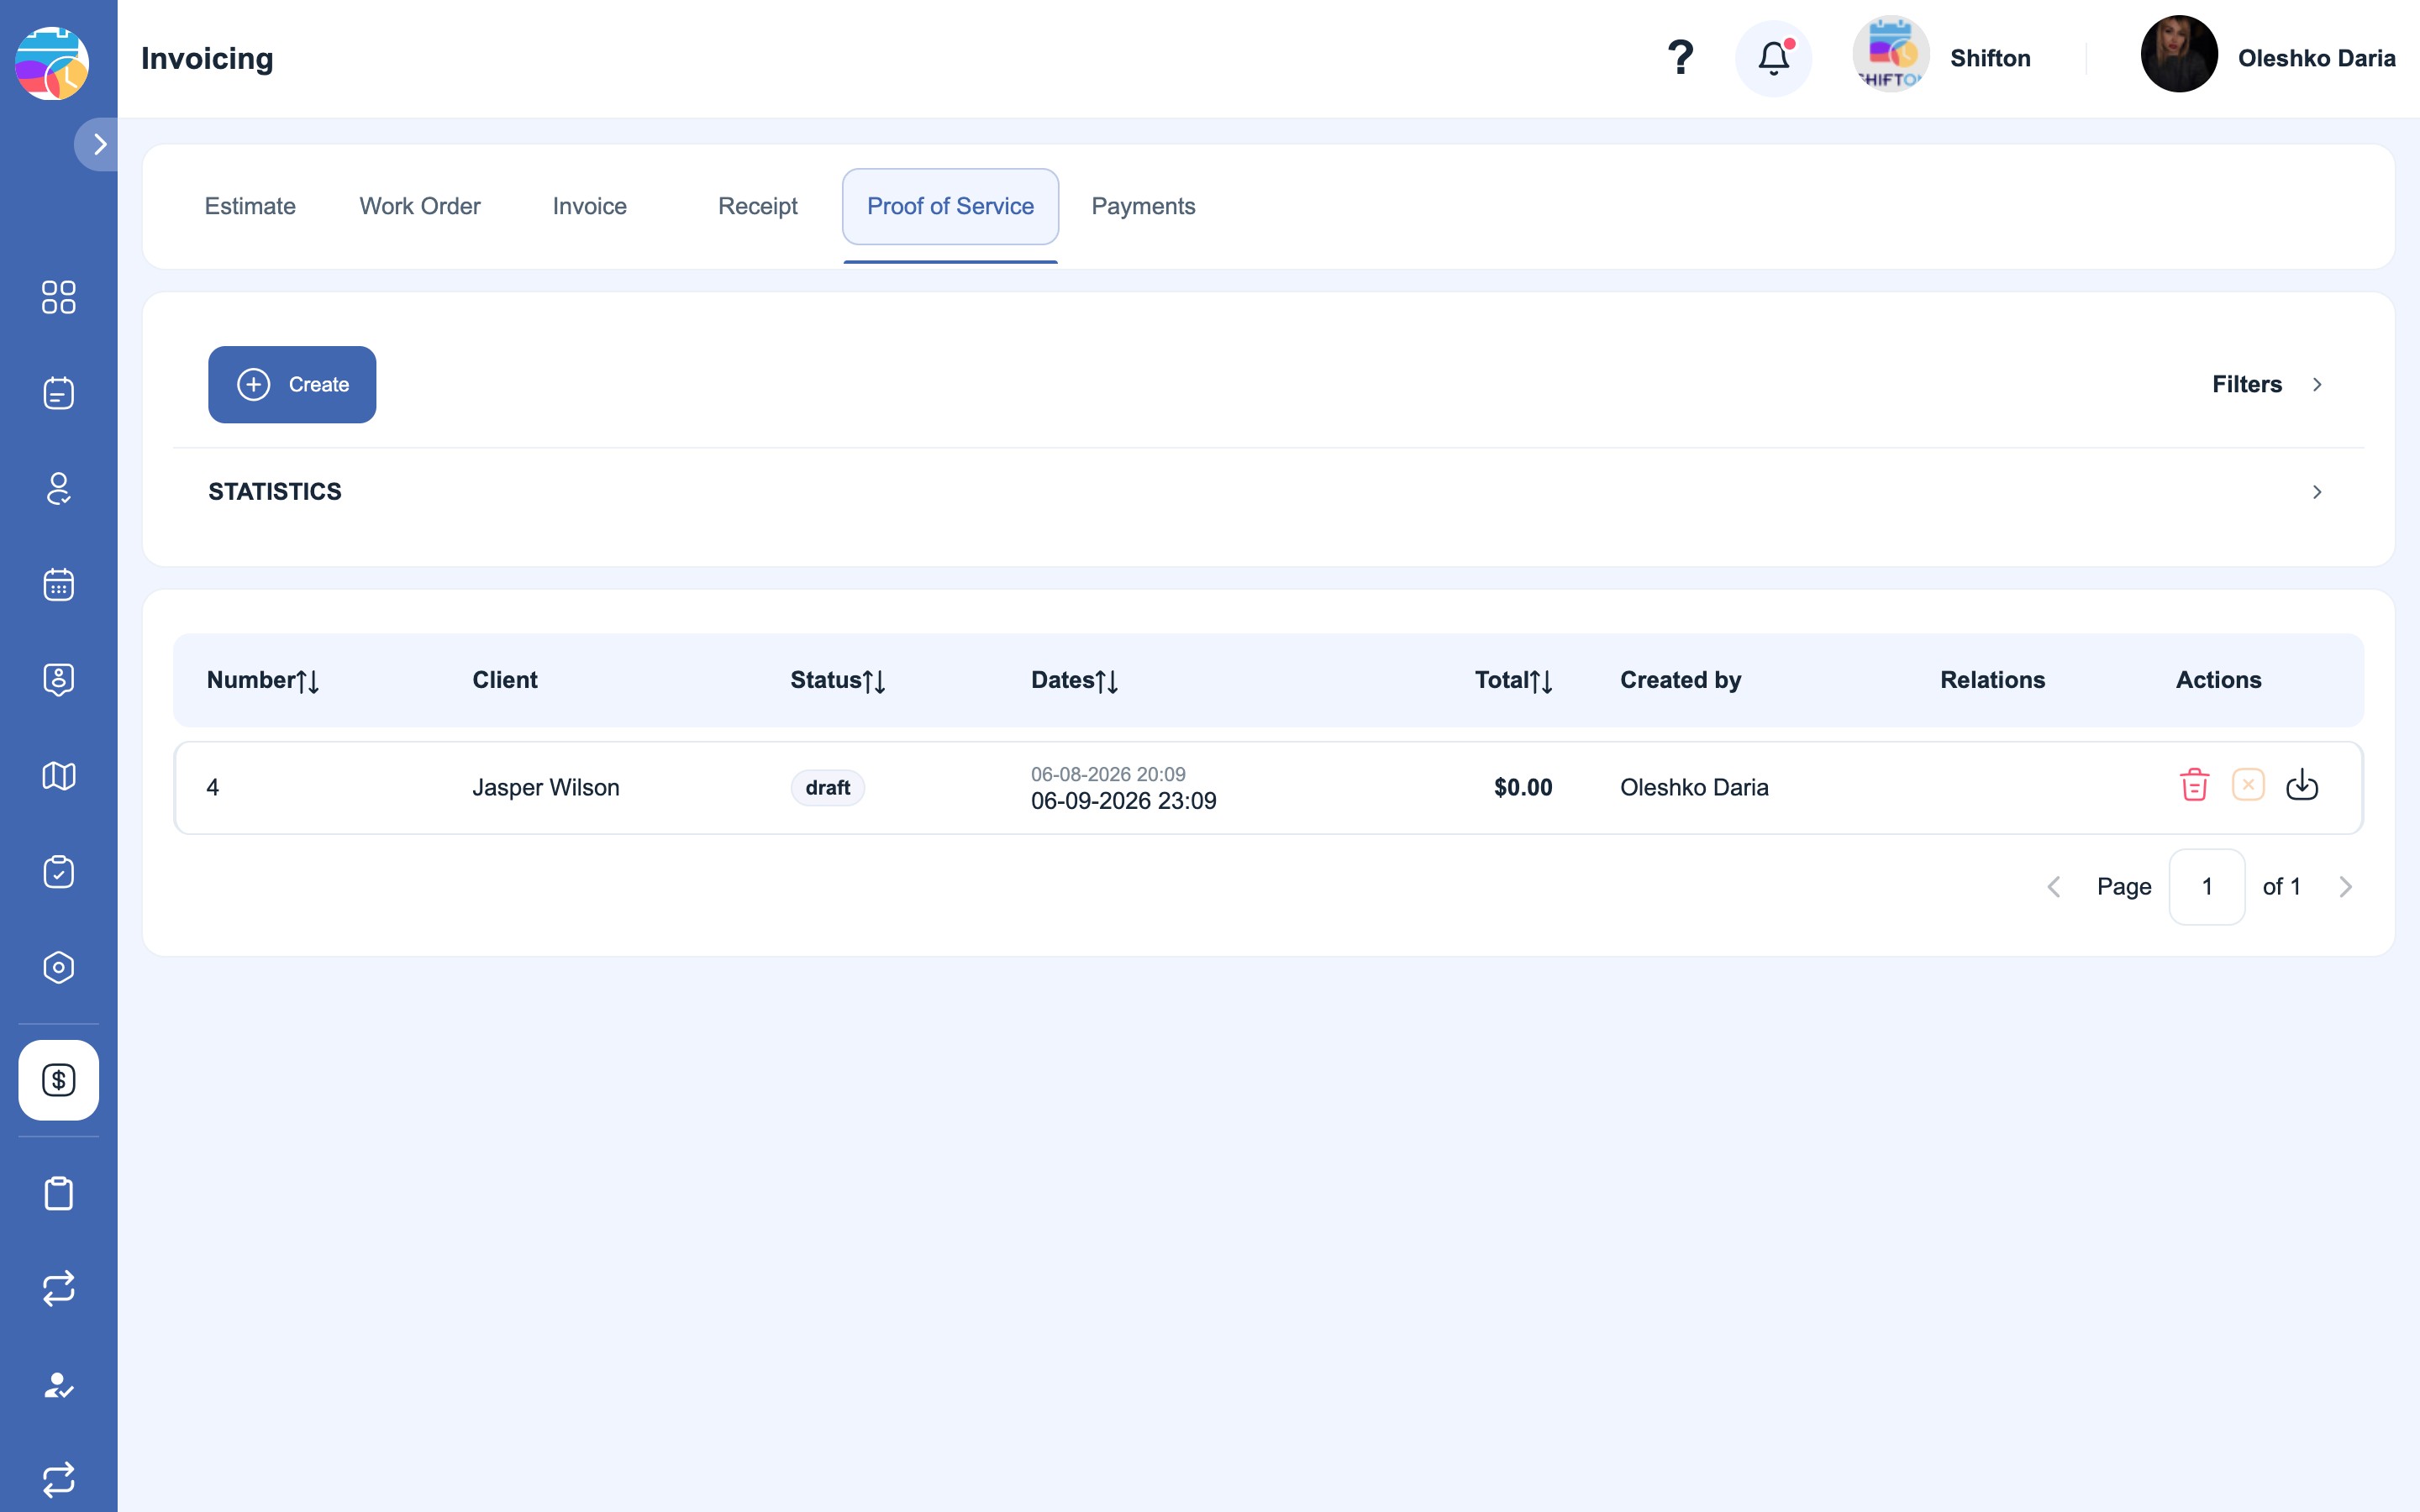
How the documents are connected to each other
The document types go in a certain order — it follows the course of the work with the client. Each next document is created from the previous one with the conversion button, so the data does not have to be entered again.
- Estimate — a commercial offer. It is the first thing sent to the client, before the work starts: what exactly will be done and how much it costs.
- Work Order — a document for carrying out the work. It is created after the client has agreed to the estimate.
- Invoice — a bill for the payment of the work done.
- Receipt — a proof of payment confirming that the payment has been received.
- Proof of service — confirmation that the work has been done and accepted.
- Payment — the record of the payment itself: you specify the payment method and the amount.
You do not have to go through the whole chain — you can start with any document. But if you work in order, each next document picks up the client, the line items, the discount and the tax from the previous one.
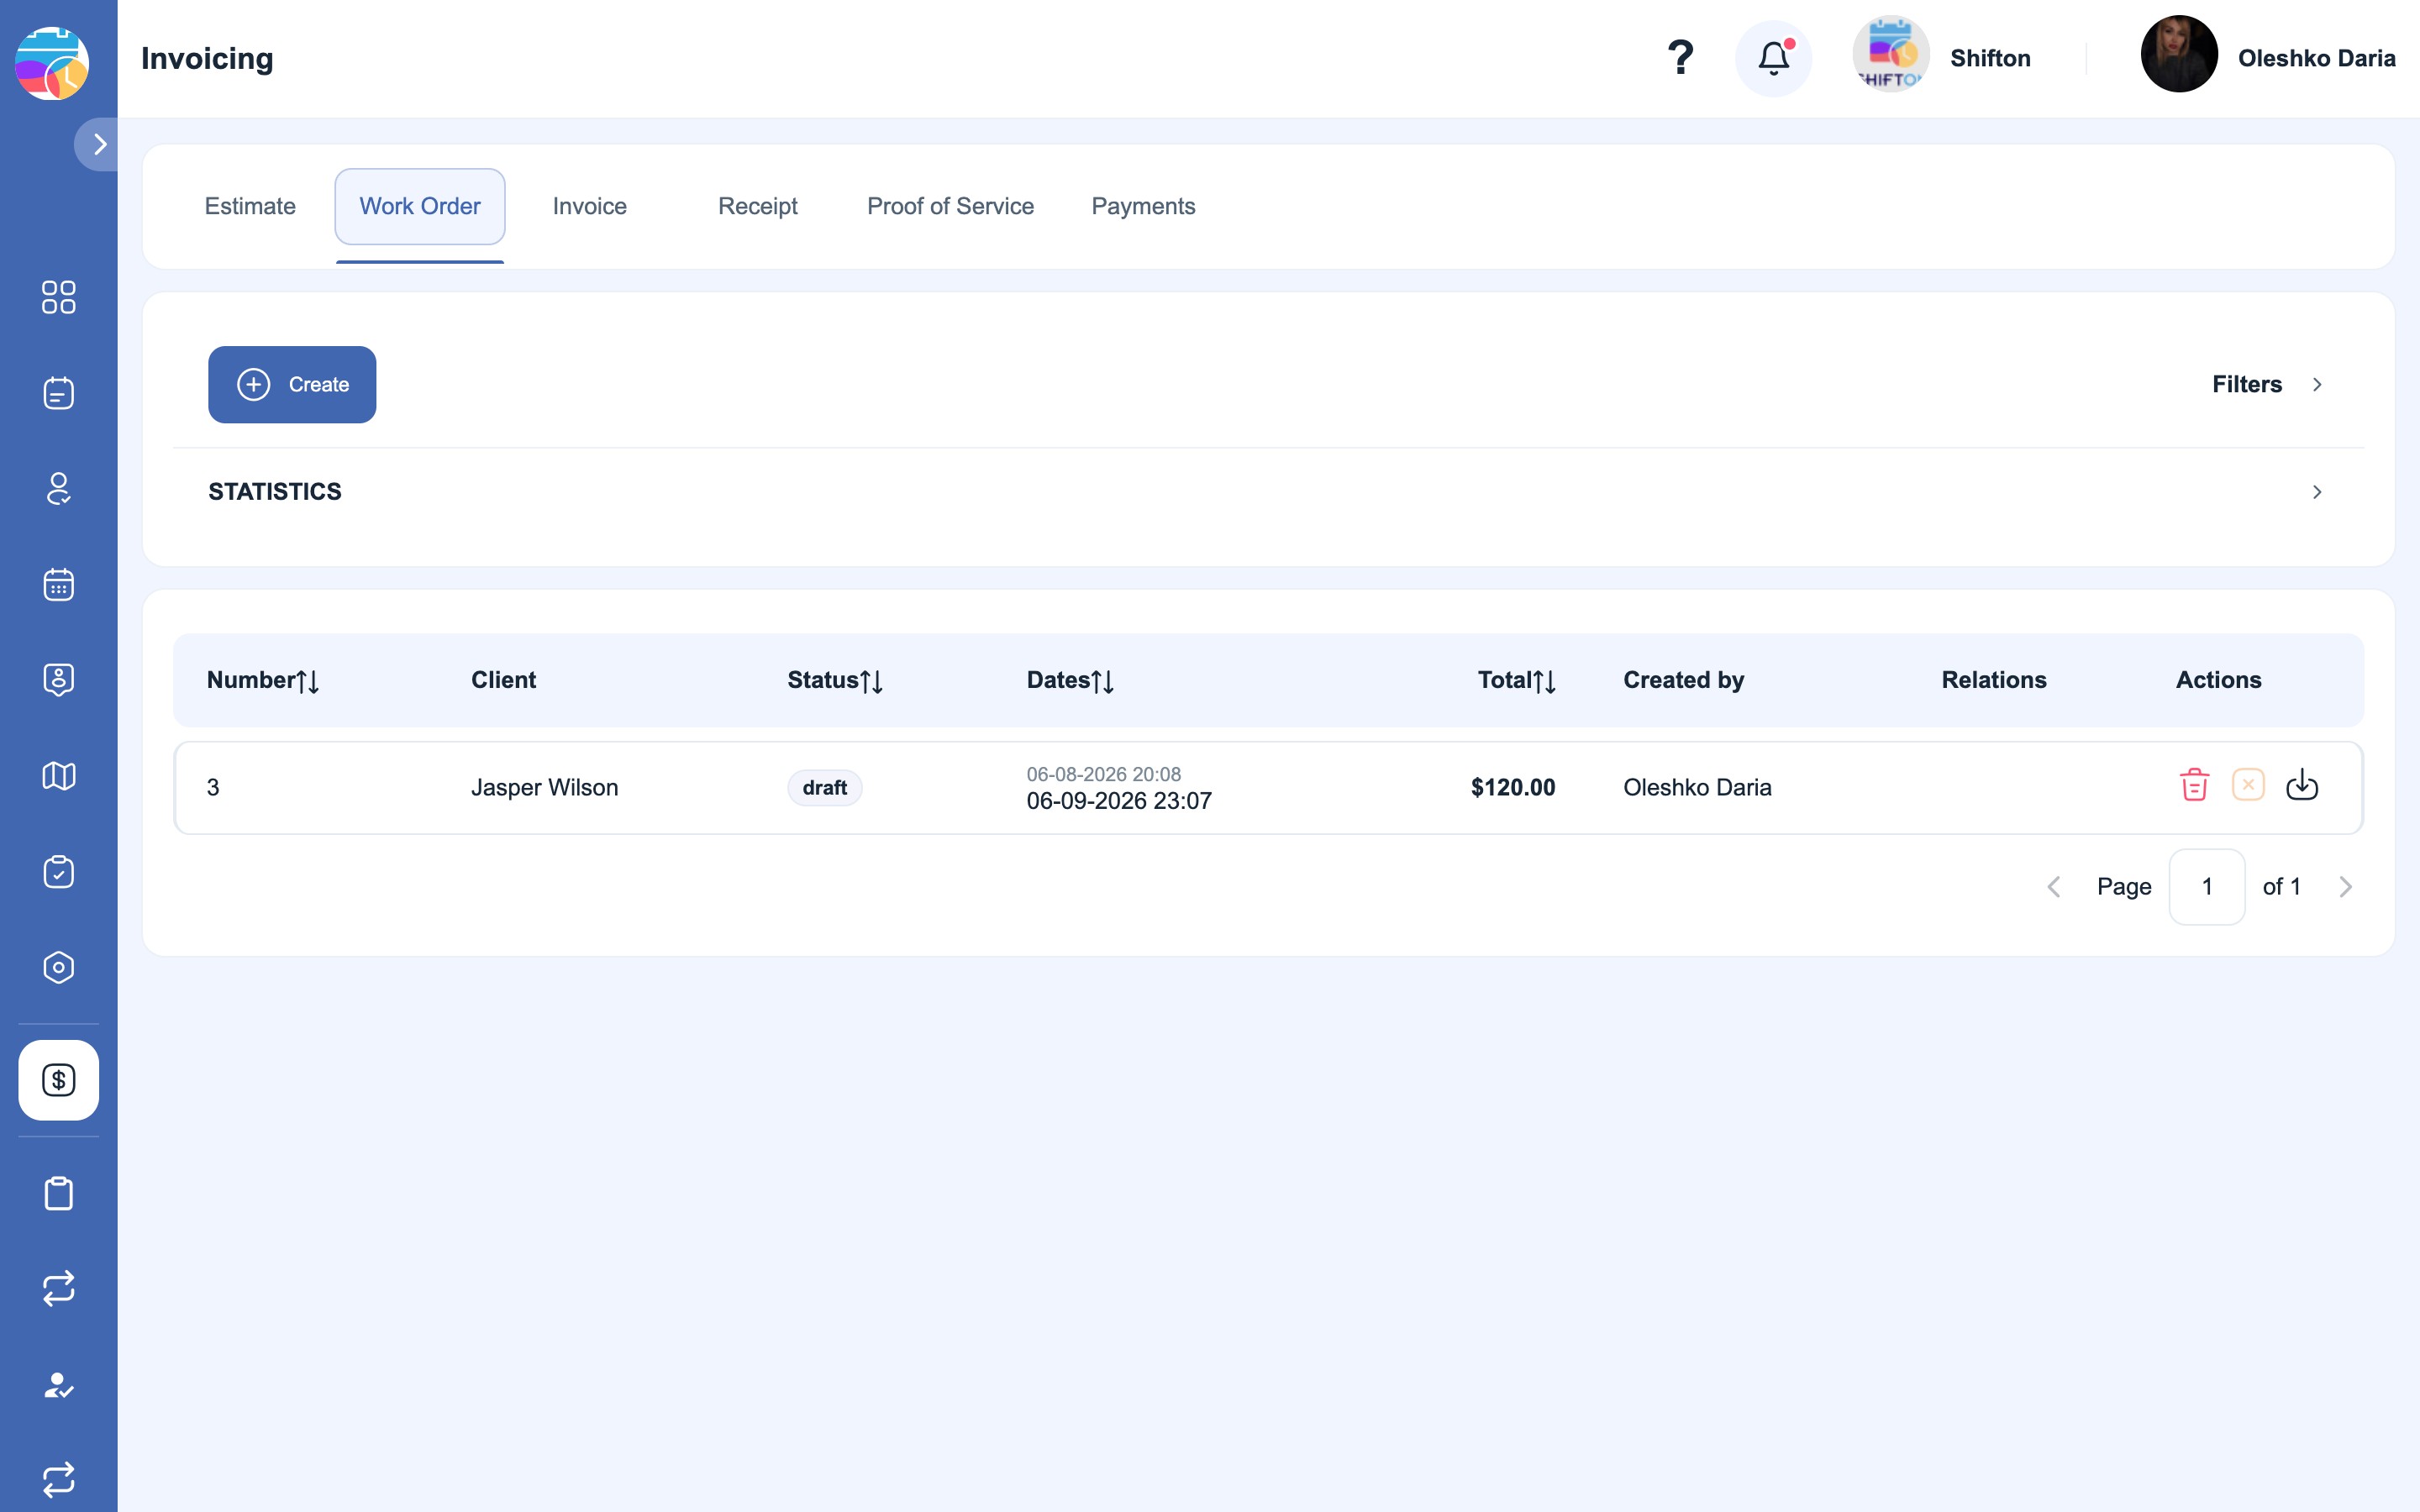
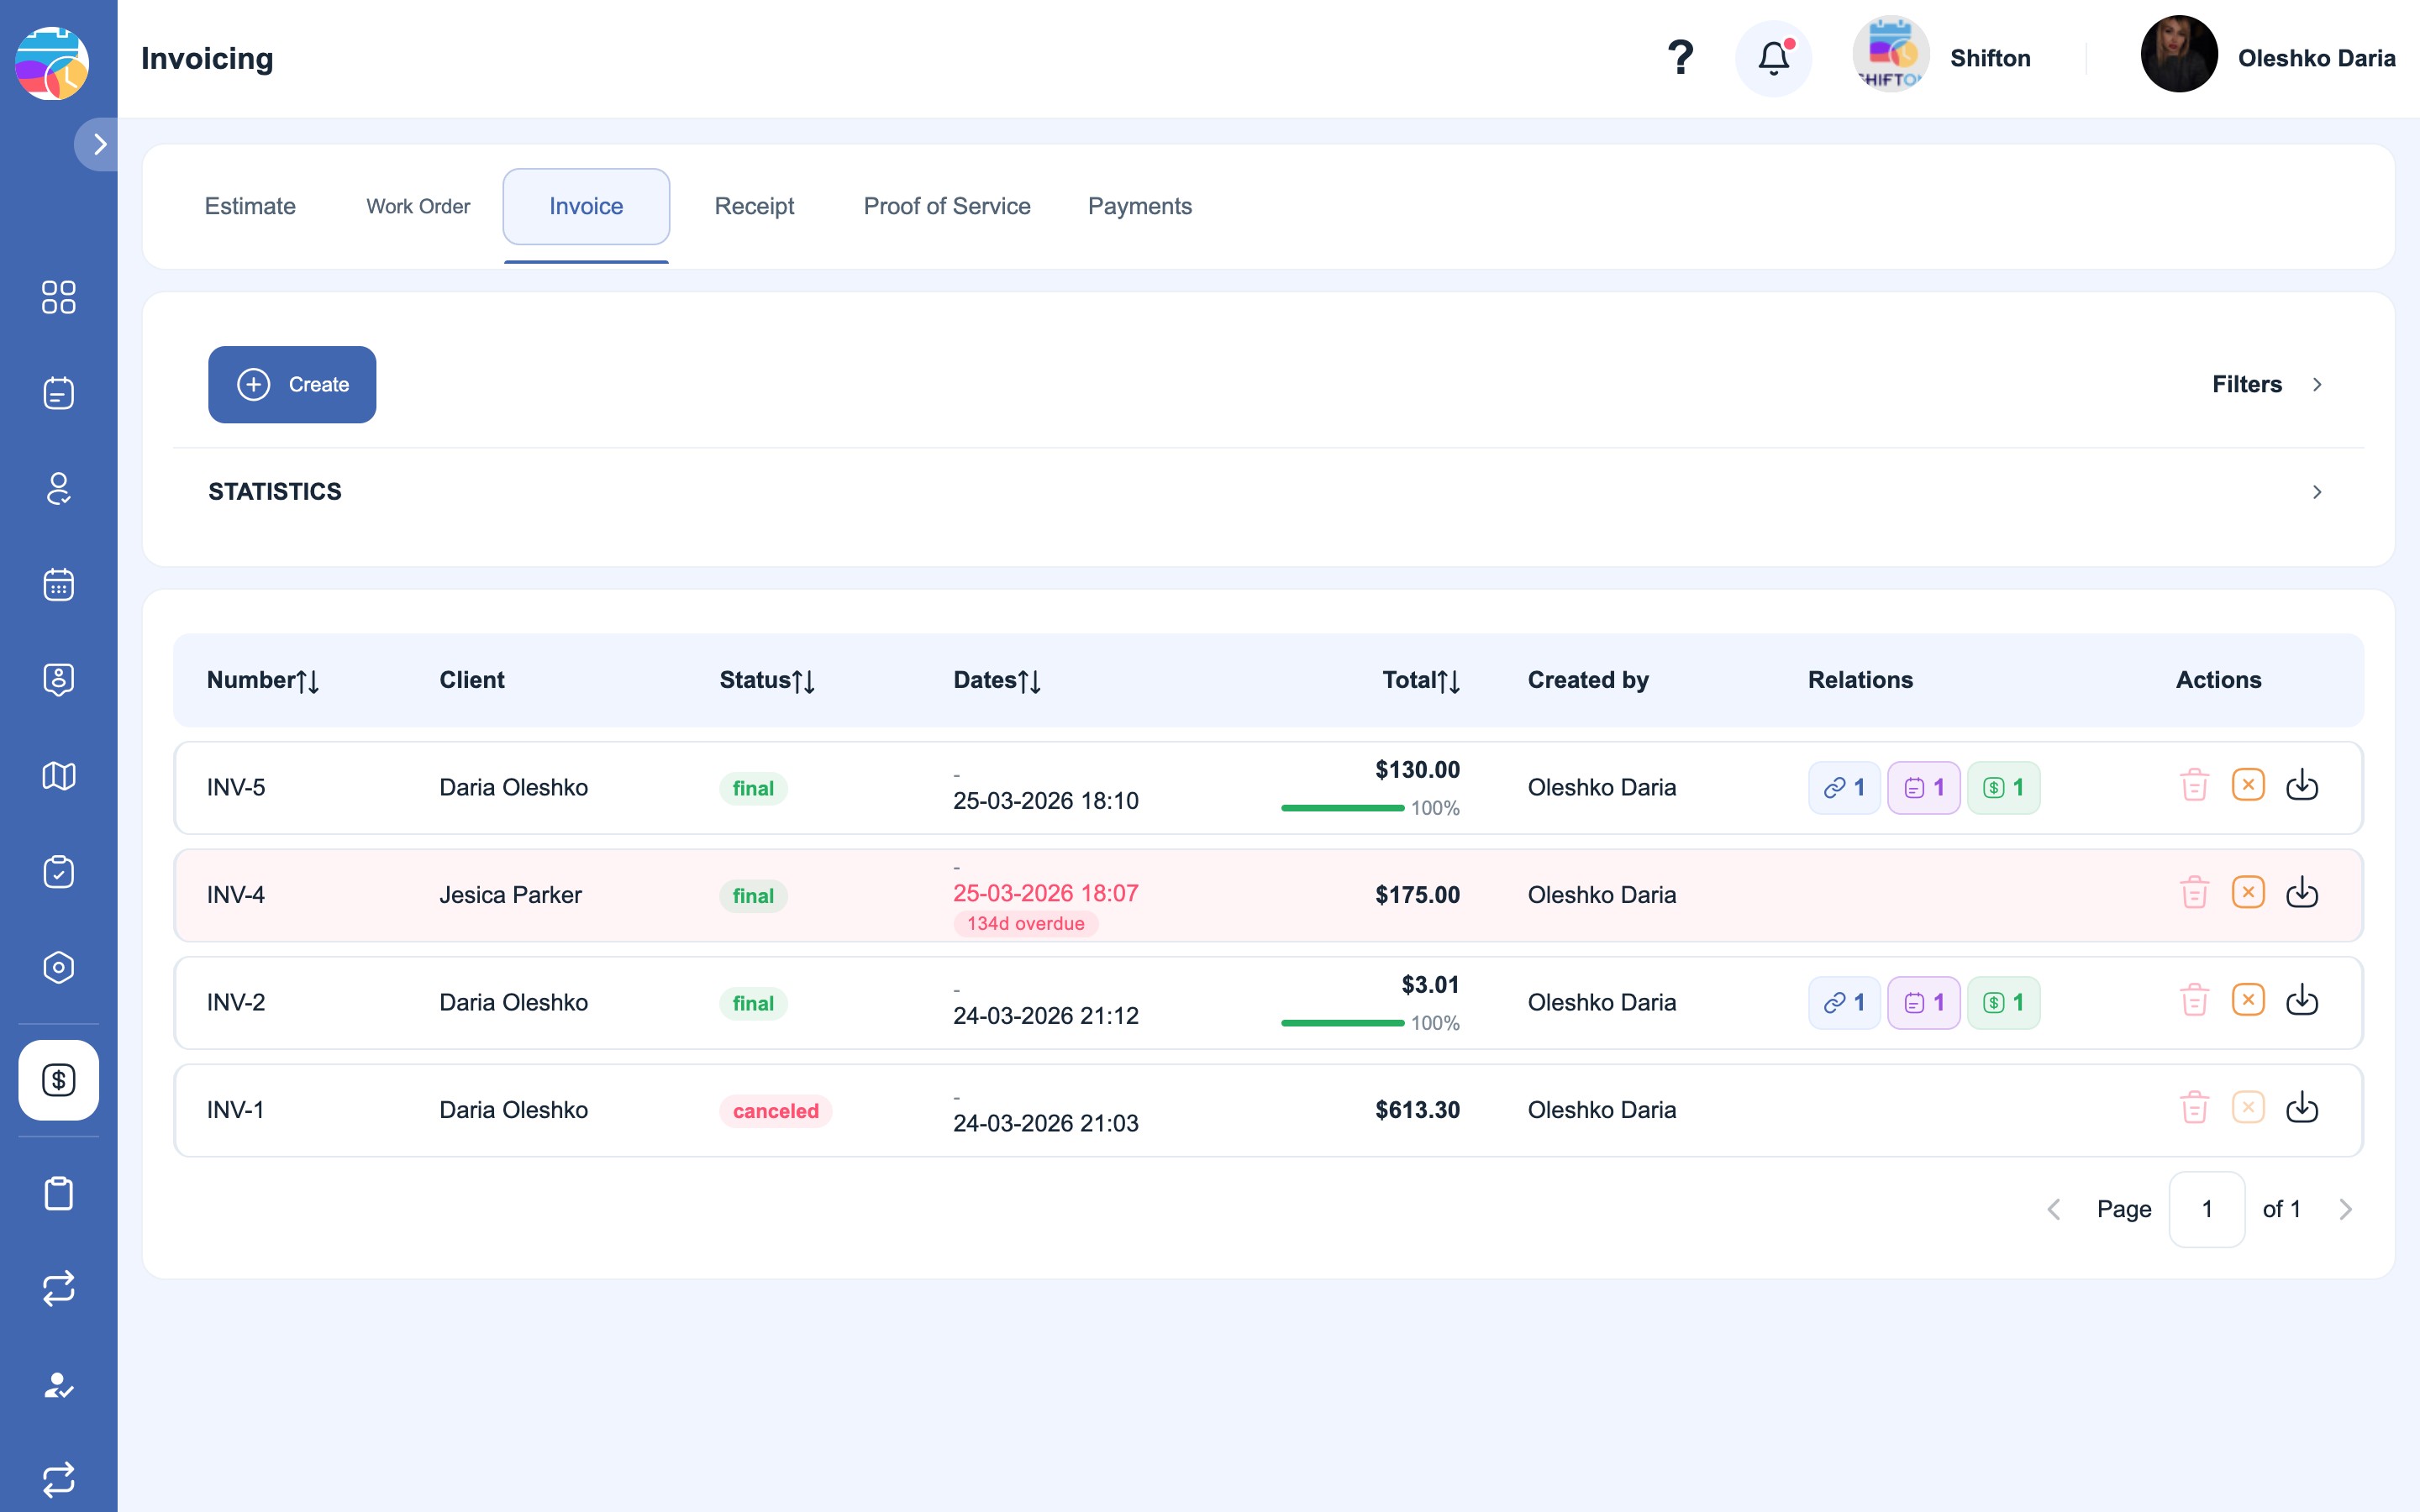
The Estimate, Work Order, Invoice and Proof of service tabs work in the same way — their list, statistics and life cycle are common and are described below.
Receipt is the exception: it cannot be created manually. A receipt is generated automatically when you register a payment, so on this tab, instead of the “Create” button, there is “Create payment”.
The life cycle of a document
Creation (draft) → editing the line items → Save draft → Generate (issuing → “final”, irreversible)
                                                       → Send / Download PDF / Convert / Cancel
1. Creating a document
- Open the tab of the type you need (for example, Estimate) and click Create. The Add side panel opens.
- Select the Client — the field is mandatory. The document is linked to this client (the address, phone and email are pulled in automatically).
- If necessary, select the client’s Tasks. The hours and services from these completed tasks will be pulled into the document.
- Click Add. A draft of the document opens in the editor.
2. Editing the document
Click Edit to open the editable form.
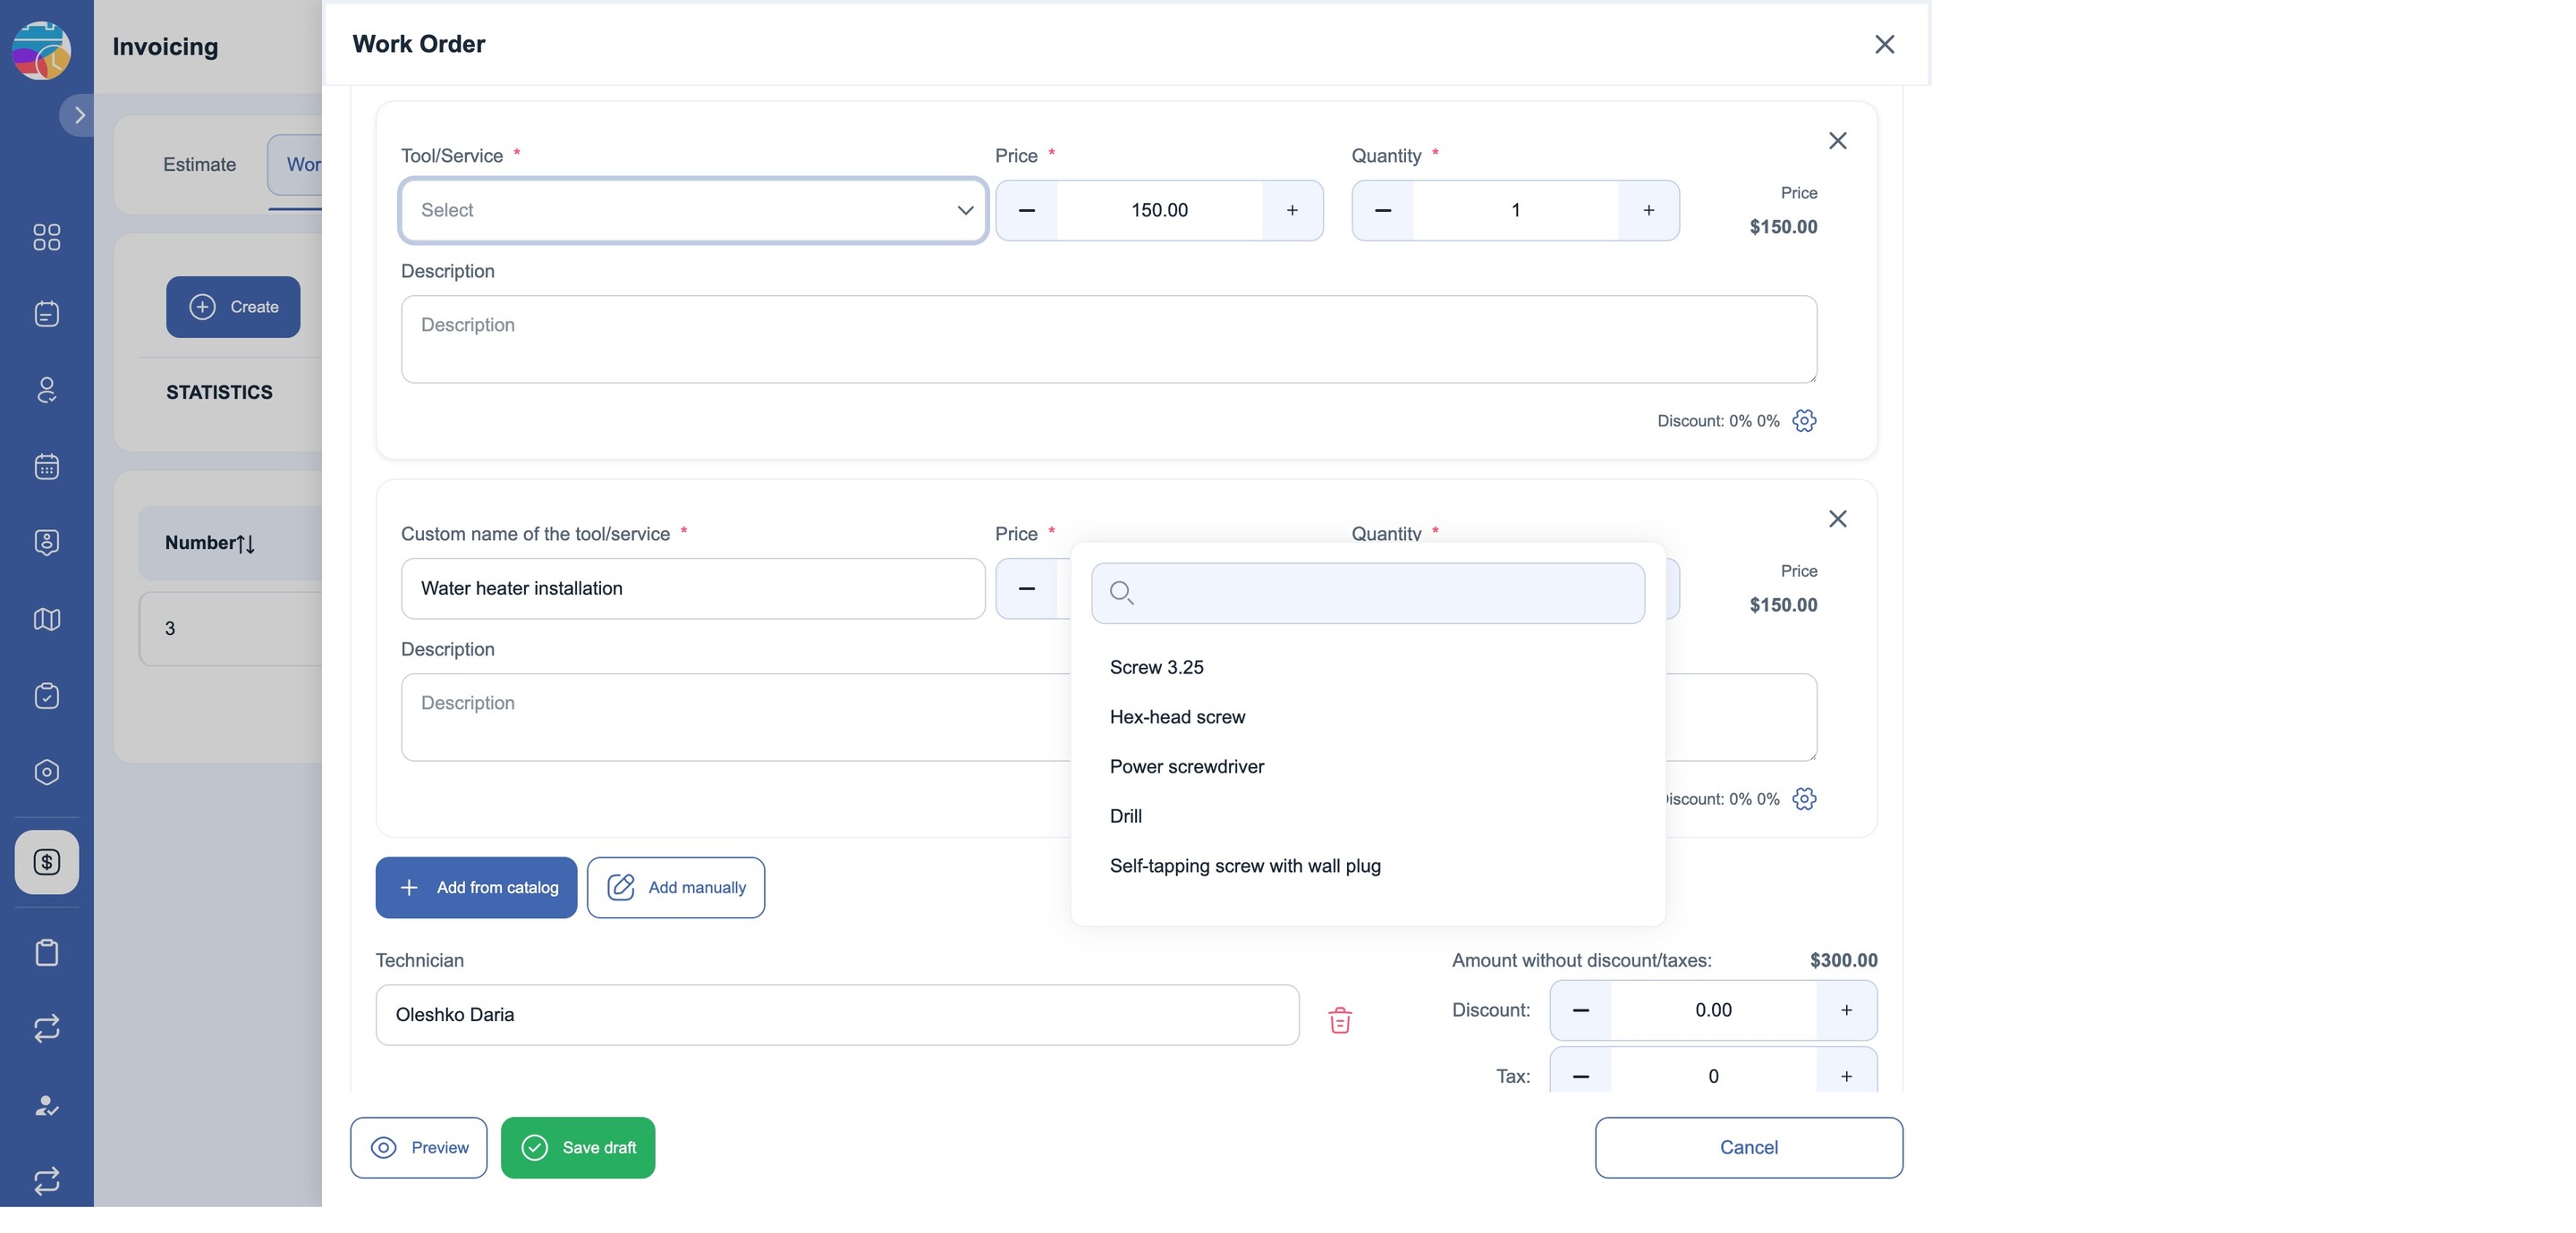
In editing mode every field of the document is available for editing: the name and the address of the company, the payment due date, the billing details, and below them the Items block with the lines of the document. Every line has its own name, price, quantity, description and discount; the line total is calculated automatically.
You can set:
- Company name, logo and address They are shown in the header of the document.
- Payment due date The date and time of the payment.
- Billing details. A single text field with the payment data for the client written in it — the recipient (ATTN), the bank (Bank), the BIC Code, the account number (Account number) and the routing number (Routing number). It is filled in from the module settings (Modules → Settings → Invoicing), but in the document itself it can be edited as ordinary text. The total amount of the document is shown next to it.
- Tools/Services (Items). This is the content of the document — what the bill is issued for. Lines are added with two buttons:
- Add from catalog. You select ready-made tools or services from your catalogue — the name, the price and the description are filled in on their own.
- Add manually. An empty line appears, in which you fill in: Custom name of the tool/service — an arbitrary name of the tool or the service (a mandatory field), Price — the price (mandatory), Quantity — the quantity (mandatory), Description — the description and Discount — the discount on this line as a percentage.
The line total (Sum) is calculated on its own: price × quantity. Lines added manually are marked with the Custom label. You can add as many lines as you like — each one appears as a separate block with the same fields.
- Salesperson The person responsible for the sale.
- Discount and Tax The tax is set as a percentage of the amount (for example, Tax
10on $300 → +$30 → Total $330). - Note An arbitrary comment on the document.
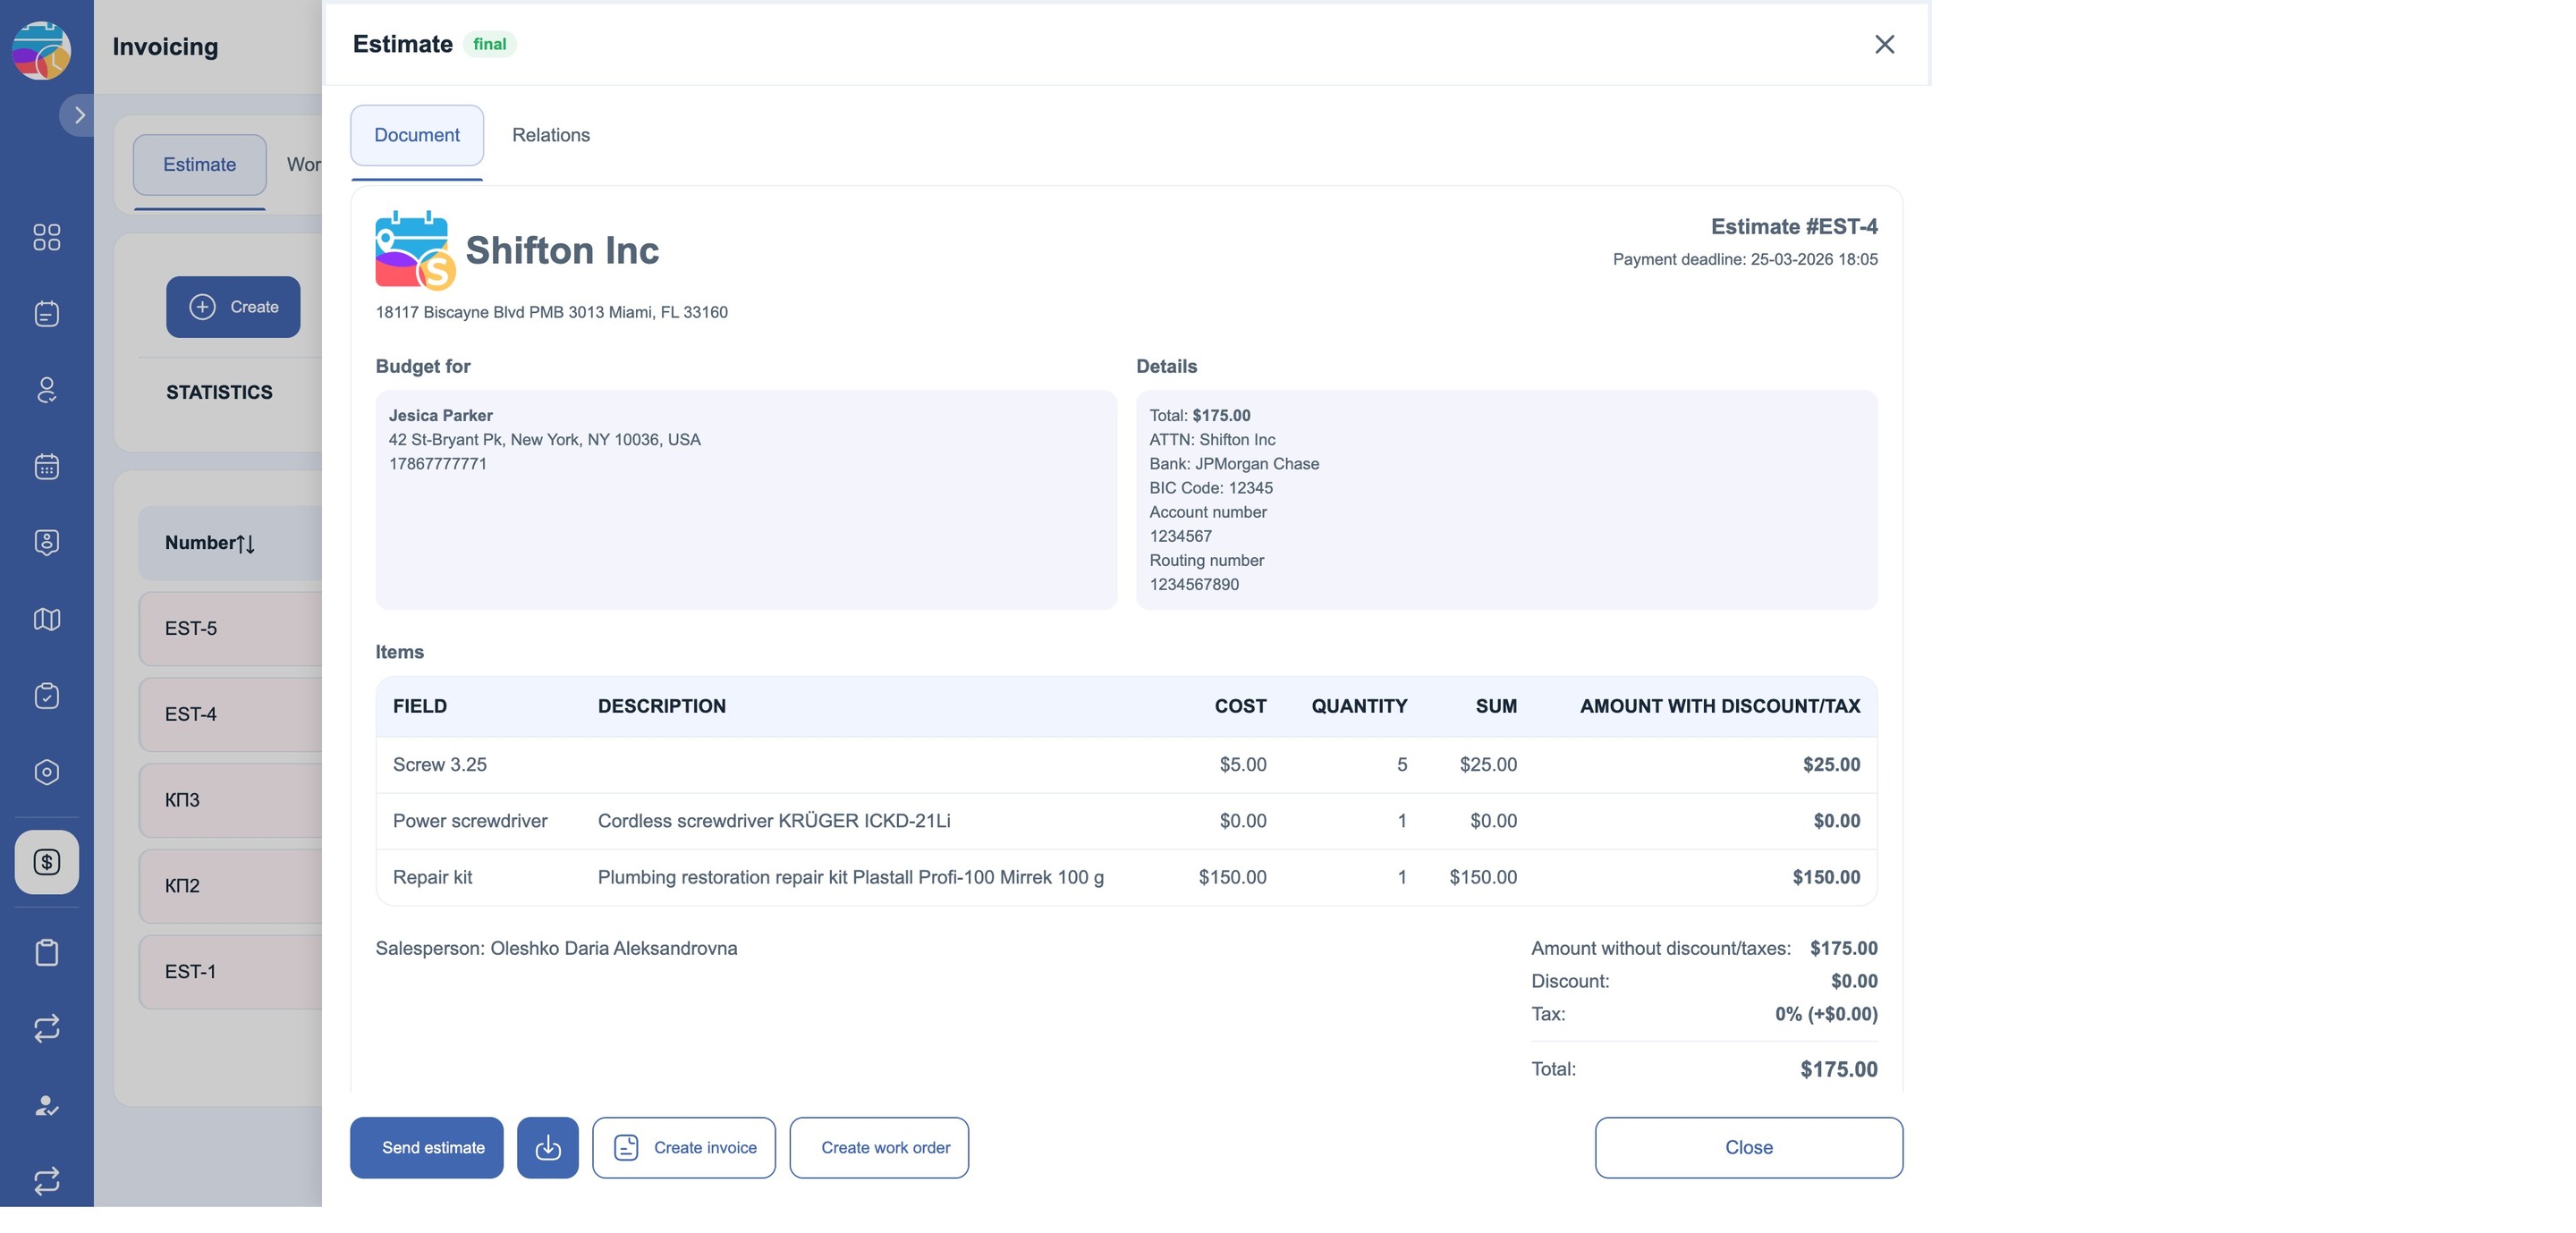
This is what a finished document looks like: a header with the logo and the address of the company, the Estimate for block with the client’s data, the Details block with the billing details and the total, the Items table with the price, the quantity and the total of every line, the totals with the discount and the tax, and the action buttons at the bottom.
Use Preview to see the finished look of the document, and Save draft to save the changes (the Save draft button becomes active only after you have changed something).
3. Issuing — the “Generate” button
Click “Generate” to issue the document. A confirmation appears: *“Are you sure you want to issue this …? This action is irreversible.”*
- When you confirm, the status changes to final, the document is given a number (for example, EST-6), and a success notification appears.
Where the number of the document comes from. Before it is issued, the document has no number — in the draft there is a placeholder of the WO-000000 kind instead. The number is given at the moment of issuing and is made up of two parts: the prefix and the counter. Both of them are set in the module settings: Modules → Settings → Invoicing. Every document type has its own prefix and its own counter — for example, EST- for estimates, WO- for work orders, INV- for invoices, REC- for receipts, POW- for proofs of service. If the estimate counter equals 6, the next issued estimate will get the number EST-6, and the counter will become 7.
The counter can also be switched to a different value there — for example, to continue the numbering you kept before. For more details on how to open the module settings, see the article “Modules and module settings”.
The number of a cancelled document stays with it and is not given out again.
- An issued document can no longer be edited.
4. After issuing
The following actions are available for issued documents:
- Send (for example, *Send estimate*). It opens the email window — Email (of the client), Subject, Message; the document is attached as a PDF. Click Send — the client will receive the document by email.
- Download (the icon). It downloads the document in PDF format.
- Create invoice. It converts the document into a new draft in Invoices, filled in with the same client, line items, discount and tax.
- Create work order It converts the document into a new Work order draft.
Converted documents are connected to each other — see the Relations tab.
5. Cancelling or deleting (the actions in the row)
In every row of the list the Actions menu offers:
- 🗑 Delete. Available for drafts only: an issued document cannot be deleted, it can only be cancelled.
- ⨯ Cancel The confirmation *“This action cannot be undone”* → the status changes to canceled.
- ⬇ Download PDF It saves the PDF.
The “Relations” tab
Open the document → Relations to see:
- Client The name and the email.
- Document links Other documents connected to this one (for example, an invoice created from this estimate).
- Payment summary — Total amount, Paid and To pay.
- Related tasks The field tasks linked to the document.
Registering a payment
The Payments tab records the money received.
- Open the Payments tab → Create payment.
- Select the Client — the field is mandatory.
- Enter the Payment amount and select the Currency — mandatory.
- Set the Payment date — mandatory.
- Select the Payment method: Cash, Bank card, Bank Transfer, Swift or Check.
- If necessary, add the Payment information (the receipt number / the transaction ID) and an Internal note on the payment.
- Click Submit.
The payment is recorded with the Succeeded status. The list of payments shows the client, the status, the payment method, the amount, the payment date and who created the record.
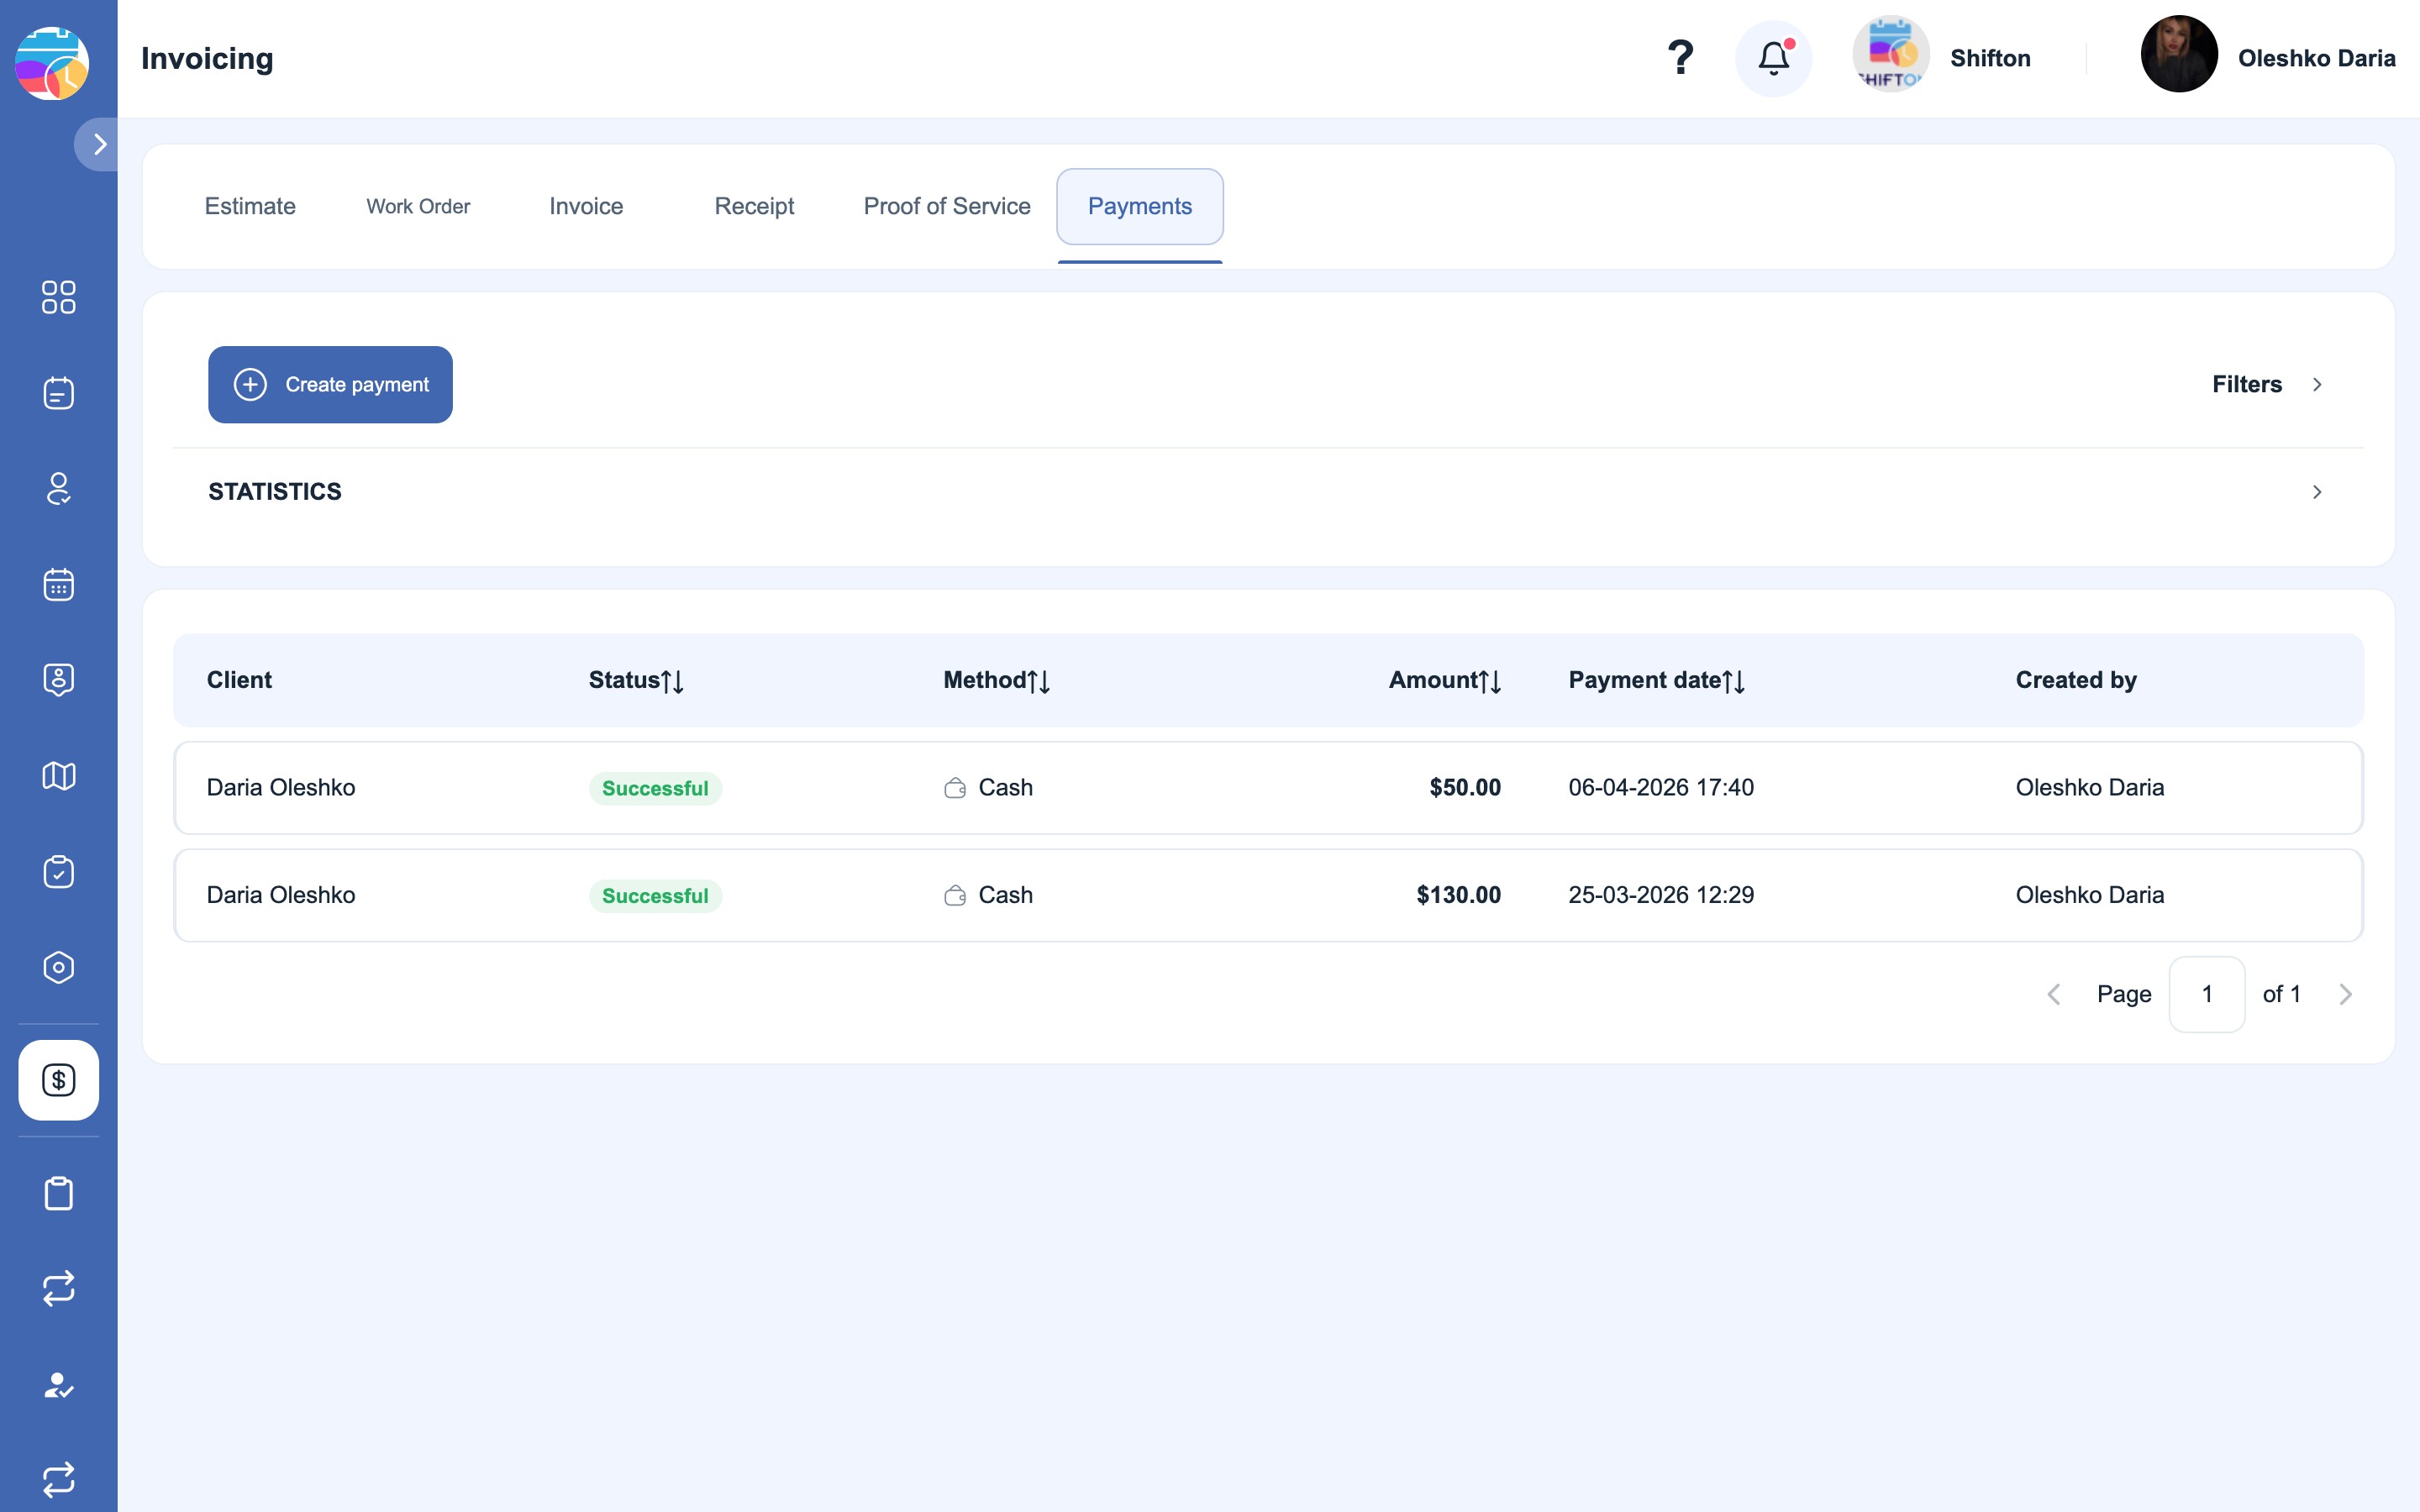
Statuses, list and statistics
- Statuses: Draft (being prepared) · Final (issued) · Canceled (annulled). Documents with an expired payment due date are additionally marked as overdue — in red.
- List columns: Number, Client, Status, Dates (of creation and of the payment due date), Total, Created by, Relations, Actions.
- STATISTICS (it expands). It shows the number of documents and the monetary amount broken down by status (Draft / Final / Canceled) and with the totals.
- Filters They narrow the list down.
Permissions
| Role | Invoicing |
|---|---|
| Owner / Administrator | Full access |
| Employee | No access |
Possible problems and solutions
| Problem | Cause | Solution |
|---|---|---|
| There is no “Invoicing” item in the side panel | The module is disabled or you are not in Tasks (Field Service) mode | Enable it in the Company settings → Modules section; switch to Tasks (Field Service) mode. |
| The Save draft button is inactive | There are no unsaved changes | It becomes active as soon as you change something. |
| The document cannot be edited | It is already final | Cancel it and create a new one. |
| The data from the task was not filled in | The tasks are not linked or not completed | Link the client’s task(s) in the Tasks field when creating it. |
| The client did not receive the document | An incorrect or missing client email | Check the client’s email and click Send again. |
FAQ
Question: I issued the wrong document — can it be edited? Answer: No — issuing is irreversible. You can Cancel the document (status → canceled) and create a new one.
Question: How do I turn an approved estimate into a bill for payment? Answer: Open the issued estimate and click Create invoice — a linked invoice draft with the same line items will be created.
Question: Is the tax an amount or a percentage? Answer: It is a percentage. A tax of 10 adds 10% to the amount.
Question: How do I send the document to the client by email? Answer: Issue it, then click Send — the PDF is attached and sent to the email address of the client.
Question: Where can I see how much is still left to pay? Answer: On the Relations tab of the document → Payment summary (Total amount / Paid / To pay).
Question: In what order should the document types be used? Answer: In the course of the work with the client: estimate (an offer before the work starts) → work order (for carrying out the work) → invoice (a bill for payment) → receipt (a proof of payment) → proof of service (confirmation). The payment is registered separately on the Payments tab. You can start with any document — the order is not mandatory.
Question: Why is there no “Create” button on the “Receipt” tab? Answer: A receipt is not created manually. It appears automatically when you register a payment, so this tab has the “Create payment” button.
Question: Can an issued document be deleted? Answer: No. Only a draft can be deleted. All you are allowed to do with an issued document is cancel it — it will stay in the list with the “canceled” status.
Question: What happens to the number of a cancelled document? Answer: The number stays with the cancelled document and is not given out again. The next document will get the next number by the counter. Prefixes and counters are set in Modules → Settings → Invoicing — see the article “Modules and module settings”.
Question: Where do the billing details and the logo in the document come from? Answer: From the module settings (Modules → Settings → Invoicing, see the article “Modules and module settings”). The logo is pulled in there from the company settings. In the document itself they can be changed before it is issued.
Question: Can the document be sent to the client again? Answer: Yes. The send button of an issued document is always available — the email with the PDF can be sent as many times as you need.
Question: What does the red “overdue” mark mean? Answer: That the payment due date specified in the document has already passed and the document has not been paid. The mark appears automatically.
Question: In what currency are the documents issued? Answer: The currency is selected when a payment is registered. The amounts in the documents themselves are calculated in the currency set for the company.
Question: Which payment methods can be specified? Answer: Cash, bank card, bank transfer, Swift and check. The method is selected when the payment is created, together with the amount and the date.
Question: Which employees see the financial documents? Answer: The owner and the administrator of the company. The module is not available to ordinary employees.
Question: Is the module a paid one? Answer: Yes, “Invoicing” is a paid module. It is enabled in Company settings → Modules, and once it is enabled it appears in the left menu.
Question: Is the tax counted as an amount or as a percentage? Answer: As a percentage. The value 10 will add 10% to the amount.