Generate a standard work schedule with fixed hours, lunch breaks, and regular work days and days off. The Basic schedule type is ideal for traditional 9-to-5 teams.
What Is This?
The Basic schedule type uses automatic distribution to create shifts with consistent working hours for every assigned employee. It is the simplest and most commonly used schedule type — perfect for office teams, retail staff, or any group that follows a standard daily timetable.
When you choose Basic, Shifton automatically generates shifts for each employee across the selected date range based on the work days, start and end times, and break settings you define.
Prerequisites
| # | Prerequisite | Details |
|---|---|---|
| 1 | Active Shifton account | You must have a registered company account |
| 2 | Admin, Owner, or Manager role | You need permissions to create schedules |
| 3 | A project with assigned employees | The schedule must be linked to a project that has employees |
Step-by-Step Instructions
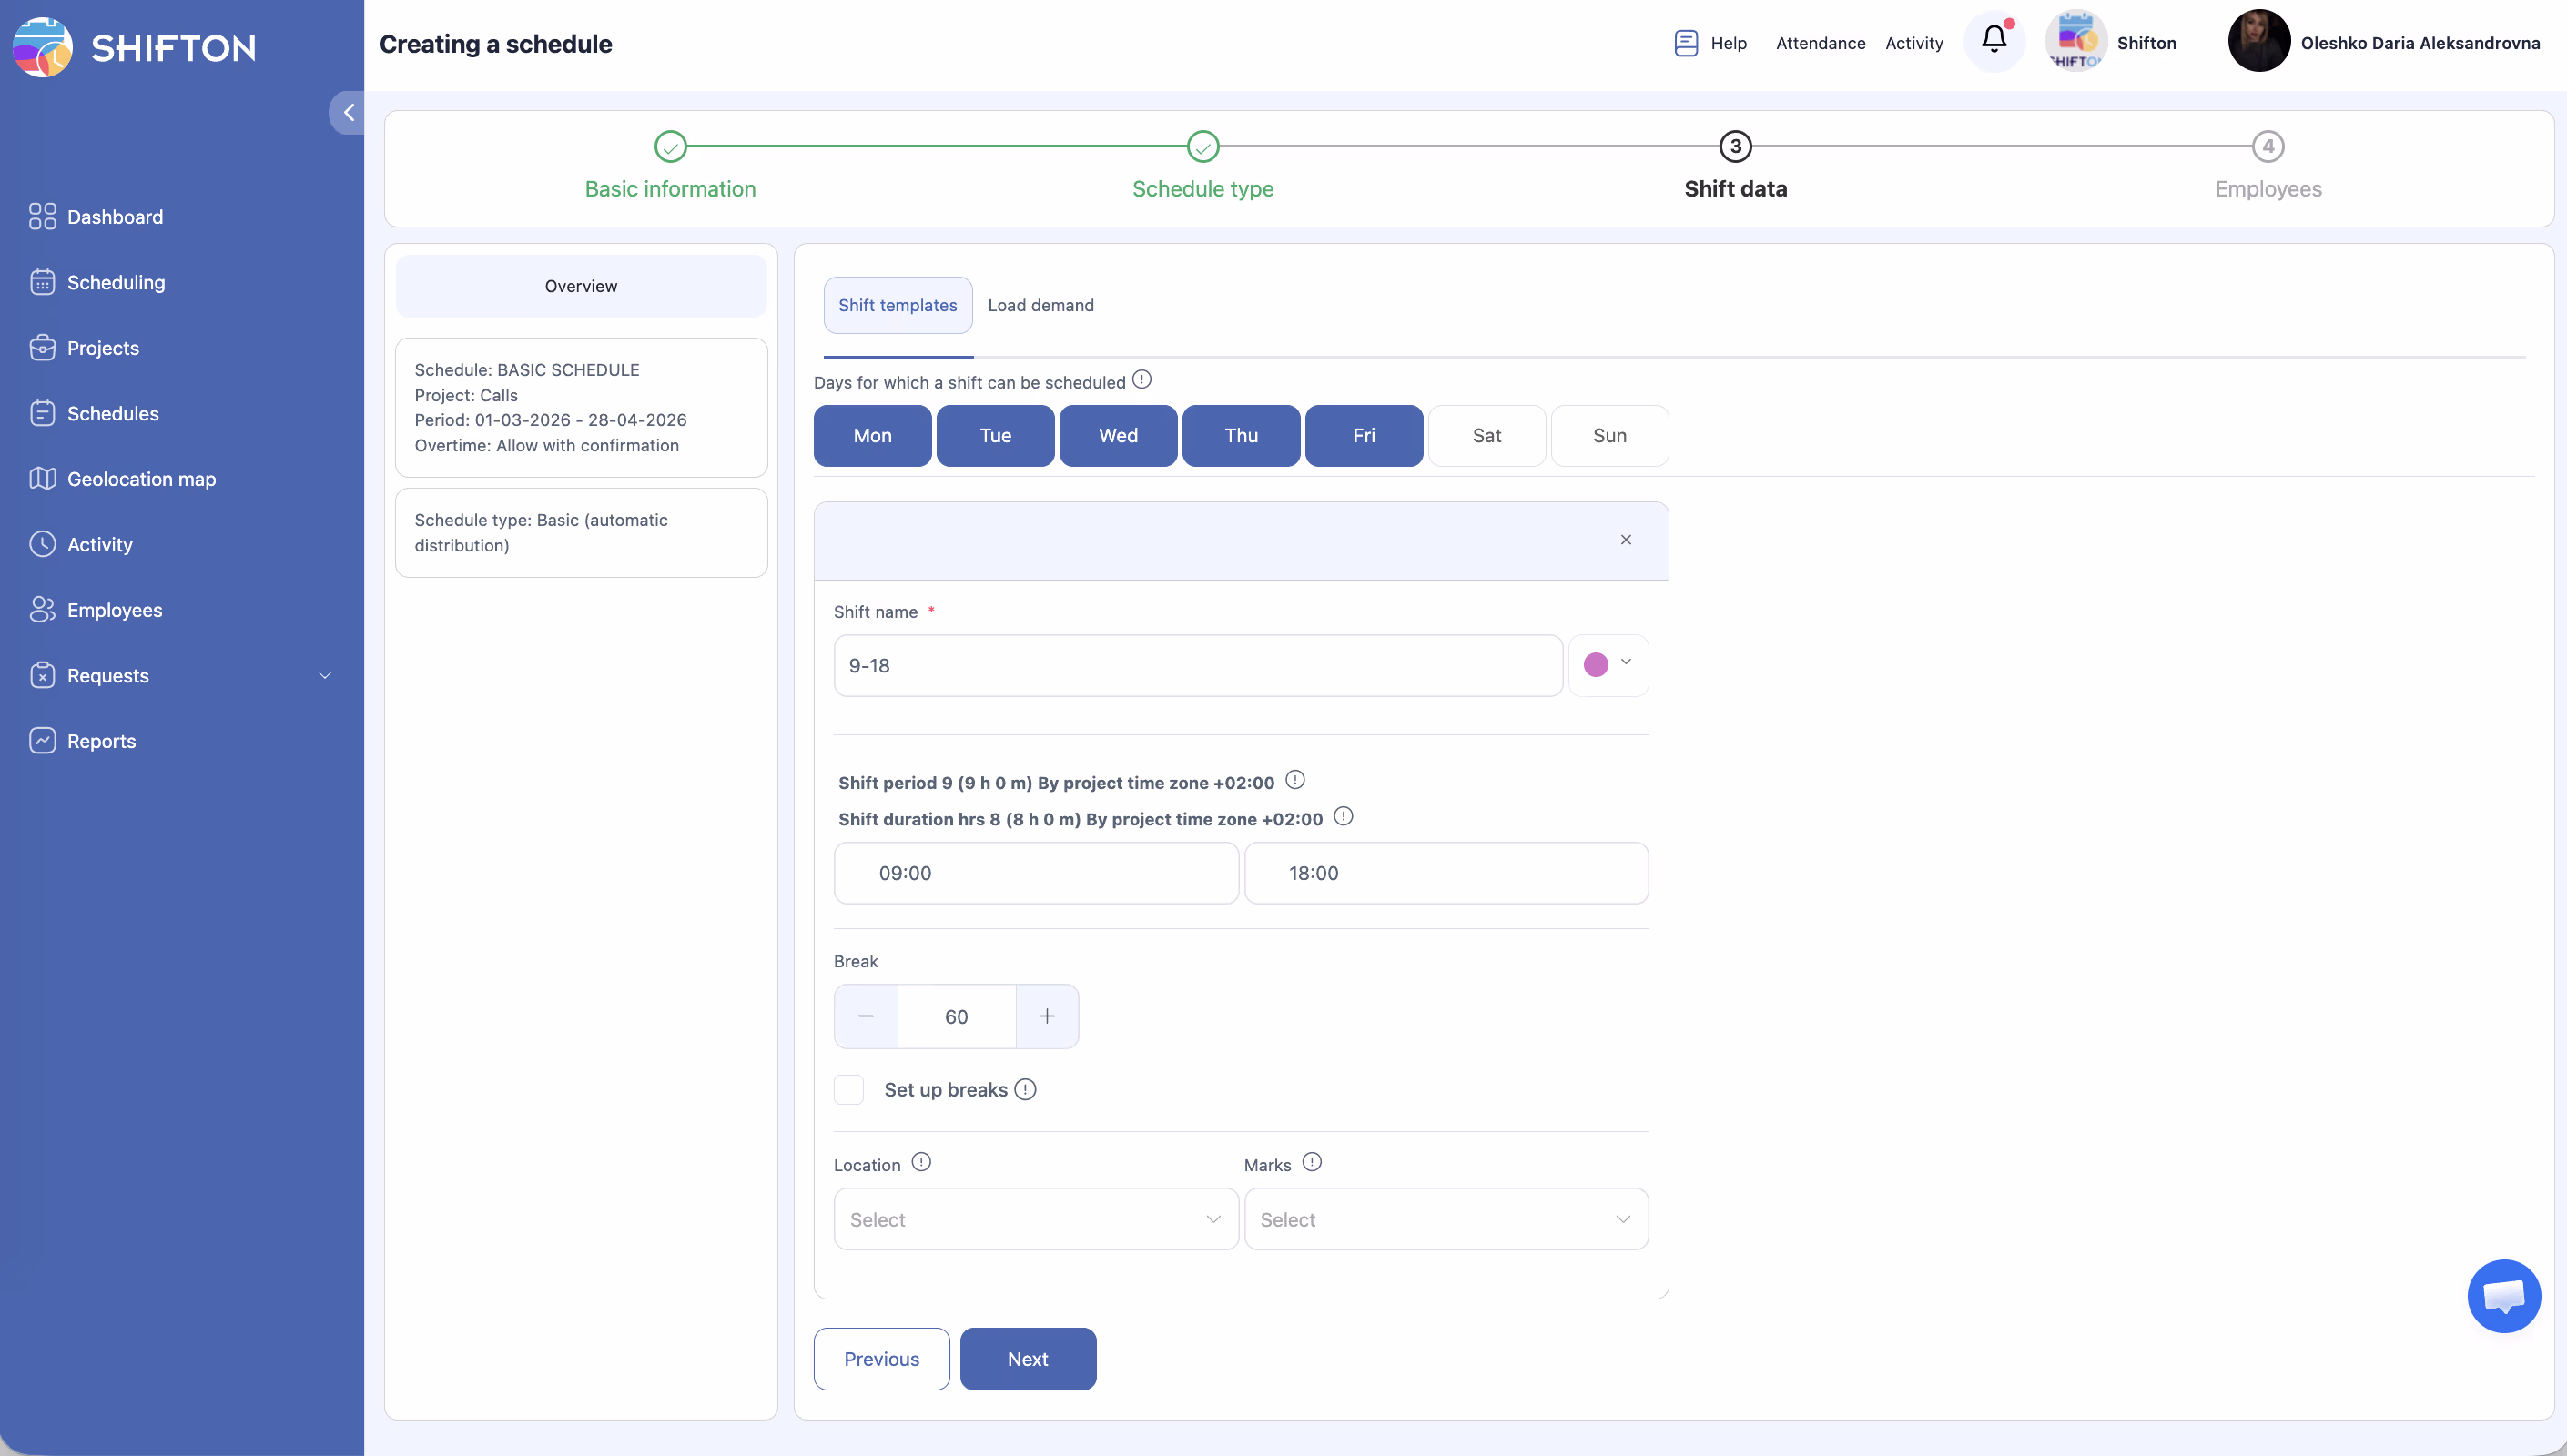
Step 1: Basic Information
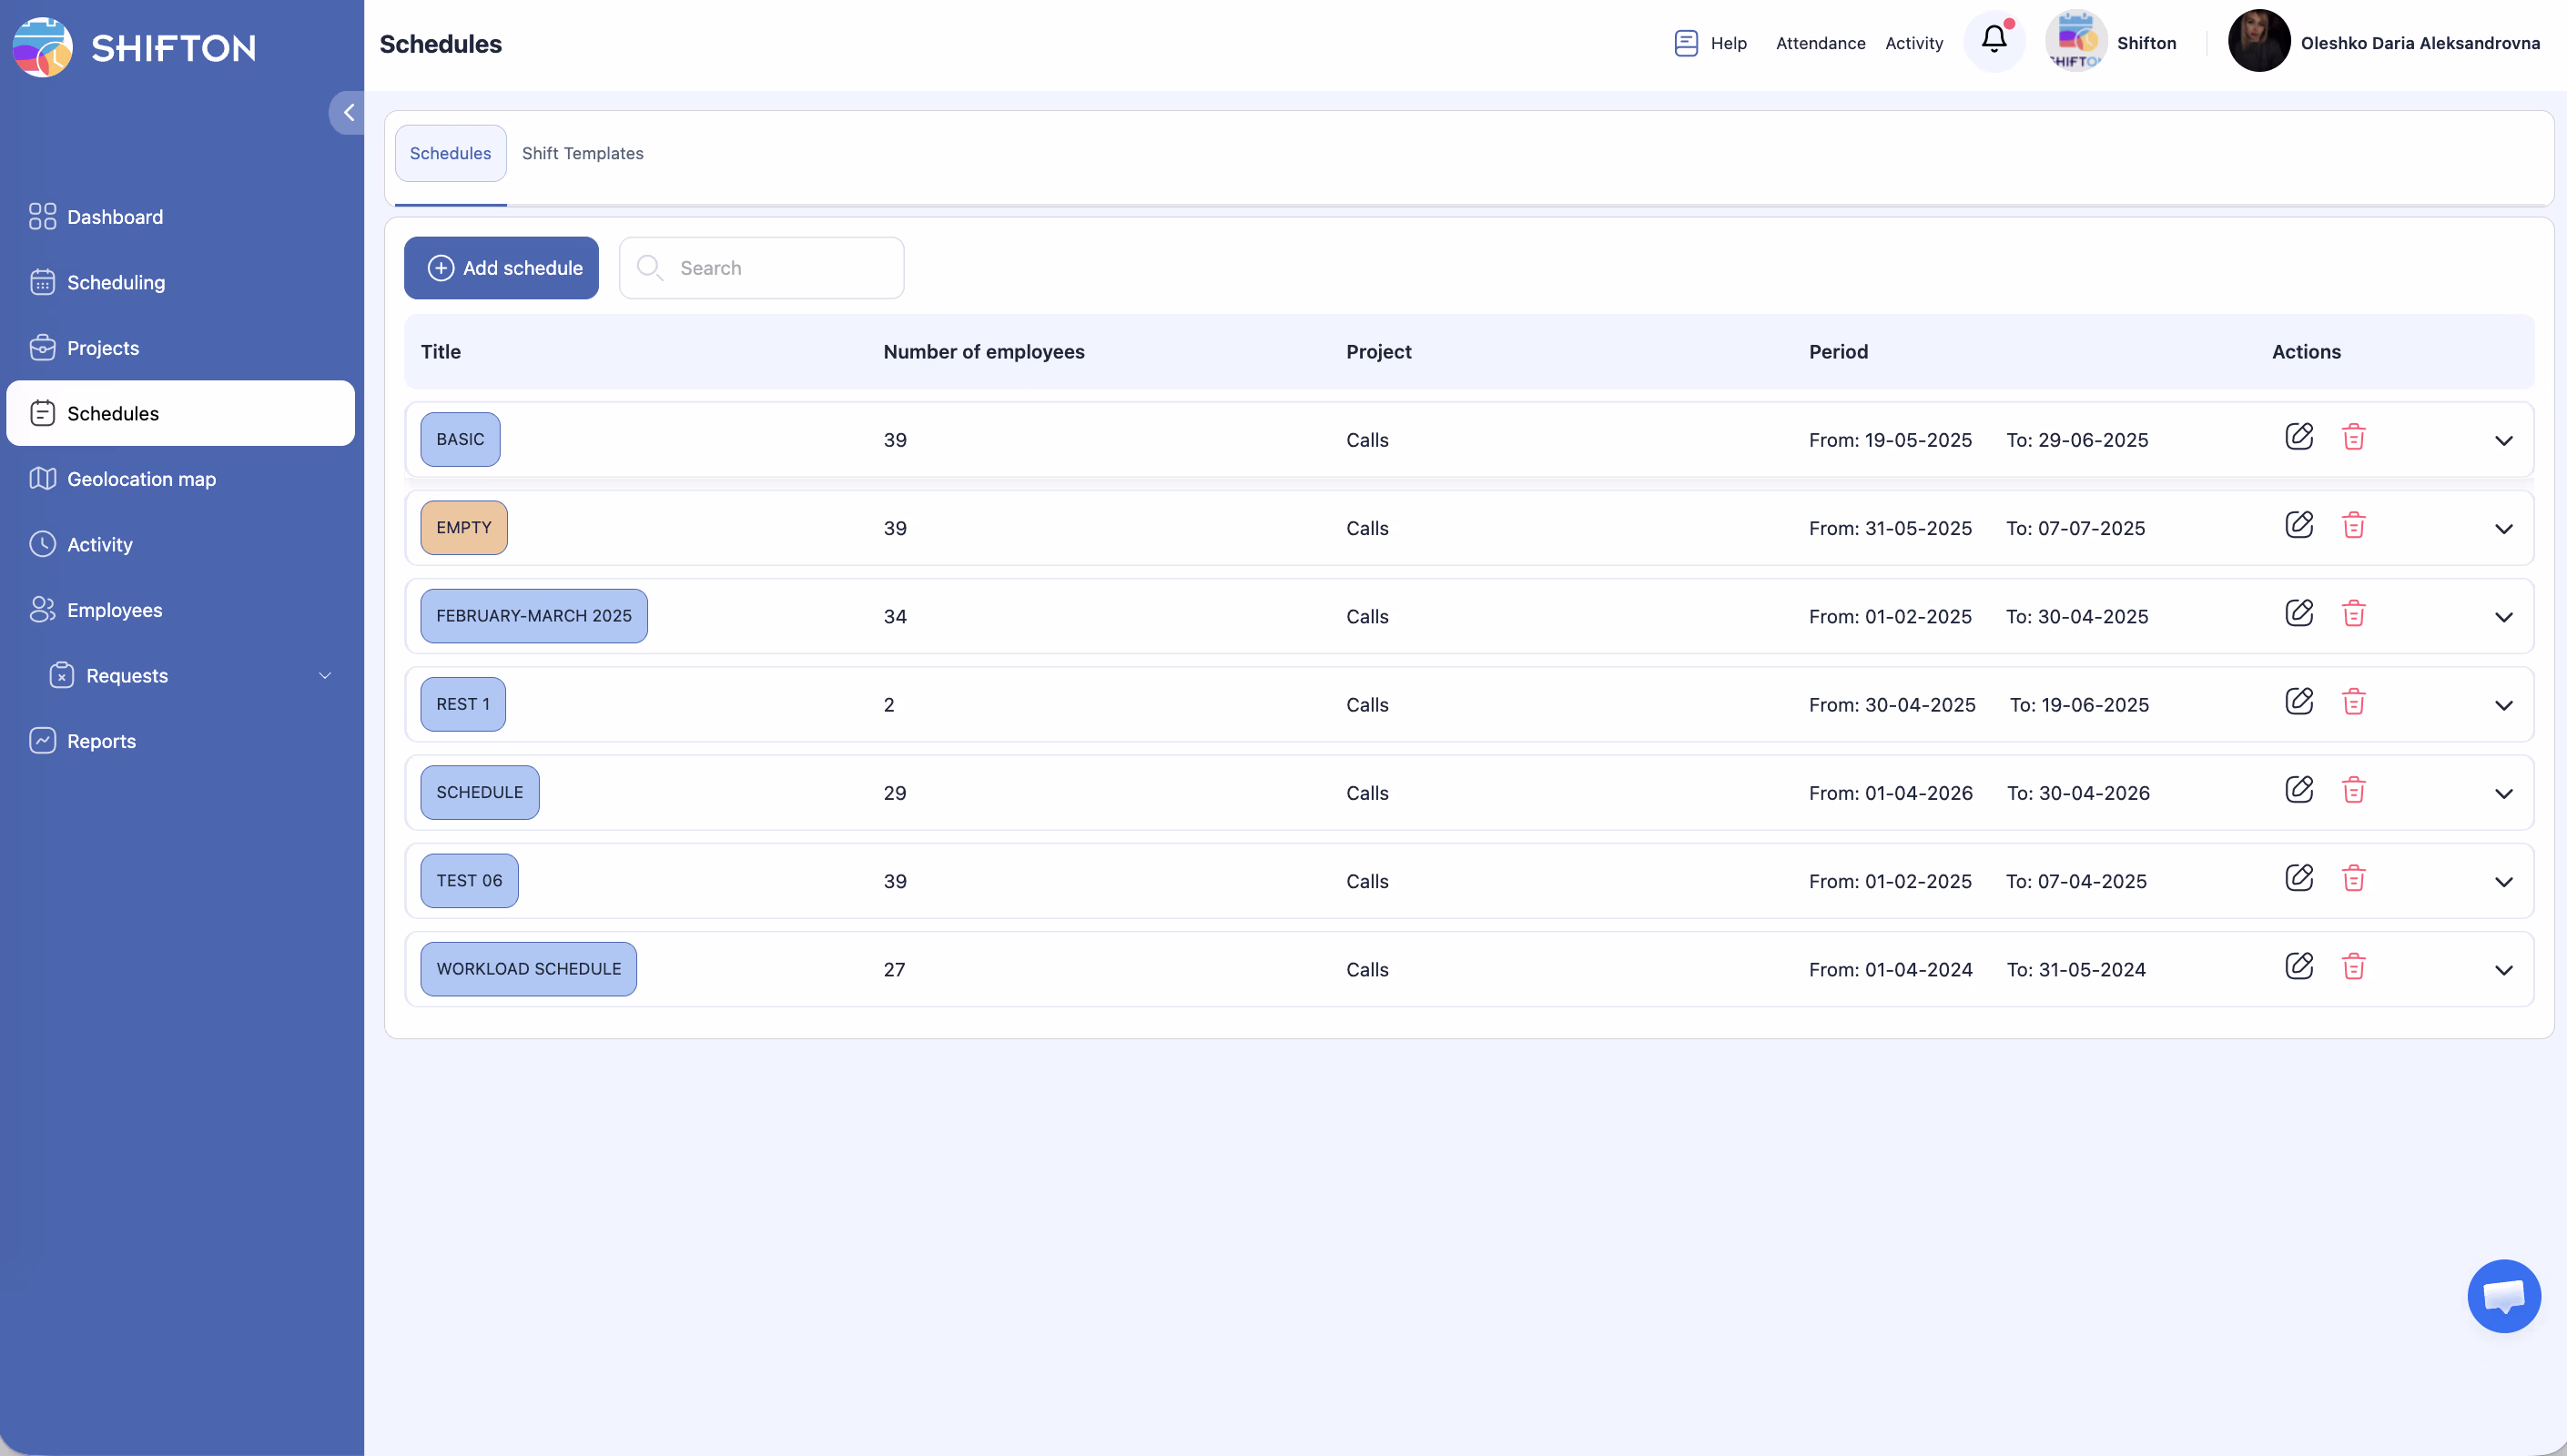
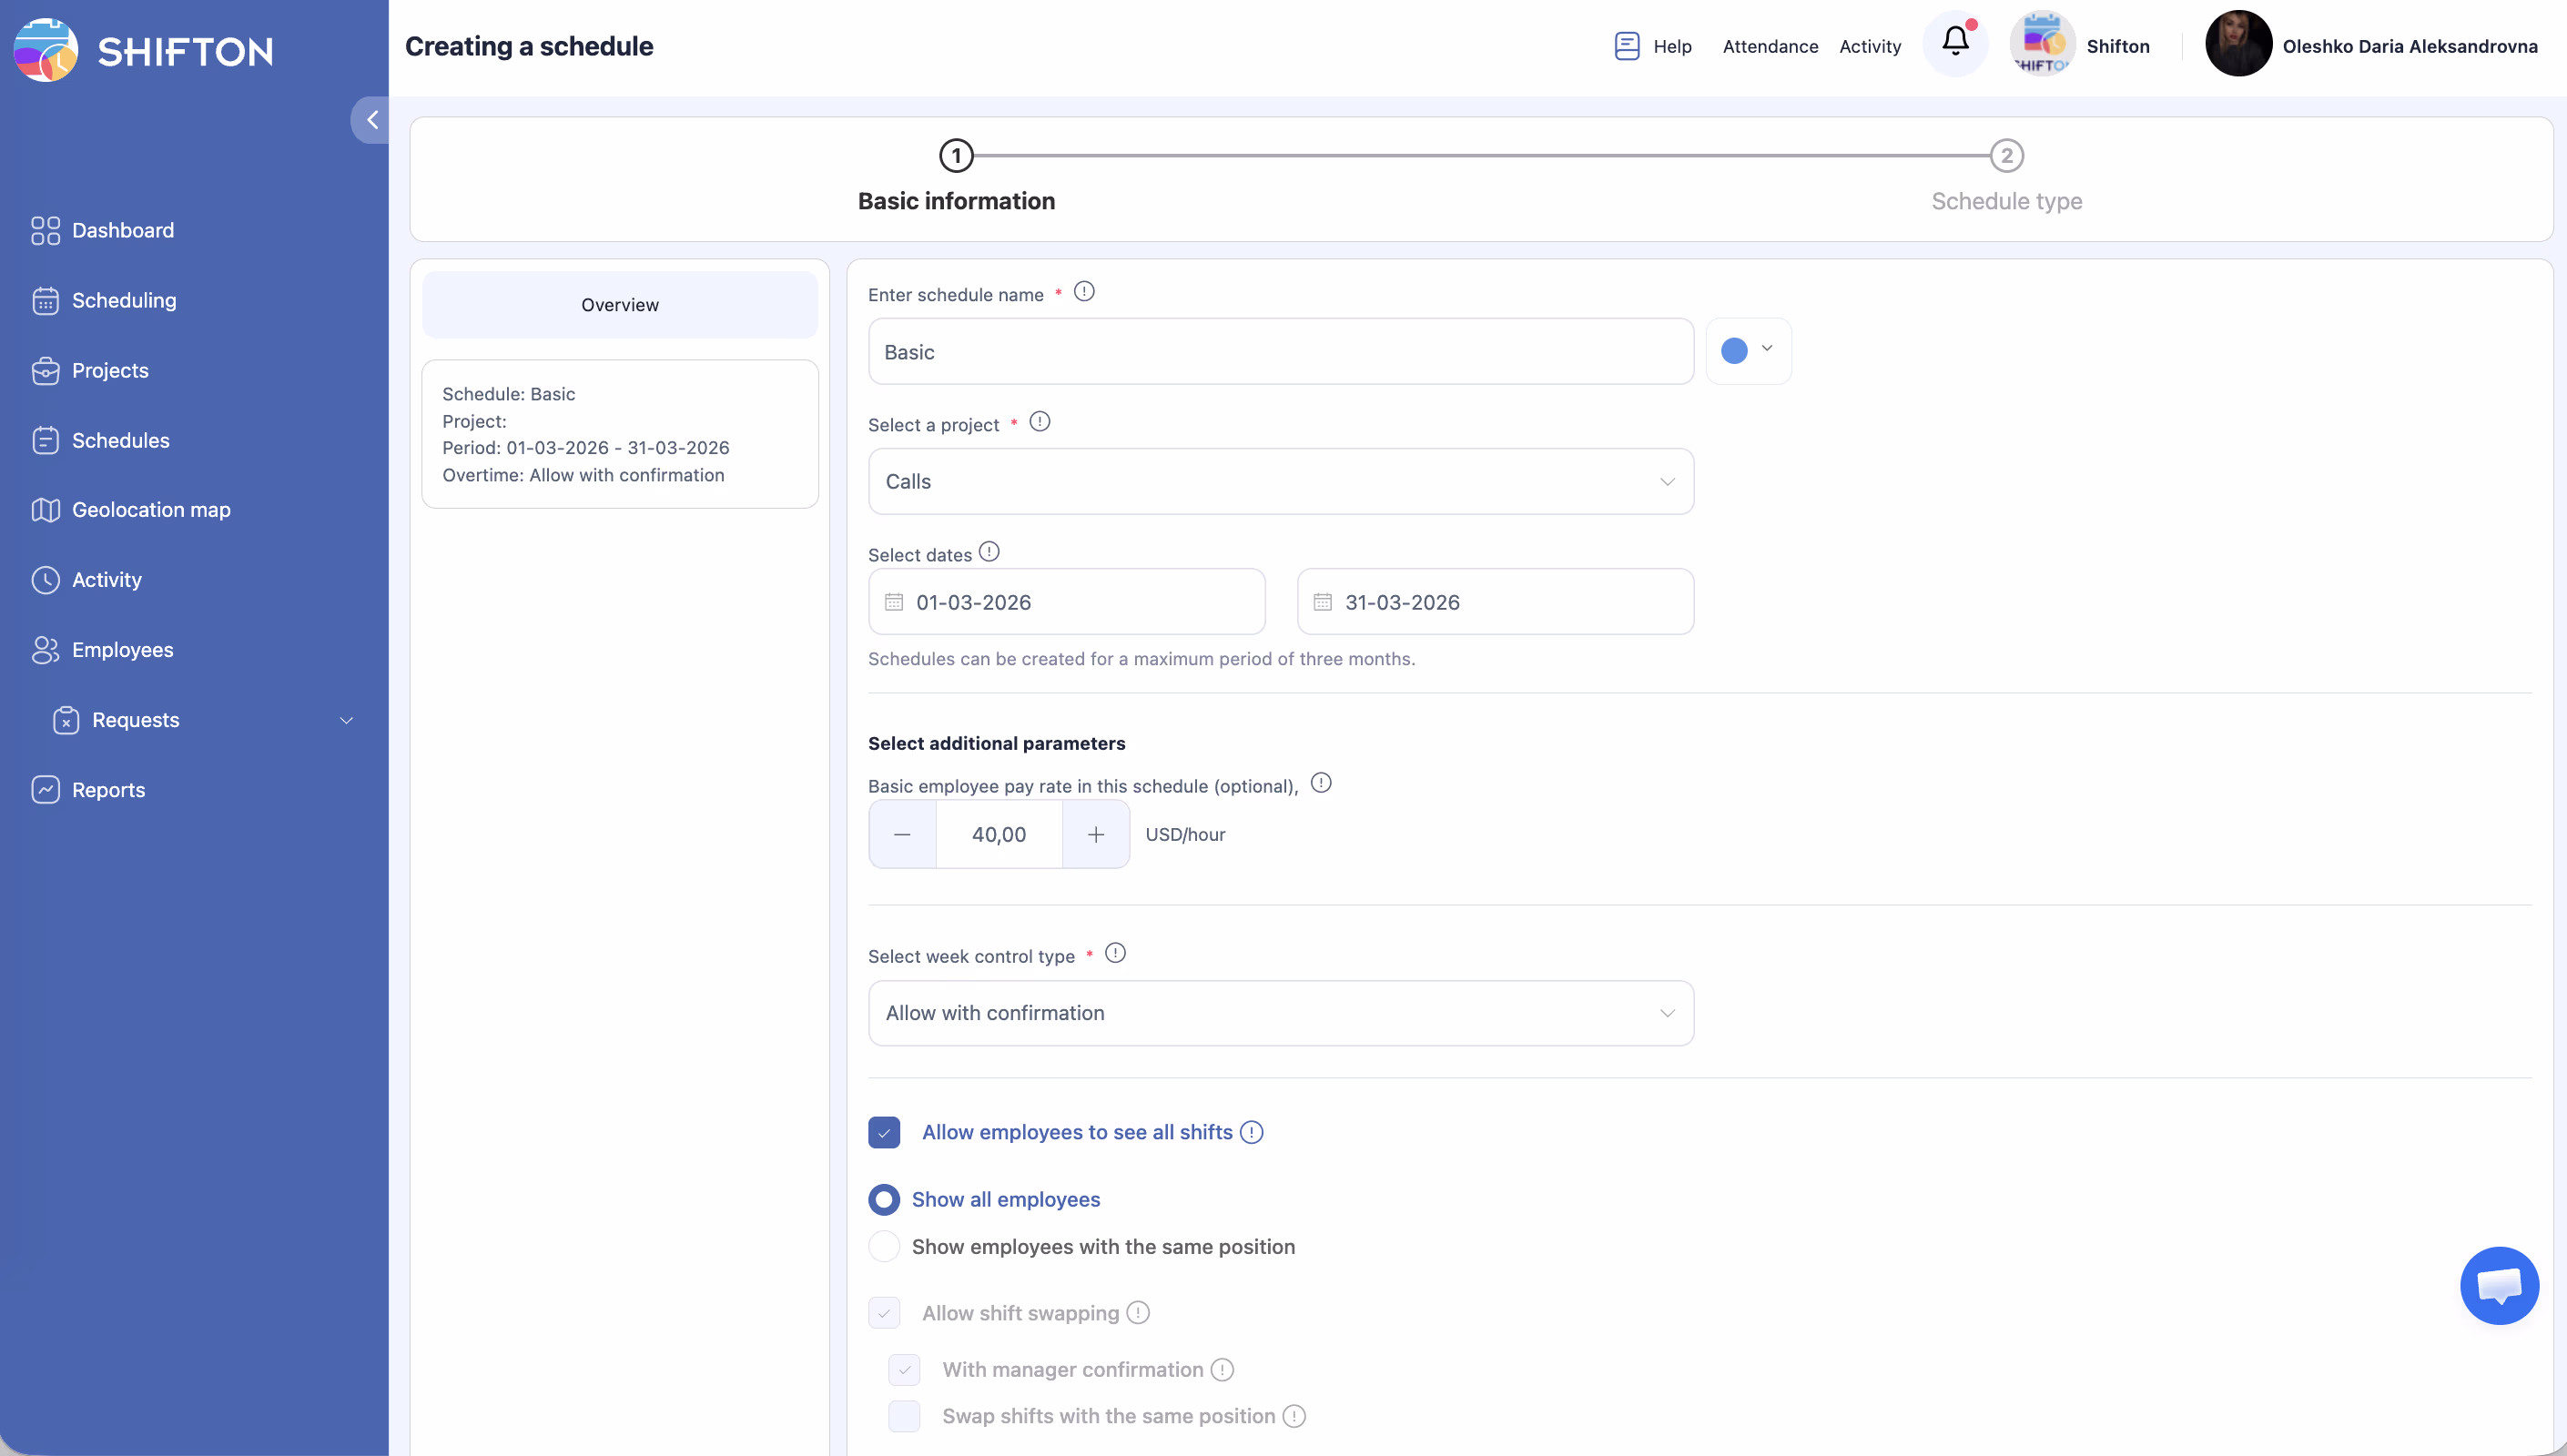
| Field | Required | Description |
|---|---|---|
| Enter schedule name | Yes | A descriptive title (e.g., “Office Team — March”) |
| Color | No | Choose a color to identify this schedule on the calendar |
| Select a project | Yes | Select the project this schedule belongs to |
| Select dates | Yes | Set the start and end dates — maximum 3 months |
| Basic employee pay rate | No | Base pay rate per hour for shifts in this schedule |
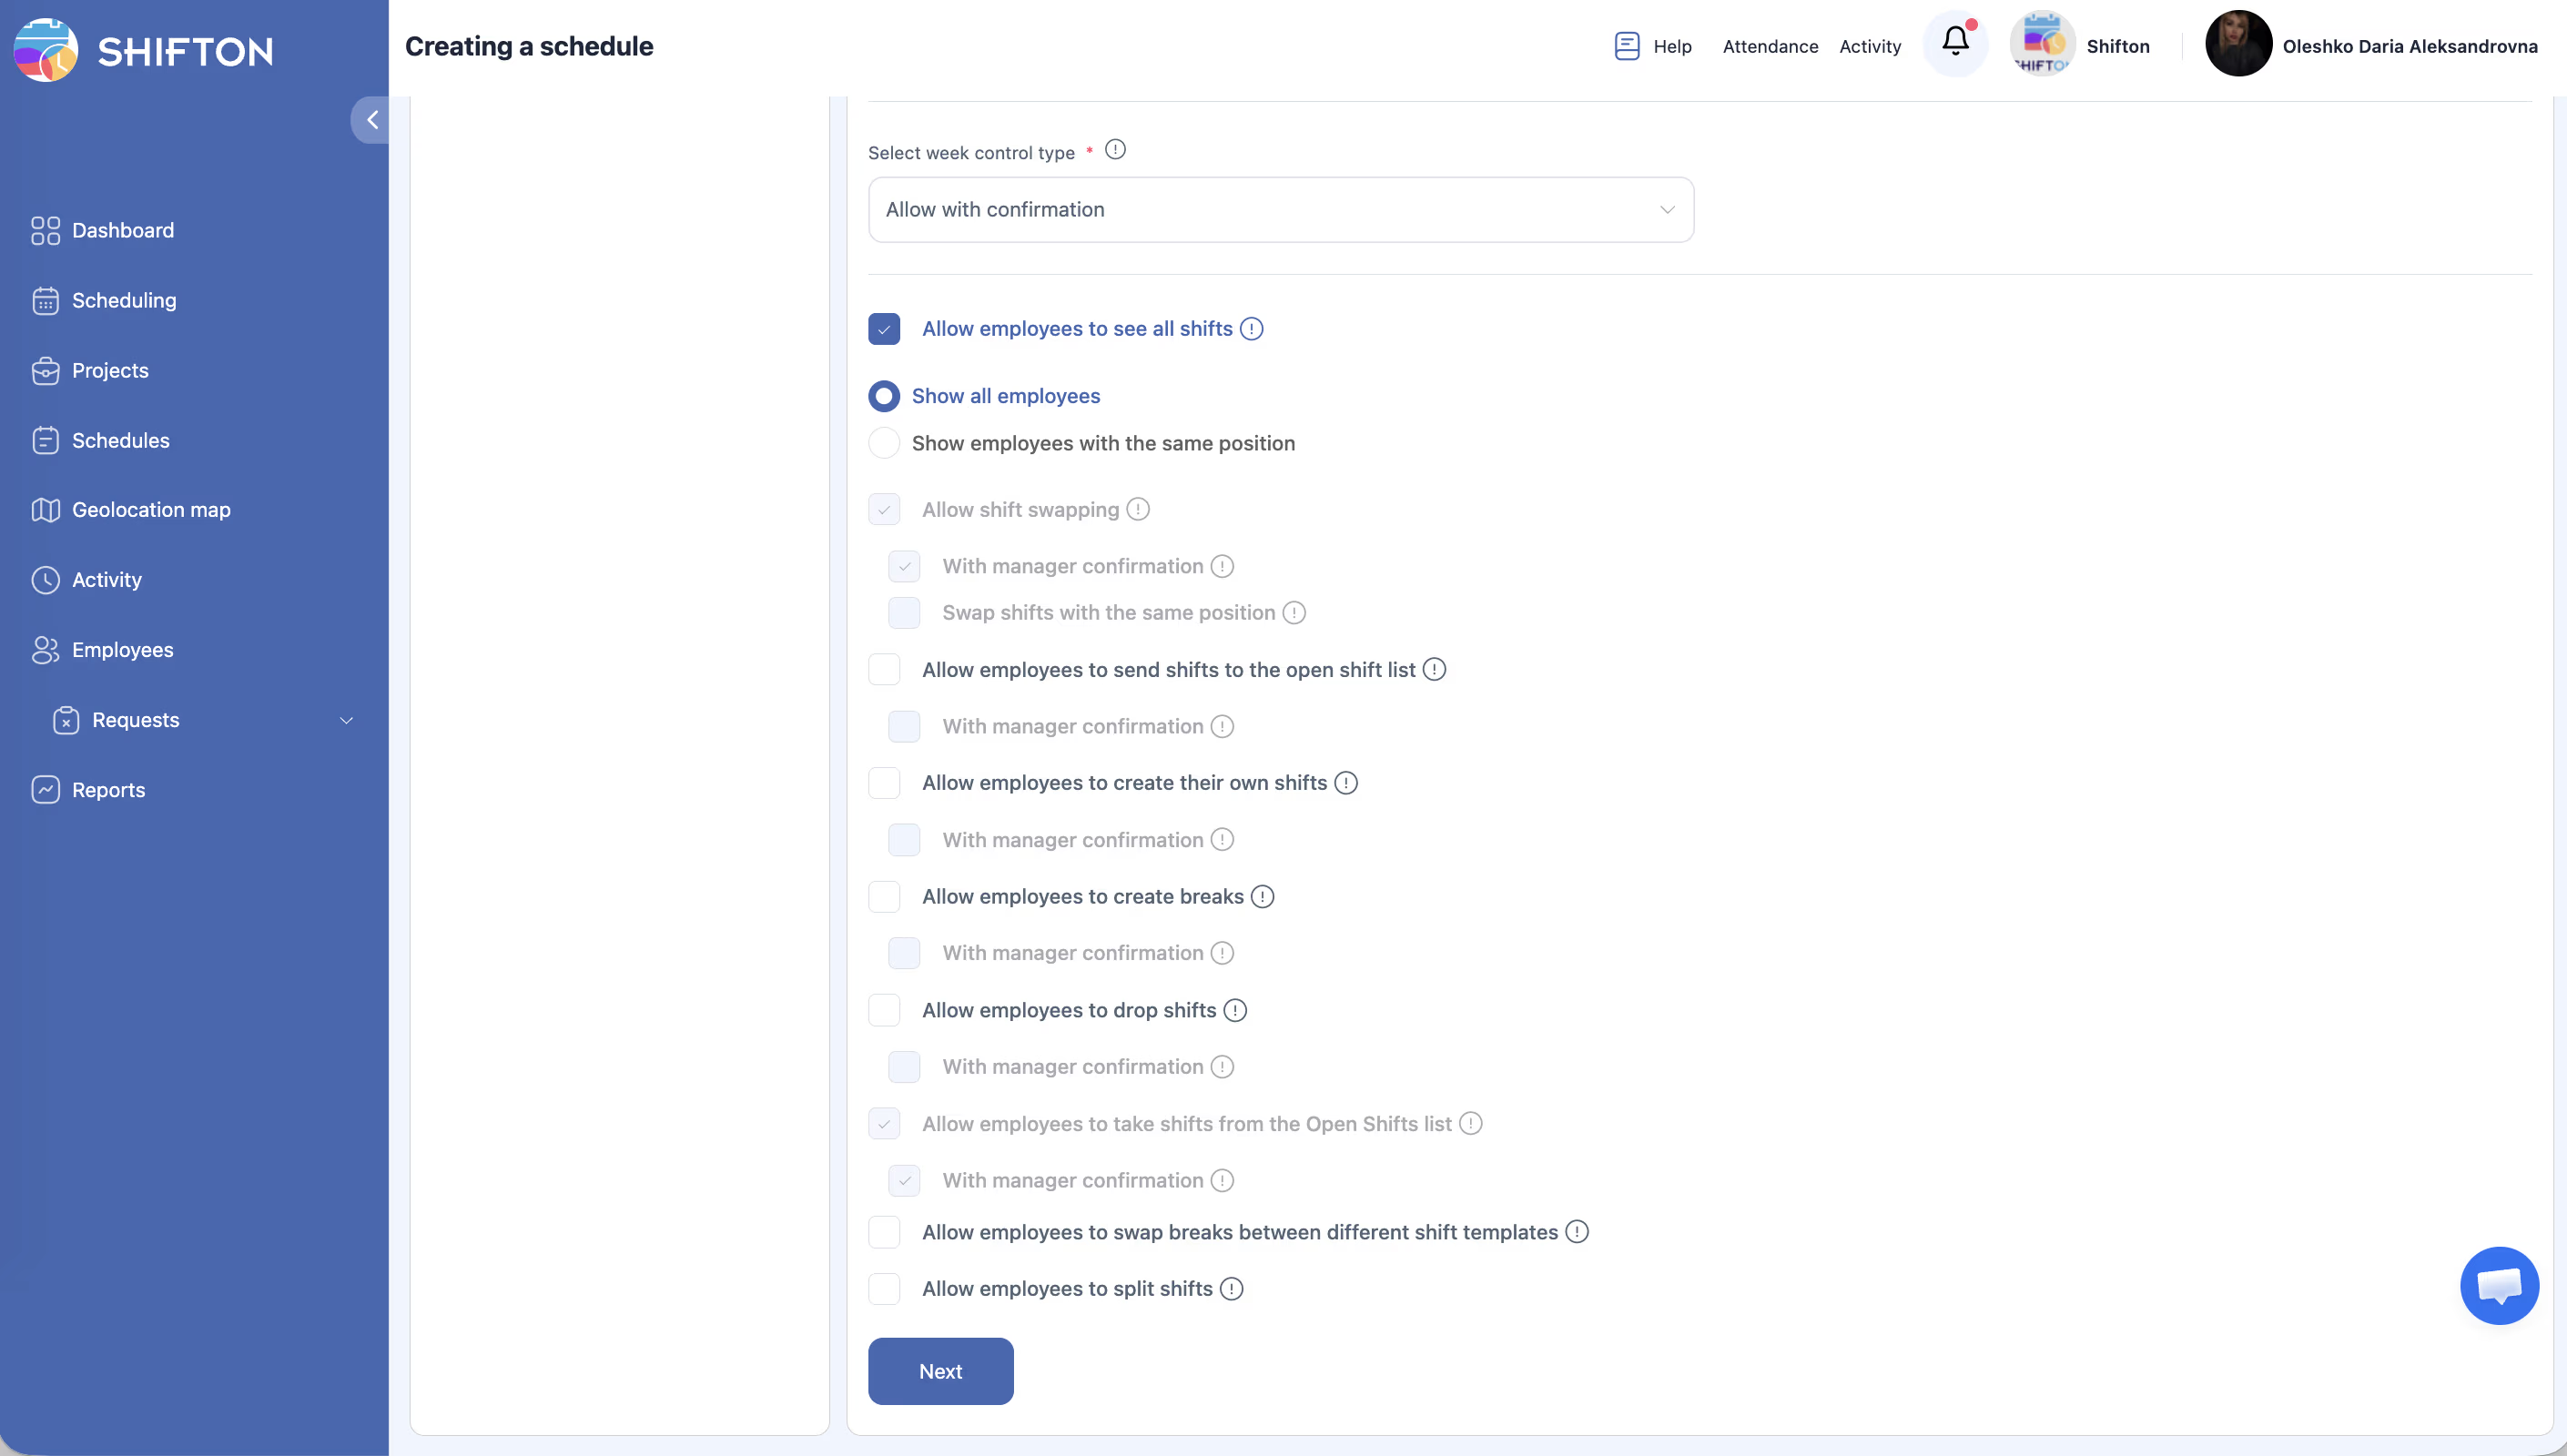
| Select week control type | Yes | How overtime is handled: Allow with confirmation (default) / Allow / Disallow |
Below these fields is a section with employee action permissions (checkboxes). See the Schedule Settings and Permissions article for details.
Step 2: Select Schedule Type
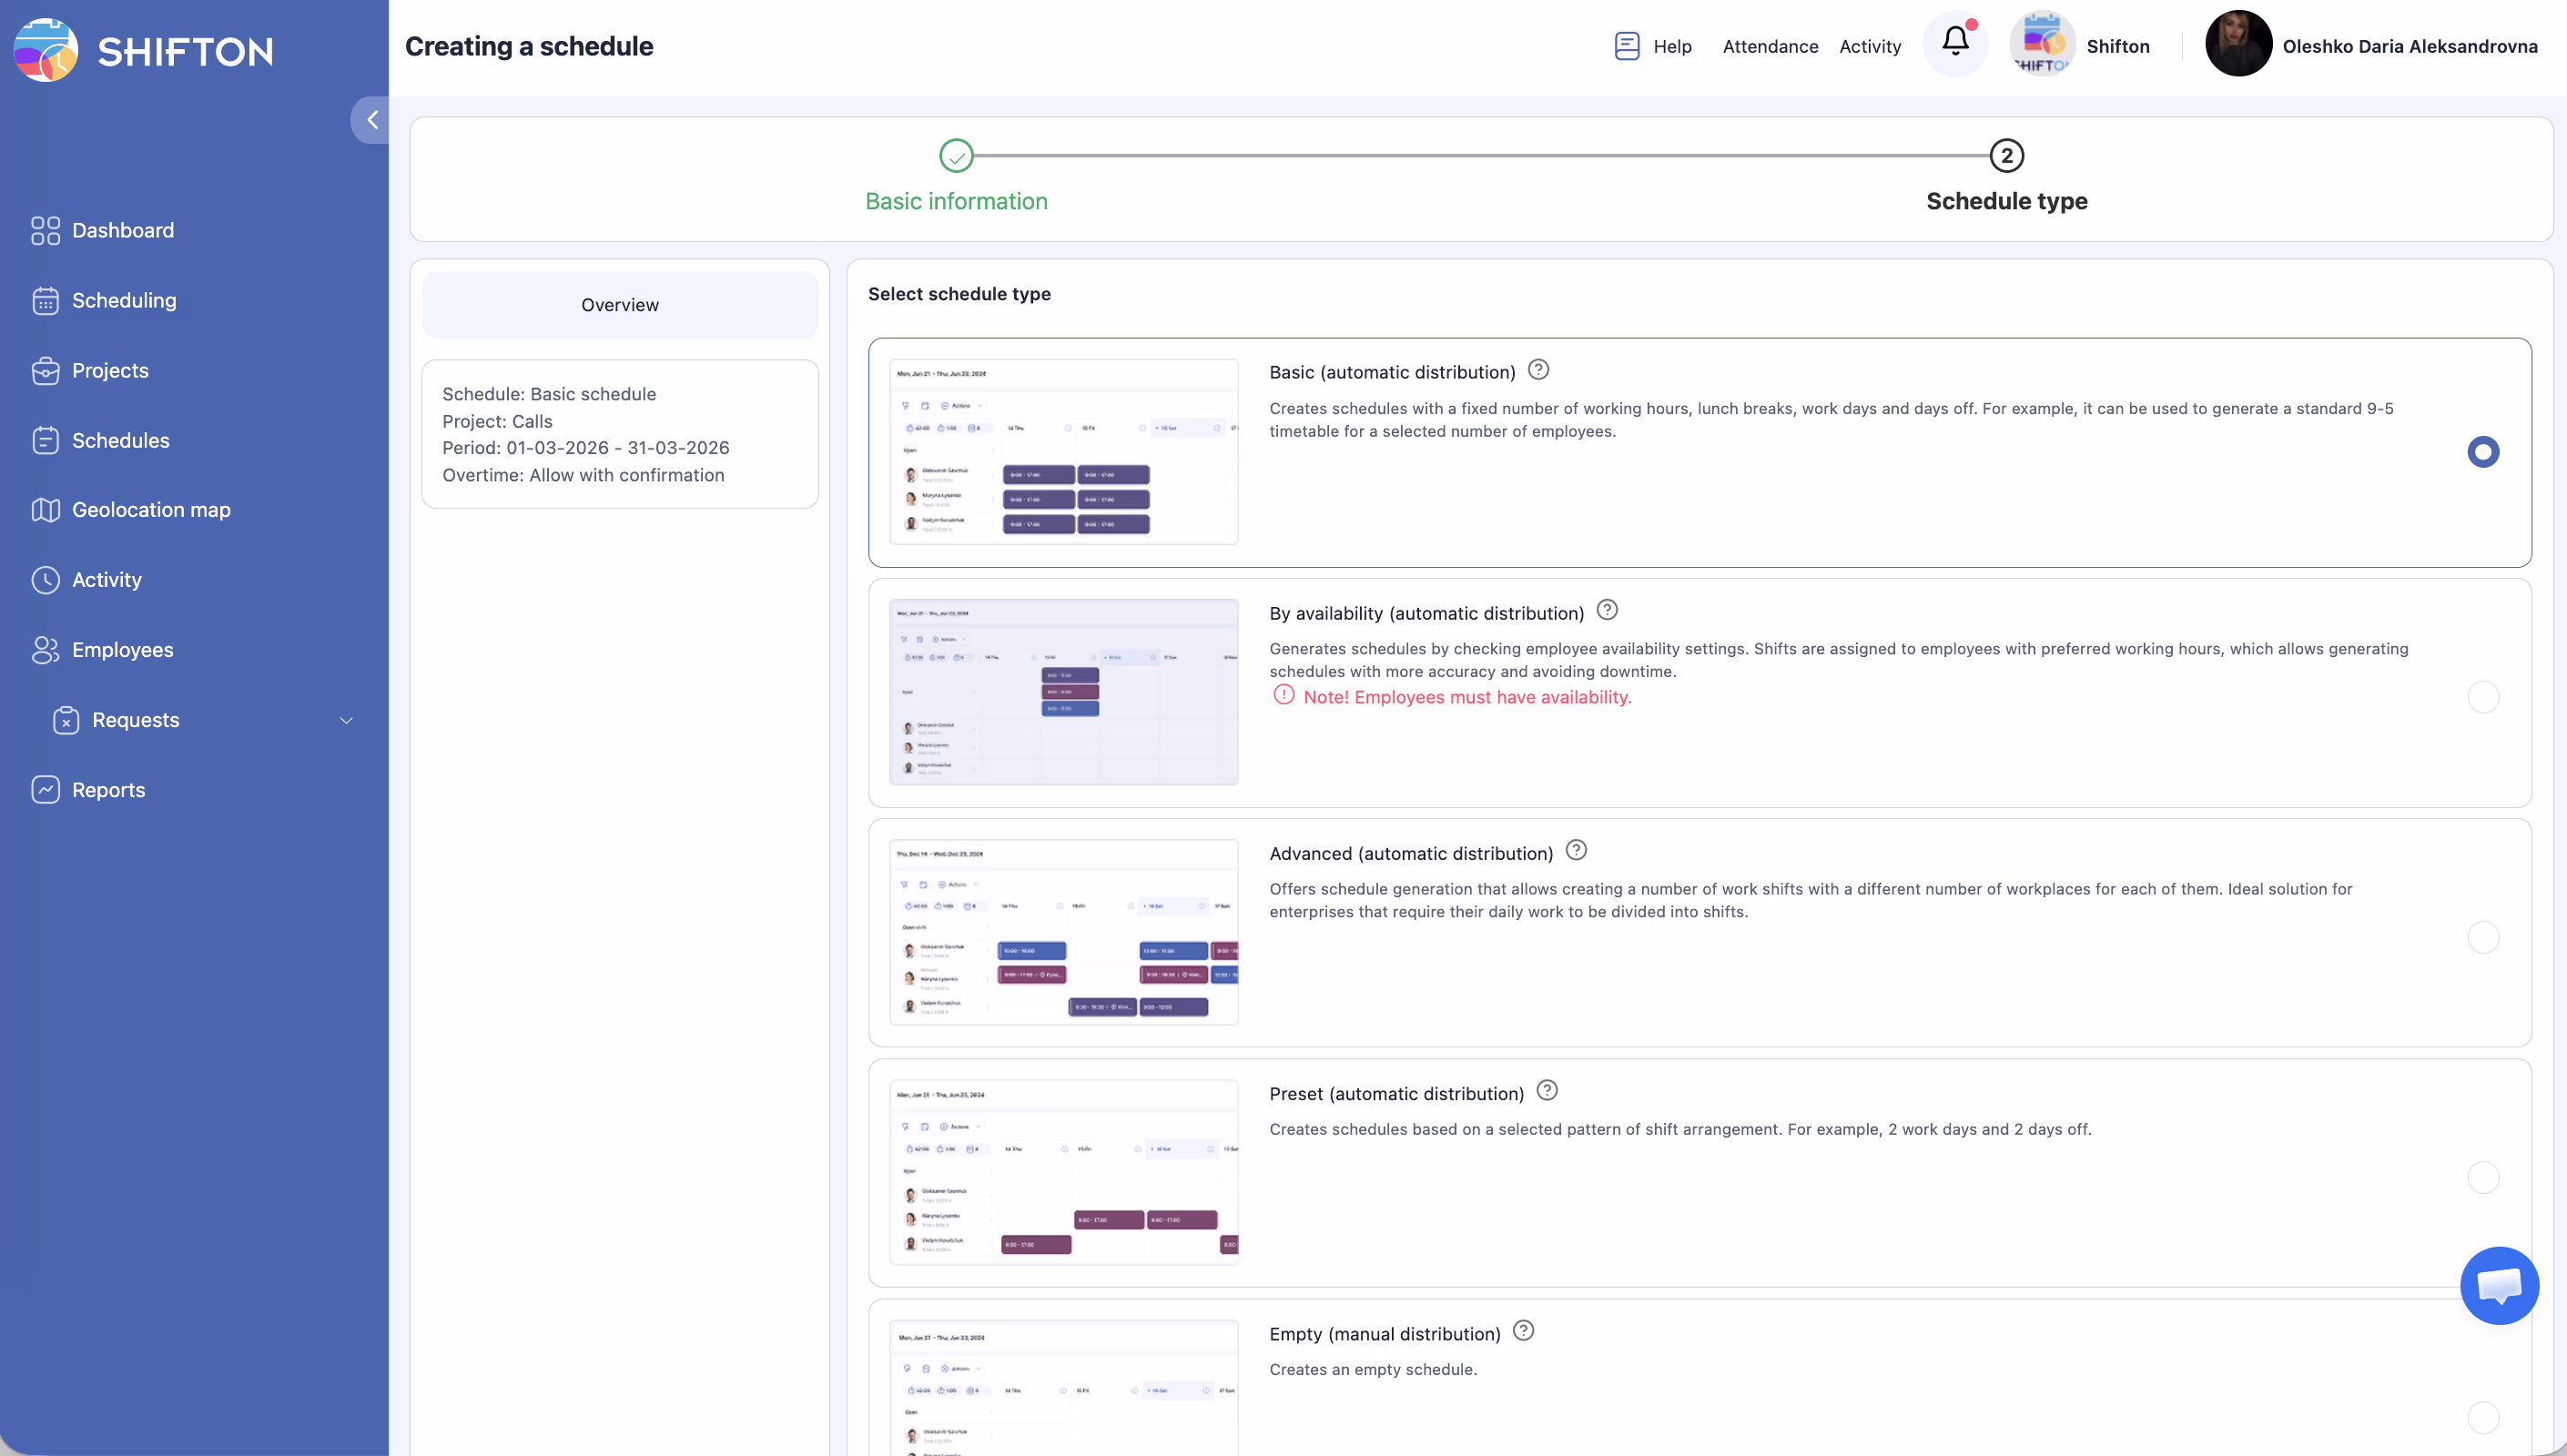

“Creates schedules with a fixed number of working hours, lunch breaks, work days and days off. For example, it can be used to generate a standard 9-5 timetable for a selected number of employees.”
After Creation: Add Employees
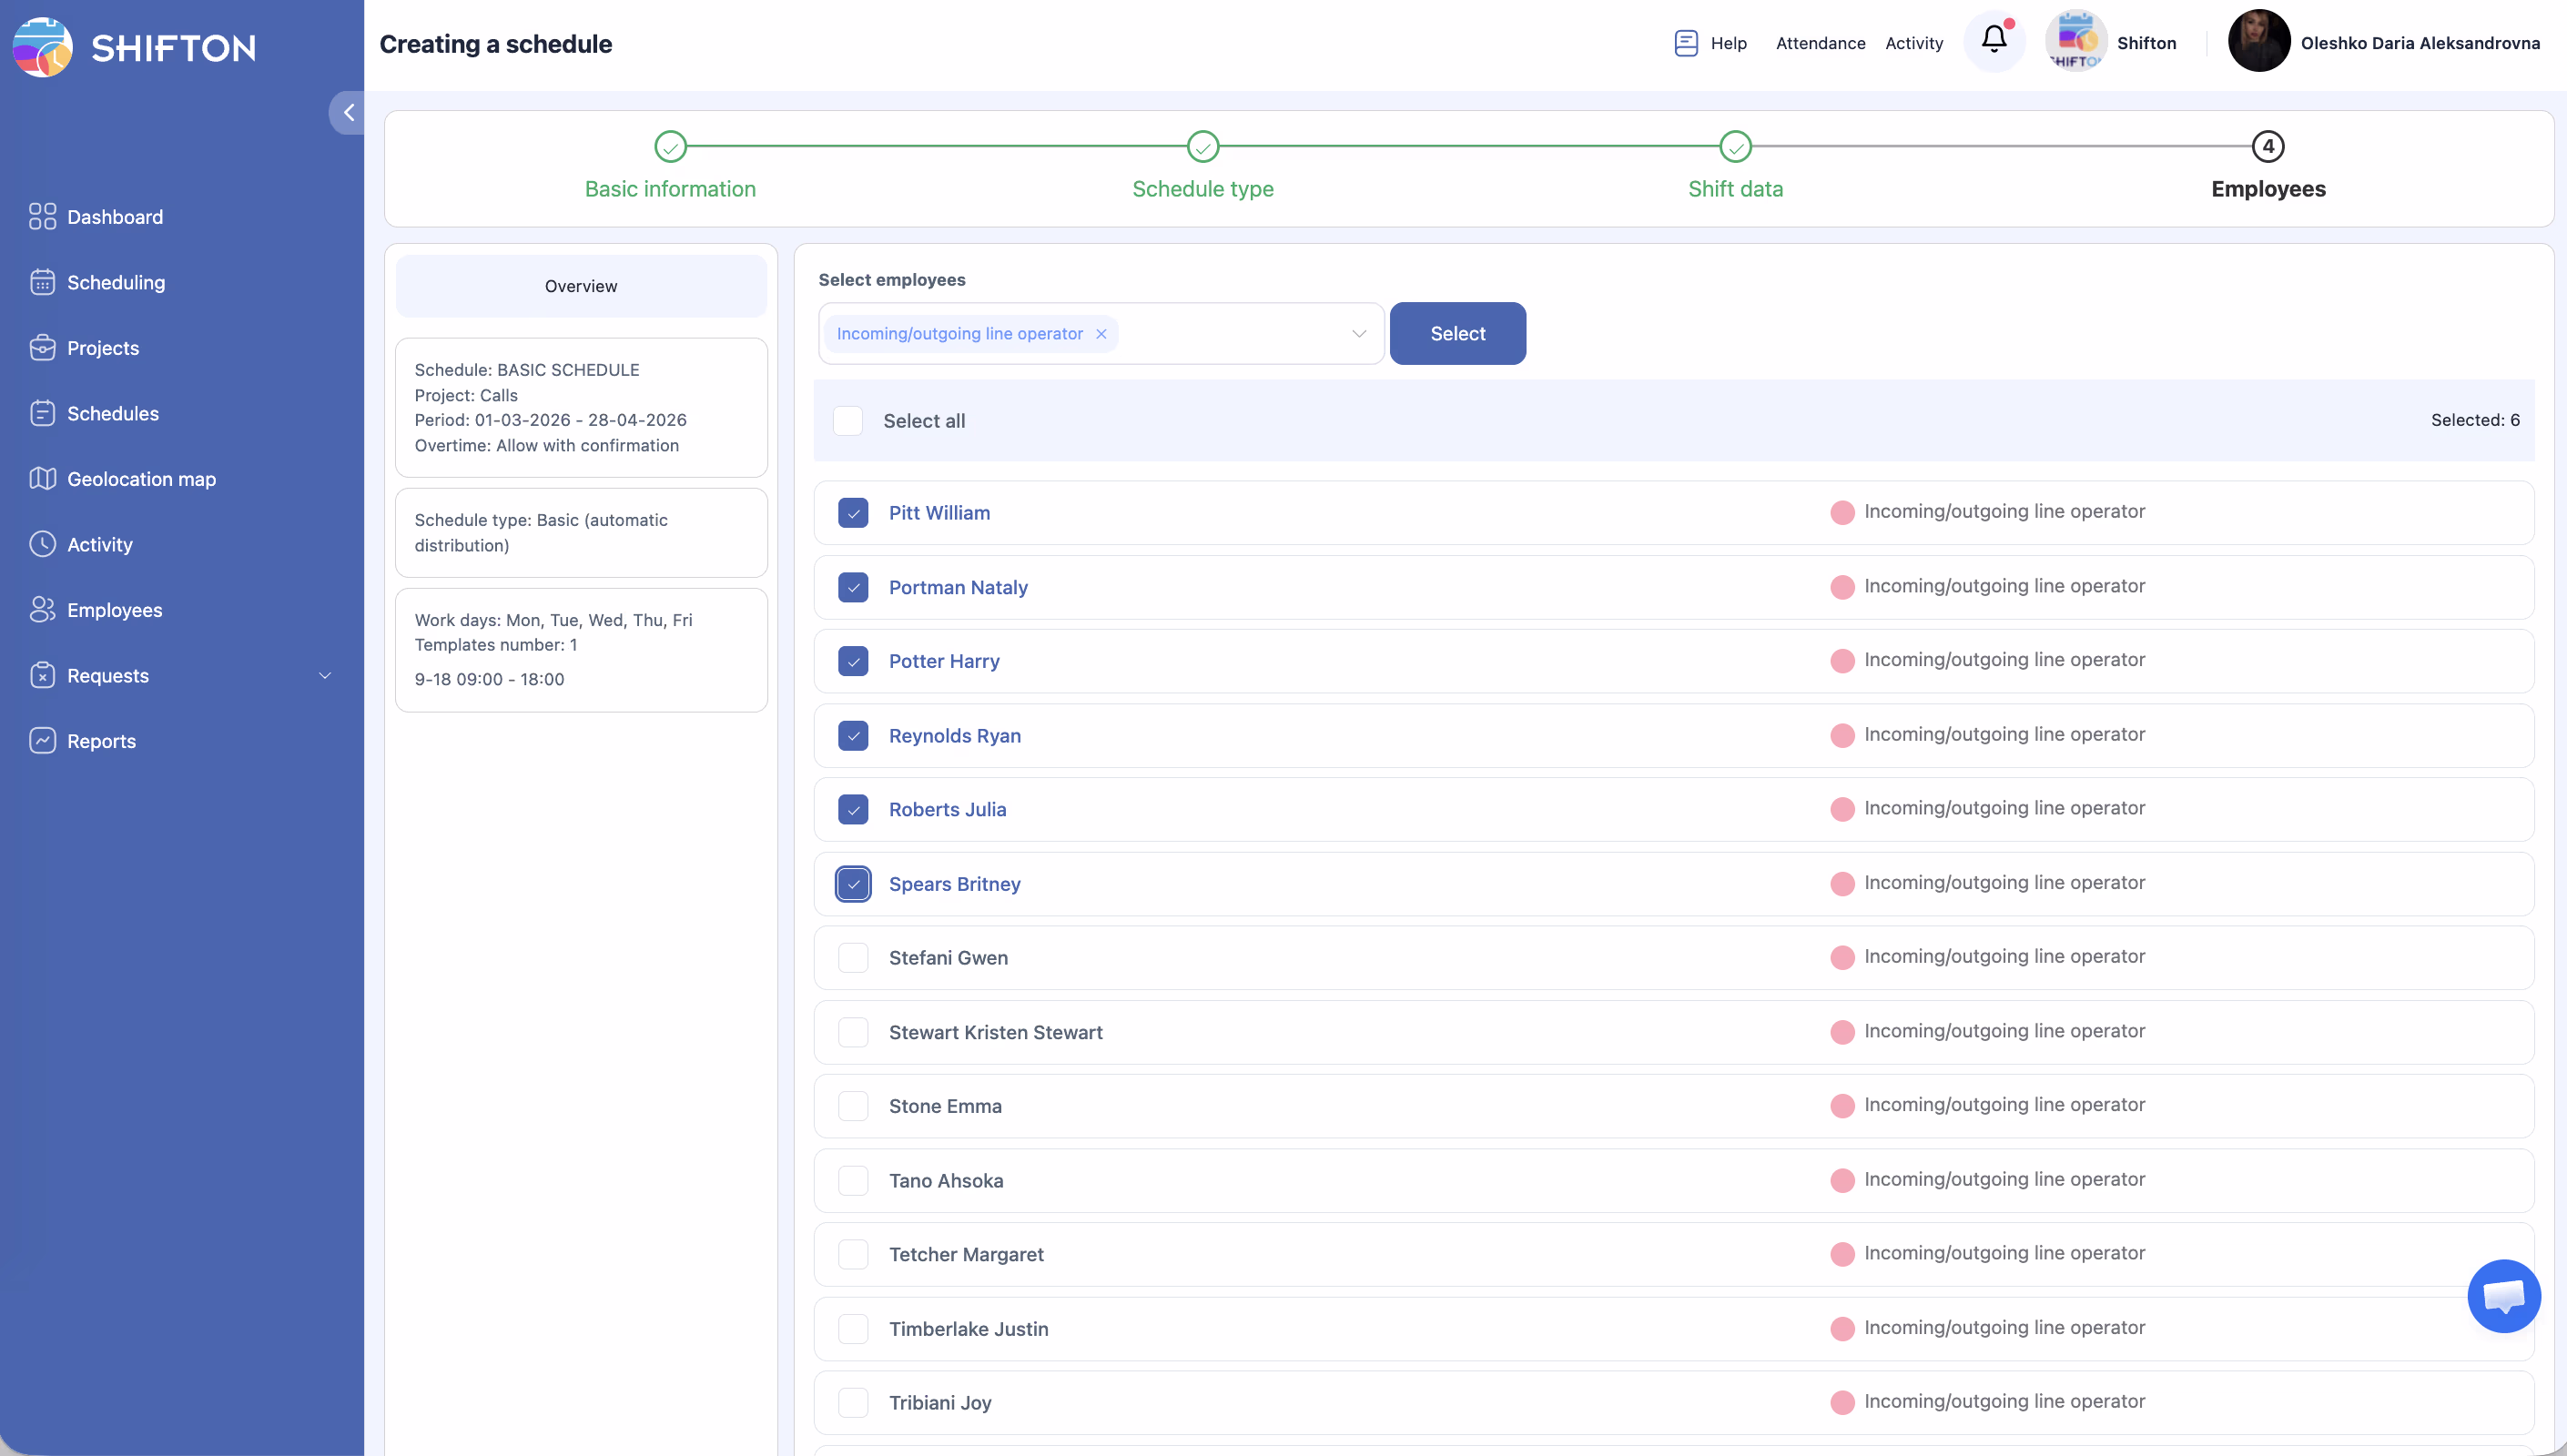
After the schedule is created, it appears in the Schedules list but has no employees yet.
After Creation: Add Shifts

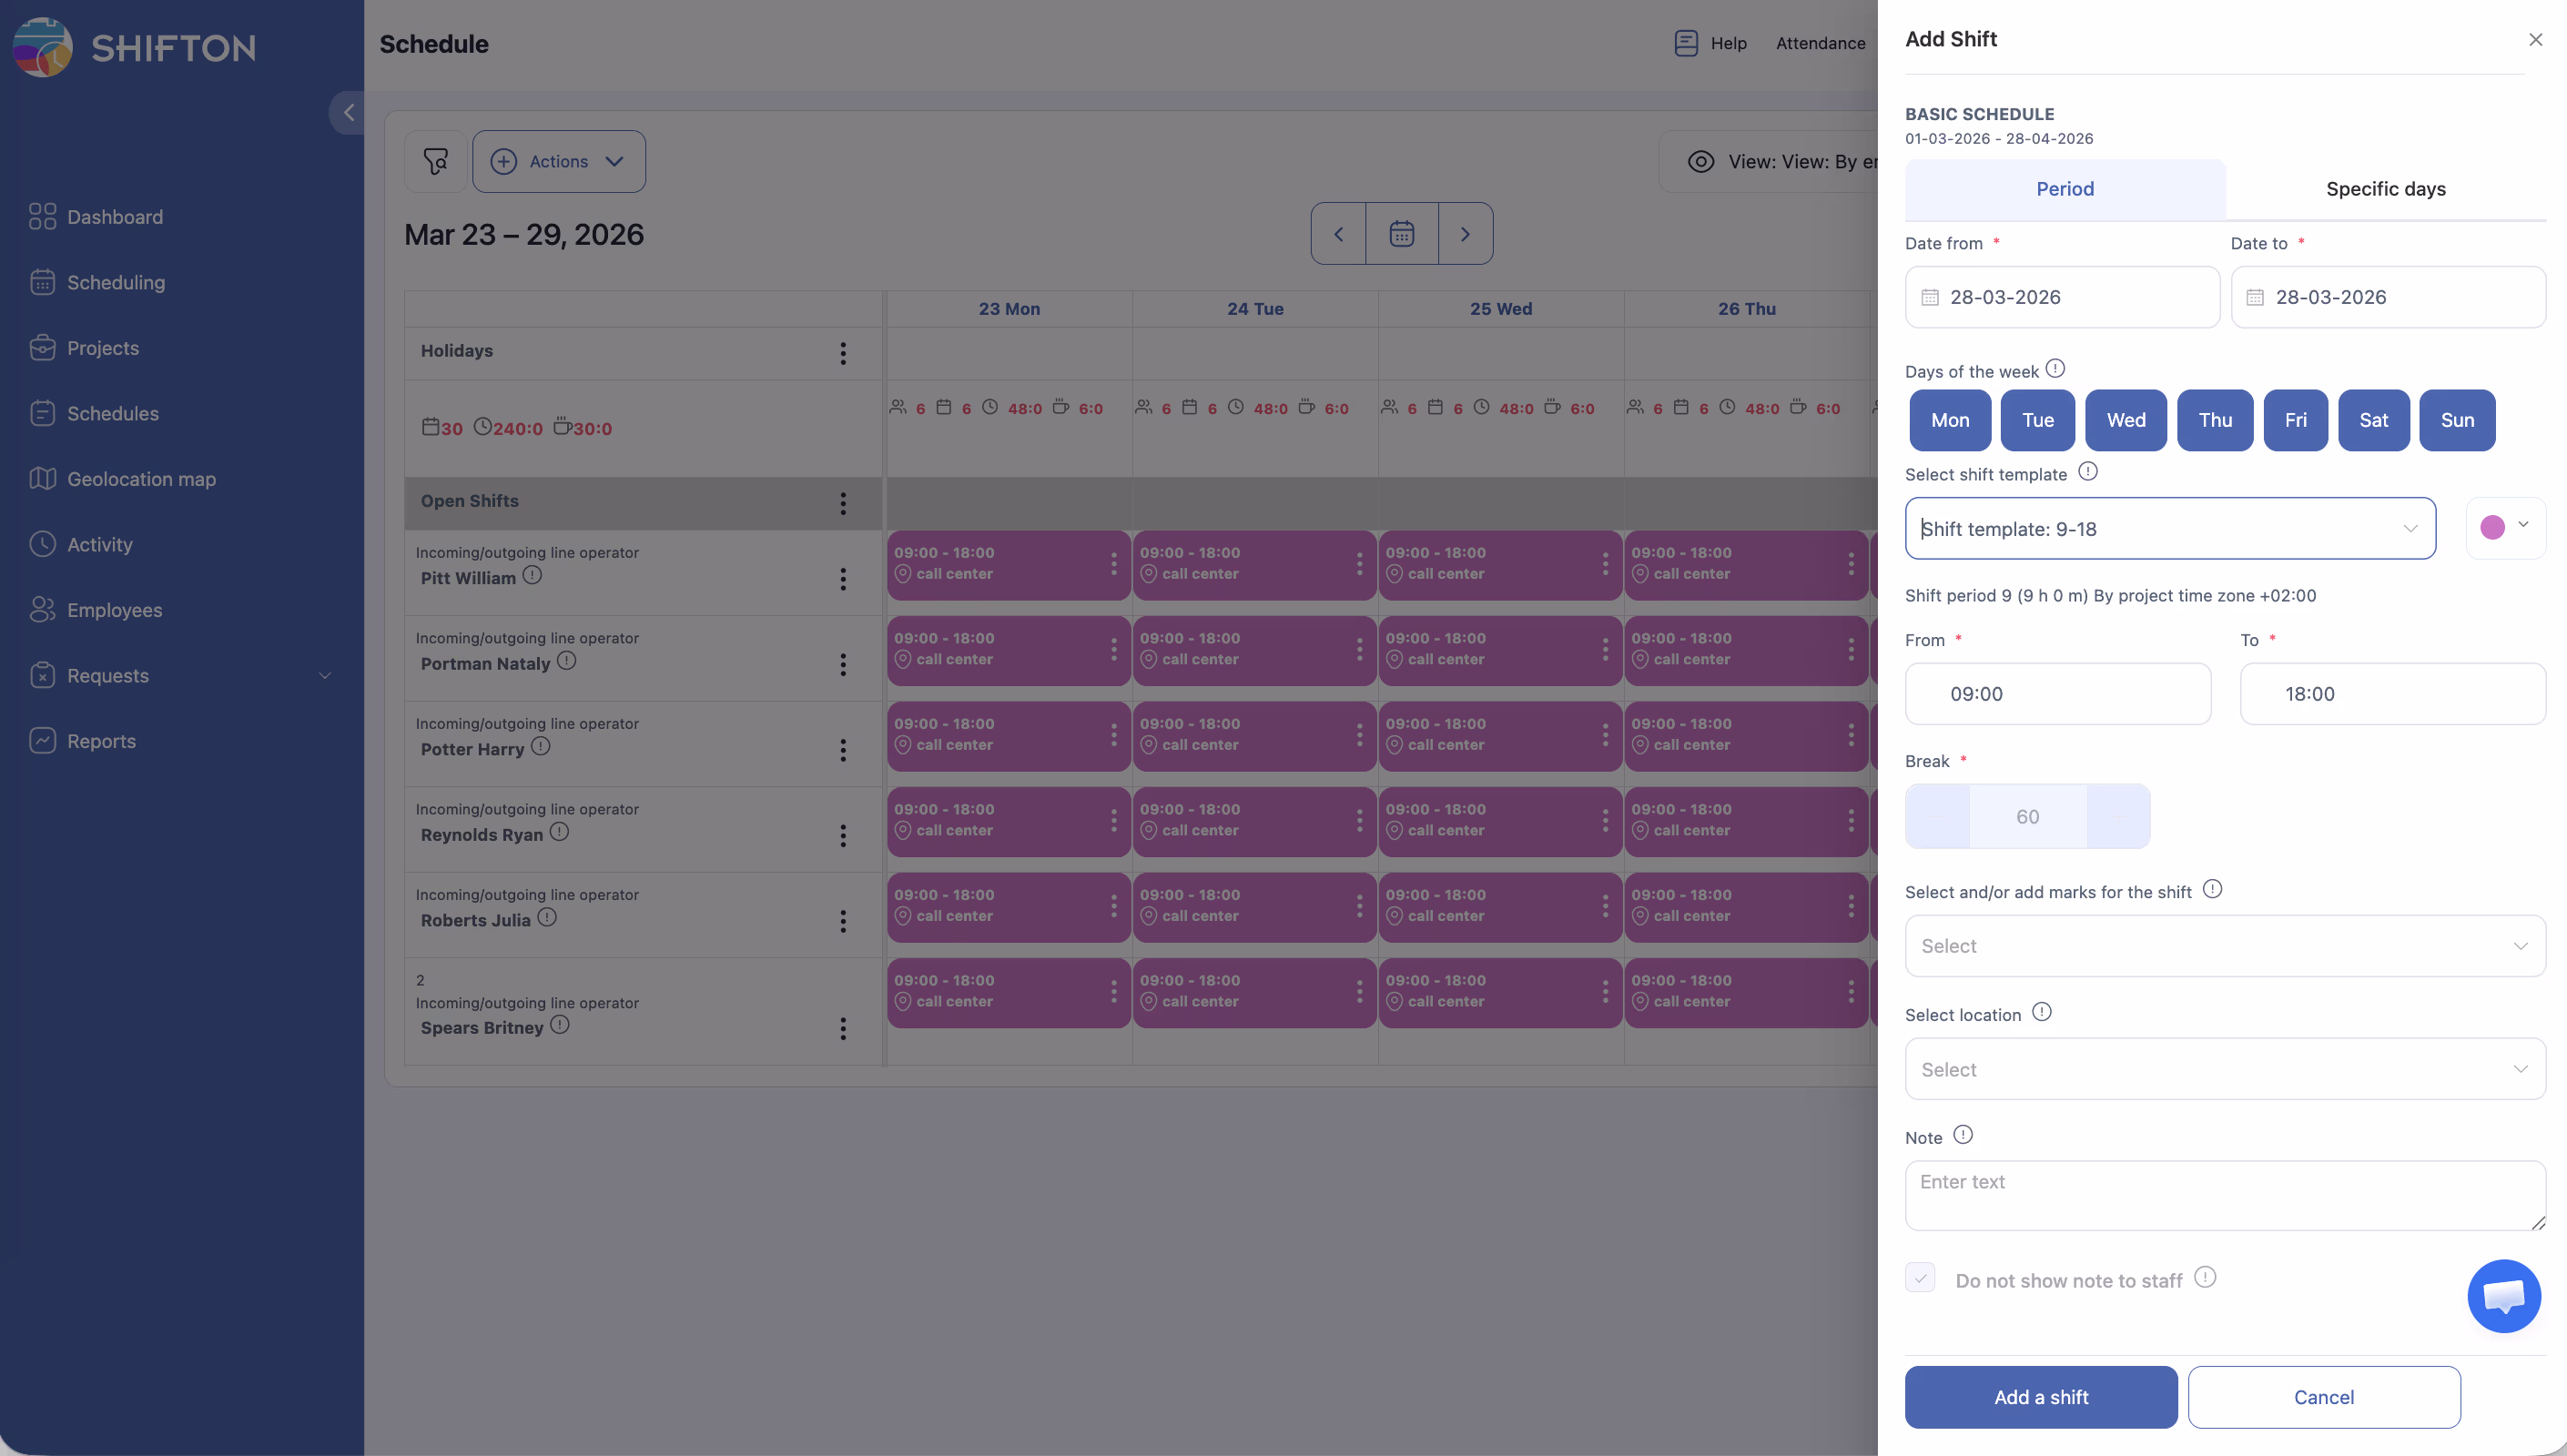
For Basic schedules, shifts are added through the Company Schedule page:
See the articles on Bulk Shift Actions and Adding Shifts Manually for details.
Publish the Schedule
Click Publish & notify employees so employees can see their shifts in the mobile app. Until published, shifts are visible to managers only.
Access Permissions
| Role | View Schedule | Create Basic Schedule | Edit Shifts | Delete Schedule |
|---|---|---|---|---|
| Owner | Yes | Yes | Yes | Yes |
| Admin | Yes | Yes | Yes | Yes |
| Manager | Yes (assigned projects) | Yes (assigned projects) | Yes (assigned projects) | Yes (assigned projects) |
| Employee | Yes (own shifts only) | No | No | No |
FAQ
Q: What is the typical use case for a Basic schedule?
A: The Basic type works best for teams with a standard, predictable timetable — such as a Monday-through-Friday office with 9 AM to 5 PM shifts and a one-hour lunch break.
Q: Can I set different hours for different days of the week?
A: No. The Basic schedule uses the same shift template for every work day. If you need different hours on different days, consider the Advanced schedule type instead.
Q: What if I need to exclude a specific day (like a holiday)?
A: After the schedule is generated, you can manually delete or modify individual shifts for holiday dates.
Q: Can I change the work days after the schedule is created?
A: You cannot change the schedule type configuration after creation. However, you can manually add or remove individual shifts on the schedule page.
Q: The schedule date range is limited to 3 months — what do I do after it ends?
A: Use the Reduce/Extend schedule function to extend the schedule into the next period. See the Extending and Shortening Schedules article.
Q: Shifts are not visible to employees — why?
A: Shifts must be published. Click Publish & notify employees on the schedule page. Until published, only managers can see the shifts.
Possible Issues and Solutions
| Issue | Possible Cause | Solution |
|---|---|---|
| Shifts not generated for some employees | Those employees are not assigned to the selected project | Assign the missing employees to the project and recreate or add shifts manually |
| Break time overlaps with shift end time | The break start time is set too late in the day | Adjust the break start time so the break ends before the shift end |
| Schedule shows no data on the calendar | You are viewing a different project or date range | Switch to the correct project and navigate to the schedule’s date range |
| Cannot select Saturday or Sunday as work days | Calendar interface issue | Ensure you are clicking the correct day toggles in the work days selector |
| Shifts appear with wrong duration | Incorrect start or end time entered | Delete the schedule, correct the times, and recreate it |