Projects group employees and schedules together (like departments, locations, or teams). Schedules define working time rules and contain actual shifts. You need at least one project and one schedule before you can assign shifts.
Part 1: Project
The first project is created automatically right after company registration. You can rename it or change its settings.
How to Edit a Project
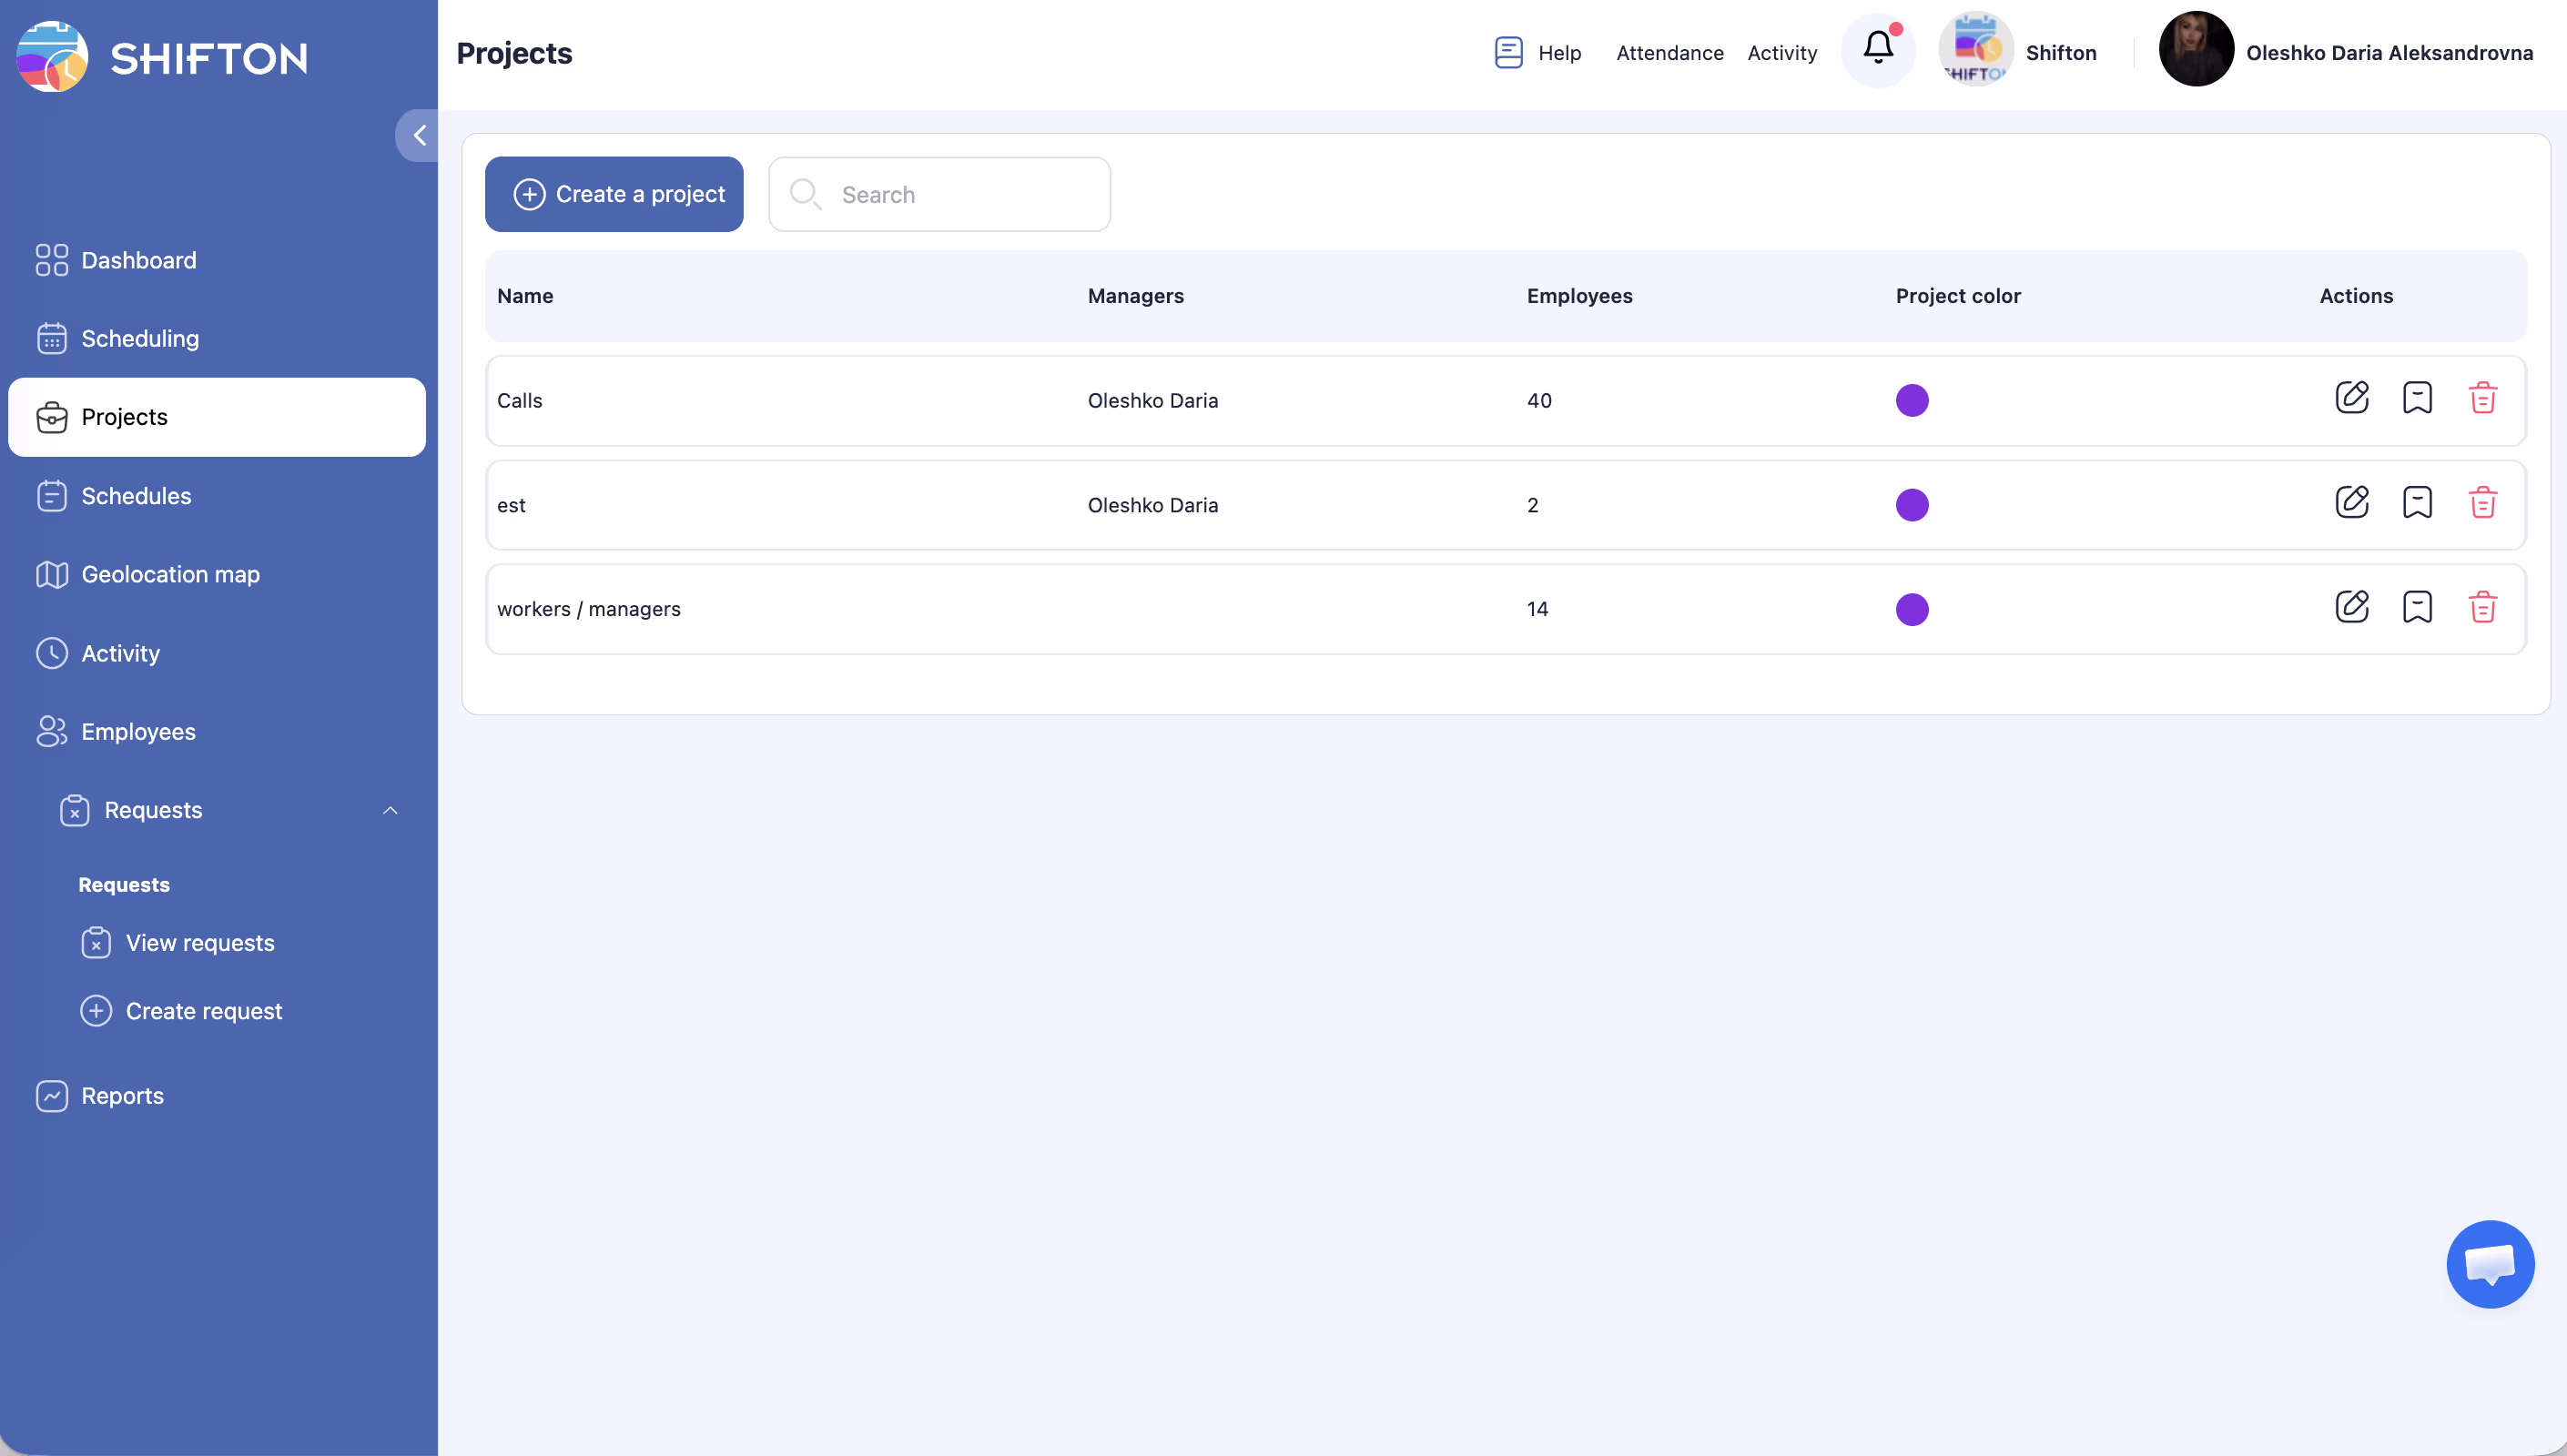
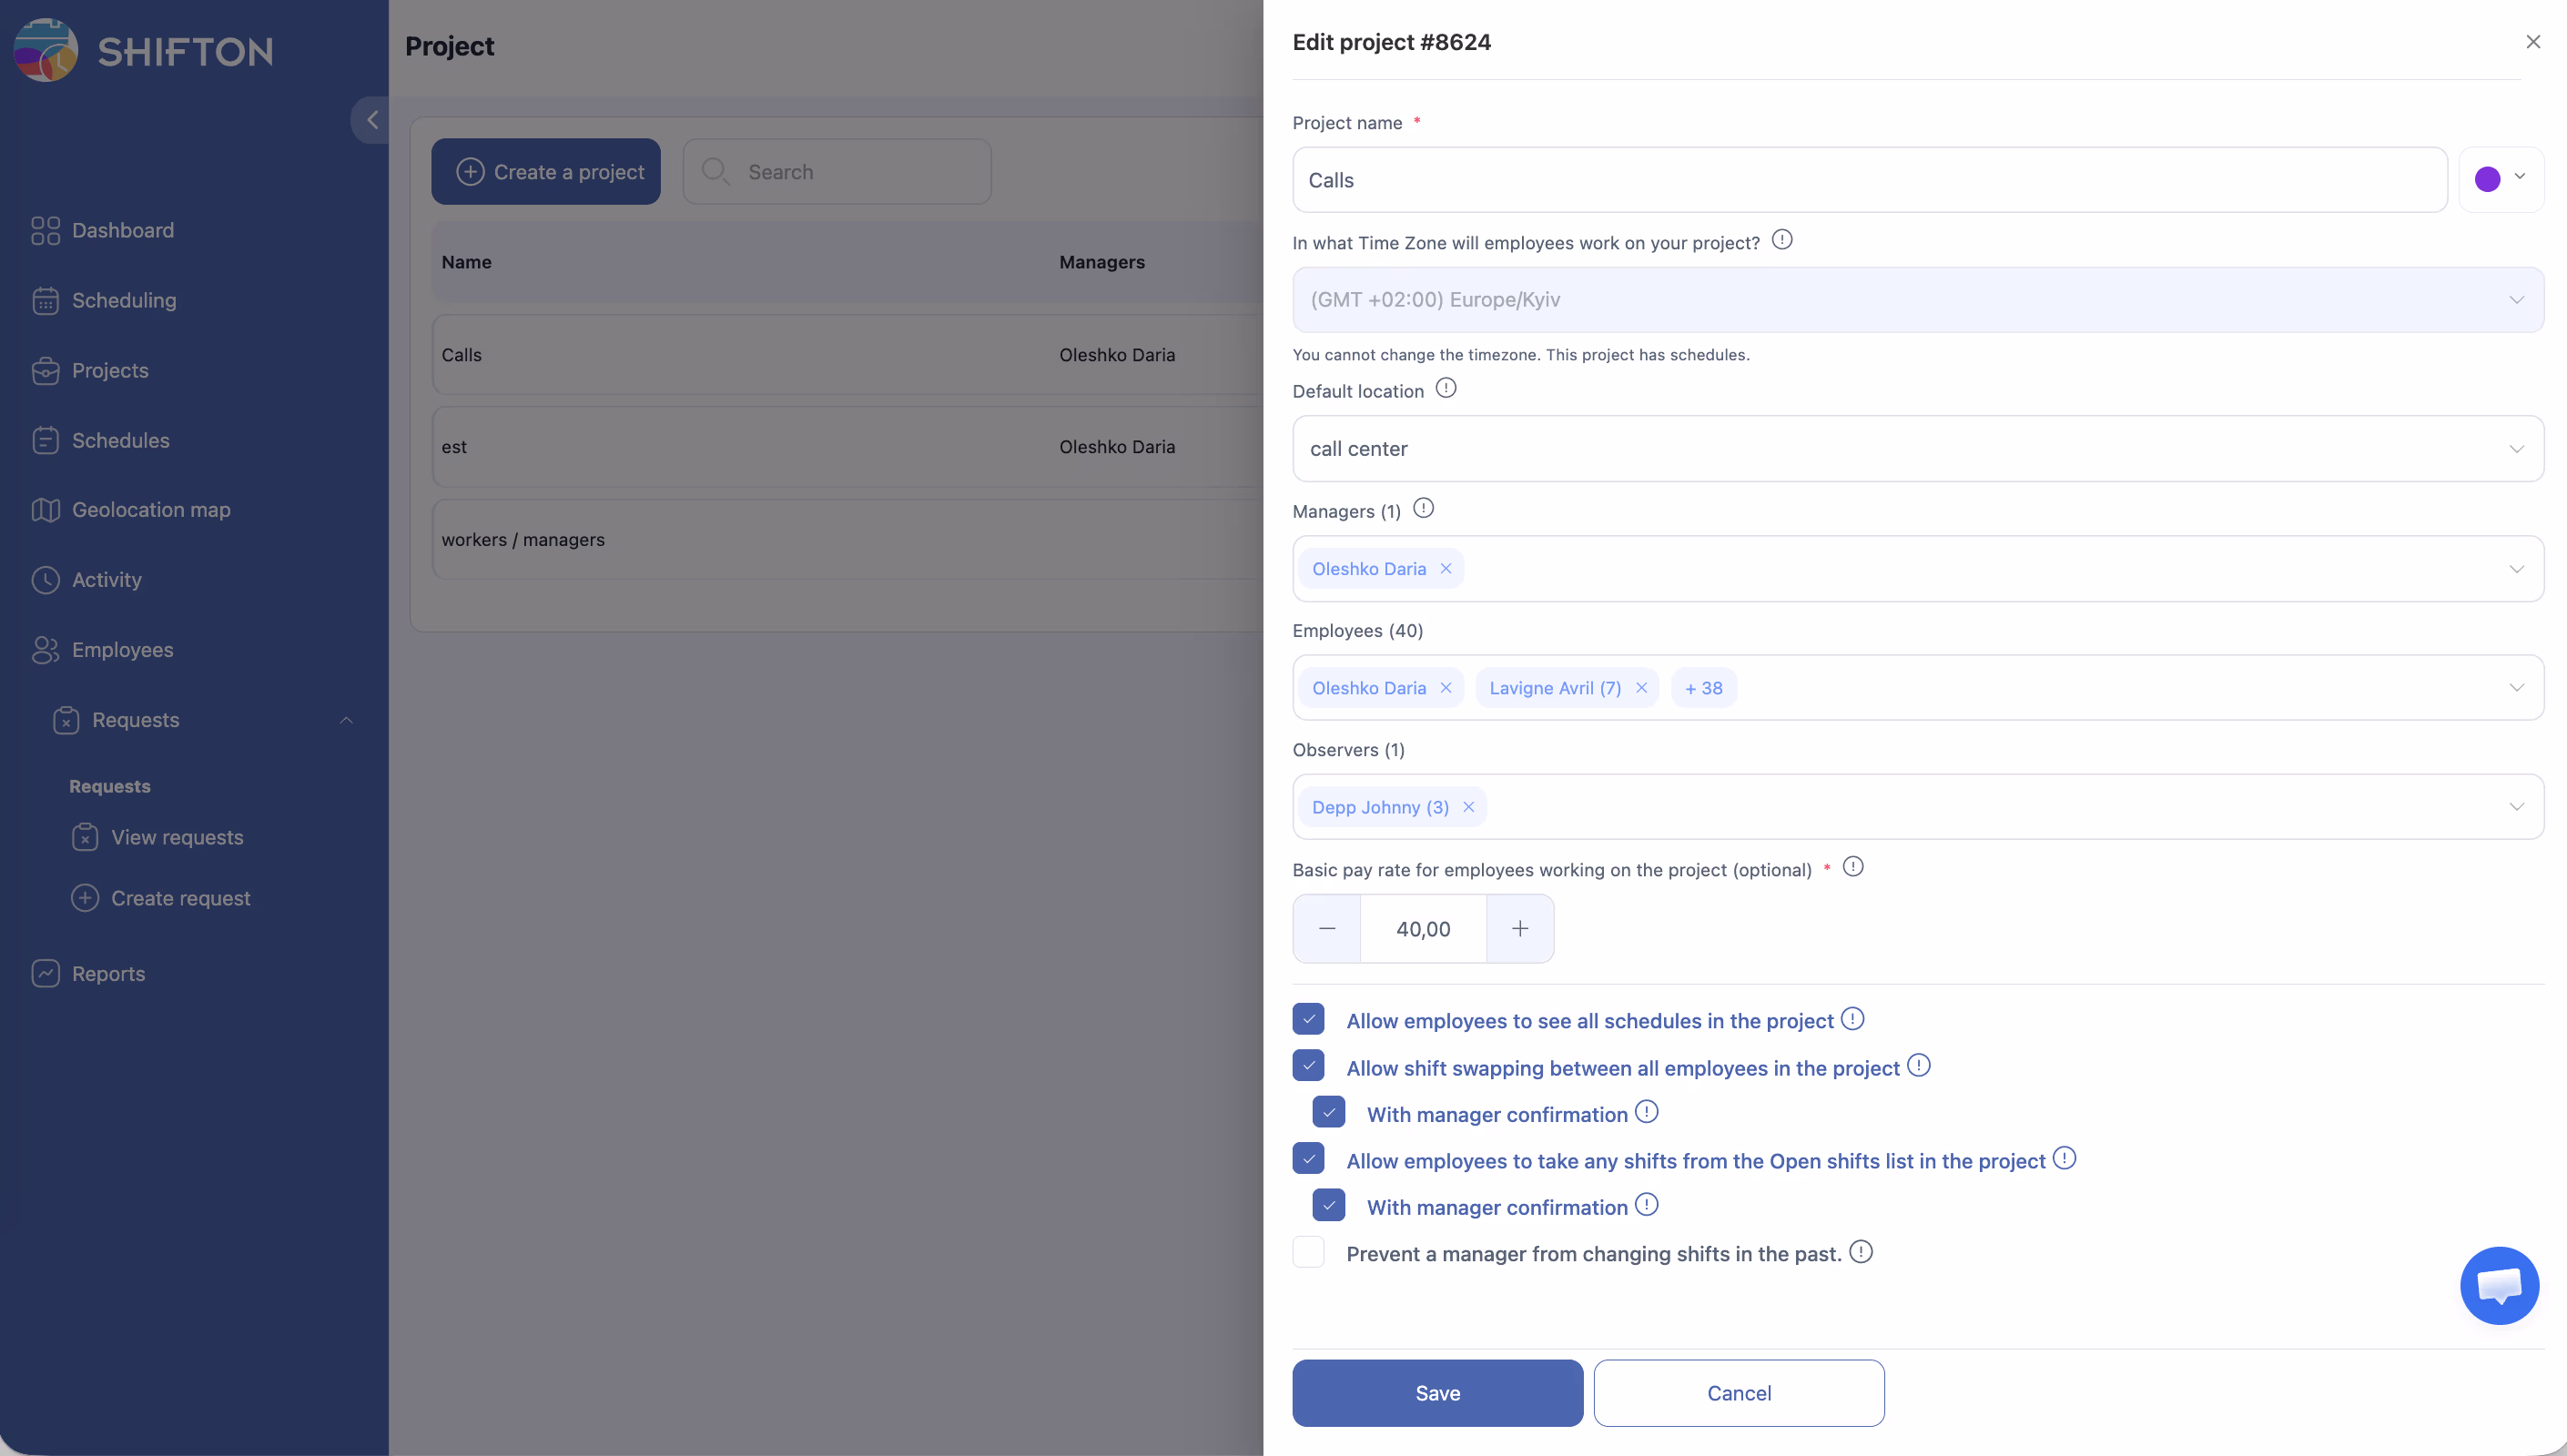
Click the Projects icon in the left sidebar (folder icon) → select a project → modify the data:
| Field | Description |
|---|---|
| Project name * | Team, department, or location name (required) |
| Color | Color coding for visual identification in schedules and reports |
| Time Zone | Project time zone. Used when generating schedules. Can only be selected or changed if the project has no schedules yet |
| Default location | Location that will be automatically assigned to shifts when generating the schedule |
| Managers | Employees assigned as project managers. Can create and edit schedules and oversee employee work |
| Employees | Employees in the project. Multiple can be added at once via multi-select |
| Observers | Observers — can only view shift schedules within the project. No editing access. Their requests are not routed to managers of this project |
| Basic pay rate | Base pay rate (optional). The system uses it for automatic employee payroll calculation and saving in company reports. An individual rate for each employee can be set after creating the schedule |
Employee Permissions in the Project
| Setting | Description |
|---|---|
| Allow employees to see all schedules in the project | Employees can see schedules of all colleagues in the project |
| Allow shift swapping between all employees in the project | Allows shift swapping between project employees. Sub-option With manager confirmation — swapping is only possible after manager approval |
| Allow employees to take any shifts from the Open shifts list in the project | Employees can take available shifts from the Open shifts list. Sub-option With manager confirmation — manager approval required |
| Prevent a manager from changing shifts in the past | The manager will not be able to edit, move, or delete shifts for past dates |
Project Marks
Each project can have its own set of marks — colored labels for categorization. Marks can be attached to shifts as well as to employees in the schedule (tab Scheduled Team Members).
To manage marks: open project editing → Marks → + Add mark → enter a name and select a color → Save.
Click Save.
Creating Additional Projects
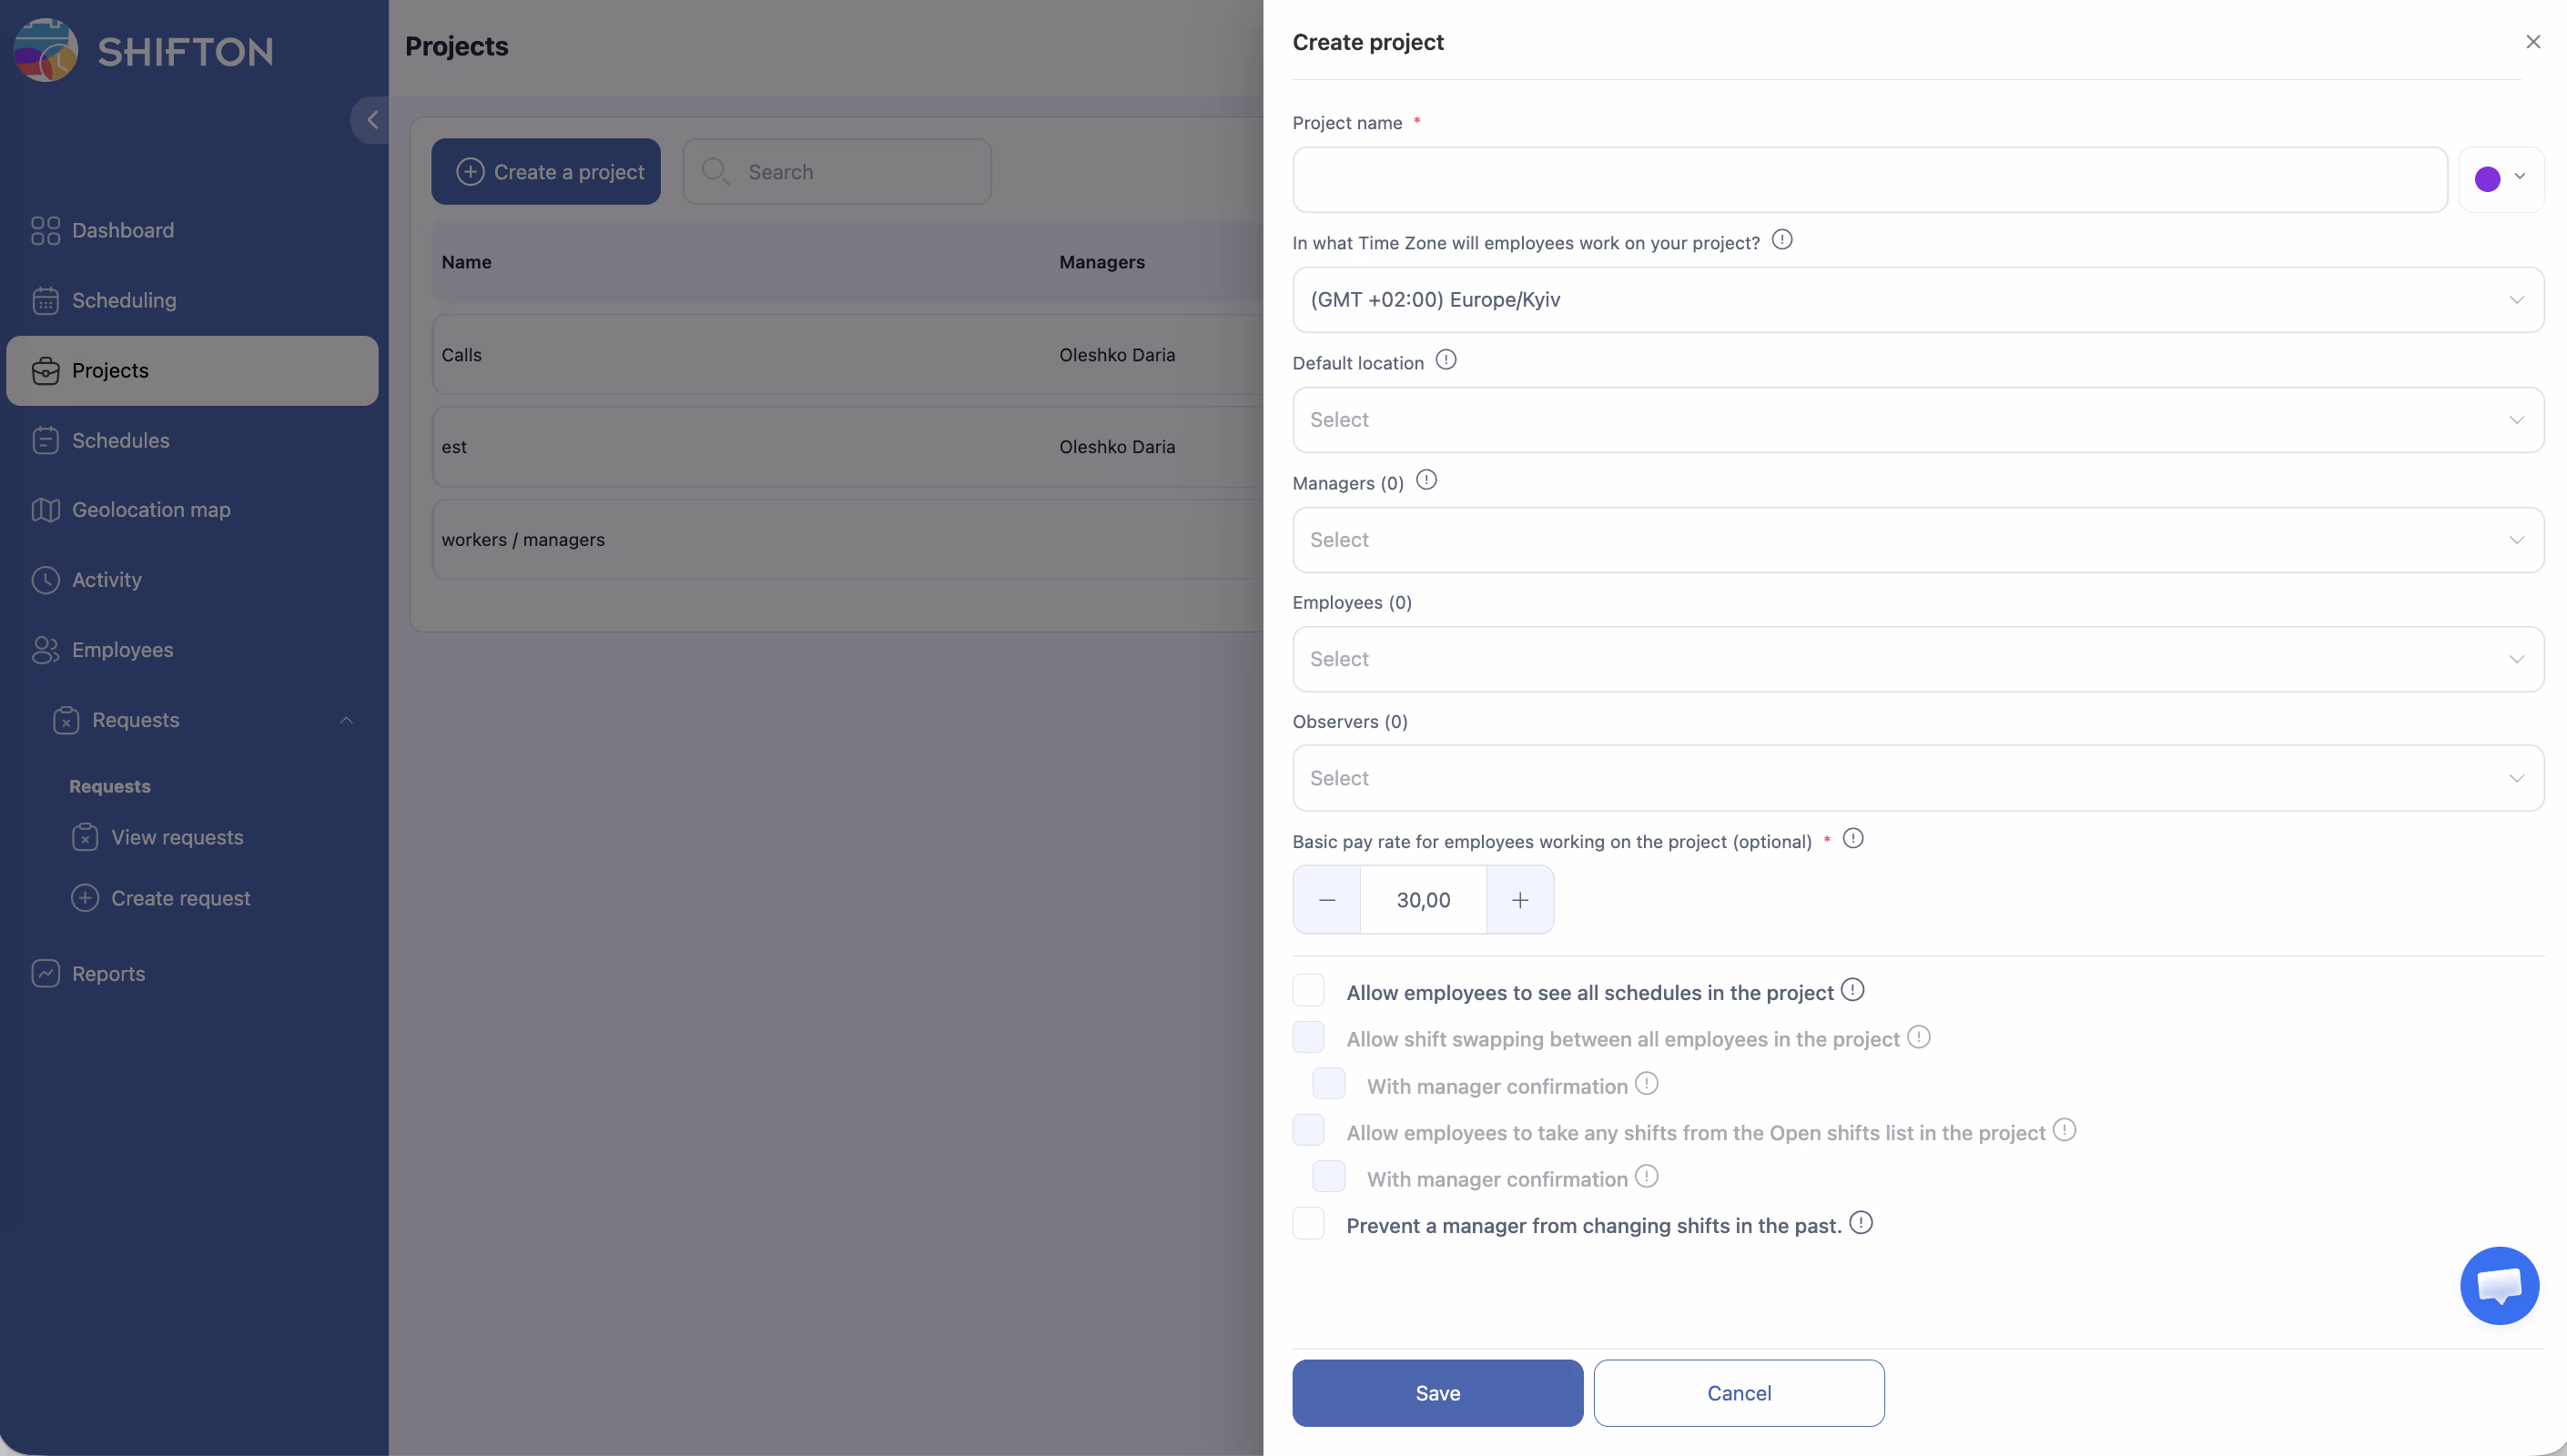
Click + Create a project on the Projects page.
Note: The first project is free. To create a second or more projects, go to Modules, increase the number of projects in the Departments and Projects module, and save the changes.
Part 2: Creating a Schedule
Step 1: Open the Schedules Page

Click the Schedules icon in the left sidebar (list icon).
Step 2: Launch the Wizard
Click + Add schedule.
Step 3: Basic Information (Step 1)

| Field | Required | Description |
|---|---|---|
| Schedule name | Yes | Name + color |
| Select a project | Yes | Schedule project |
| Select dates | Yes | Date range (no more than 3 months per step) |
| Basic employee pay rate | No | Base hourly rate |
| Select week control type | Yes | E.g., “Allow with confirmation” |
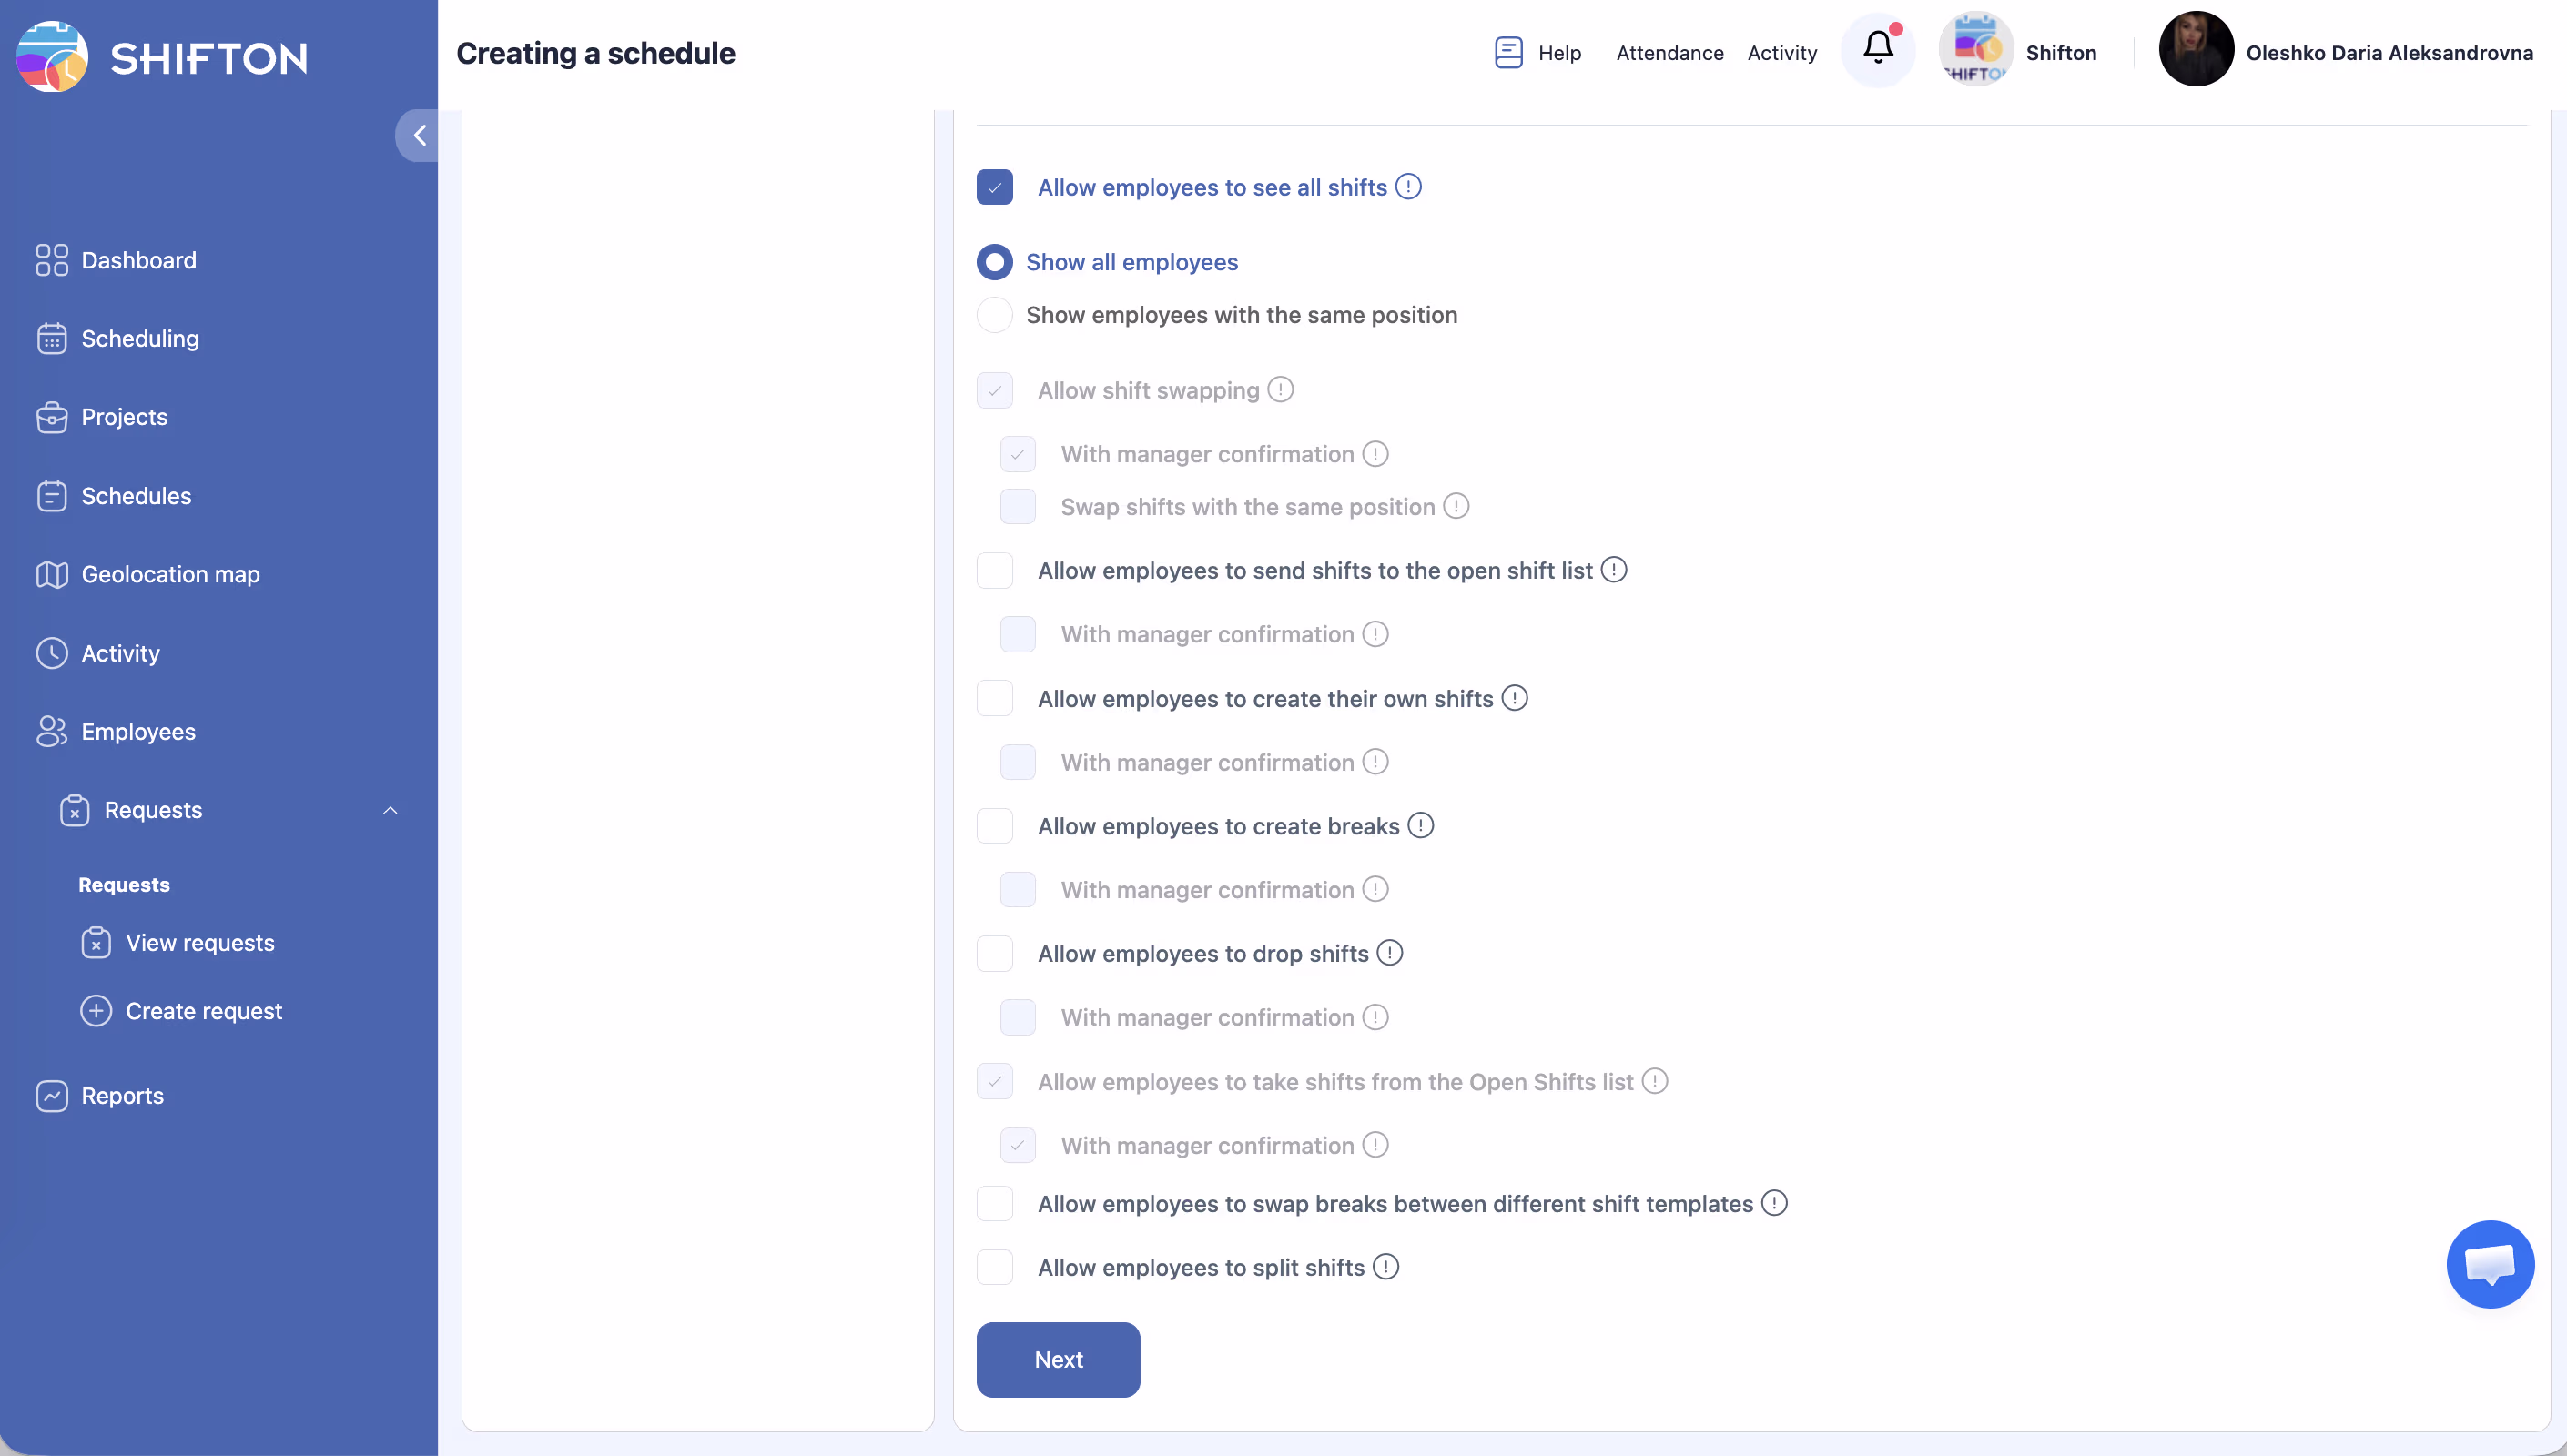
| Allow employees to see all shifts | — | Checkbox + visibility toggle |
Employee permissions (each with a “With manager confirmation” option):
– Shift swapping
– Posting shift to open
– Creating own shifts
– Creating breaks
– Dropping shifts
– Taking open shifts
– Swapping breaks between templates
– Splitting shifts
Click Next.
Step 4: Choose the Schedule Type (Step 2)
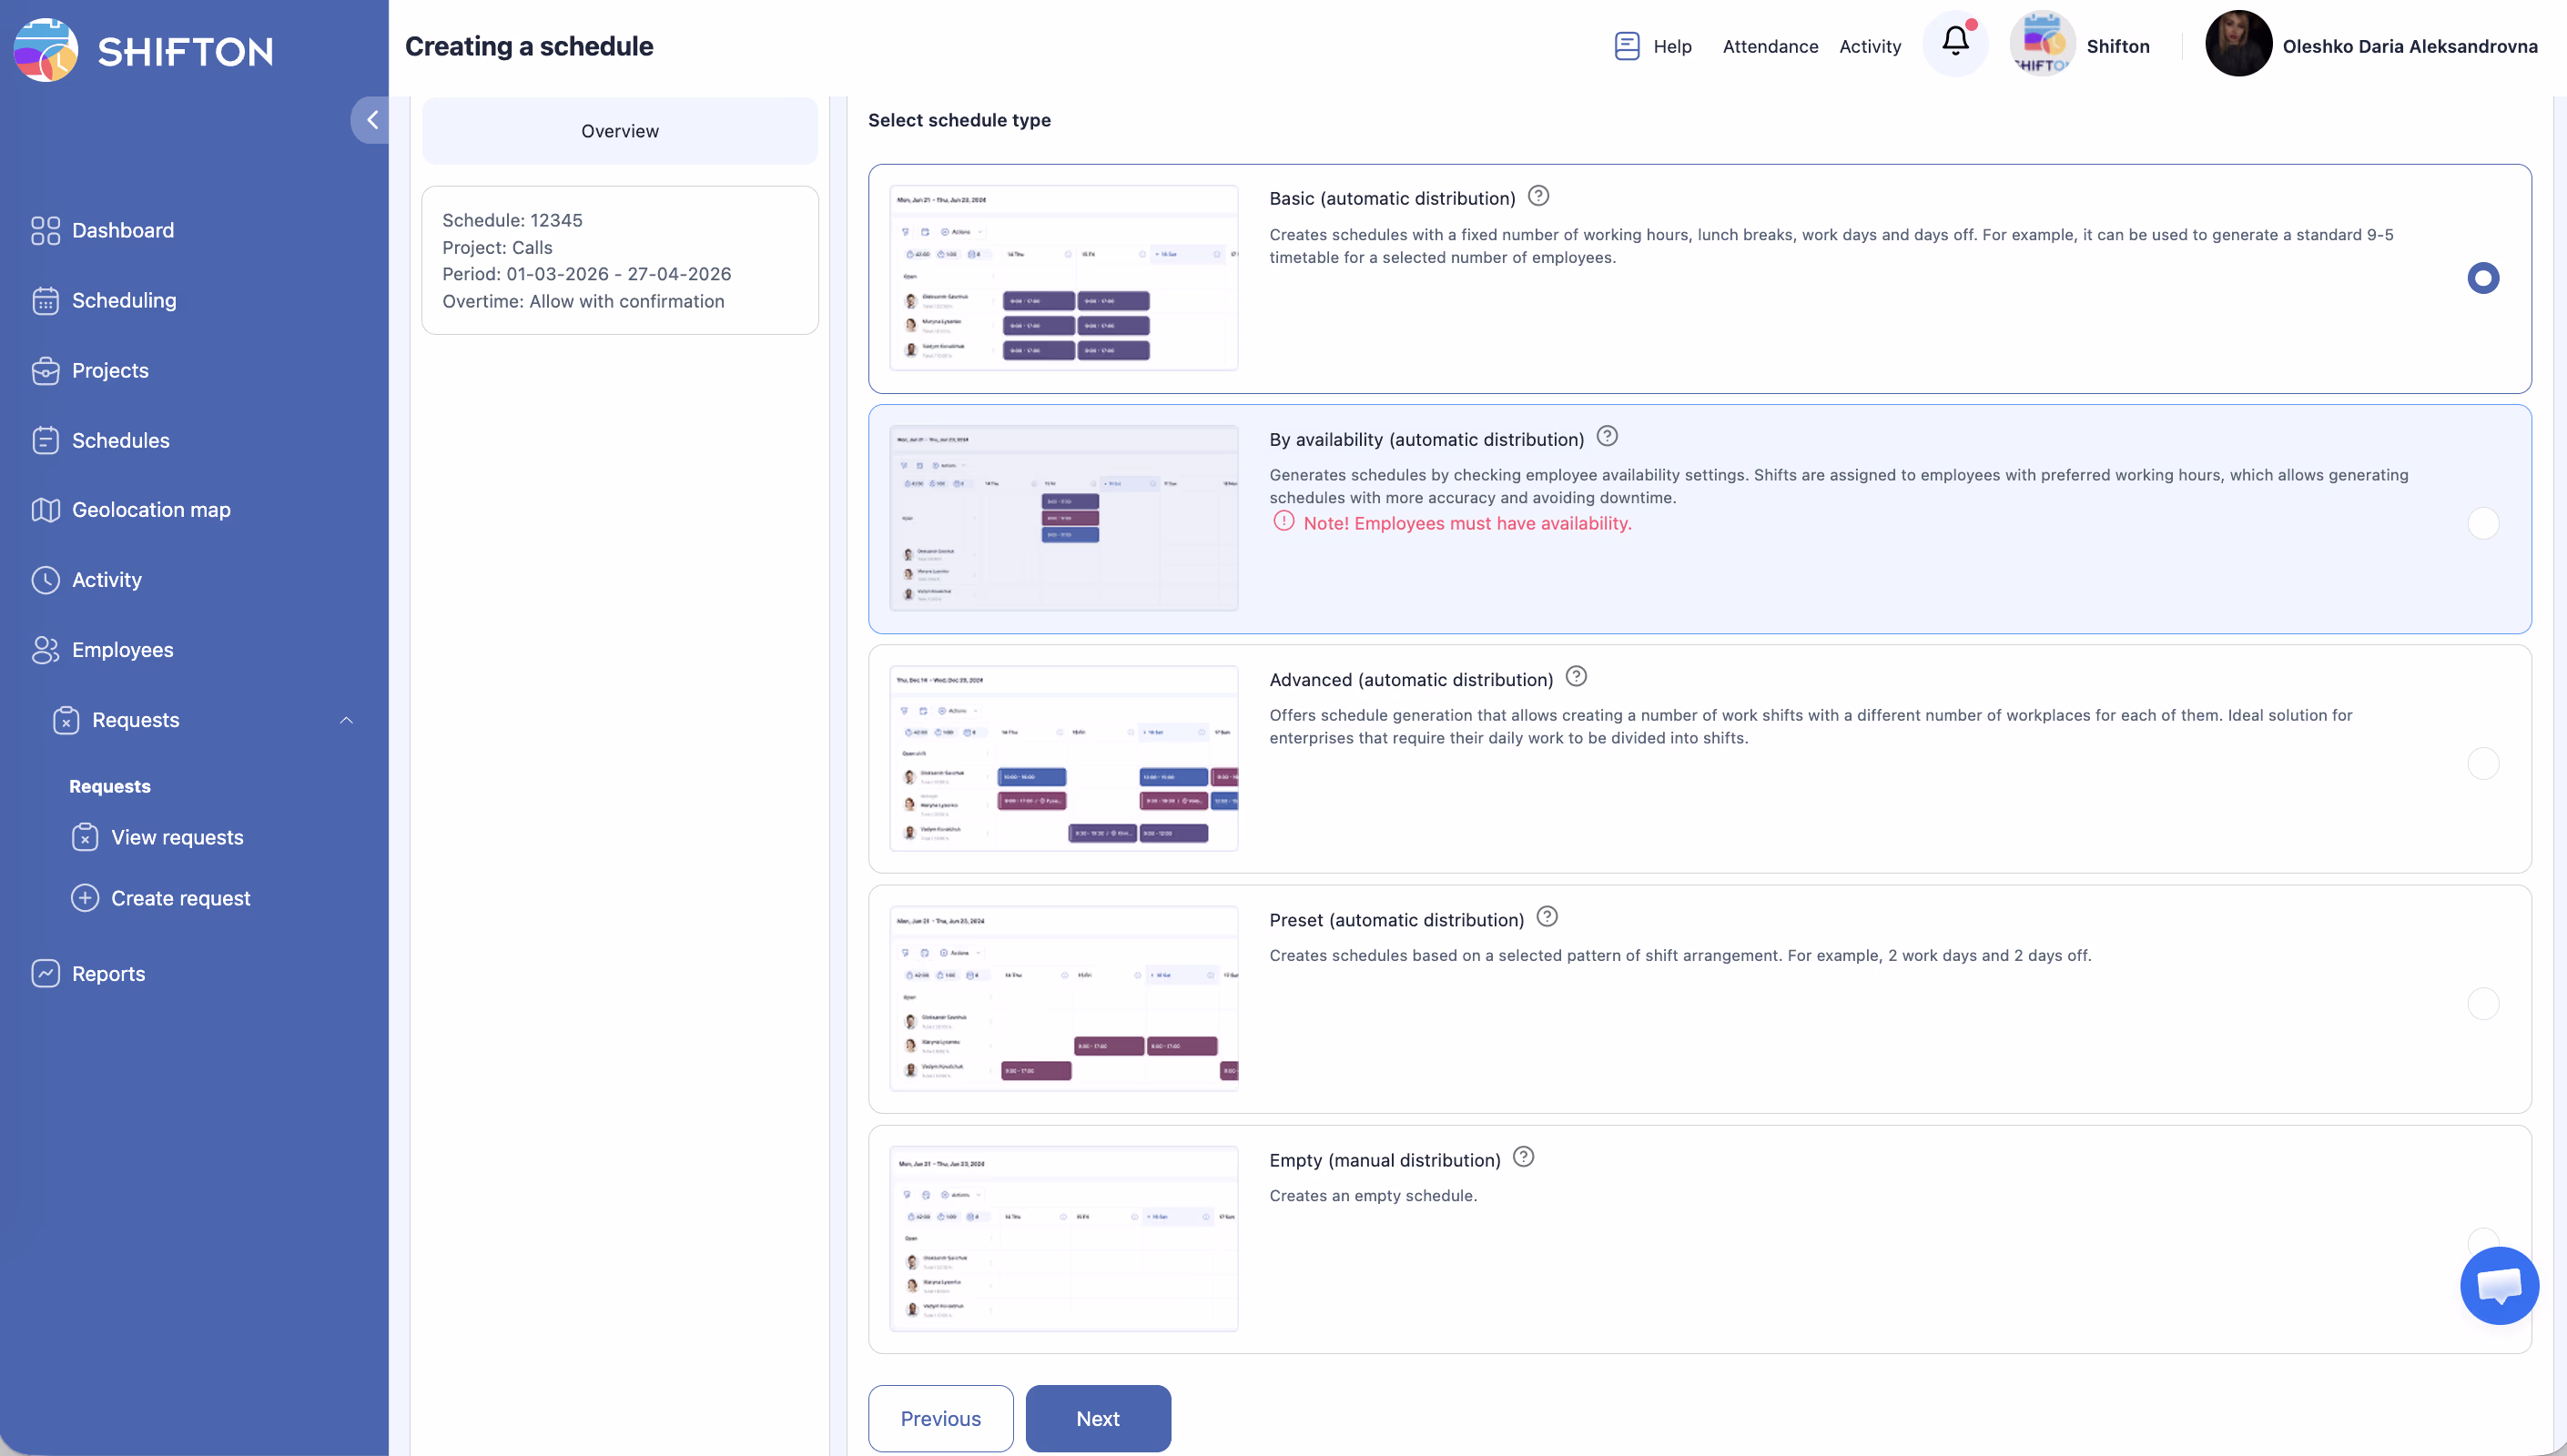
Each schedule type has its own settings on the following wizard steps.
Empty — Manual Schedule
Full manual control. The system does not generate shifts — you add them manually through the Schedule page.
Example: A small 5-person office where the manager decides who works when and manually places shifts for each day.
No additional wizard steps — the schedule is created immediately.
Basic — Standard Automatic
Suitable for simple schedules with fixed hours. On Step 3 (Shift Data), shift templates are defined:
- Days of the week for each template
- Shift start and end time
- Break duration
- Location
The system automatically distributes employees according to the defined templates.
Example: An office works Mon–Fri 09:00–18:00. You create one shift template, and the system assigns it to all employees on the selected days.
By Availability — Based on Employee Availability
Employees indicate their available time in advance (through the When I am available section). The system automatically generates shifts taking each employee’s availability into account. On Step 3 (Shift Data), the following are defined:
Example: A cafe where student baristas indicate which days and hours they can work. On weekdays, 3 people are needed; on weekends — 1. The system creates the schedule based on availability and demand.
Advanced — Advanced Automatic
For complex schedules with multiple shifts per day and different staffing needs. On Step 3 (Shift Data):
Example: A call center with a morning shift (08:00–16:00, 10 operators needed on weekdays, 5 on weekends), an evening shift (16:00–00:00, 8 operators needed), and a night shift (00:00–08:00, 3 operators needed). The system distributes employees across shifts based on the load for each day.
Preset — Rotation Patterns
For cyclic schedules. On Step 3, a rotation pattern is defined — the system automatically alternates working and off days according to the given template.
Example: A security company where employees work 2 days on, 2 days off (2/2), or a factory with a 24-on/72-off schedule. You define the pattern once, and the system repeats it for the entire schedule period.
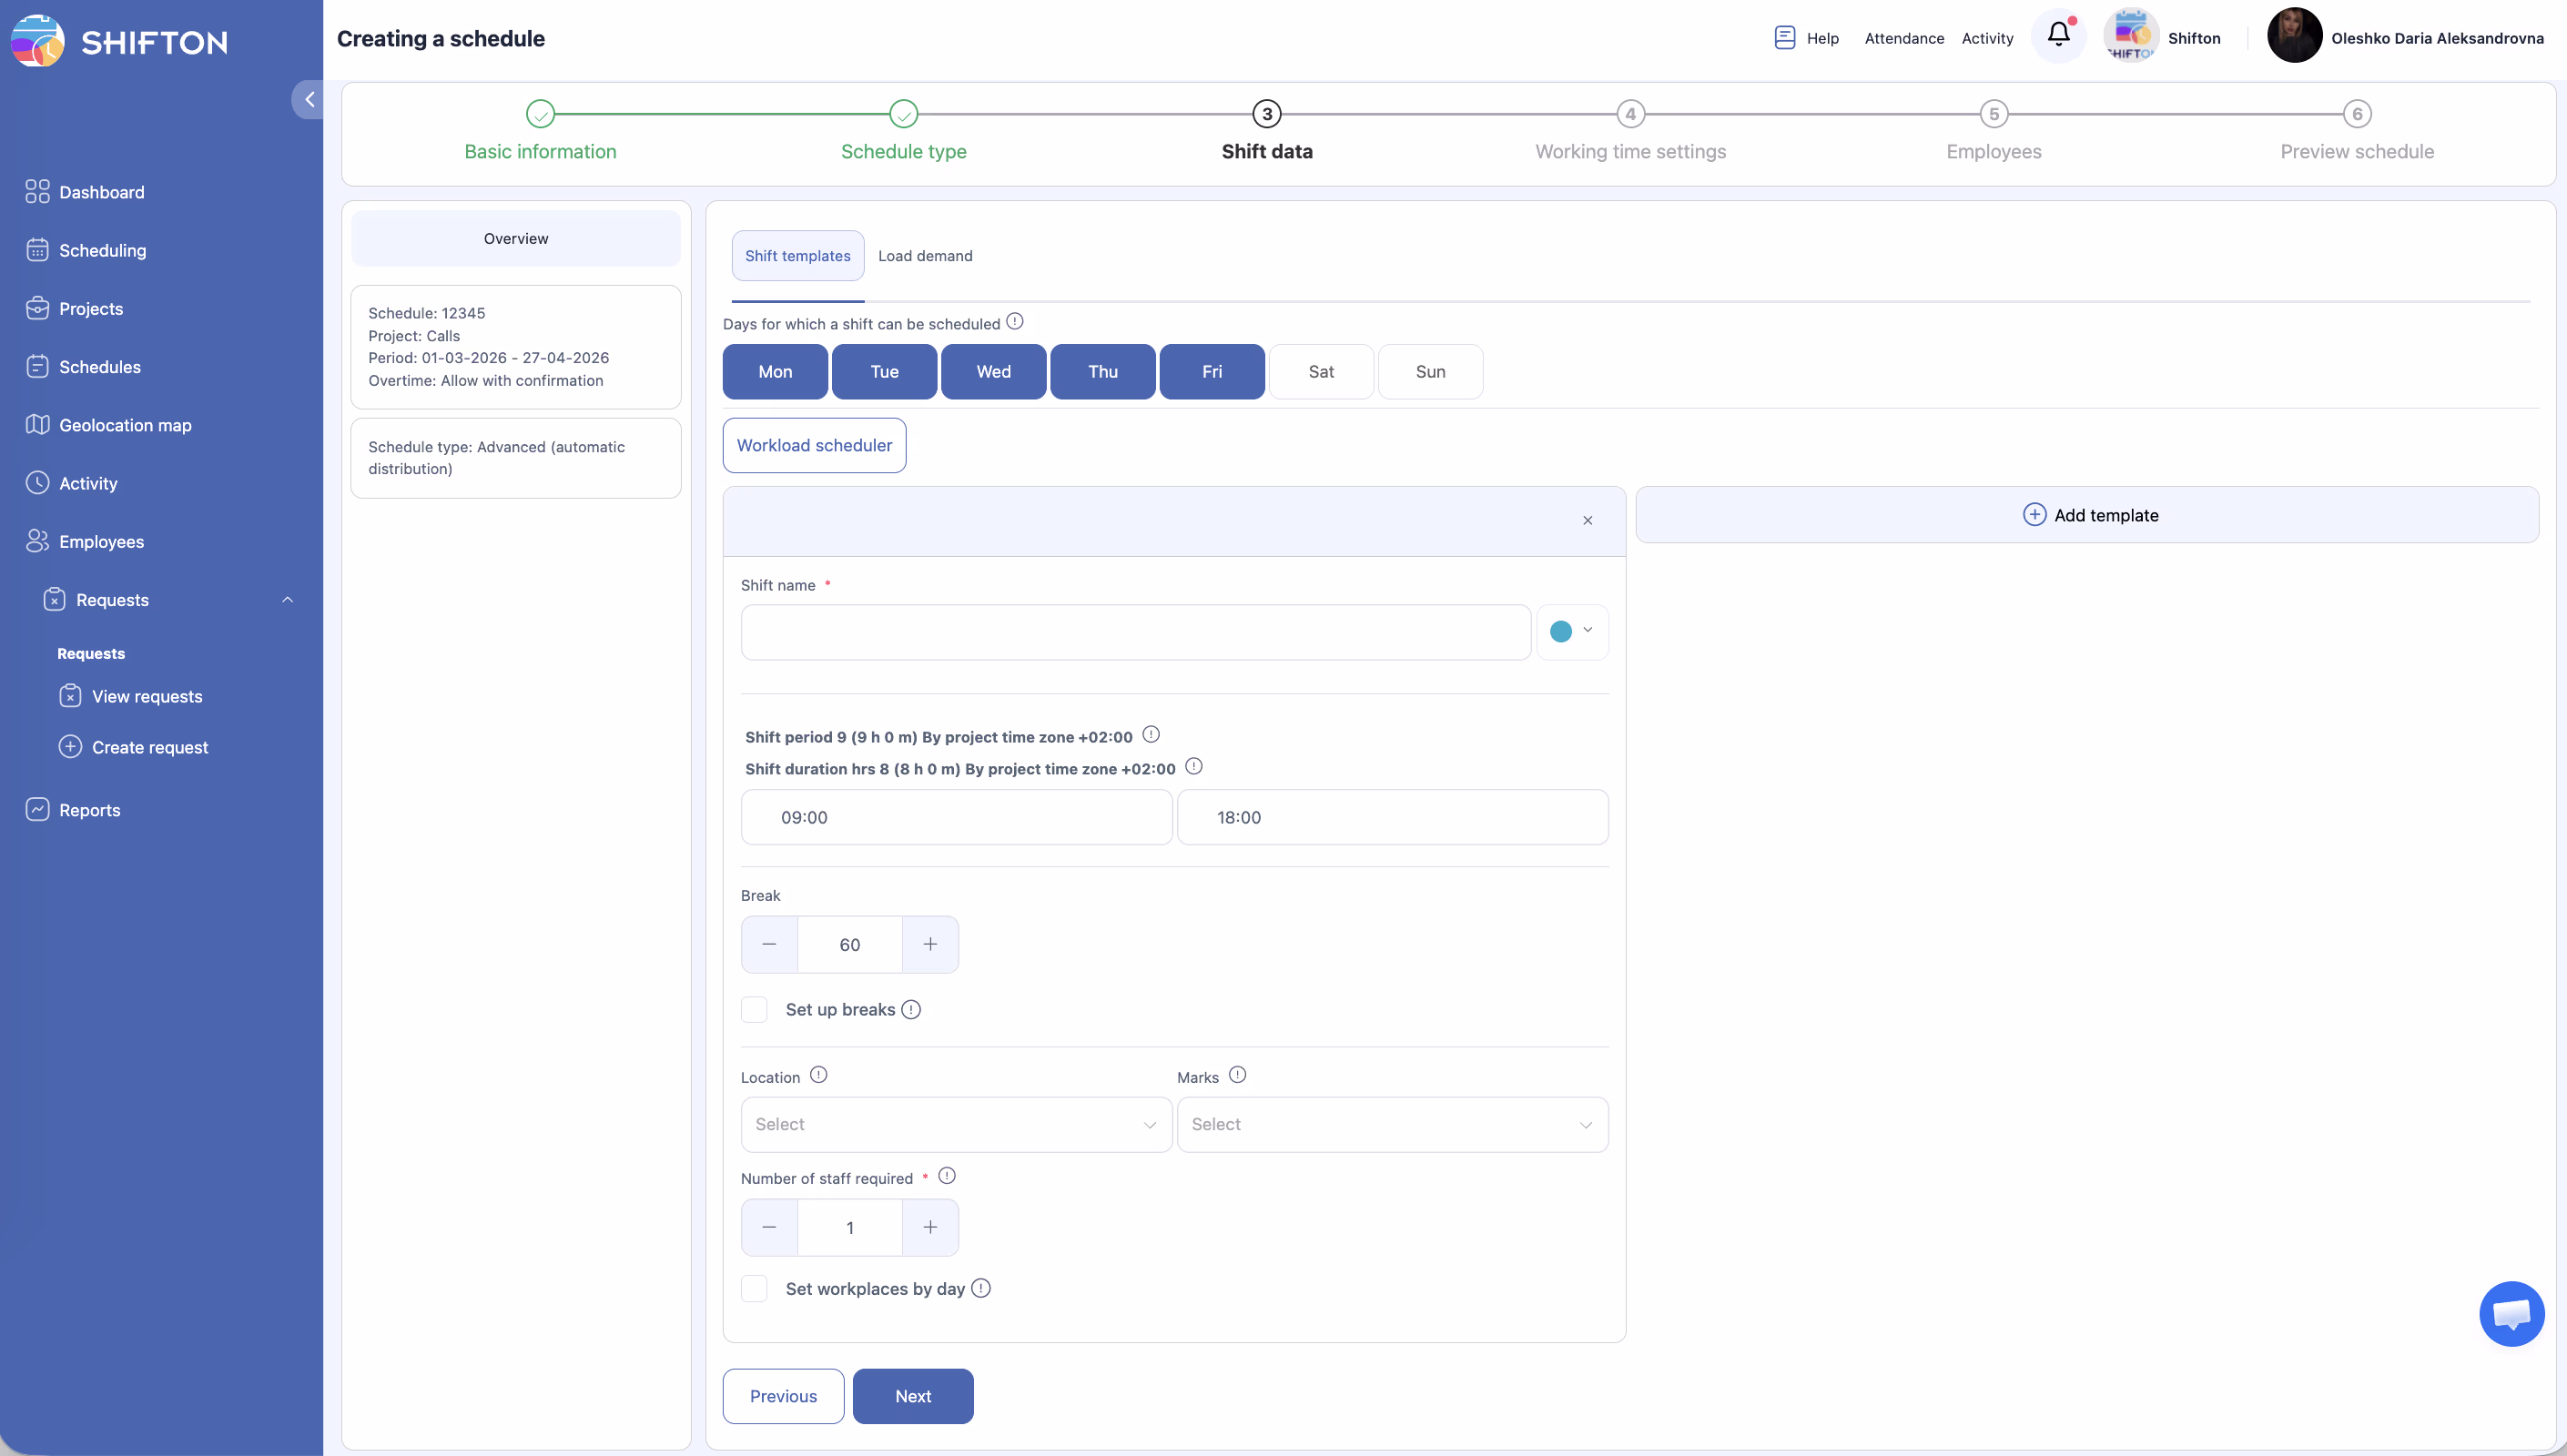
What Is a Shift Template
A shift template is a saved set of parameters for quickly creating shifts. Instead of entering time, break, and other data manually each time, you select a ready template — and all fields are filled automatically.
Templates are created on Step 3 (Shift Data) of the schedule wizard (for Basic, By availability, and Advanced types) or later — on the Schedule page.
What a Shift Template Consists Of
| Field | Description |
|---|---|
| Name | Template name (e.g., “Morning Shift”, “Night Shift”) |
| Color | Color coding for display in the schedule grid |
| From (time) | Shift start time |
| To (time) | Shift end time |
| Break (minutes) | Break duration (simple break — a single number in minutes) |
| Days of week | Days of the week when the template applies (set in the schedule wizard) |
| Set up breaks | Scheduled breaks with exact times (see below) |
| Location | Work location |
| Marks | Marks for shift categorization |
| Number of staff required | Number of employees by day of the week (only for By availability and Advanced) |
| Set workplaces by day | Checkbox — different number of workplaces by day (only for By availability and Advanced) |
Breaks in Shift Template
A shift template supports two ways of defining breaks:
1. Simple break (Break) — only the duration in minutes is specified. The break is not tied to a specific time.
2. Scheduled breaks (Set up breaks) — exact breaks with start time and parameters. Activate the Set up breaks checkbox in the shift template:
| Field | Required | Description |
|---|---|---|
| Title * | Yes | Break name (e.g., “Lunch break”) |
| Duration * | Yes | Duration: 5, 10, 15, 20, 25, 30, 35, 40 min, etc. |
| Start * | Yes | Break start time (e.g., 09:00, 12:00) |
| Paid | No | Checkbox — paid break or not |
| At the same time on a break | — | Shows how many employees can be on break simultaneously (e.g., 0–1) |
Click Add break to add additional breaks to the template. Multiple breaks can be defined within one shift (e.g., a morning coffee break and a lunch break).
Scheduled breaks are displayed in the schedule grid and are factored into working time calculations.
Number of Employees by Day of the Week
For By availability and Advanced schedule types, each shift template allows setting the Number of staff required — the required number of employees separately for each day of the week (Mon–Sun). Use the +/- buttons to adjust.
This allows, for example, assigning 5 people on weekdays and 2 on weekends for the same shift template.
The Set workplaces by day checkbox enables separate workplace management by day.
Where Templates Are Used
Example
A restaurant creates three templates: “Morning” (07:00–15:00, scheduled break “Lunch break” 30 min from 12:00, paid), “Day” (15:00–23:00, 30 min break), “Night” (23:00–07:00, 20 min break). On weekdays, 5 people are needed for the morning shift; on weekends — 3. When creating the schedule, the manager selects a ready template — time, breaks, and employee count are filled automatically.
Step 5: Constraint Settings — Settings (By Availability and Advanced only)
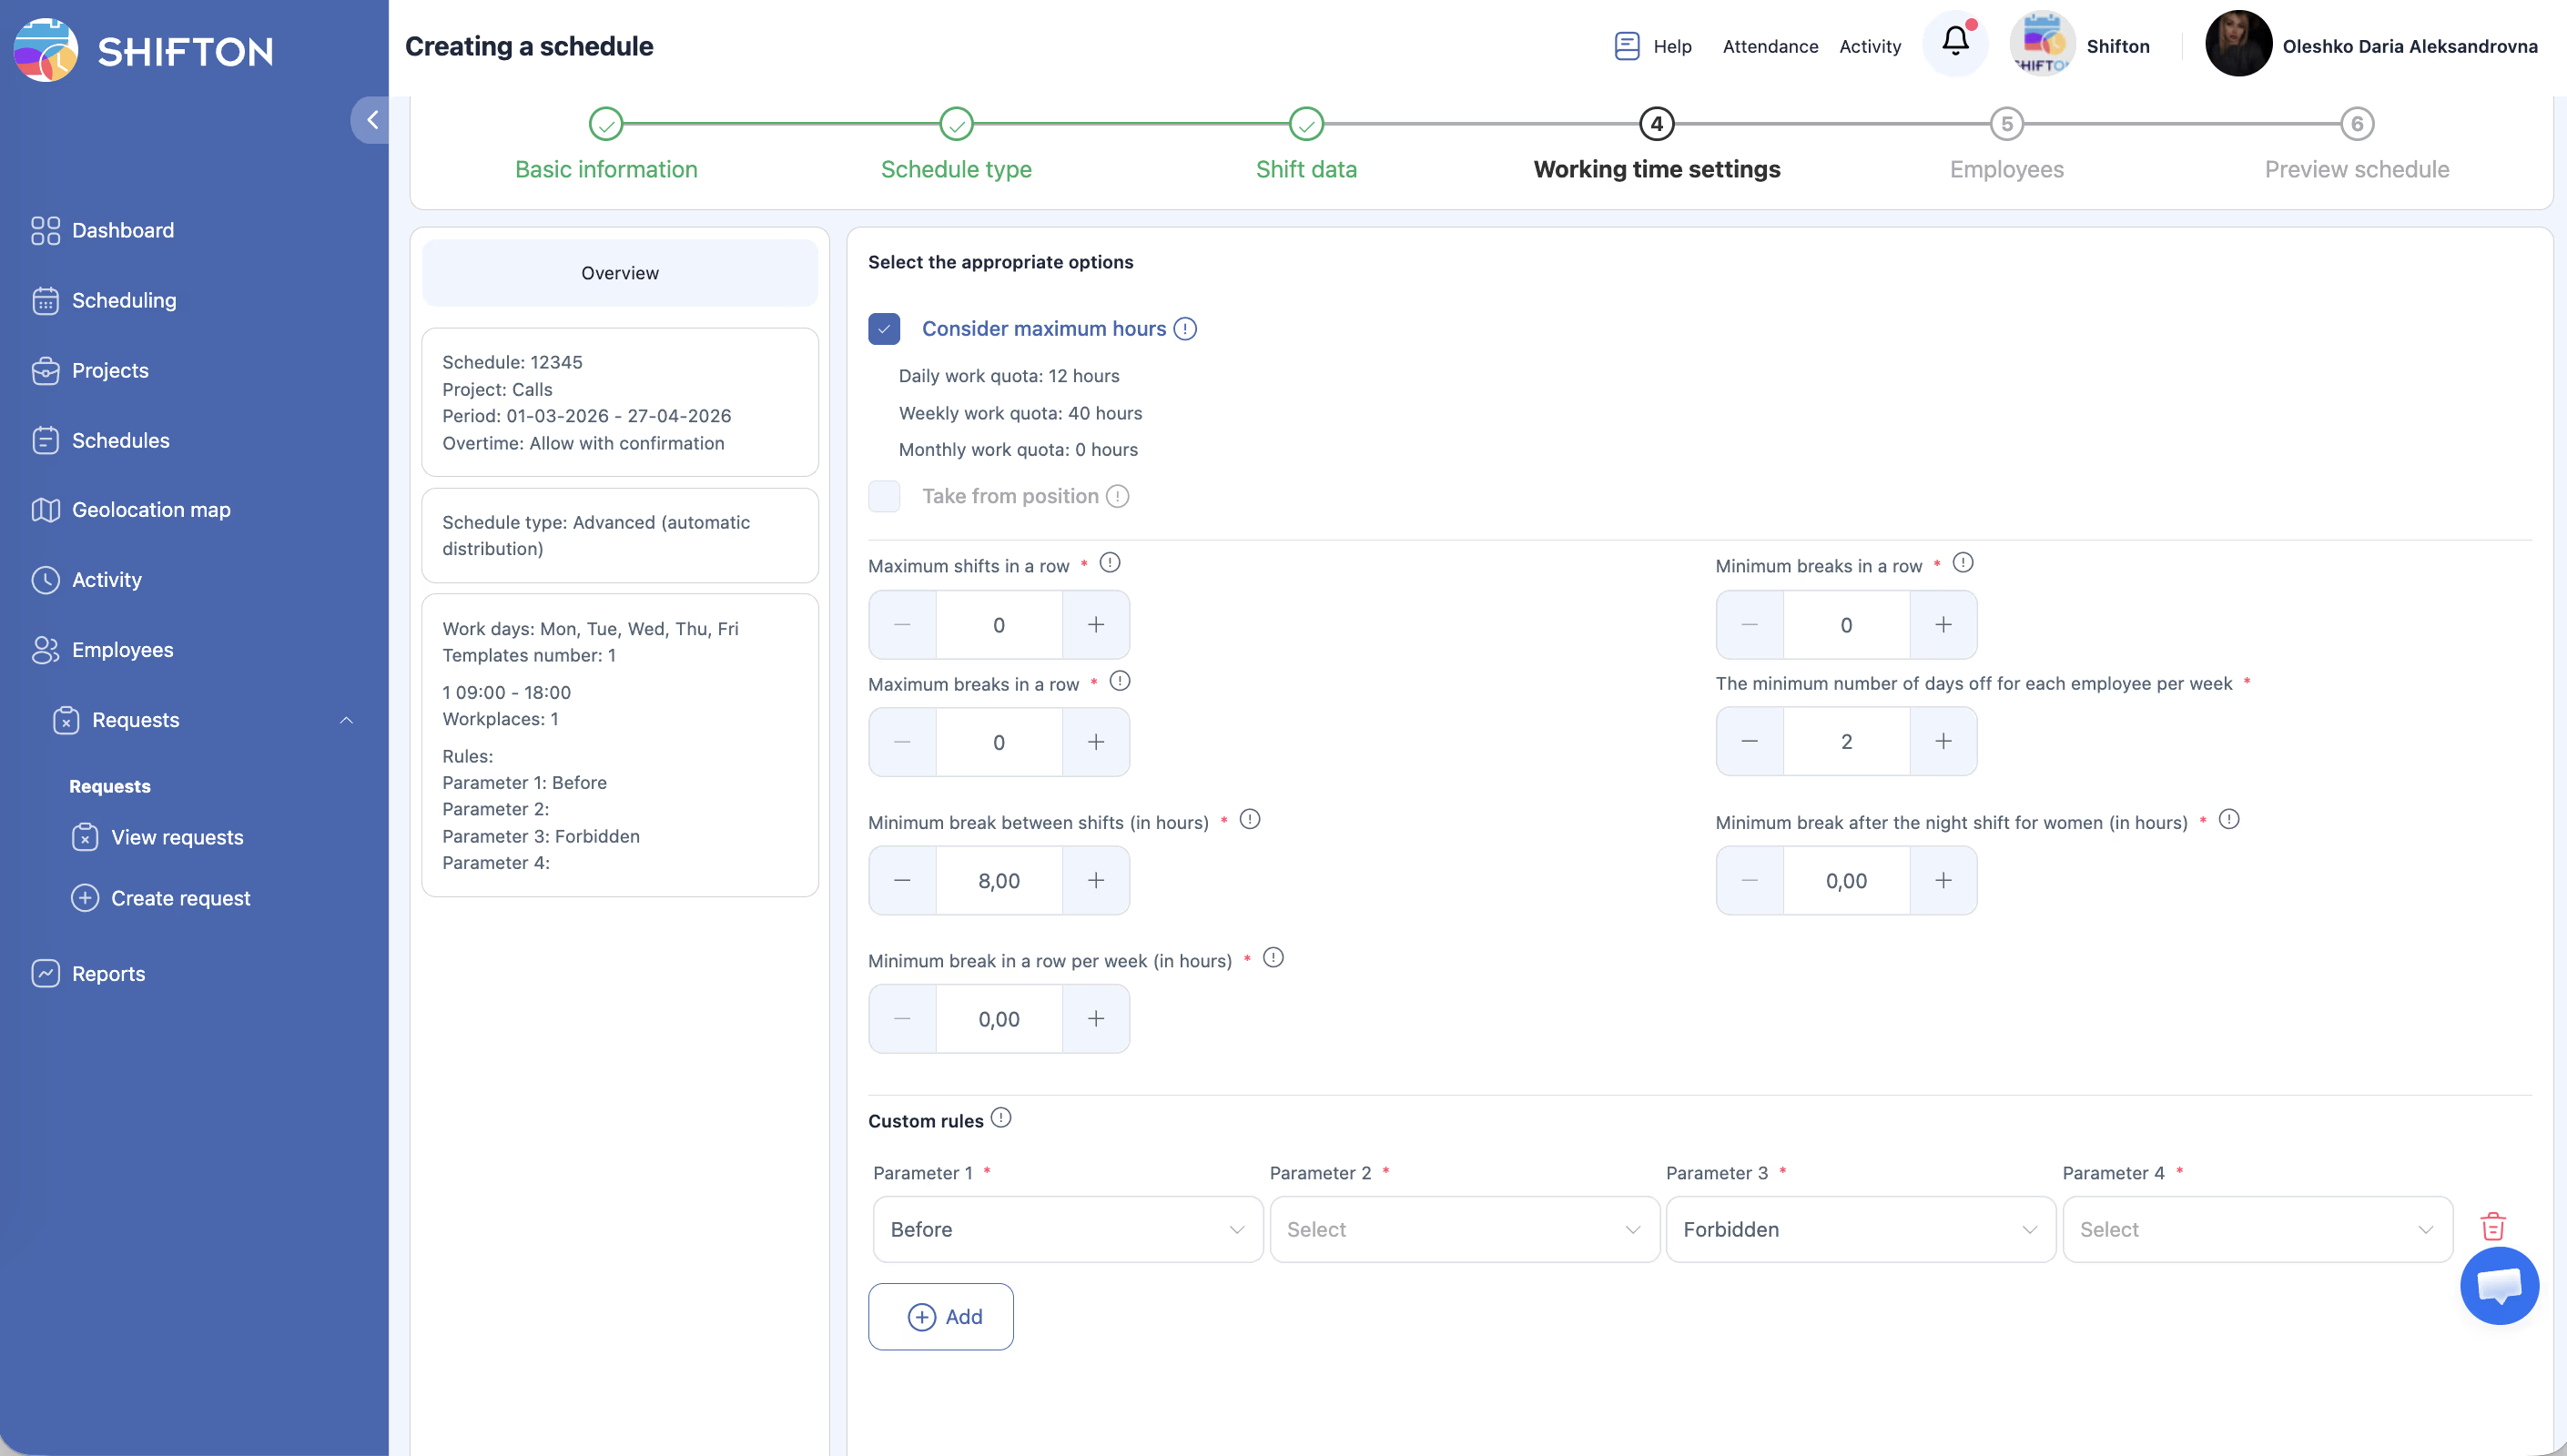
For By availability and Advanced types, the wizard includes an additional Settings step that defines constraints for automatic shift distribution:
Working hour quotas:
| Setting | Description | Default |
|---|---|---|
| Consider maximum hours | Consider maximum working hours | Enabled |
| Daily work quota | Maximum working hours per day | 5 hours |
| Weekly work quota | Maximum working hours per week | 40 hours |
| Monthly work quota | Maximum working hours per month | — |
| Take from position | Take quotas from the employee’s position settings | Disabled |
Shift and rest constraints:
| Setting | Description | Default |
|---|---|---|
| Maximum shifts in a row | Maximum consecutive shifts without a day off | 0 (no limit) |
| Minimum breaks in a row | Minimum consecutive days off | 0 |
| Maximum breaks in a row | Maximum consecutive days off | 0 |
| The minimum number of days off for each employee per week | Minimum days off per week | 2 |
| Minimum break between shifts (in hours) | Minimum rest between shifts | 8.00 hours |
| Minimum break after the night shift for women (in hours) | Minimum rest after night shift for women | 0.00 |
| Minimum break in a row per week (in hours) | Minimum continuous rest per week | 0.00 |
Custom rules — the + Add button allows adding additional rules for auto-generation.
These settings ensure that the automatically created schedule complies with labor laws and internal company policies.
Load Planner (By Availability and Advanced only, requires Forecasting module)
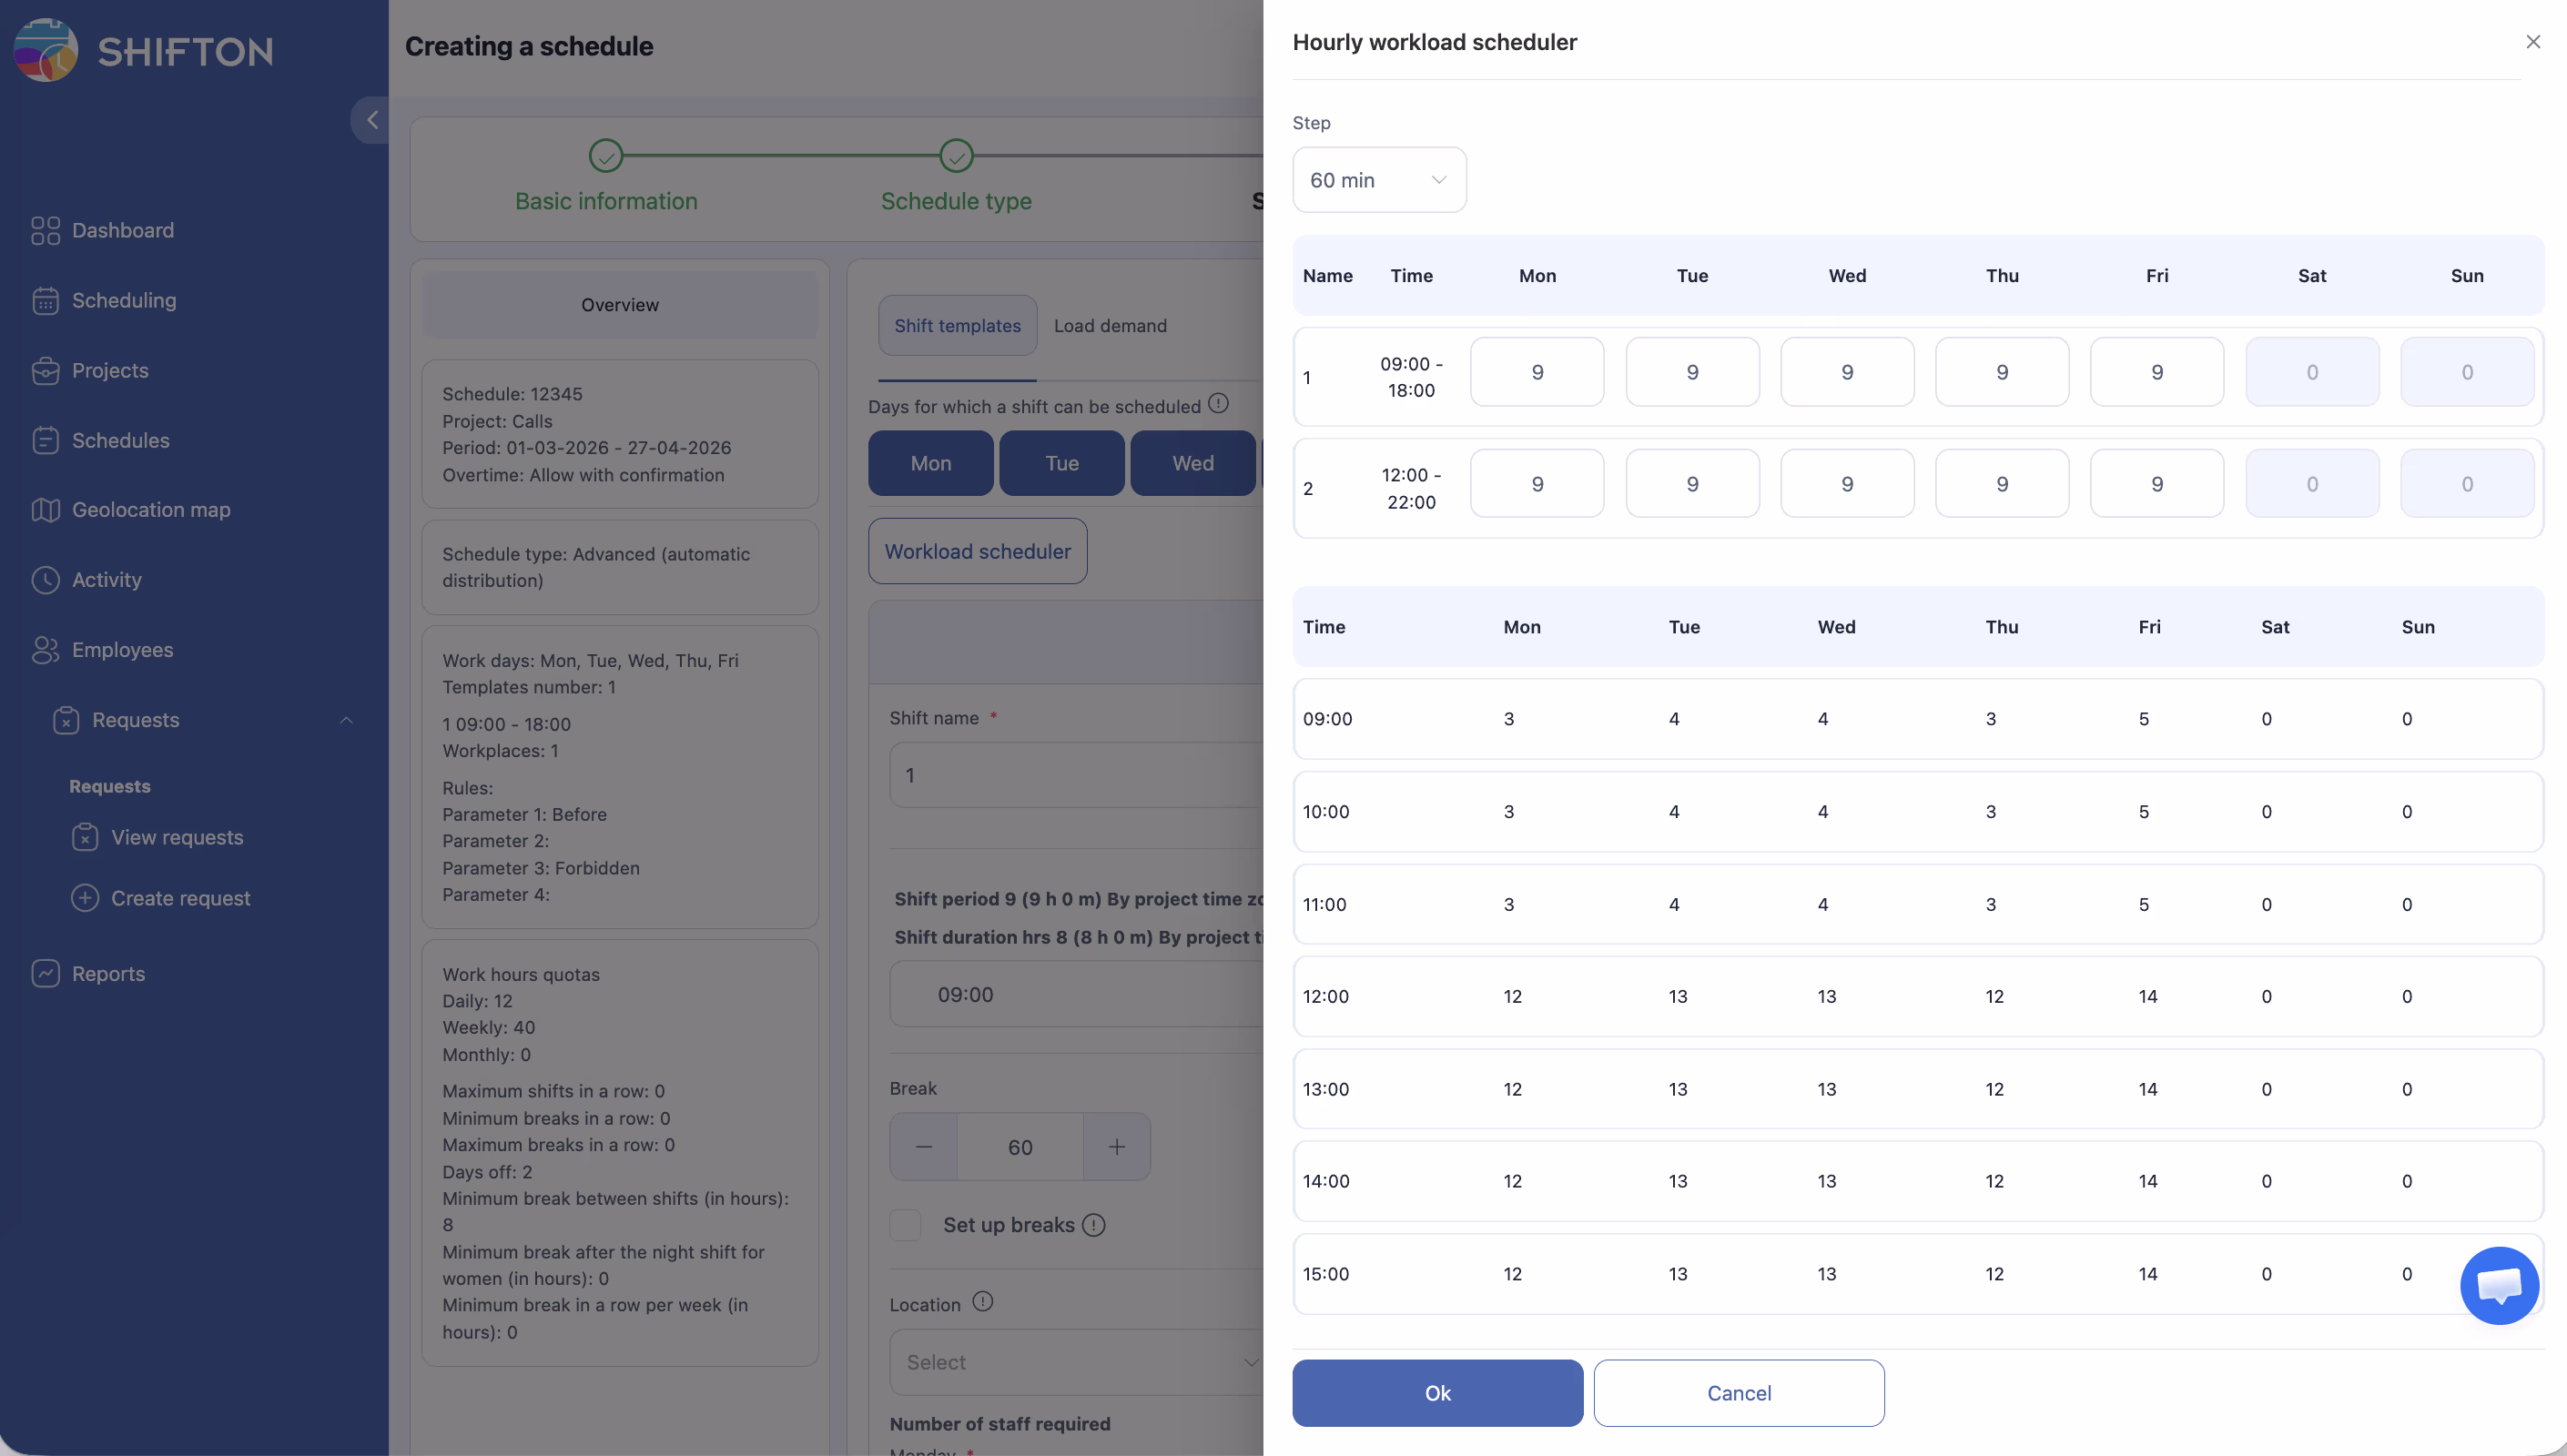
In the schedule wizard for By availability and Advanced types, when the Forecasting module is enabled, the Load Demand tab is available. It allows defining how many employees are needed for each hour of each day.
Hourly Workload Scheduler
A visual load editor directly in the interface:
| Column | Description |
|---|---|
| Time | Hour interval (09:00, 10:00, 11:00, etc.) |
| Mon–Sun | Number of employees needed at this hour for each day of the week |
Example: An office operates Mon–Fri 09:00–18:00. On weekdays, 1 employee is needed per hour; on Sat and Sun — 0. Fill in the grid, and the system automatically calculates the optimal number of shifts.
Step 6: Add Employees to the Schedule
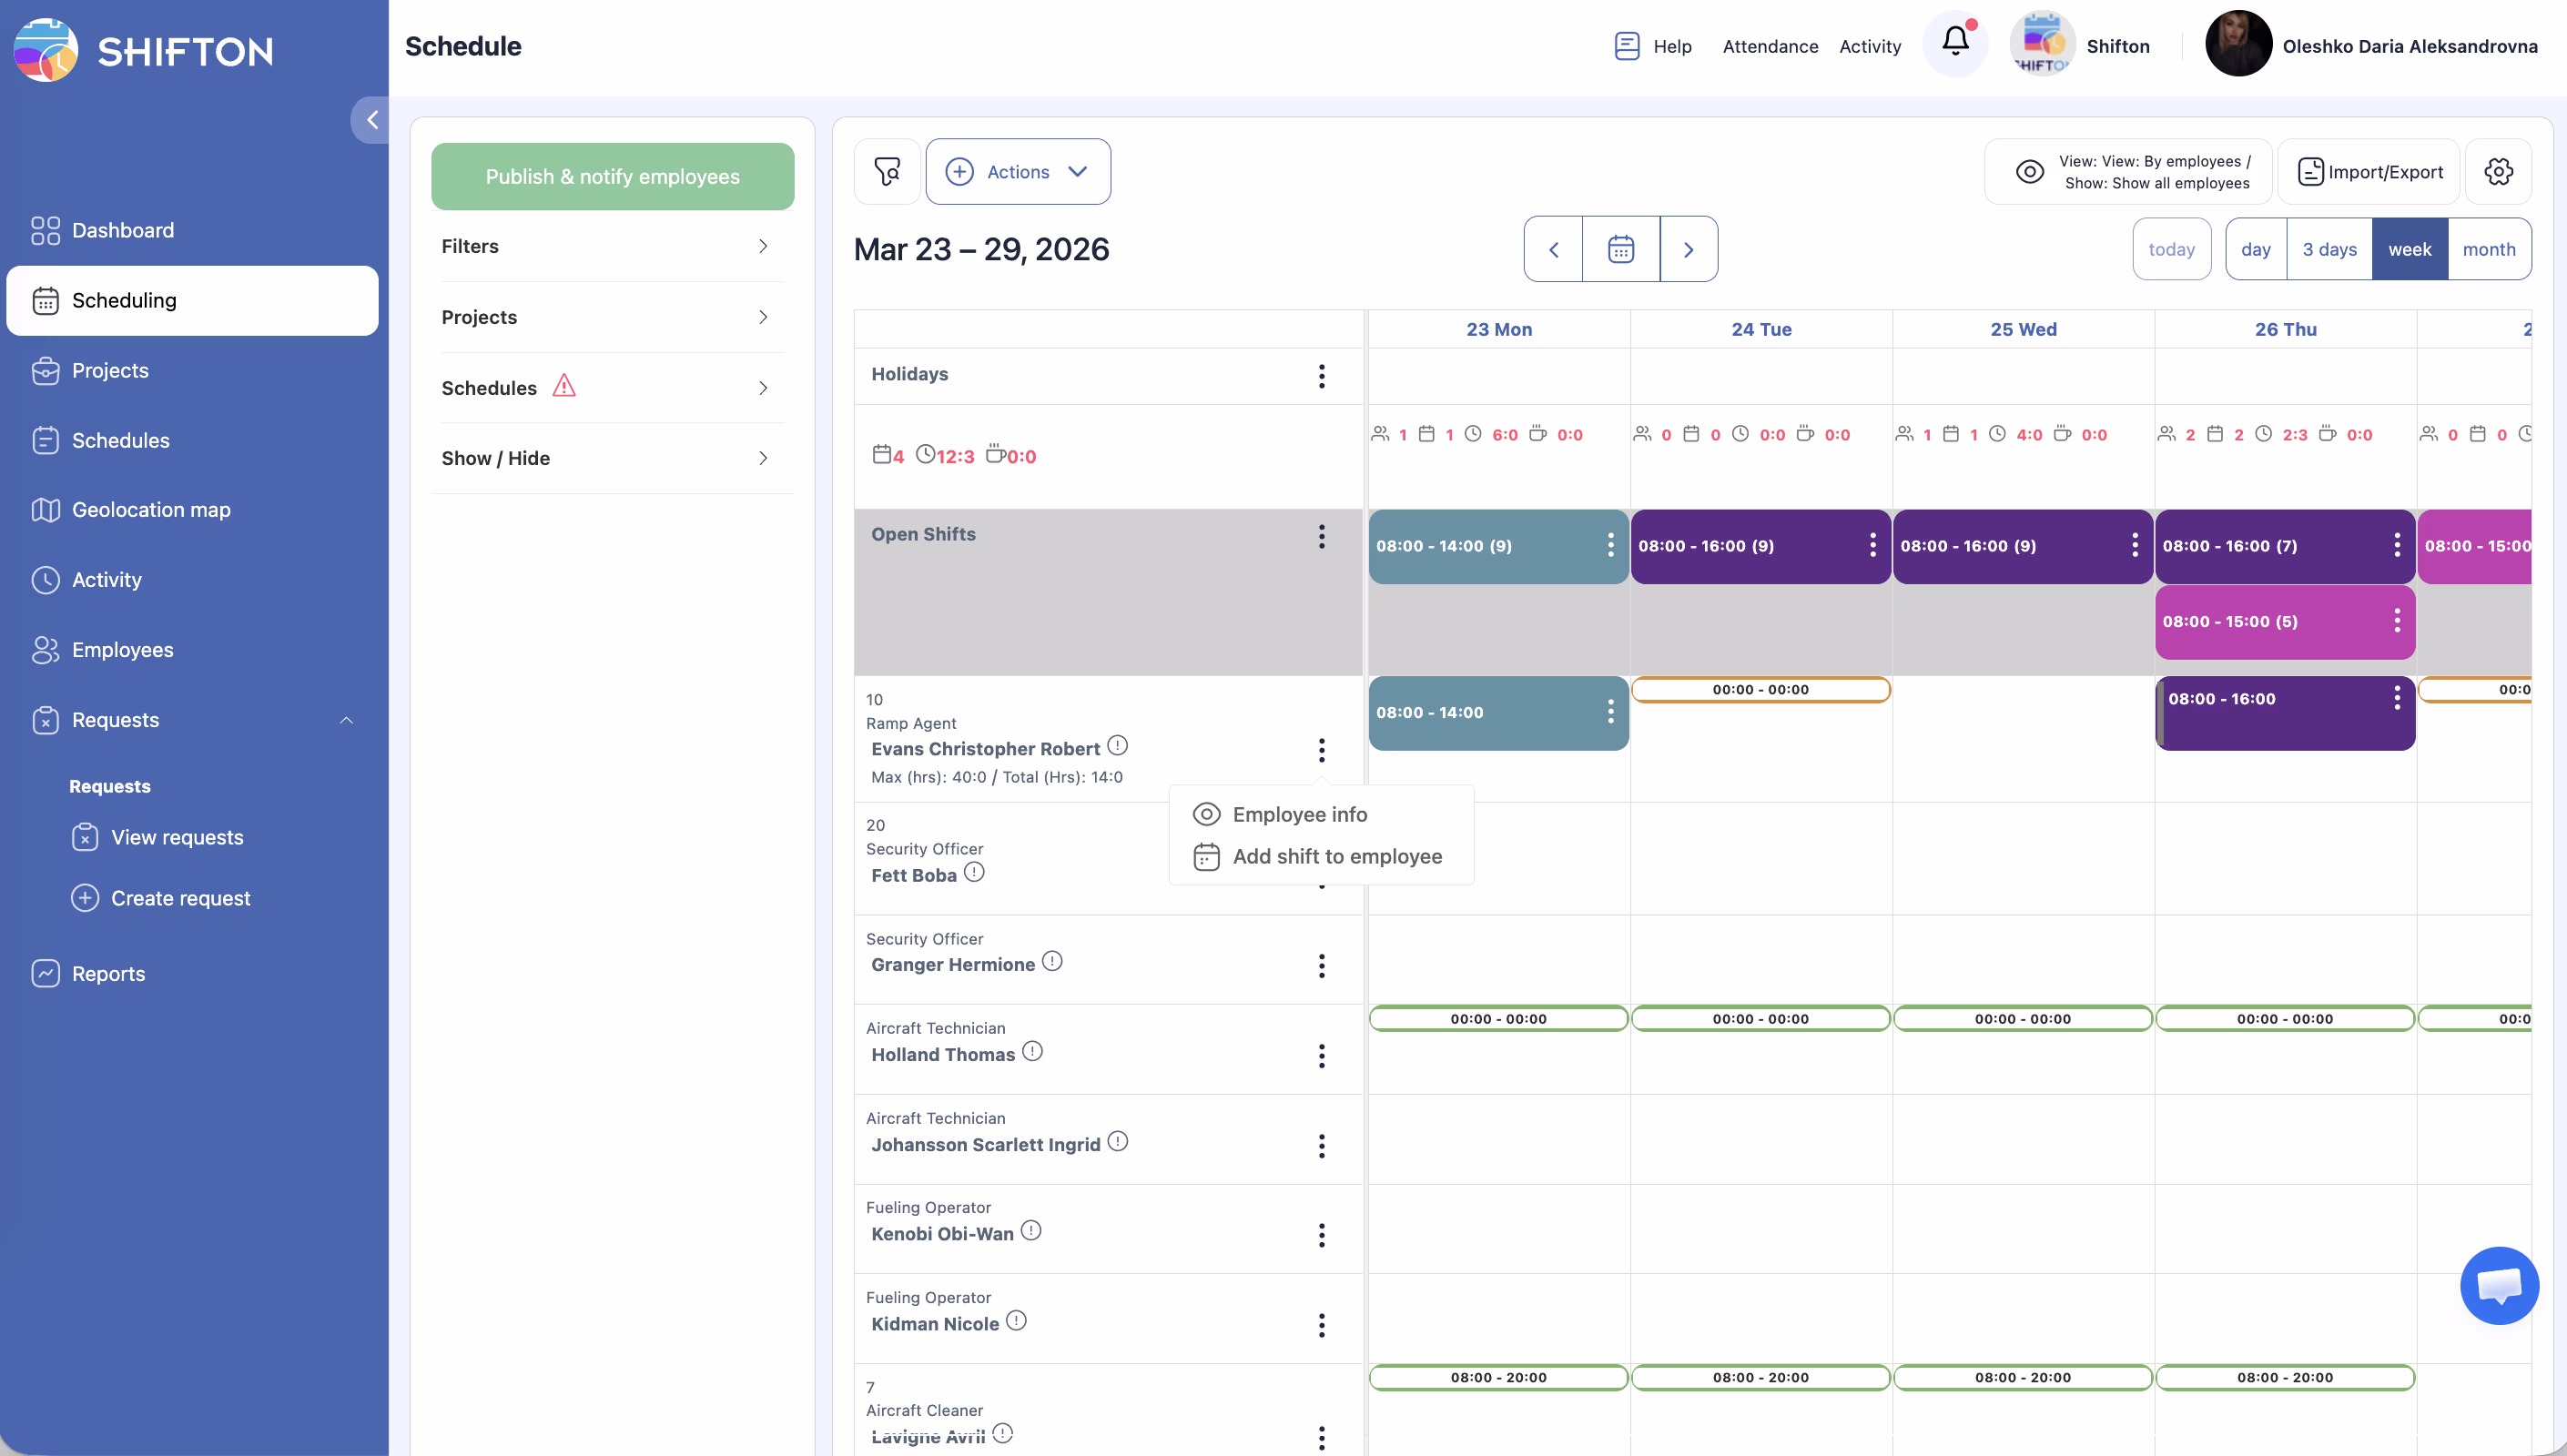
Open the Schedule Page (calendar icon) → select the project and schedule → add employees through the Actions menu.
Part 3: Add Your First Shift
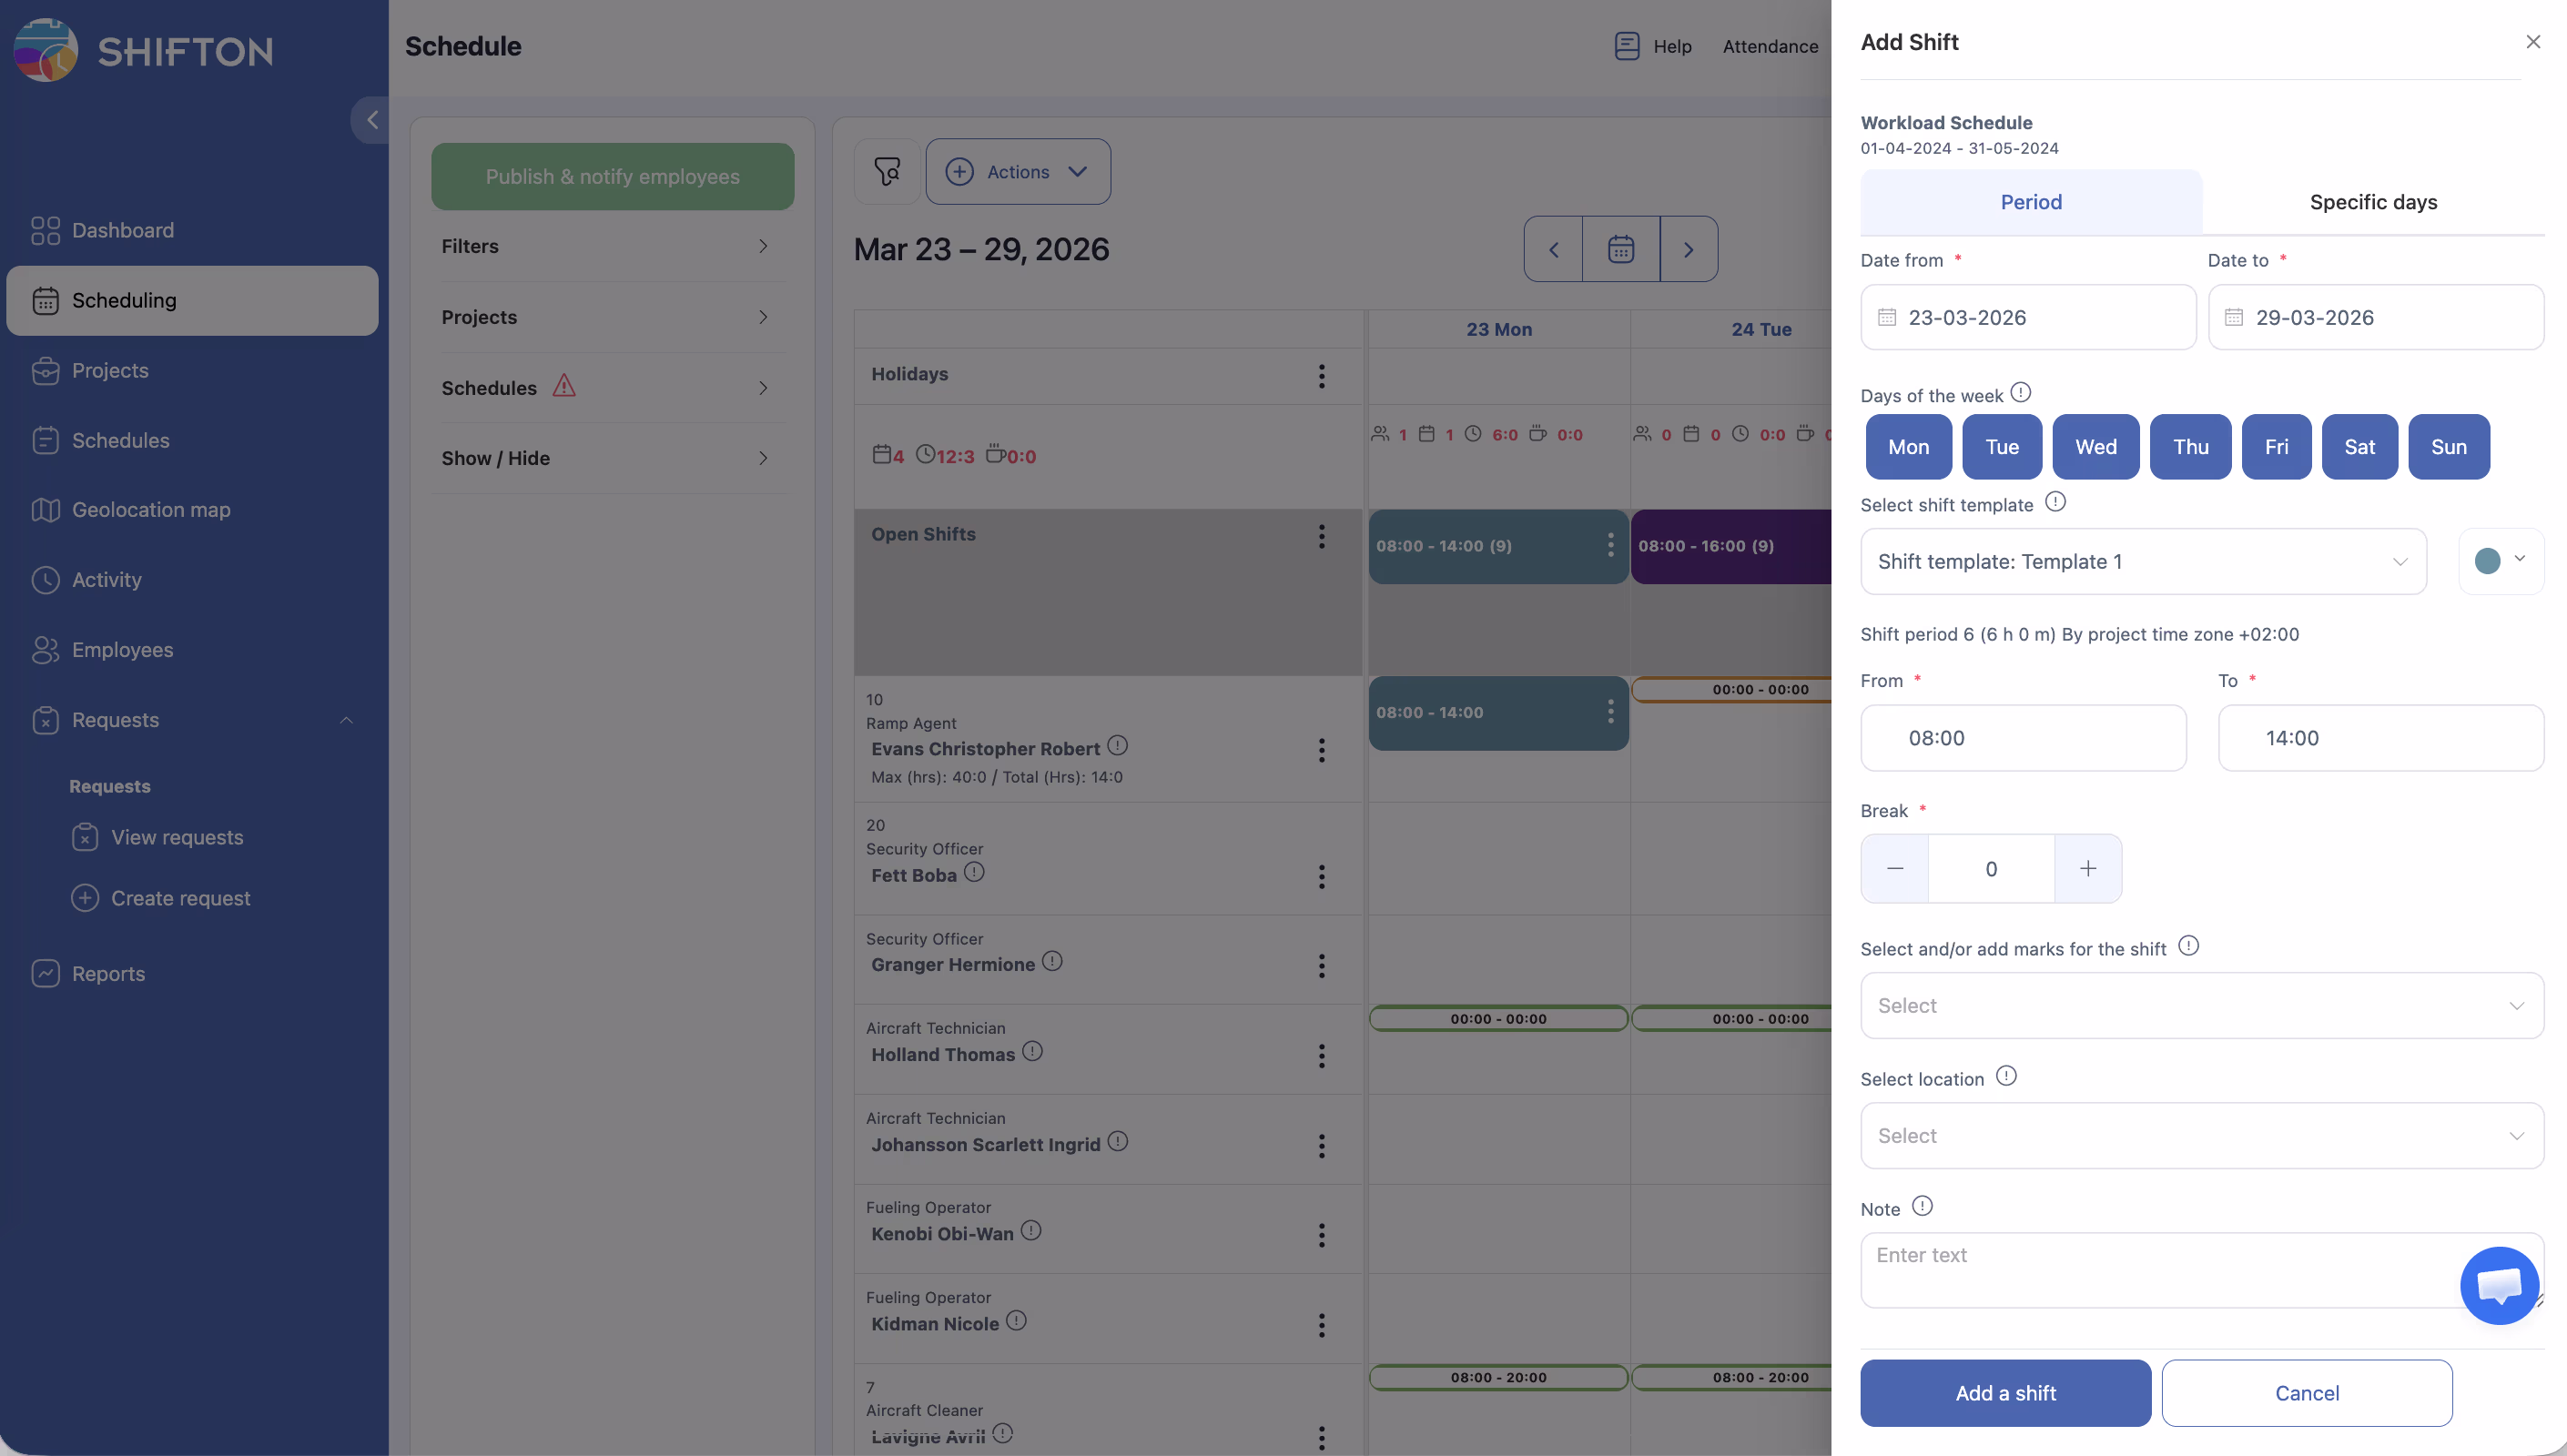
| Field | Description |
|---|---|
| Date from / Date to | Period for shifts |
| Days of the week | Days of the week |
| Shift template | Optional |
| From / To | Shift time |
| Break | Break in minutes |
| Location | Workplace |
| Note | Notes |
After adding, click Publish & notify employees — employees will receive notifications about the schedule.
Related Articles
- Step-by-Step Setup Guide
- Adding Your First Employees
- Salary Settings
- Departments and Projects
- Breaks
- Forecasting
- Managing Projects
- Managing Locations
FAQ
Q: How many schedules can be in one project?
A: Unlimited.
Q: What is the maximum schedule duration?
A: When creating and extending — no more than three months per step. The schedule can be extended an unlimited number of times.
Q: Can I change the schedule type after creation?
A: No. For a different type, create a new schedule.
Q: Employees are not showing in the schedule grid.
A: Make sure employees are added to both the project and the schedule.
Q: Warning icon next to the schedule.
A: The date range has expired. Create a new schedule or extend the existing one.
Q: How do I add employees to a schedule after it has been created?
A: Open Schedules → pencil icon next to the schedule → Add employees tab → select employees → save.
Q: How do I extend a schedule after it expires?
A: Schedules → pencil → Reduce/extend schedule tab → select Extend schedule → specify the new date → save.
Q: What is the “Week control type” in the schedule for?
A: It determines how the system reacts to overtime. Allow — no restrictions, Allow with confirmation — manager confirms overtime, Block — shifts exceeding quotas are marked with a red dot.
Q: How do I create a second project?
A: Go to Modules → increase the number of projects in the Departments and Projects module → save. After that, the + Create a project button will become active.
Q: Can I rename a shift template after creating the schedule?
A: Yes. Click on the shift template in the schedule grid → edit button — change the name and save.
Q: How do I select the “Preset” schedule type for a 2/2 rotation?
A: In the schedule creation wizard on Step 2, select Preset, then define the pattern: 2 working days, 2 days off.
Q: What happens if I don’t publish the schedule?
A: Employees will not receive notifications and will not see shifts in the mobile app. Publishing is required to notify the team.
Q: Can I assign a project manager when creating it?
A: Yes. In the project settings, there is a Managers field — add the desired users with the Manager role.
Q: How do I delete a schedule?
A: Open the schedule settings and click Delete. All shifts within the schedule will be deleted automatically.
Q: How do I add scheduled breaks to a shift template?
A: In the shift template, enable the Set up breaks checkbox → specify Title, Duration, Start, and Paid → click Add break to add additional breaks. Each break is tied to a specific time.
Q: What is the difference between a simple break (Break) and a scheduled break (Set up breaks)?
A: A simple Break is only duration in minutes, not tied to a time. Set up breaks are exact breaks with a name, start time, duration, and paid/unpaid flag.
Q: Can I set different numbers of employees for weekdays and weekends?
A: Yes. In By availability and Advanced schedule types, for each shift template, the Number of staff required is set separately for each day of the week (Mon–Sun).
Q: What is the Hourly Workload Scheduler?
A: A visual load planner in the Load Demand tab (requires the Forecasting module). It allows defining how many employees are needed for each hour of each day. Based on this data, the system calculates the optimal number of shifts.
Q: Where can I find the load planner?
A: Enable the Forecasting module → in the schedule wizard for By availability or Advanced types → Load Demand tab → Hourly workload scheduler.
Q: What does “Set workplaces by day” mean in a shift template?
A: The checkbox allows setting different numbers of workplaces for each day of the week within a single shift template. Available in By availability and Advanced types.
Q: Can I add multiple breaks to a single shift template?
A: Yes. Click Add break for each additional break. For example, a 15-min coffee break at 10:30 and a 30-min lunch at 13:00.
Q: What does “At the same time on a break 0–1” mean in break settings?
A: It shows how many employees can be on this break simultaneously. The system controls this to prevent everyone from going on break at the same time.